はじめに
PX4、ArduPilotのGCSであるQGroundControlの調査・検証用にPX4シミュレータ環境が必要になったため、WSL2を使って構築してみました。
本来はUbuntu、Windowsのいずれかに寄せた方がよいかと思いますが、プログラミングは普段慣れてるWindowsで、PX4のビルドと実行は安定している(ハマりが少ない)Ubuntuで、というニーズを想定しています。
動作環境
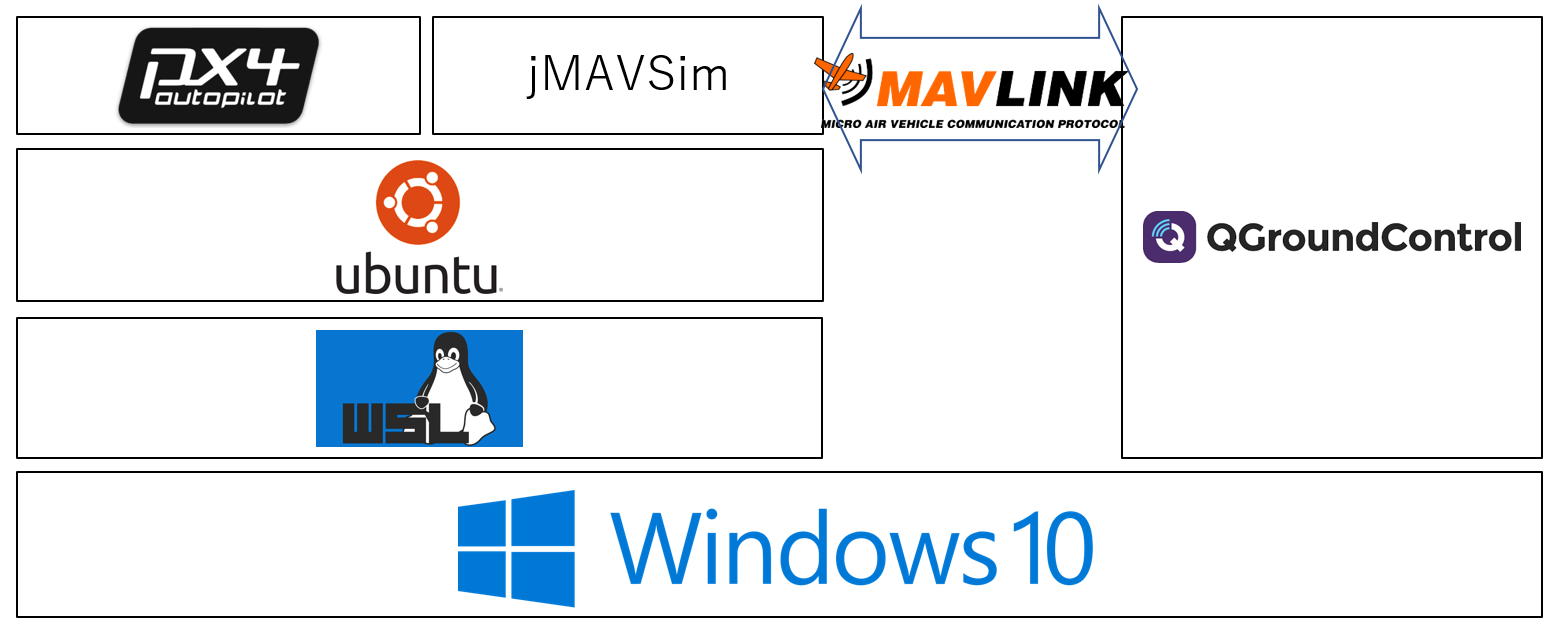
| Software | Version | Commnets |
|---|---|---|
| Windows | 10 | ホストOS |
| QGroundControl | 4.0 | GCS(GroundControlStation)。Windowsに導入 |
| WSL | 2 | Windowsに導入 |
| Ubuntu | 20.04LTS | ゲストOS。WSL2に導入 |
| jMAVSim | 2021/10時点最新 | Java製シミュレータ。Ubuntuに導入 |
| PX4 | 1.13 | フライトコントロールソフトウェア。Ubuntuに導入 |
WSL2&Ubuntu導入(Windows)
-
下記記事を参考にWSL2とUbuntuをインストール。
https://qiita.com/pyon_kiti_jp/items/0be8ac17439abf418e48 -
下記記事を参考にUbuntuのGUI環境をセットアップ。
https://qiita.com/ryoi084/items/0dff11134592d0bb895c
QGroundControl導入(Windows)
-
http://qgroundcontrol.com/ を開いて上部メニューの
DOWNLOADS>WINDOWSをクリック。 - ダウンロードされたインストーラを開いて指示に従いインストールを完了させる。
PX4セットアップスクリプト実行(Ubuntu)
-
GitHubからソースコードを取得
$ git clone https://github.com/PX4/PX4-Autopilot.git --recursive -
セットアップスクリプトを実行。
$ bash ./PX4-Autopilot/Tools/setup/ubuntu.sh
jMAVSimに必要なJava環境導入(Ubuntu)
- 参考URL1 ... https://docs.px4.io/master/en/simulation/jmavsim.html
- 参考URL2 ... https://github.com/PX4/jMAVSim
-
下記コマンドを実行してjMAVSimのビルド・実行に必要なJDK、JRE、Antをインストール。
$ sudo apt-get install ant openjdk-13-jdk openjdk-13-jre libvecmath-java -y
PX4ビルド&SITL起動(Ubuntu)
-
下記コマンドを実行。PX4のビルドが開始される。
$ cd PX4-Autopilot $ make px4_sitl jmavsim- jMAVSimをヘッドレスモード(GUI無し)で起動する場合は
HEADLESS=1をコマンド先頭に追加する。
- jMAVSimをヘッドレスモード(GUI無し)で起動する場合は
-
ビルドが成功するとシミュレータが起動する。下記のように表示されたらOK。
(((省略)))
______  __   __    ___
| ___ \ \ \ / /   /   |
| |_/ /  \ V /   / /| |
|  __/   /   \  / /_| |
| |     / /^\ \ \___  |
\_|     \/   \/     |_/

px4 starting.

INFO  [px4] Calling startup script: /bin/sh etc/init.d-posix/rcS 0
(((省略)))
pxh>
MAVProxyを使ったテレメトリ転送(Windows&Ubuntu)
- Ubuntu/WSL2上のlocalhostにWindowsからアクセスできないため、MAVProxy(ルーティング機能を持つCLIのGCP)でテレメトリを転送する必要がある。
-
ipconfigなどでWindwos のIPアドレスを調べる。 -
MAVProxyがインストールされてない場合、下記コマンドを実行してインストールする。
$ sudo apt-get install python3-dev python3-opencv python3-wxgtk4.0 python3-pip python3-matplotlib python3-lxml python3-pygame $ pip3 install PyYAML mavproxy --user $ echo "export PATH=$PATH:$HOME/.local/bin" >> ~/.bashrc -
新しいUbuntuのウィンドウを開いて下記コマンドを実行する。
$ mavproxy.py --master 127.0.0.1:14550 --out <WindowsのIPアドレス>:14550- 本設定によりWindowsからアクセス可能となる
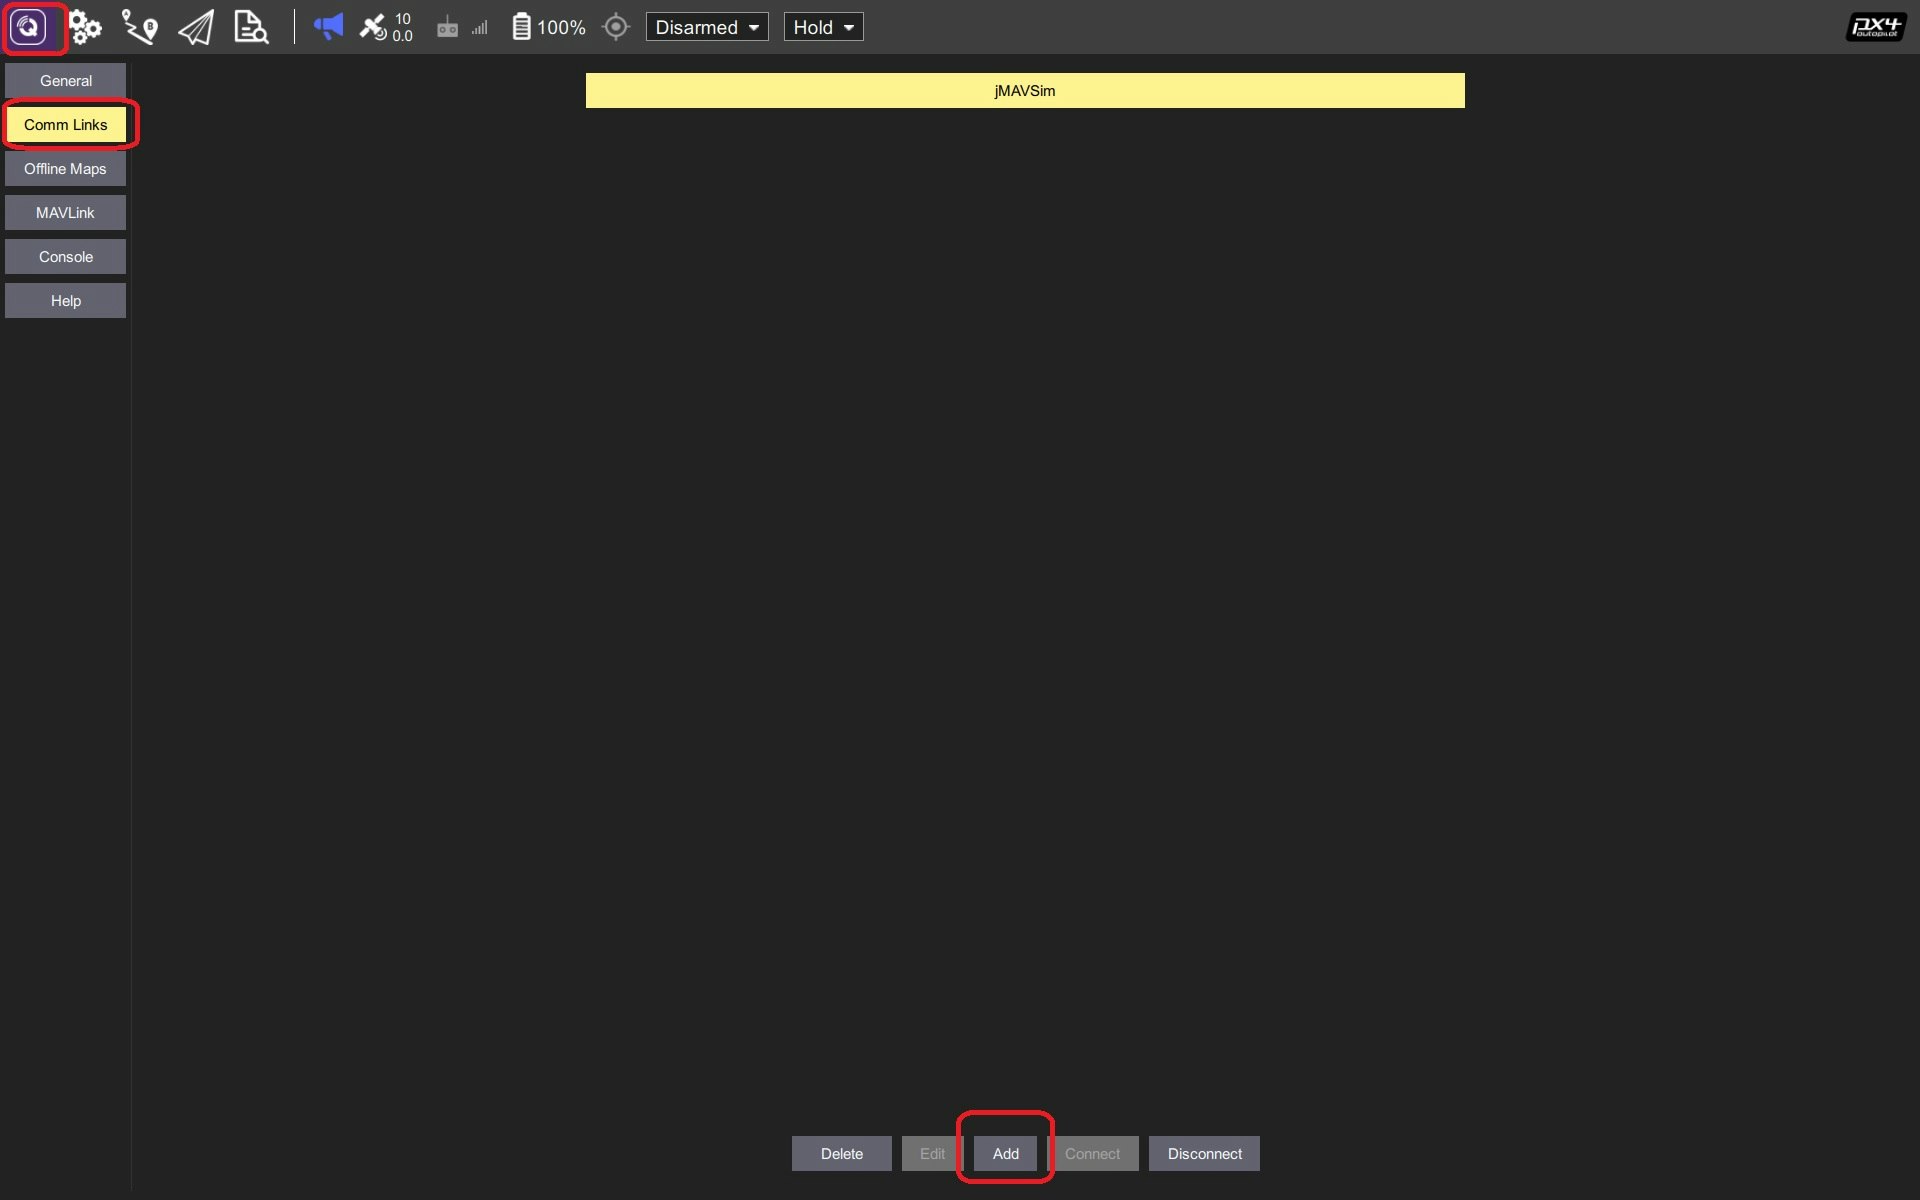
QGroundControl起動(Windows)
-
WindowsスタートメニューからQGroundControlを起動。
-
左上のQGroundControlロゴボタンを押下 > 左メニューの
Comm Linksを押下 > 画面下部のAddを押下 。
-
下記の通り入力(他はデフォルト値)して
OKを押下。- Name ... 任意の名前
- Type ... UDP
- Automaticaly Connect On Start ... チェックあり
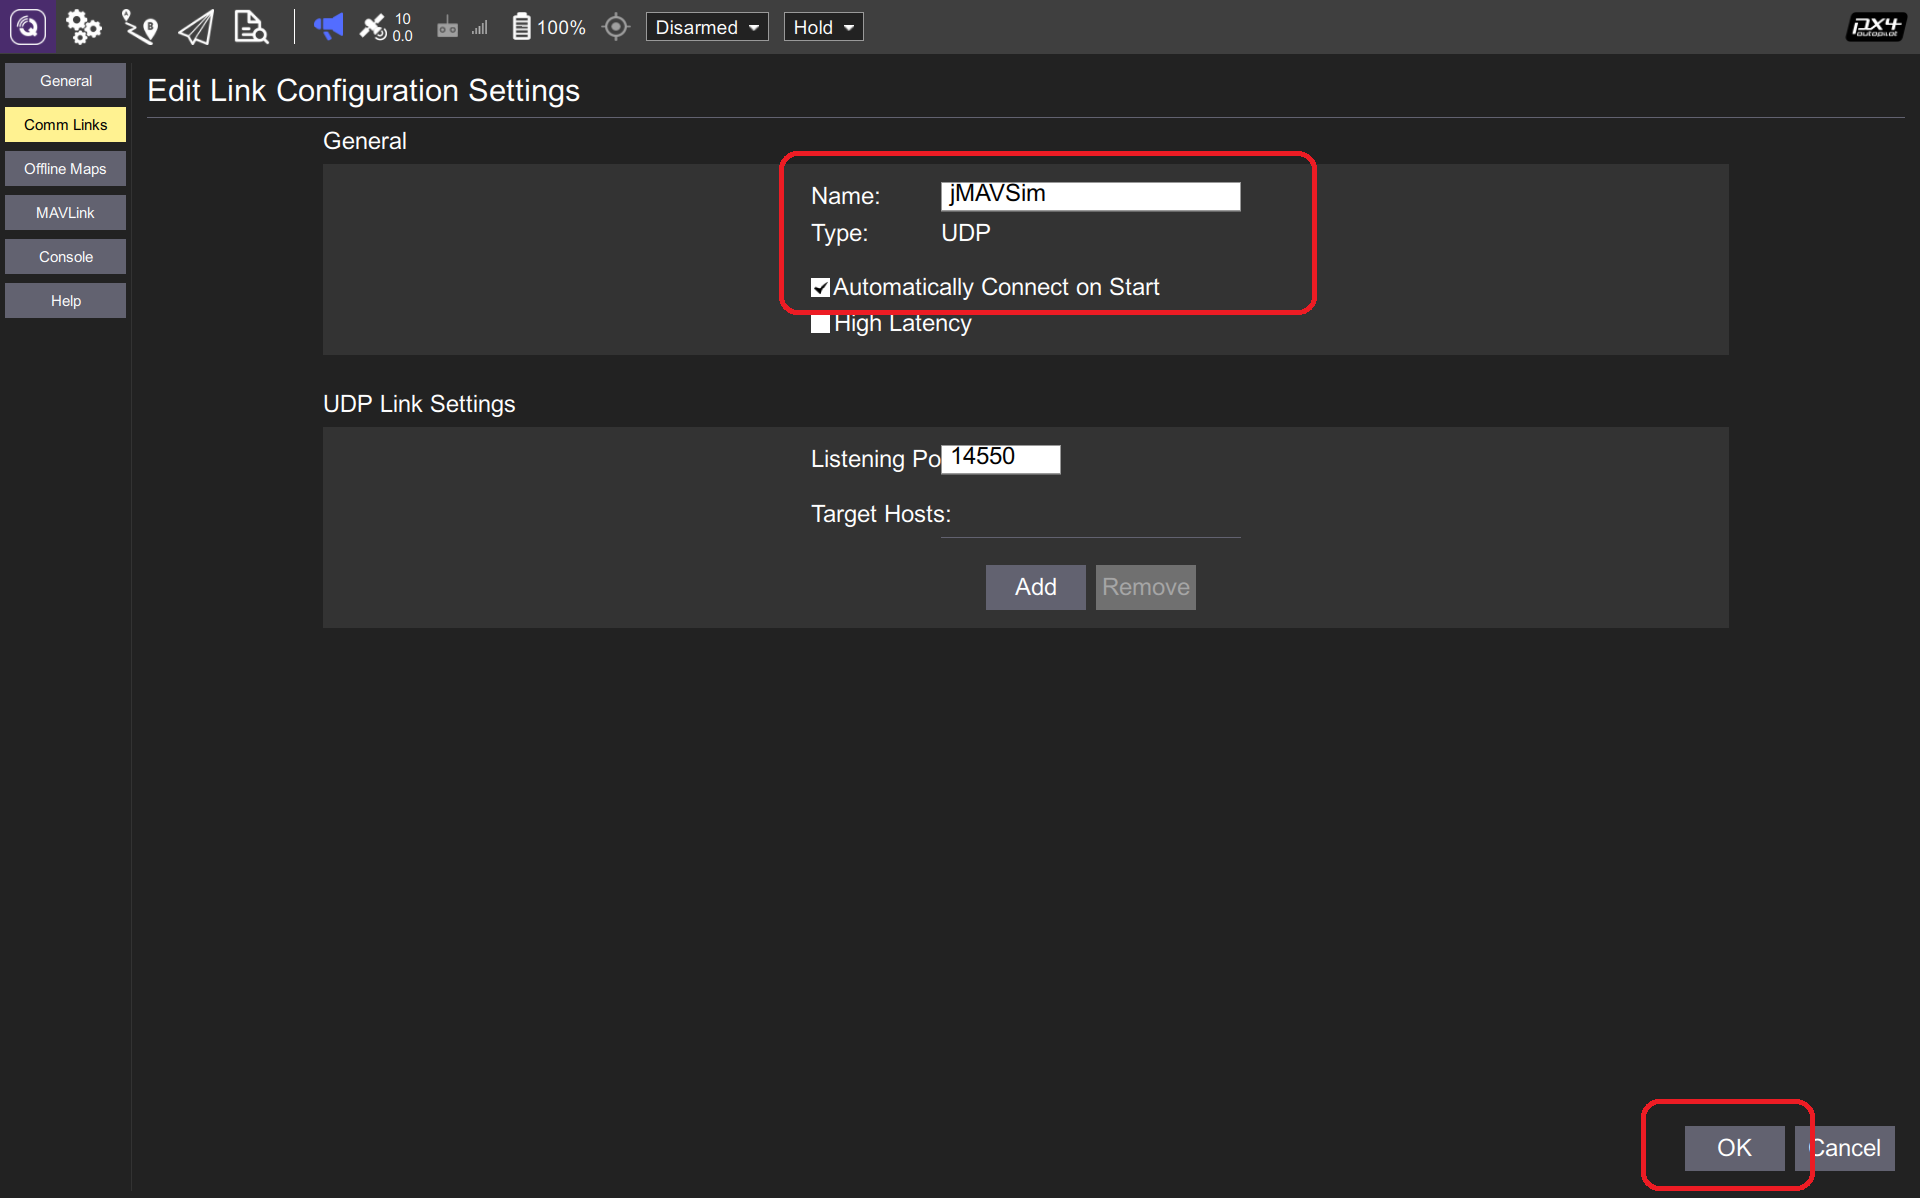
-
上記手順で作成された接続を選択して
Connectを押下。 -
接続成功を示すメッセージが表示され、右上に
PX4のロゴが表示されていたらOK。

動作シーン
@t_mac116
— fujihide (@hfujikawa77) October 25, 2021
もう不要かもしれませんが、WSL2上のPX4 SITLからWin上のQGCからの接続を確認しました。
(手順は後述 pic.twitter.com/TTFfVrSKAy
まとめ
使い慣れたWindowsでPX4の検証環境ができました。