※こちらの記事は【Flutter】色んな状態管理手法でカウンターアプリを作ってみるの一部として作成された記事です
Reactの系譜 Redux
今回はFlutterが元々参考にしたと言われるReactから輸入された状態管理手法の__Redux__でカウンターアプリを作っていきます
使用するPackage:
- flutter_redux v0.8.2
概要
- Reduxは状態管理手法であり、アーキテクチャでもある
- FacebookによってReactを使った状態管理アーキテクチャとして考案された
- Reactを使ってきた人には馴染みが深いはず
- アプリ全体でたった1つのクラスに全ての状態値を集約させる管理手法
- Brian Egan氏が開発
- 初版リリースは2017年08月
全体像
Reduxとは?
前述した通り、Facebookが考案した状態管理手法で以下の3つの基本理念を元に考案されました。
- Single source of truth:単一の状態管理クラス
- State is read only:状態値は読み取りのみ
- Changes are made with pure function:変更は関数を通してのみ行われる
コレらの理念に基づき考案されたReduxは「アプリ全体の状態値をたった1つの状態管理クラスに集約」し、「関数によって読み取り専用のimmutableな状態値を生成する」事で状態管理を行います。
そしてもう1つ重要な特徴は__「単一方向に流れるデータの流れ」__です。
Reduxの構成要素
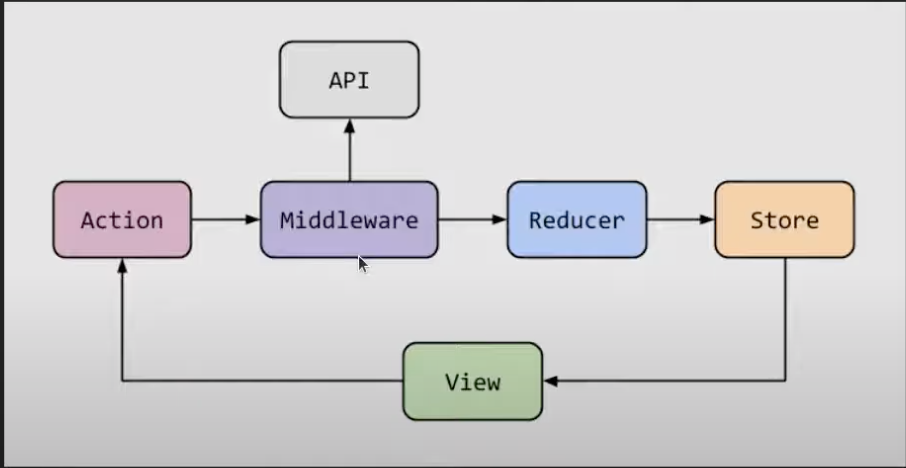
上記の特徴を持つReduxアーキテクチャは以下の5つのプレーヤーで構成される。
-
Store:状態管理クラス -
View:状態値を活用するUI -
Action:UIからStoreへ状態値の変更を指示するオブジェクト -
Reducer:状態値を変更し、UI側に返す関数 -
Middleware:ActionがReducerに渡される前に外部APIと連携し処理を行う
Viewは状態値の変更をActionオブジェクトを状態管理クラスであるStoreに送る(dispatch)事で要請する。
Storeは受け取ったActionオブジェクトに対応したReducerを実行し、再びViewに状態値を渡します。
Reducerで処理を行う前に外部APIと連携する必要がある時は Middlewareが橋渡し役を担います。
キーとなるクラスやメソッド
-
Storeクラス:状態管理クラス -
StoreProviderクラス:Widgetツリーに沿って状態管理クラスの依存関係を注入するクラス -
StoreConnectorクラス:ラップしたWidgetにStoreへのアクセスを可能にするクラス -
dispatchメソッド:StoreへActionオブジェクトを送るメソッド
準備
具体的にカウンターアプリを例に使い方を見ていきましょう。
サンプルコードはこちら
1. Stateクラス
- 今回はCountフィールドを持つ
CounterStateクラスを定義。 - 前述の通り、Stateは読み取りのみ =
immutableなオブジェクトになります
@immutable
class CounterState {
  final int count;
  const CounterState({this.count = 0});
}
- 今回管理するStateクラスは上記の
CounterStateだけですが、アプリ全体で管理する状態値を全て保持する事になるので、複数の状態値の塊となるRootStateクラスを定義します。
@immutable
class RootState {
  final CounterState reduxCounterState;

  RootState({this.reduxCounterState = const CounterState()});
}
2. Actionクラス
-
View側からStoreにdispatchされるActionクラスを用意します。 - 今回はincrement、decrement、resetの3つのアクションを用意します。
class IncrementAction {
  IncrementAction();
}

class DecrementAction {
  DecrementAction();
}

class ResetAction {
  ResetAction();
}
3. Reducer
-
Actionオブジェクトを受け取り、それに応じて処理を行い、状態値を返すメソッドReducerに集約させます。 - 所謂ビジネスロジックそのものですね。
-
Storeのコンストラクタに渡す為、第二引数Actionの型はdynamicである必要がある様です
CounterState counterReducer(CounterState state, action) {
  // type of second argument needs to be `dynamic`, to be able to pass into Store constructor.
  if (action is IncrementAction) {
    return CounterState(count: state.count + 1);
  } else if (action is DecrementAction) {
    return CounterState(count: state.count - 1);
  } else if (action is ResetAction) {
    return CounterState();
  } else {
    return state;
  }
}
-
Storeが取り扱うのはあくまでも状態値の集合体となるRootStateなので、先ほどのcounterReducerをラップする親ReducerであるrootCounterReducerを定義します。
RootState rootCounterReducer(RootState state, action) {
  return RootState(
      reduxCounterState: counterReducer(state.reduxCounterState, action));
}
4. 状態管理クラス(Store)
- 状態管理クラスである
Storeをインスタンス化 - 引数にビジネスロジックである
Reducerと状態の初期値を渡す - Storeはwidgetツリーの最上層で生成する
final store = Store<RootState>(rootCounterReducer, initialState: RootState());
5. Viewへ注入
-
reduxパッケージでも依存関係の注入にはProviderを使用します。 -
providerパッケージの時とほぼ同じです。違いはflutter_reduxパッケージのStoreProviderを使う事くらい。 -
storeフィールドにインスタンス化したStoreを渡す -
childフィールドに定義した_ReduxCounterPagewidgetにインスタンスを注入
  @override
  Widget build(BuildContext context) {
    return StoreProvider(
      store: store,
      child: _ReduxCounterPage(),
    );
  }
さあ、これで_ReduxCounterPage widgetより下に位置する全てのWidgetでStoreクラスにアクセスできる様になりました。
状態へのアクセス
Storeへのアクセスは全てStoreConnectorクラスを使います。
状態値の取得
-
converterフィールドにて取得する状態値を指定します -
builderフィールドでラップしたWidgetにconverterで定義した値を渡す事が出来ます -
distinct:trueとする事で値が変わった時だけ再描画が走るようにする事ができます
  StoreConnector<RootState, int>(
    converter: (store) => store.state.reduxCounterState.count,
    distinct: true,
    builder: (context, count) => Text(
      '$count',
      style: Theme.of(context).textTheme.headline4,
    ),
  ),
状態値の変更
- 変更の場合は、
Actionオブジェクトをstoreのdispatchメソッドを使ってStoreに送る事で実行します -
builderフィールドでラップしたWidgetにconverterで定義したメソッドを渡す事が出来ます
  StoreConnector<RootState, VoidCallback>(
    converter: (store) => () => store.dispatch(IncrementAction()),
    builder: (context, dispatchIncrement) => FloatingActionButton(
      onPressed: dispatchIncrement,
      tooltip: 'Increment',
      heroTag: 'Increment',
      child: Icon(Icons.add),
    ),
  ),
全体
import 'package:flutter/material.dart';
import 'package:flutter_redux/flutter_redux.dart';
import 'package:redux/redux.dart';
import 'package:state_management_examples/widgets/main_appbar.dart';

// 状態管理クラス(State)
@immutable
class CounterState {
  final int count;
  const CounterState({this.count = 0});
}

@immutable
class RootState {
  final CounterState reduxCounterState;

  RootState({this.reduxCounterState = const CounterState()});
}

// Actionクラス
class IncrementAction {
  IncrementAction();
}

class DecrementAction {
  DecrementAction();
}

class ResetAction {
  ResetAction();
}

// Reducerクラス
CounterState counterReducer(CounterState state, action) {
  // type of second argument needs to be `dynamic`, to be able to pass into Store constructor.
  if (action is IncrementAction) {
    return CounterState(count: state.count + 1);
  } else if (action is DecrementAction) {
    return CounterState(count: state.count - 1);
  } else if (action is ResetAction) {
    return CounterState();
  } else {
    return state;
  }
}

RootState rootCounterReducer(RootState state, action) {
  return RootState(
      reduxCounterState: counterReducer(state.reduxCounterState, action));
}

// 依存関係の注入
class ReduxCounterPage extends StatelessWidget {
  // 状態管理クラス(Store)をインスタンス化
  final store = Store<RootState>(rootCounterReducer, initialState: RootState());

  @override
  Widget build(BuildContext context) {
    return StoreProvider(
      store: store,
      child: _ReduxCounterPage(),
    );
  }
}

// カウンター本体
class _ReduxCounterPage extends StatelessWidget {
  const _ReduxCounterPage({Key key}) : super(key: key);

  @override
  Widget build(BuildContext context) {
    print('rebuild!');

    return Scaffold(
      appBar: MainAppBar(
        title: 'Redux',
      ),
      body: Center(
        child: Column(
          mainAxisAlignment: MainAxisAlignment.center,
          children: <Widget>[
            Text(
              'You have pushed the button this many times:',
            ),
            StoreConnector<RootState, int>(
              converter: (store) => store.state.reduxCounterState.count,
              distinct: true,
              builder: (context, count) => Text(
                '$count',
                style: Theme.of(context).textTheme.headline4,
              ),
            ),
          ],
        ),
      ),
      floatingActionButton: FittedBox(
        child: Row(
          mainAxisAlignment: MainAxisAlignment.spaceBetween,
          children: <Widget>[
            StoreConnector<RootState, VoidCallback>(
              converter: (store) => () => store.dispatch(IncrementAction()),
              builder: (context, dispatchIncrement) => FloatingActionButton(
                onPressed: dispatchIncrement,
                tooltip: 'Increment',
                heroTag: 'Increment',
                child: Icon(Icons.add),
              ),
            ),
            const SizedBox(width: 16),
            StoreConnector<RootState, VoidCallback>(
              converter: (store) => () => store.dispatch(DecrementAction()),
              builder: (context, dispatchDecrement) => FloatingActionButton(
                onPressed: dispatchDecrement,
                tooltip: 'Decrement',
                heroTag: 'Decrement',
                child: Icon(Icons.remove),
              ),
            ),
            const SizedBox(width: 16),
            StoreConnector<RootState, VoidCallback>(
              converter: (store) => () => store.dispatch(ResetAction()),
              builder: (context, dispatchReset) =>
                  FloatingActionButton.extended(
                onPressed: dispatchReset,
                tooltip: 'Reset',
                heroTag: 'Reset',
                label: Text('RESET'),
              ),
            ),
          ],
        ),
      ),
    );
  }
}
以上でした
いかがだったでしょうか?
自分はReactの経験はない為、今回Reduxに初めて触れましたが、単一クラスでアプリ全体の状態を管理するというのは結構衝撃的でした。
しっかりとした組織でならちゃんと運用出来ますが、そうでないと怖いなーと思いつつ、React経験者が多い組織でFlutterを始める場合はうまく運用出来るのかもしれないなと思いました。