はじめに
どうも、皆川です。YOLOv3を使って推論エンドポイントを立てて実際に画像を物体認識させてみます。悪名高いSageMakerのコンソールの操作手順や推論エンドポイントの叩き方に慣れることを目的としています。以下が記事の流れです。
AWSマーケットプレースで物体認識のDeepLearningモデルのYOLOv3を手に入れる
↓
そのモデルを推論エンドポイントとしてデプロイする
↓
自分のMacOSでAWS CLIとPythonを使った2種類の方法で推論を実行してみる。推論にはローカルの画像ファイルを使う。
1と2の手順が明確に分離できないのでまとめて一気に紹介しています。
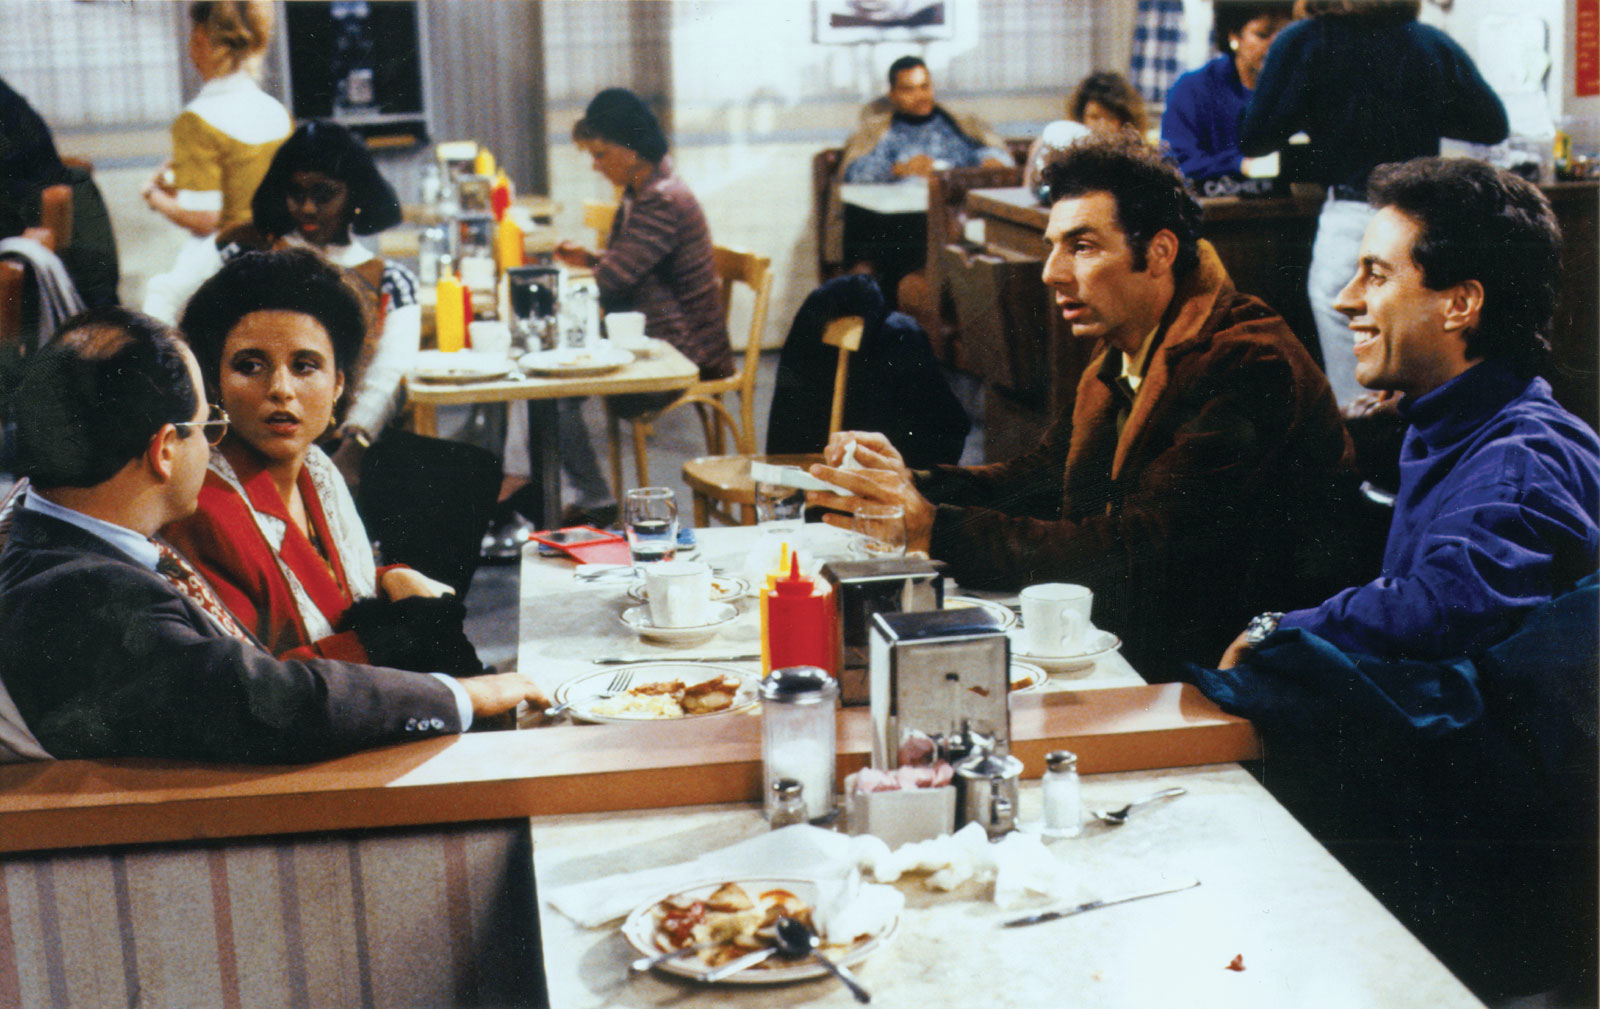
推論させる画像
今回推論させる画像はこちら!筆者の好きなアメリカのシットコム「サインフェルト」からのワンシーンです。
注意点その1
今回推論はローカルのMacOSでやりますが、あらかじめAWS CLIコマンドで認証情報を以下のようにホームディレクトリ配下の.awsディレクトリにデフォルトのリージョン設定や認証情報がテキストファイルで保存されていないと行けません。
hidehirominagawa/.aws
├── config
└── credentials
ターミナルで
aws configure
と打つと、
AWS Access Key ID [****************DCUN]:
AWS Secret Access Key [****************ljYL]:
Default region name [us-east-1]:
Default output format [None]:
というふうに聞かれるのでアカウントIDとシークレットキー、デフォルトのリージョン、希望するアウトプット形式(JSONなど)を入力します。入力すると生成されるcredentialsファイル内のシークレットキーを参照してAWS CLIもPython SDK(boto3)もAWSと通信するので、
これがないと以下で紹介する推論の実施は失敗してしまいます。
注意点その2
以下の作業は上記の手順で設定したデフォルトリージョンで行ってください。リージョンが違うと失敗します。例えばオハイオリージョンで作成したエンドポイントをデフォルトリージョンが東京リージョンのアカウントで叩くことはできません。
手順
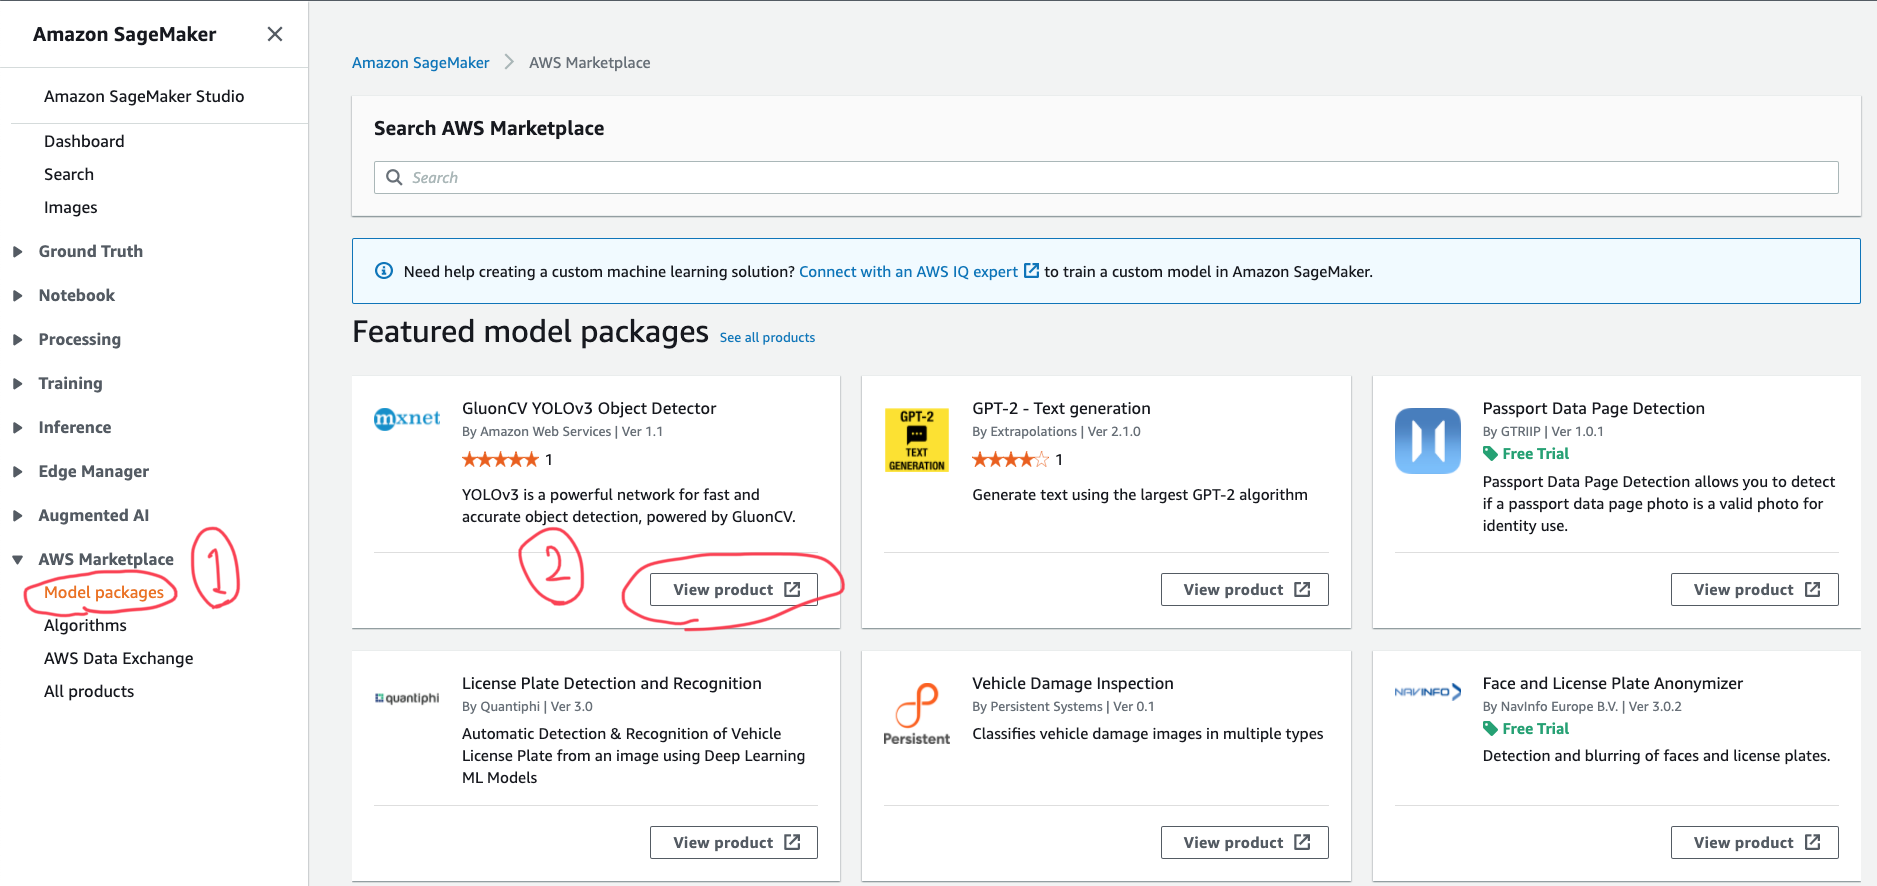
AWSマーケットプレースでモデルの取得&モデルのデプロイ
早速手順に入っていきましょう。まずはSageMakerのAWS MarketplaceのModel packagesを選択し、一番最初に出てくるGluonCV YOLOv3 Object DetectorのView Productを選択します。
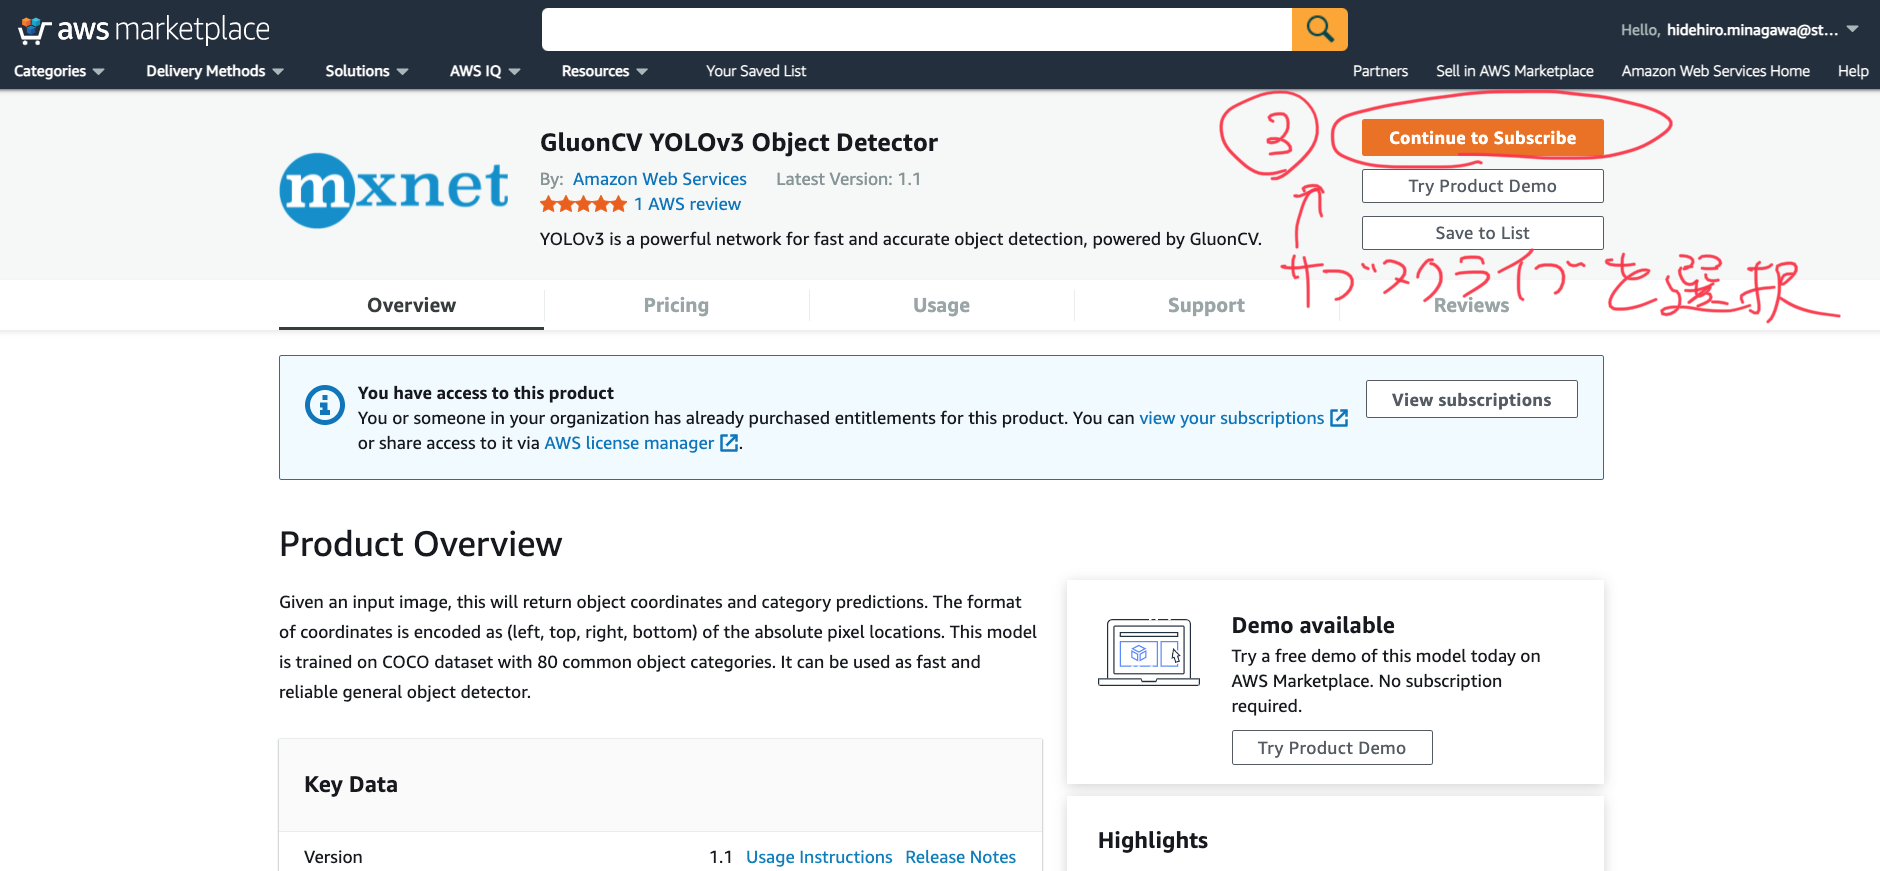
右上のオレンジのボタンを選択します。ちなみに、このモデルは無料で使用できます(インスタンス起動にはお金がかかる)。
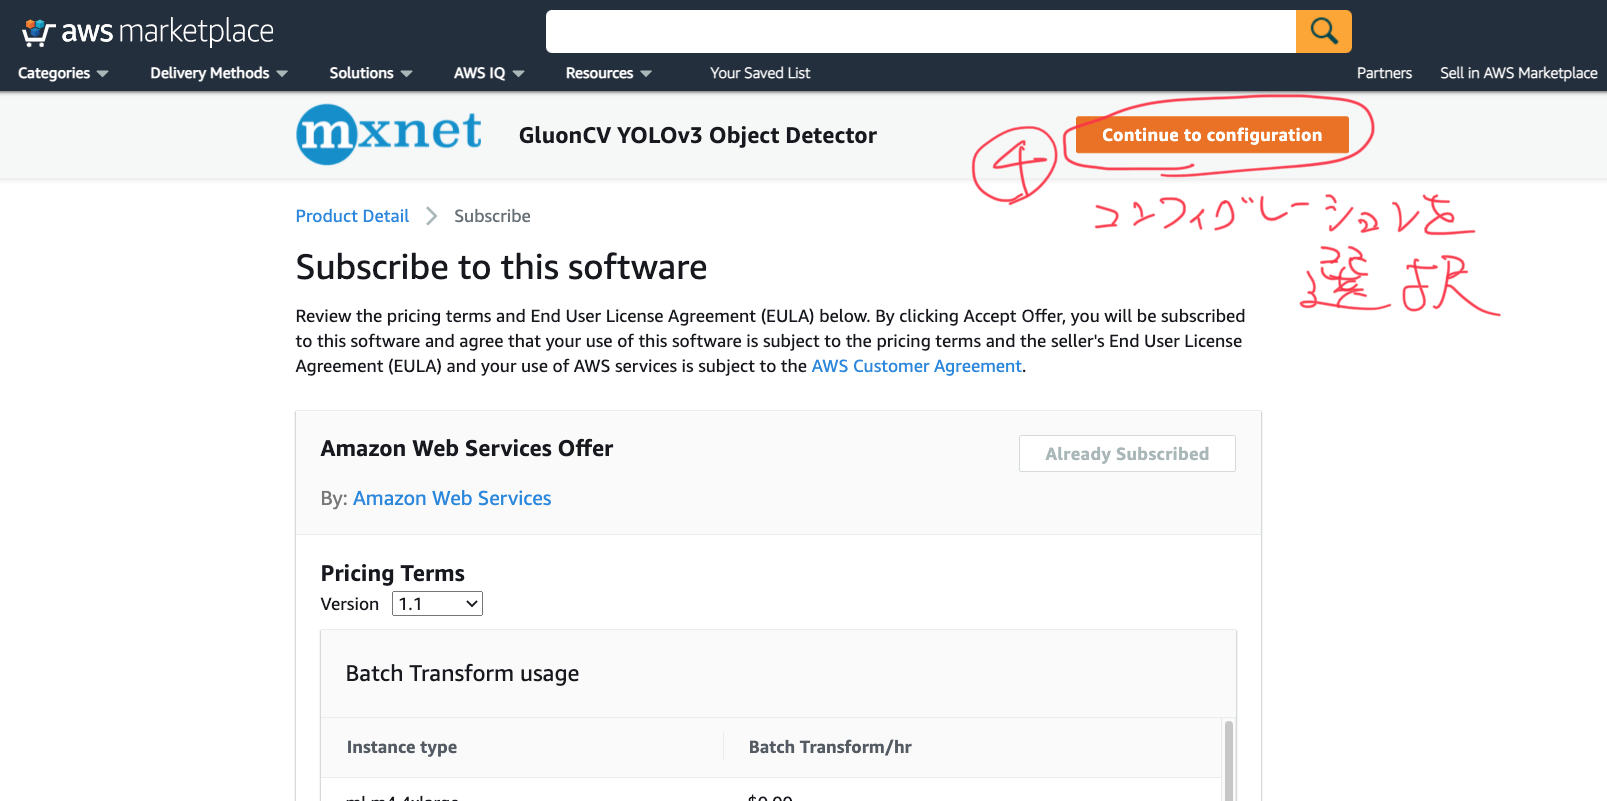
続いてまた右上のオレンジボタンをポチッと押します。
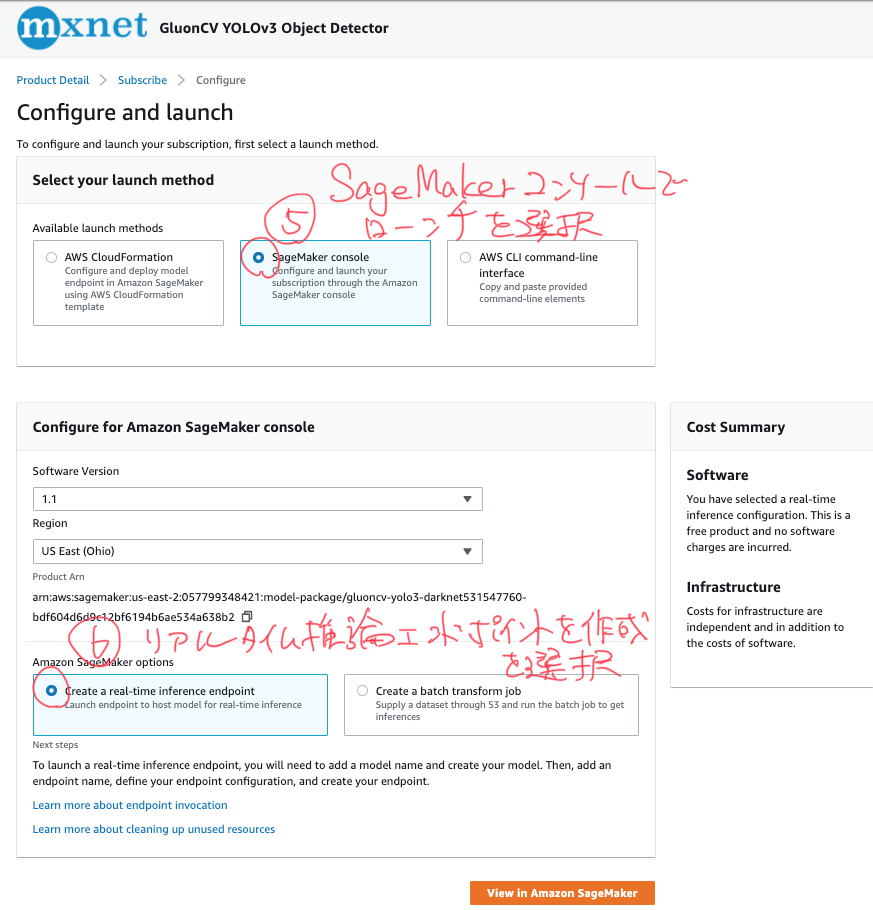
いくつかローンチの方法がありますが今回は真ん中の「SageMakerコンソールを使う」を選びます。そしたらリアルタイム推論用のエンドポイントを作成をクリックします。
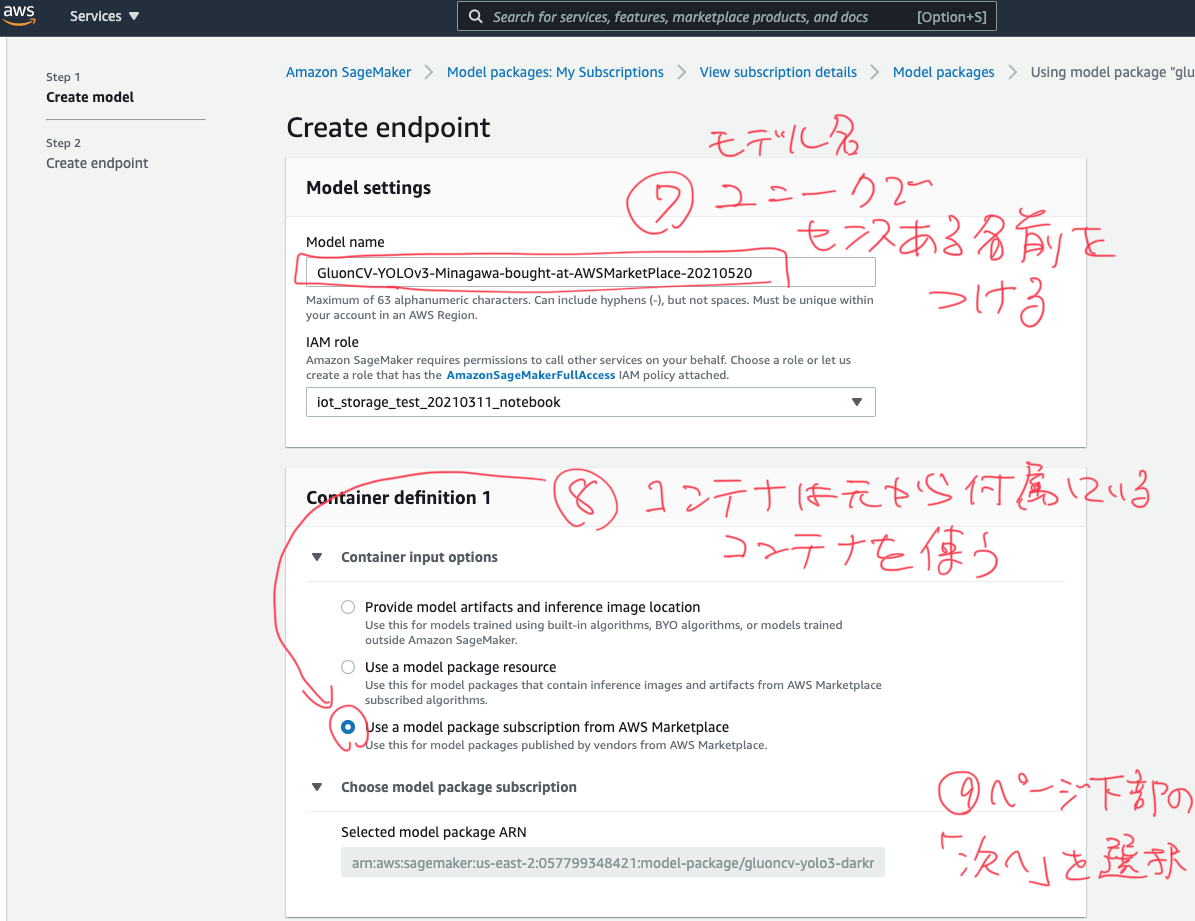
モデル名は最低限GluonCV、YOLOv3、ObjectDetectionあたりが入っていると後でなんのモデルかわからなくならないのでいいでしょう。
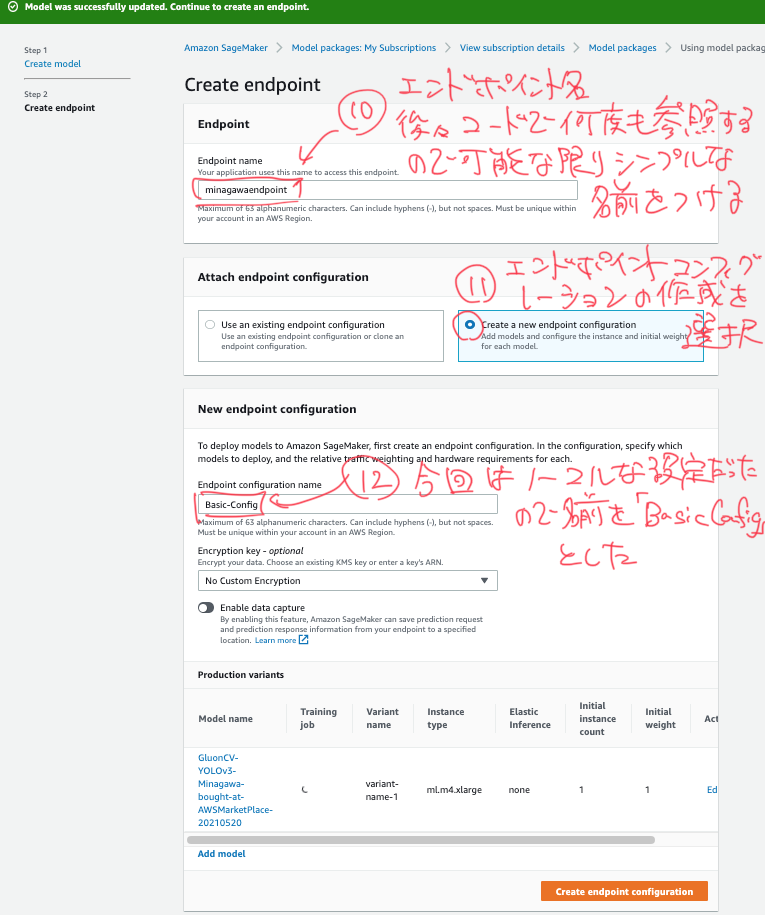
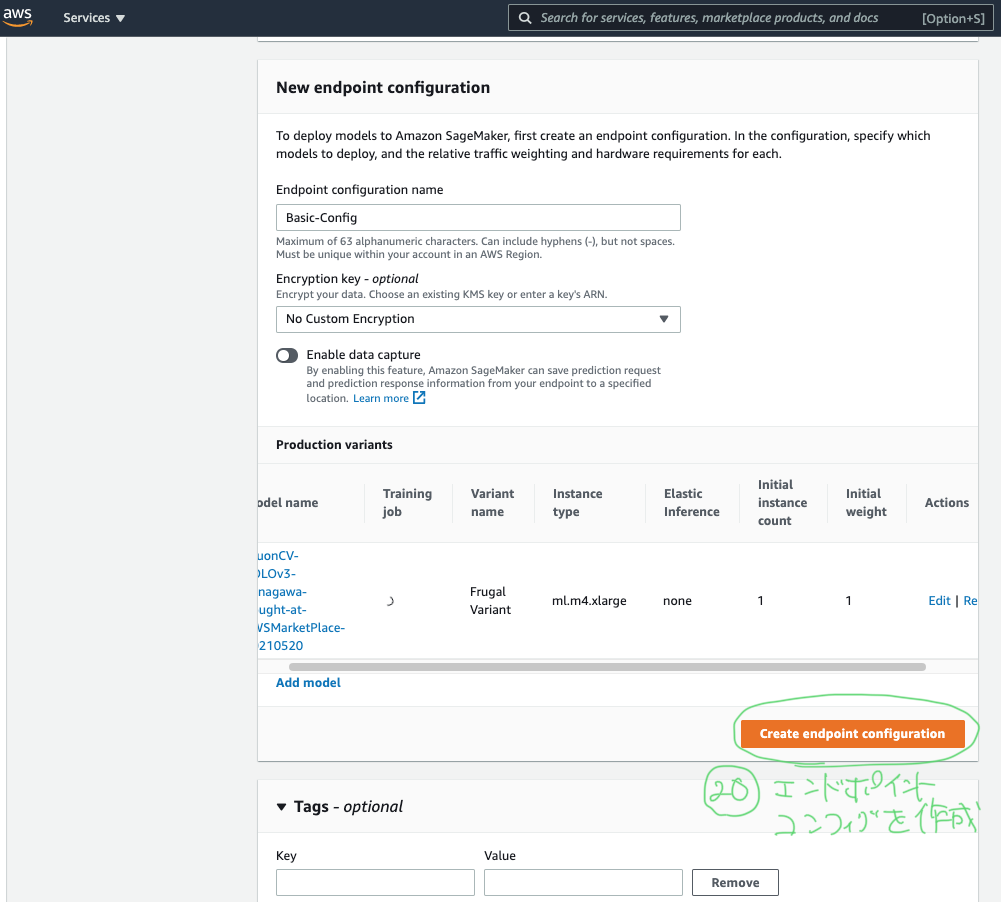
エンドポイント名はコード内で後から何度も参照することになるのでできるだけシンプルな名前をつけましょう。またエンドポイントコンフィギュレーションの作成を選択します。名前ですが、今回はデフォルトの設定のままなので「Basic-Config」としましたが、DefaultConfigとかNormalConfig等でもいいでしょう。
エンドポイントのコンフィギュレーションはデフォルトのままで大丈夫ですが、14番にあるようにEditを押して少し中身の設定を見てみましょう。
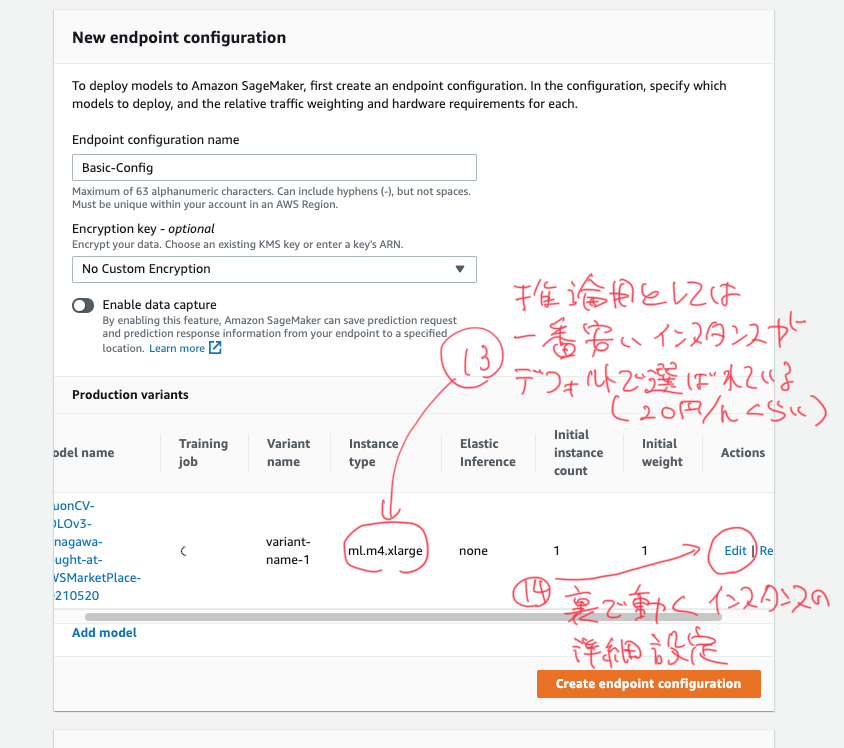
それが下の画面。Variantバリアントとはエンドポイントの裏で動くインスタンスの設定のことです。今回は一番安いインスタンスを1台で動かすので「FrugalVariant」(節約バリアント)という名前にしました。CheapVariantとかでもいいかもしれません。

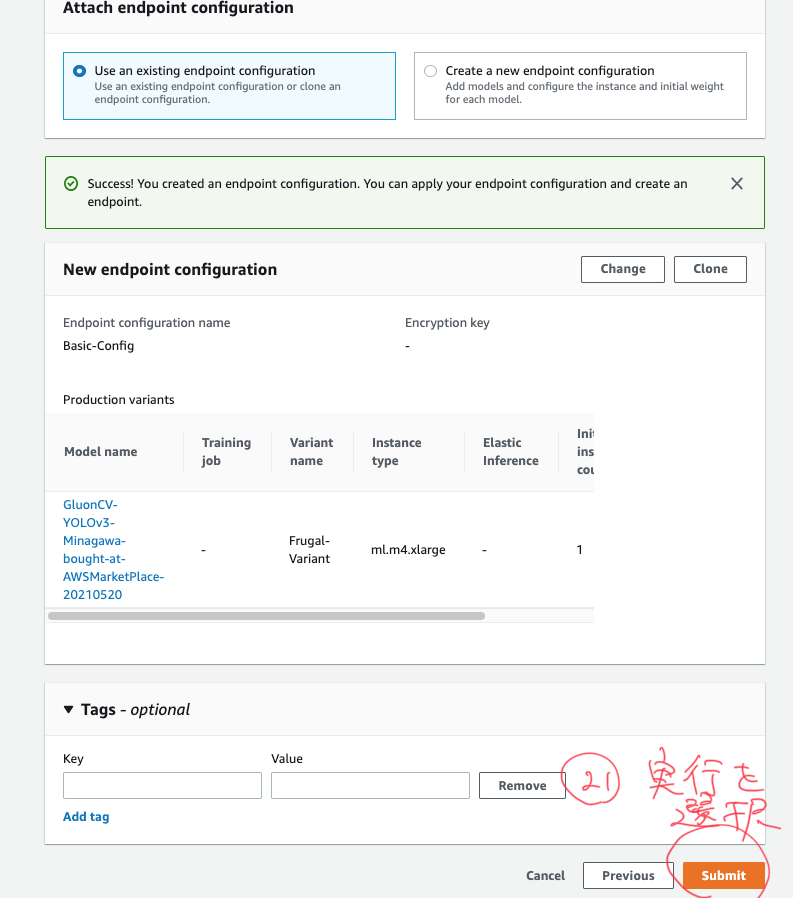
エンドポイントコンフィギュレーションの作成をポチッと押します。
右下の実行ボタンを押します。
はいできた!エンドポイントが作成中になっているのが見られると思います。
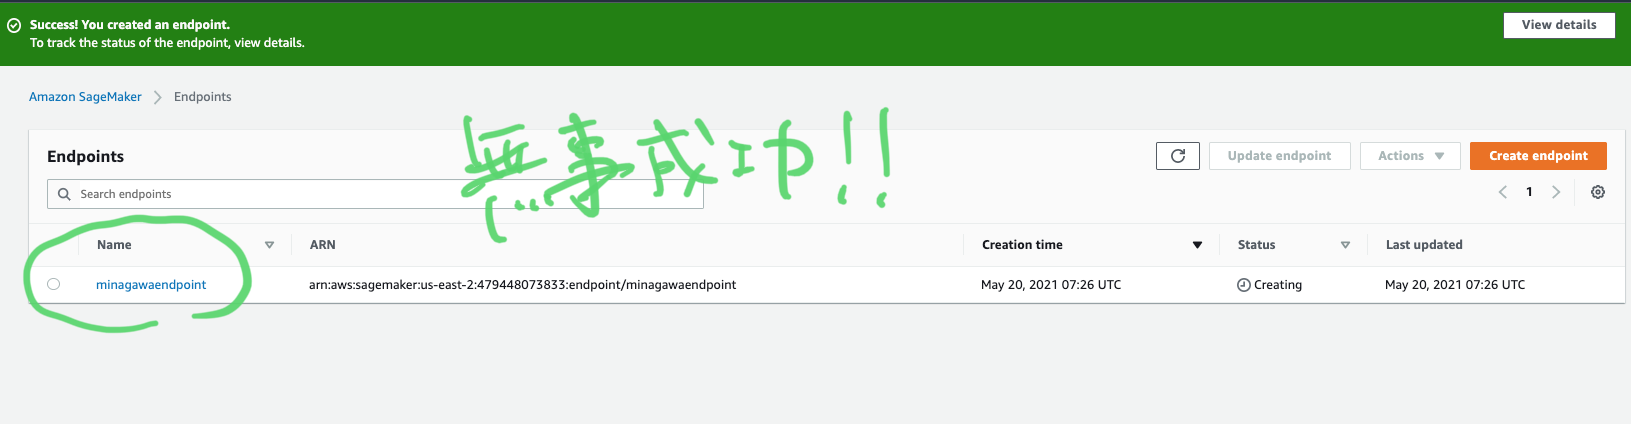
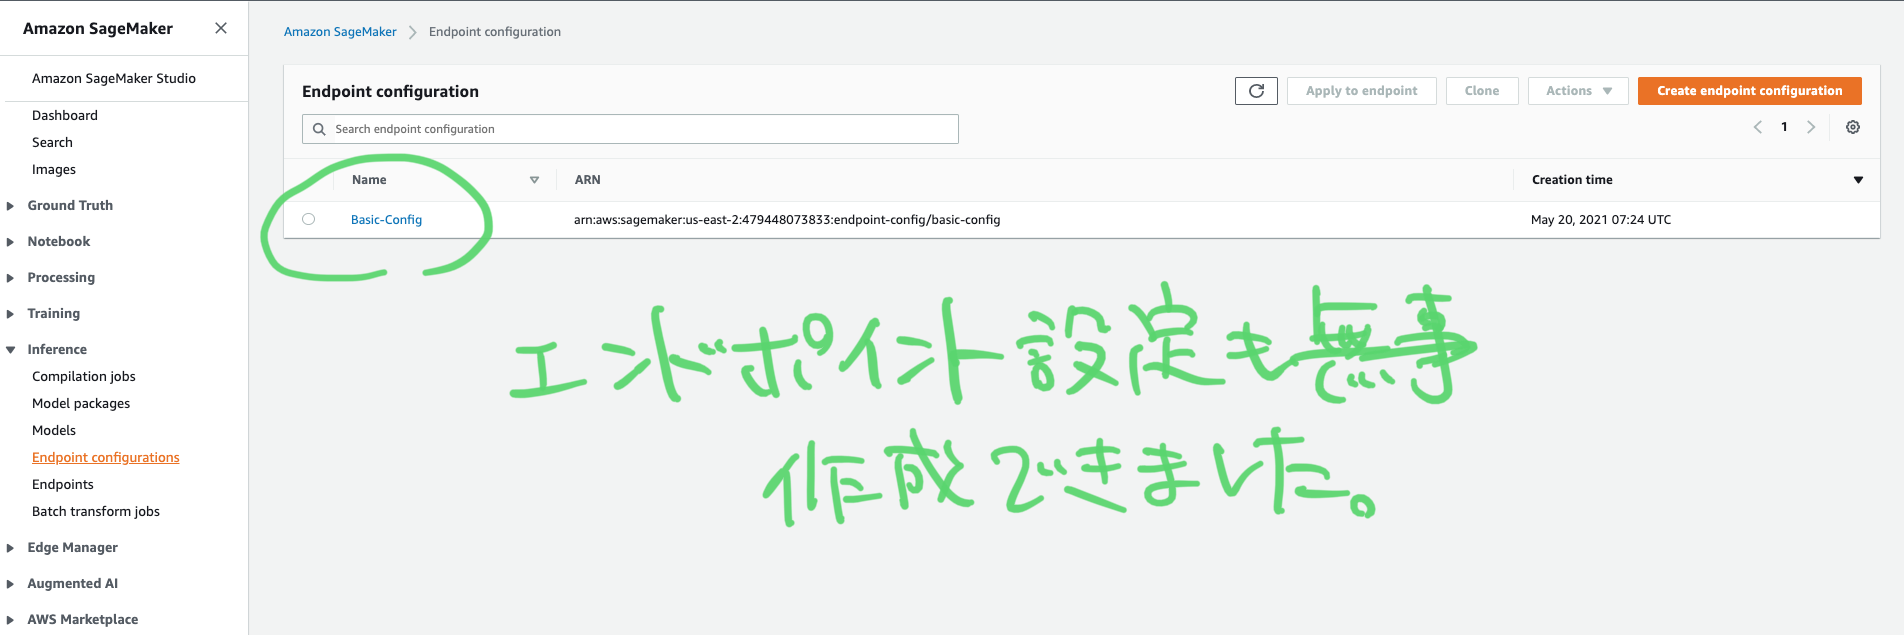
エンドポイント設定(コンフィギュレーション)も無事作成できました。
推論エンドポイントができるまで8分ほど待った後(ちなみにデフォルトリージョンはus-east-1)、実際に推論ができます。カメラの映像をリアルタイムにエンドポイントに投げて結果をバウンダリーボックス上に重ね合わせて表示させることもできますが、今回はローカルファイルの画像を使います。
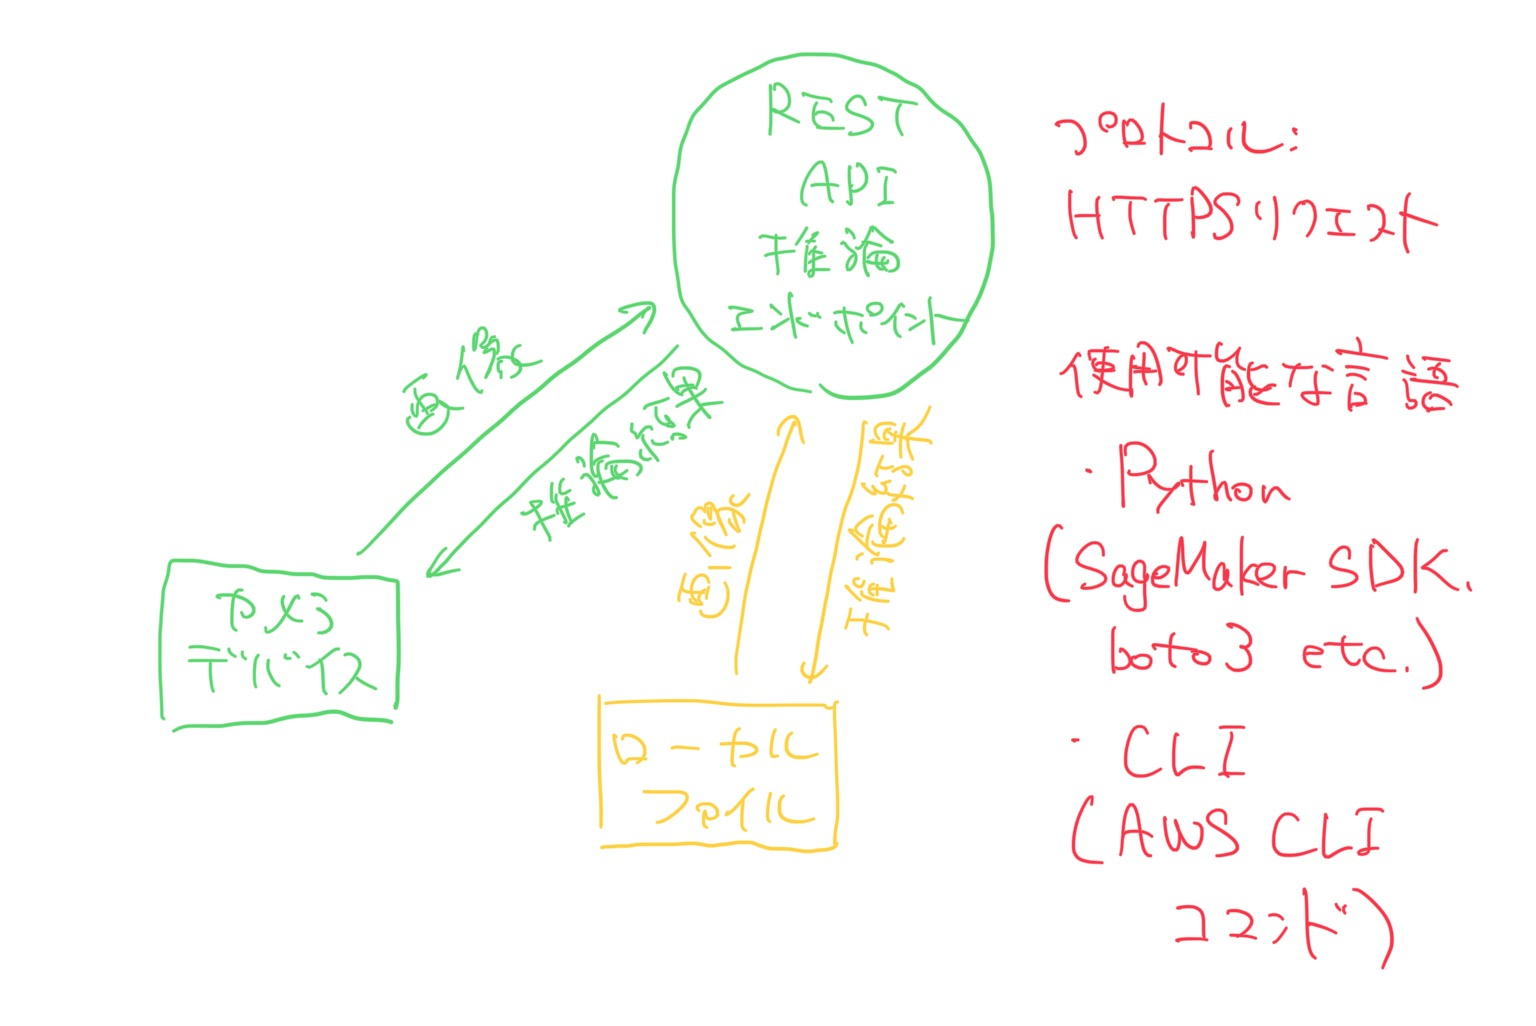
AWS CLIもしくはboto3を使って、ローカルの画像ファイルを推論させる
AWS CLIを使ったエンドポイント推論
基本的な文法は以下です。
aws sagemaker-runtime invoke-endpoint \
--endpoint-name <value> \
--body <value> \
[--content-type <value>] \
[--accept <value>] \
[--custom-attributes <value>] \
[--target-model <value>] \
[--target-variant <value>] \
[--target-container-hostname <value>] \
[--inference-id <value>] \
<outfile>
実際のコードです。画像はバイナリファイルなのでfileb://で指定します。また推論結果の出力ファイルは.txtでも.jsonでも大丈夫です。
aws sagemaker-runtime invoke-endpoint \
--endpoint-name minagawaendpoint \
--body fileb://~/Pictures/test.jpg \
--content-type image/jpeg \
./result.txt
コマンドライン上に以下のような出力が返ってきたら成功です。lsコマンドでファイルが生成されているのを確認しましょう。
{
    "ContentType": "application/json",
    "InvokedProductionVariant": "FrugalVariant"
}
どれどれcat result.json…って、うわあああああああ…!
[{"right": 504, "bottom": 780, "top": 317, "score": 0.9636420607566833, "id": "person", "left": 4},
 {"right": 1365, "bottom": 679, "top": 148, "score": 0.9556920528411865, "id": "person", "left": 826},
{"right": 1600, "bottom": 984, "top": 164, "score": 0.9527370929718018, "id": "person", "left": 1171},
{"right": 529, "bottom": 662, "top": 250, "score": 0.9427894949913025, "id": "person", "left": 172},
{"right": 1299, "bottom": 188, "top": 0, "score": 0.9392236471176147, "id": "person", "left": 1169},
{"right": 1103, "bottom": 651, "top": 580, "score": 0.8915793895721436, "id": "cup", "left": 1029},
{"right": 746, "bottom": 521, "top": 84, "score": 0.8718092441558838, "id": "person", "left": 552},
{"right": 1516, "bottom": 426, "top": 0, "score": 0.8573465347290039, "id": "person", "left": 1248},
{"right": 782, "bottom": 524, "top": 245, "score": 0.7530757188796997, "id": "chair", "left": 652},
{"right": 913, "bottom": 559, "top": 502, "score": 0.7406493425369263, "id": "cup", "left": 861},
{"right": 721, "bottom": 626, "top": 564, "score": 0.7077181339263916, "id": "cup", "left": 648},
{"right": 295, "bottom": 243, "top": 1, "score": 0.6890624165534973, "id": "person", "left": 145},
{"right": 117, "bottom": 313, "top": 68, "score": 0.6665889620780945, "id": "person", "left": 2},
{"right": 807, "bottom": 970, "top": 880, "score": 0.6630868315696716, "id": "pizza", "left": 645},
{"right": 1025, "bottom": 262, "top": 54, "score": 0.6430046558380127, "id": "person", "left": 837},
{"right": 1206, "bottom": 930, "top": 877, "score": 0.617798924446106, "id": "knife", "left": 1003},
{"right": 709, "bottom": 538, "top": 325, "score": 0.6052451729774475, "id": "dining table", "left": 398},
{"right": 1167, "bottom": 156, "top": 67, "score": 0.5803423523902893, "id": "person", "left": 1072},
{"right": 654, "bottom": 349, "top": 309, "score": 0.5798755884170532, "id": "cup", "left": 613},
{"right": 685, "bottom": 574, "top": 489, "score": 0.5760888457298279, "id": "cup", "left": 629},
{"right": 400, "bottom": 257, "top": 123, "score": 0.5649474263191223, "id": "person", "left": 237},
{"right": 1096, "bottom": 843, "top": 752, "score": 0.4979955554008484, "id": "bottle", "left": 1045},
{"right": 1547, "bottom": 1009, "top": 517, "score": 0.4288981258869171, "id": "dining table", "left": 405},
{"right": 473, "bottom": 349, "top": 262, "score": 0.42519864439964294, "id": "bottle", "left": 440},
{"right": 1196, "bottom": 818, "top": 789, "score": 0.36290034651756287, "id": "spoon", "left": 1099},
{"right": 837, "bottom": 677, "top": 563, "score": 0.35803812742233276, "id": "bottle", "left": 767},
{"right": 883, "bottom": 994, "top": 914, "score": 0.3268042206764221, "id": "fork", "left": 762},
{"right": 837, "bottom": 677, "top": 563, "score": 0.31009042263031006, "id": "cup", "left": 767},
{"right": 643, "bottom": 693, "top": 668, "score": 0.2697630226612091, "id": "fork", "left": 610},
{"right": 840, "bottom": 823, "top": 668, "score": 0.2667037844657898, "id": "bottle", "left": 765},
{"right": 635, "bottom": 702, "top": 664, "score": 0.22746305167675018, "id": "fork", "left": 556},
{"right": 976, "bottom": 465, "top": 268, "score": 0.22288912534713745, "id": "person", "left": 789},
{"right": 602, "bottom": 347, "top": 280, "score": 0.21184919774532318, "id": "cup", "left": 566},
{"right": 883, "bottom": 994, "top": 914, "score": 0.2109336405992508, "id": "knife", "left": 762},
{"right": 620, "bottom": 721, "top": 671, "score": 0.19310098886489868, "id": "fork", "left": 545},
{"right": 1153, "bottom": 194, "top": 104, "score": 0.18009953200817108, "id": "person", "left": 1033},
{"right": 513, "bottom": 360, "top": 321, "score": 0.1797870546579361, "id": "cup", "left": 474},
{"right": 853, "bottom": 287, "top": 146, "score": 0.15673811733722687, "id": "chair", "left": 818},
{"right": 1520, "bottom": 188, "top": 0, "score": 0.1561068594455719, "id": "person", "left": 1252},
{"right": 1062, "bottom": 231, "top": 184, "score": 0.14721772074699402, "id": "dining table", "left": 973},
{"right": 229, "bottom": 640, "top": 540, "score": 0.1459408700466156, "id": "tie", "left": 155},
{"right": 883, "bottom": 994, "top": 914, "score": 0.14244000613689423, "id": "spoon", "left": 762},
{"right": 572, "bottom": 357, "top": 267, "score": 0.1293671429157257, "id": "cup", "left": 511},
{"right": 751, "bottom": 648, "top": 607, "score": 0.12670713663101196, "id": "bowl", "left": 634},
{"right": 473, "bottom": 349, "top": 262, "score": 0.12271665781736374, "id": "cup", "left": 440},
{"right": 685, "bottom": 574, "top": 489, "score": 0.1211455762386322, "id": "wine glass", "left": 629},
{"right": 503, "bottom": 612, "top": 429, "score": 0.10427384078502655, "id": "chair", "left": 360}]
オブジェクトが多すぎて推論結果が膨大になってしまいました。ただpersonが95%で推論できていたりフォークやスプーンなども認識できていて悪くないですね。
Pythonでエンドポイント推論
Pythonでも同じことができます。
import boto3
import datetime
import json

client = boto3.client('sagemaker-runtime')

def endpoint_inference():
    response = client.invoke_endpoint(
# 作成したエンドポイント名を指定
        EndpointName='minagawaendpoint',
# ローカルのファイルを絶対参照で指定してread binaryモードで開く
        Body= open("/Users/hidehirominagawa/Pictures/test.jpg", mode='rb'),
# HTTPヘッダー
        ContentType='image/jpeg',
        Accept='application/json'
    )

# 推論結果をJSONからStringへ変換
    result = response['Body']
    result_json=json.load(result)
    result_str=json.dumps(result_json)

# /tmp/にendpointinference.logという名前で結果を保存
    logfile = "/tmp/endpointinference.log"
    date = datetime.datetime.now()
    timestamp = date.strftime("%Y-%m-%d %H:%M:%S")

    f = open(logfile, mode="a")
    f.write(timestamp + '\n' + result_str + '\n')
    f.close()

    print('Finished!')

endpoint_inference()
/tmp/にlogファイルが出力されているはずです。次回以降の記事でLambdaを使った推論もやっていくのでご期待ください。
以上です。
注意点その3:推論エンドポイントの消し忘れ
立てた推論エンドポイントの消し忘れに注意しましょう。1日400円くらいかかります。