小規模なデータセットで学習をさせる時、大まかな傾向を見るためにモデルのパラメータを振りたい時があります。scikit-learnにはGrid SearchとCross Validationを同時に行うGridSearchCVという名前そのまんまな便利機能がありますが、
- これをTensorFlowでも、
- リモートで並列に、
- そして面倒な分散処理コードを書かずに
- Jupyter Notebookから簡単に
やりたいですよね。
はい、Google Cloud Dataflowならそれができるんです!
準備
ここは前回の記事とほぼ同じですが、モデルによってはマシンタイプを変えた方が良いでしょう。worker_options.machine_typeの部分で指定できます。
またnum_workersを指定するとautoscaleが無効にされるようです。今回は6を設定したので、workerが6つ一気に生成されました。
import apache_beam as beam
import apache_beam.transforms.window as window

options = beam.utils.pipeline_options.PipelineOptions()

google_cloud_options = options.view_as(beam.utils.pipeline_options.GoogleCloudOptions)
google_cloud_options.project = '{PROJECTID}'
google_cloud_options.job_name = 'tensorflow-gs'
google_cloud_options.staging_location = 'gs://{BUCKET_NAME}/binaries'
google_cloud_options.temp_location = 'gs://{BUCKET_NAME}/temp'

worker_options = options.view_as(beam.utils.pipeline_options.WorkerOptions)
worker_options.max_num_workers = 6
worker_options.num_workers = 6
worker_options.disk_size_gb = 20
# worker_options.machine_type = 'n1-standard-16'

# options.view_as(beam.utils.pipeline_options.StandardOptions).runner = 'DirectRunner'
options.view_as(beam.utils.pipeline_options.StandardOptions).runner = 'DataflowRunner'

p = beam.Pipeline(options=options)
Gridパラメータの生成
組み合わせを全てハードコードで列挙するのは大変なので、GridSearchCVのように各パラメータの振りたい値から、重複しない組み合わせを生成します。
import itertools

# DNNの設定としては無意味。ここはあくまで例
param_grid = {'hidden_units': [[10, 20, 10], [20, 40, 20], [100, 200, 100]],
              'dropout': [0.1, 0.2, 0.5, 0.8],
              'steps': [20000, 50000, 100000]}

def dict_product(param):
    return (dict(itertools.izip(param, x)) for x in itertools.product(*param.itervalues()))

params = list(dict_product(param_grid))
すると下記のような36通りのパラメータ組み合わせが生成されるはずです。
[{'dropout': 0.1, 'hidden_units': [10, 20, 10], 'steps': 20000},
 {'dropout': 0.1, 'hidden_units': [20, 40, 20], 'steps': 20000},
 {'dropout': 0.1, 'hidden_units': [100, 200, 100], 'steps': 20000},
 {'dropout': 0.2, 'hidden_units': [10, 20, 10], 'steps': 20000},
 {'dropout': 0.2, 'hidden_units': [20, 40, 20], 'steps': 20000},
# ... 中略
 {'dropout': 0.5, 'hidden_units': [20, 40, 20], 'steps': 100000},
 {'dropout': 0.5, 'hidden_units': [100, 200, 100], 'steps': 100000},
 {'dropout': 0.8, 'hidden_units': [10, 20, 10], 'steps': 100000},
 {'dropout': 0.8, 'hidden_units': [20, 40, 20], 'steps': 100000},
 {'dropout': 0.8, 'hidden_units': [100, 200, 100], 'steps': 100000}]
ある程度負荷をかけたかったのでstep数を10000以上にしていますが、irisだったら数千で十分収束します。またdropoutは学習時間が増えるため、over fitting が確認されてから徐々に適用する方が良いとされています。
モデルの学習部分
paramにはパラメータ組み合わせの一つが入ります。学習済みモデルはユニークIDを付けてGCSに保存されます。
def train(param):
    import uuid
    import json
    import tensorflow as tf
    from sklearn import cross_validation

    model_id = str(uuid.uuid4())

    # 学習データのロード
    iris = tf.contrib.learn.datasets.base.load_iris()
    train_x, test_x, train_y, test_y = cross_validation.train_test_split(
        iris.data, iris.target, test_size=0.2, random_state=0
    )

    # https://www.tensorflow.org/get_started/tflearn
    feature_columns = [tf.contrib.layers.real_valued_column("", dimension=4)]
    classifier = tf.contrib.learn.DNNClassifier(feature_columns=feature_columns,
                                                hidden_units=param['hidden_units'],
                                                dropout=param['dropout'],
                                                n_classes=3,
                                                model_dir='gs://{BUCKET_NAME}/models/%s'% model_id)
    classifier.fit(x=train_x,
                   y=train_y,
                   steps=param['steps'],
                   batch_size=50)
    result = classifier.evaluate(x=test_x, y=test_y)

    ret = {'accuracy': float(result['accuracy']),
           'loss': float(result['loss']),
           'model_id': model_id,
           'param': json.dumps(param)}

    return ret
パイプライン実行
結果はBigQueryに入力します。
(p | 'init' >> beam.Create(params)
   | 'train' >> beam.Map(train)
   | 'output' >> beam.Write(beam.io.BigQuerySink('project:dataset.table',
                              schema="accuracy:FLOAT, loss:FLOAT, model_id:STRING, param:STRING",
                              write_disposition=beam.io.BigQueryDisposition.WRITE_APPEND,
                              create_disposition=beam.io.BigQueryDisposition.CREATE_IF_NEEDED))
)

p.run()
Jobの確認
Cloud Consoleから確認できます。num_workers=6の場合、20分1秒で終わりました。num_workers=18に上げてみたところ、10分41秒でした。ほぼ何も処理しないパイプラインでも5分程度かかることから、実質15分->5分と処理時間は並列数にきちんと反比例していますね。

結果をBigQueryで確認
36組み合わせのaccuracy, loss, そのモデルとパラメータをリストで保存しています。これはirisのデータなのでaccuracyがもう1.0に張り付いていますね。

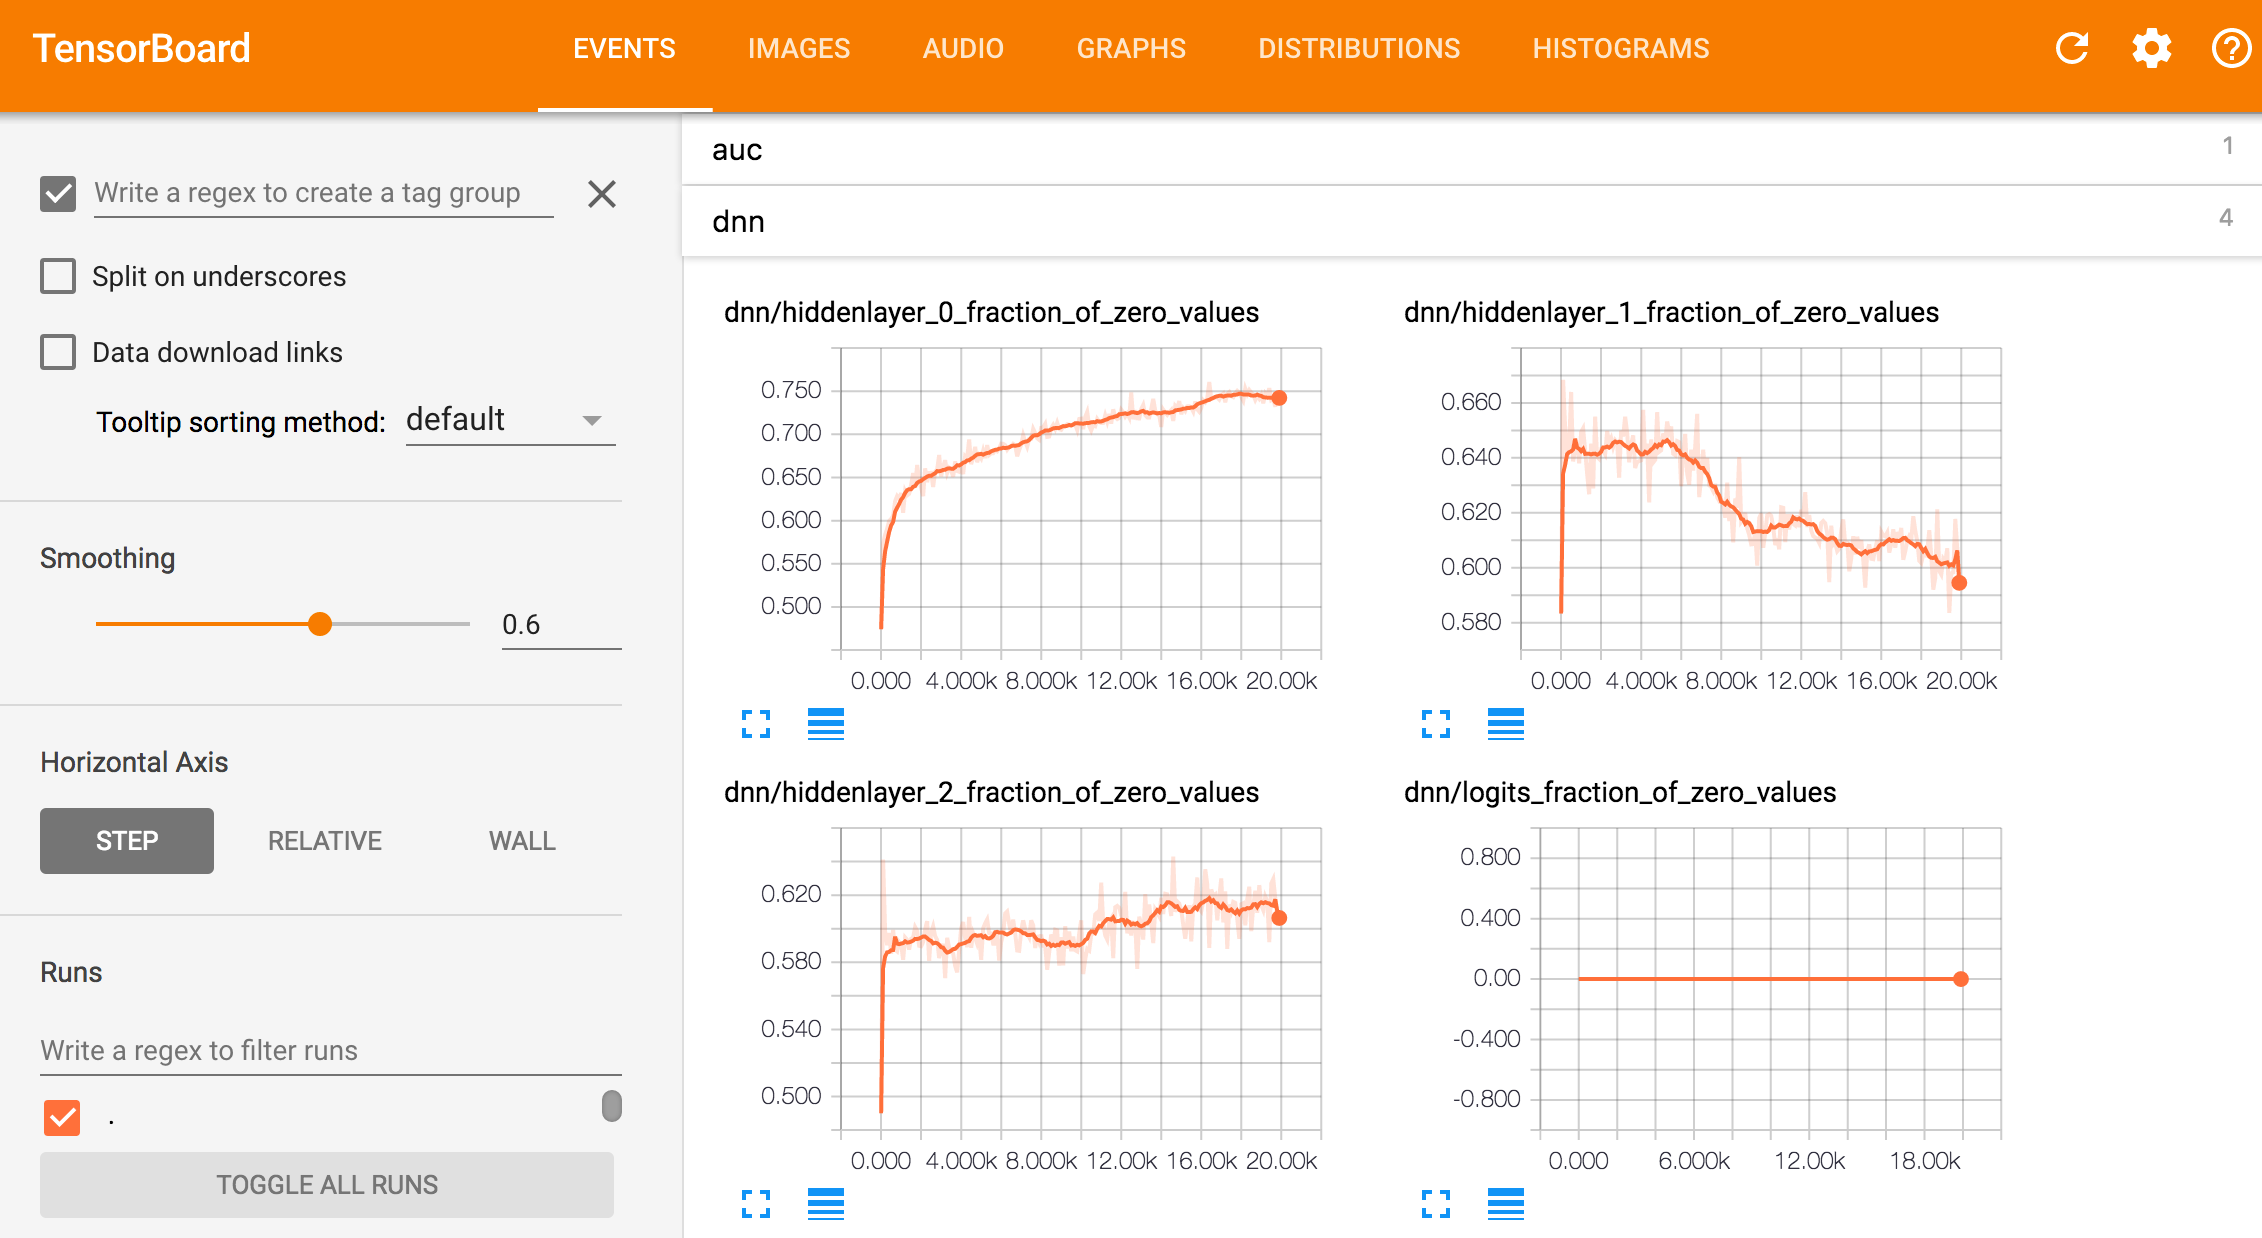
tensorboardで各モデルを確認
Cloud Shellからtensorboardを起動し、GCSに保存されたモデルを読み込むことができます。
tensorboard --logdir=gs://{BUCKET_NAME}/models/{model_id} --port=8080
Pricingについて
DataflowはGCEよりやや割高の料金設定がされています。2017年3月6日現在
しかしDataflowにはGCEにある10分のminimum chargeが無いので、並列で立ち上げて短時間でサクッと終わらせる場合はお得です。(今回のJobは13円位)
n1-standard-1の場合の損益分岐点は7分位です。
| vCPU | Memory(GB) | |
|---|---|---|
| Dataflow | $0.056 | $0.003557 |
| GCE | $0.03492 | $0.00468 |
| *DataflowはBatch, GCEはsustained use discountsを適用しない場合 |
まとめ
駆け足ですがDataflowでTensorFlowのGrid Searchをしてみました。
データセットが膨大だったり、CNNを使う場合はCloud MLを使う方が良いと思いますが、小規模であったり大量にモデルを作る場合など、Dataflowの方が良いケースがたくさんあります。また、同じやり方でscikit-learnのモデルで学習ができるのもいい点ですね。
関連リンク
- [Cloud ML Hyperparameter Tuning] https://cloud.google.com/ml/docs/how-tos/using-hyperparameter-tuning
- [中井先生のDataflow並列Prediction] http://enakai00.hatenablog.com/entry/2016/12/09/104913