☀️ はじめに
遠方に住んでいる祖母の見守りを目的として、Seeed Studio XIAO ESP32C3 を使用したIoT装置を作りました。
遠方に住んでいるため、頻繁に訪問するのは難しく…
なるべく本人には負担をかけずに、いつも通りの生活リズムのままで検知する仕組みができないかと考えた結果、自炊しているため毎日必ず使用する冷蔵庫の開閉をトリガーにするIoT装置を開発することにしました!
冷蔵庫であれば本人にはいつも通り使ってもらうだけで、何か操作を覚えてもらう必要はありません。
💡 Seeed Studio XIAO ESP32C3 を選んだ理由
見守り装置に必要な要件として、以下の点を考慮しました。
-
必要最低限のスペック
センサーを用いた検知と、簡単なAPIリクエストのみのため -
Wi-Fi 対応
インターネット経由でデータを送信するため -
低消費電力
常時稼働させるため、省電力であること -
開発の容易さ
Arduino IDE で開発できること
シリアル変換モジュールなしでデバッグできること
Seeed Studio XIAO ESP32C3 はこれらの要件をすべて満たしており、さらに価格も手頃で一般的に普及している Type-C ケーブルで給電できるため、最適な選択でした。
ESP32C3 は、RISC-V アーキテクチャを採用した低消費電力マイコンです。
秋葉原にある秋月電子で入手した際に在庫がなくこちらにしましたが、購入できる場合は ESP32C6 モデルの方が若干価格が安く、アンテナも内蔵されているのでおすすめです ↓
🚥 システム構成とインフラ
この見守りシステムは、以下のような構成で動作しています。(イラストは Gemini で作成)
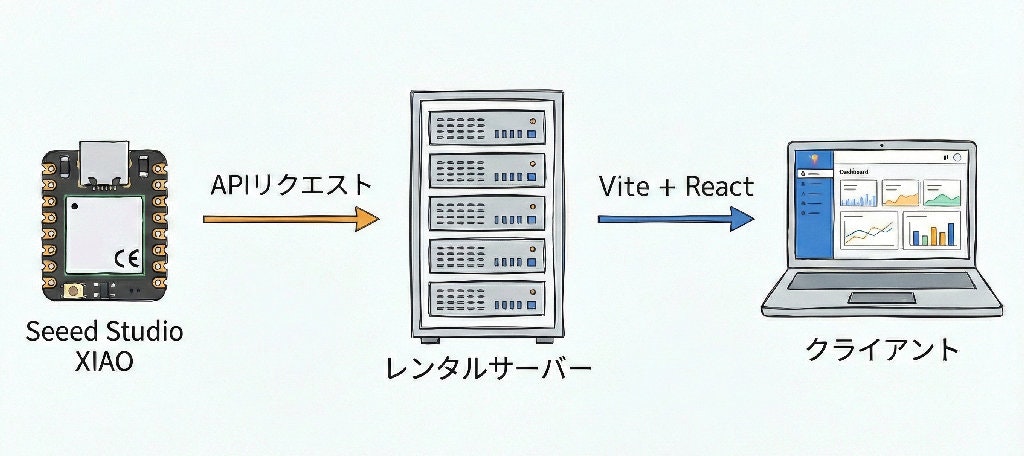
全体構成
-
デバイス
- Seeed Studio XIAO ESP32C3:冷蔵庫に取り付けるIoTデバイス
- リードスイッチ:冷蔵庫の開閉を検知
- Wi-Fi経由でインターネットに接続
-
クラウド
- APIサーバー:デバイスからのHTTPリクエストによってデータを保存・クライアント側からのHTTPリクエストによって保存されたデータを返す
- バッチサーバー:一定時間以上操作されなかった場合に、LINEで通知
- Webサーバー:データを可視化するWebページを提供
-
クライアント
- 最後に扉を開閉した日時をWebページで確認
- 届いたLINE通知で一定時間以上操作されなかった場合を認知
使用した技術スタック
今回は、以下のような構成を採用しました。
-
バックエンド
PythonでAPIサーバーを構築 -
フロントエンド
Vite + React でWebページを実装(CSR。LINE通知が来ないときも確認できるように。) -
ホスティング
個人で契約しているレンタルサーバーを使用
静的ページでの運用のため、GitHub Pages などでも問題ないと思います
🛠️ 各種実装
使用したコードと一緒に解説します。
IoT装置
ソフト側
Arduino IDE でスケッチをボードに書き込みます。
↓ ESP32C3 の公式サイトはこちらです
↓ 書き込む手順とスケッチは、こちらの記事を参考にさせていただきました
実装したコード
#include <WiFi.h>
#include <HTTPClient.h>
#include <time.h>

const char* ssid = "XXXXXX";  // 接続する Wi-Fi のSSID
const char* password = "XXXXXX";  // 接続する Wi-Fi のパスワード

WiFiServer server(80);

// 稼働状況確認用LEDの制御用変数
const int ledPin = D10;
const int sensorPin = D7;
bool ledState = false;

// チャタリング防止用
const int debounceCount = 5;
int stableCount = 0;
int lastReading = HIGH;

bool beforeIsDoorOpen = false;

// Wi-Fi再接続用変数
unsigned long lastWiFiAttempt = 0;
const unsigned long wifiRetryInterval = 60000;  // ミリ秒単位

// Wi-Fi接続とNTP同期を行う関数
bool connectToWiFi() {
  WiFi.begin(ssid, password);
  unsigned long startAttemptTime = millis();
  while (WiFi.status() != WL_CONNECTED && millis() - startAttemptTime < 10000) {
    delay(500);
    Serial.print(".");
  }

  if (WiFi.status() == WL_CONNECTED) {
    Serial.println("");
    Serial.println("WiFi connected.");
    Serial.println("IP address: ");
    Serial.println(WiFi.localIP());

    // NTPでRTCを更新
    configTime(0, 0, "ntp.nict.jp", "pool.ntp.org");
    Serial.println("Syncing time with NTP...");

    struct tm timeinfo;
    if (!getLocalTime(&timeinfo, 10000)) {  // 最大10秒待機
      Serial.println("Failed to obtain time");
    } else {
      Serial.println("Time synchronized:");
      Serial.printf("%04d/%02d/%02d %02d:%02d:%02d\n",
                    timeinfo.tm_year + 1900,
                    timeinfo.tm_mon + 1,
                    timeinfo.tm_mday,
                    timeinfo.tm_hour,
                    timeinfo.tm_min,
                    timeinfo.tm_sec);
    }

    server.begin();
    return true;
  } else {
    Serial.println("\nWiFi connection failed.");
    return false;
  }
}

void setup() {
  Serial.begin(115200);

  // LEDピンを出力に設定
  pinMode(ledPin, OUTPUT);

  digitalWrite(ledPin, HIGH);
  delay(500);
  digitalWrite(ledPin, LOW);
  delay(500);

  pinMode(sensorPin, INPUT_PULLUP);

  // WiFi接続
  if (connectToWiFi()) {
    Serial.println("Running in online mode.");
  } else {
    Serial.println("Running in offline mode.");
  }
}

// Wi-Fi再接続を試行する関数
bool attemptWiFiReconnect() {
  Serial.println("Attempting to reconnect to WiFi...");
  WiFi.disconnect();
  delay(1000);

  if (connectToWiFi()) {
    Serial.println("WiFi reconnected successfully!");
    return true;
  } else {
    Serial.println("WiFi reconnection failed.");
    return false;
  }
}

void loop() {
  // WiFi接続確認
  if (WiFi.status() != WL_CONNECTED) {
    // Wi-Fi接続できない場合 → LED点滅
    digitalWrite(ledPin, HIGH);
    delay(500);
    digitalWrite(ledPin, LOW);
    delay(500);

    // 1分間隔でWi-Fi再接続を試行
    unsigned long currentTime = millis();
    if (currentTime - lastWiFiAttempt >= wifiRetryInterval) {
      lastWiFiAttempt = currentTime;
      attemptWiFiReconnect();
    }

    return;  // 通信処理はスキップ
  }

  //  センサー読み取り(チャタリング防止)
  int reading = digitalRead(sensorPin);
  bool isDoorOpen = beforeIsDoorOpen;
  if (reading == lastReading) {
    stableCount++;
    if (stableCount >= debounceCount) {
      if (reading == LOW) {
        ledState = false;
        isDoorOpen = false;
      } else {
        ledState = true;
        isDoorOpen = true;
      }
    }
  } else {
    stableCount = 0;
  }
  lastReading = reading;

  //  ドア状態の変化検知
  if (beforeIsDoorOpen != isDoorOpen) {
    if (isDoorOpen) {
      Serial.println("Door Open!");
      digitalWrite(ledPin, HIGH);
    } else {
      Serial.println("Door Close!");
      digitalWrite(ledPin, LOW);
    }

    // WebhookにPOST
    time_t now = time(nullptr);  // UNIX時刻(秒)
    unsigned long unixtime = (unsigned long)now;

    if (WiFi.status() == WL_CONNECTED) {
      HTTPClient http;
      String url = "https://<APIのエンドポイント>/set.py?state=" + String(isDoorOpen) + "&datetime=" + String(unixtime);
      Serial.println("Send: " + url);
      http.begin(url);
      int httpResponseCode = http.GET();
      Serial.printf("HTTP Response code: %d\n", httpResponseCode);
      http.end();
    }

    beforeIsDoorOpen = isDoorOpen;
  }

  delay(50);
}
ハード側
書き込みが完了したら、扉の開閉を検知するリードスイッチや稼働状況確認用のLEDを Seeed Studio XIAO に接続していきます。
(使用する部品が少なかったので、今回は直接はんだ付けしました)
すべての部品が接続したら加工したケースに組み込みます!
↓ ケースは小型のこちらを使用しました
ACアダプタやケーブルと接続したら、IoT装置の準備は完了です!
| 部品をすべて接続した様子 | ケースに組み込み | 完成した様子 |
|---|---|---|
 |
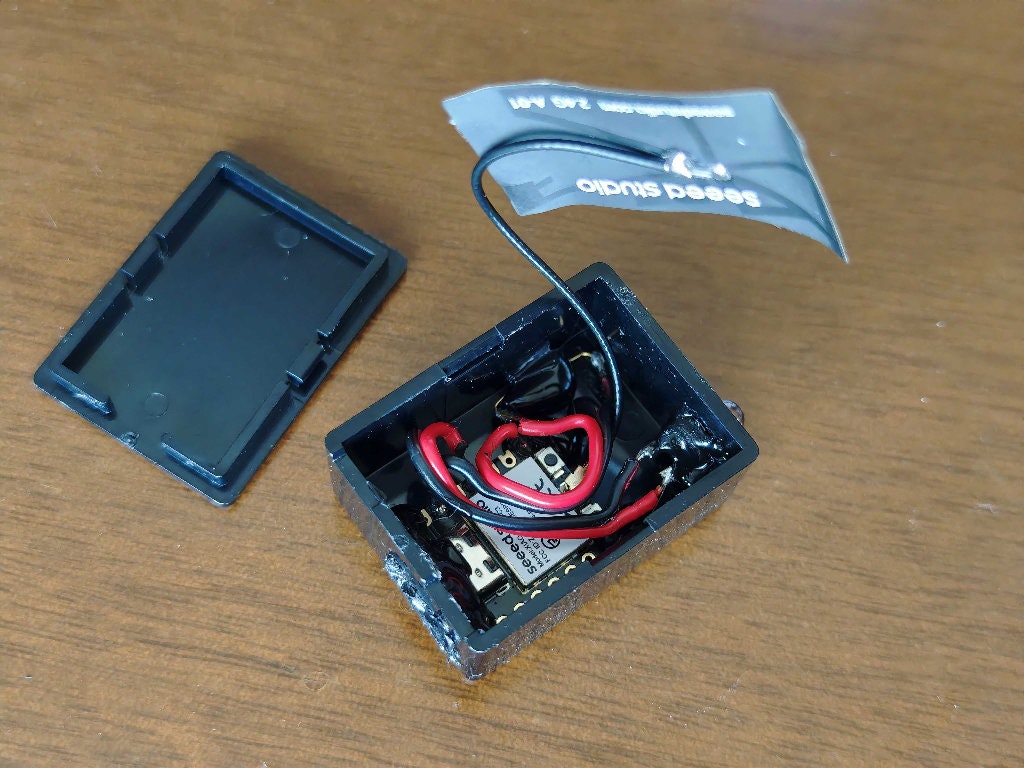 |
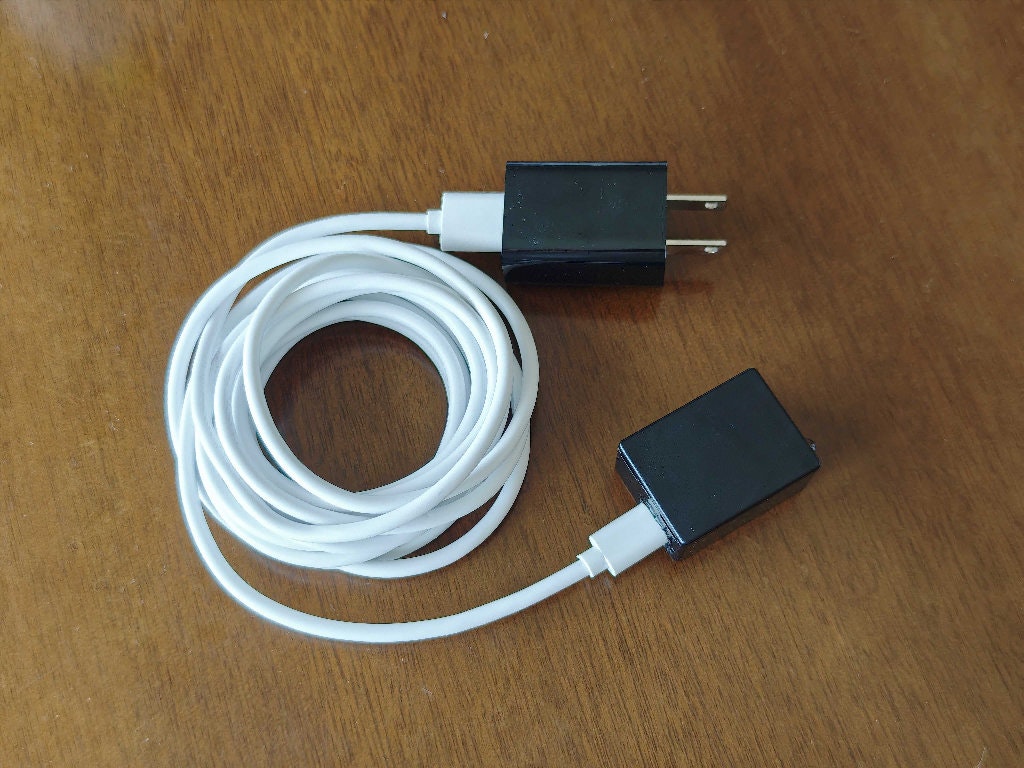 |
バックエンド
API側
CGIで実装しました。
Python 3.11 から非推奨になって現在の最新版では既に提供されていないため、FastAPI など別の手法で作ることをおすすめします。
実装したコード
取得用
# -*- coding: UTF-8 -*-

import sys
import io
import json
import time

sys.stdout = io.TextIOWrapper(sys.stdout.buffer, encoding="utf-8")


def main():
    unixTime = int(time.time())
    try:
        with open("state.csv", "r") as file:
            last_line = file.readlines()[-1]
            state, datetime = last_line.strip().split(",")

        result_json = {
            "is_done": True,
            "response_time": unixTime,
            "result": {
                "state": int(state),
                "datetime": int(datetime),
            },
        }
        result_json = json.dumps(result_json)

        print("Access-Control-Allow-Origin: *")
        print("Access-Control-Allow-Headers: *")
        print("Access-Control-Allow-Methods: PUT, GET, POST, DELETE, OPTIONS")
        print("Content-type: application/json; charset=UTF-8")
        print("")
        print(result_json)
    except Exception as e:
        result_json = {
            "is_done": False,
            "response_time": unixTime,
            "error_message": str(e),
        }
        result_json = json.dumps(result_json)
        print("Access-Control-Allow-Origin: *")
        print("Access-Control-Allow-Headers: *")
        print("Access-Control-Allow-Methods: PUT, GET, POST, DELETE, OPTIONS")
        print("Status: 400 Bad Request")
        print("Content-type: application/json; charset=UTF-8")
        print("")
        print(result_json)
        sys.exit(1)


if __name__ == "__main__":
    main()
設定用
# -*- coding: UTF-8 -*-

import sys
import io
import cgi
import json
import time

sys.stdout = io.TextIOWrapper(sys.stdout.buffer, encoding="utf-8")


def main():
    unixTime = int(time.time())
    try:
        # パラメータ取得
        form = cgi.FieldStorage()

        # パラメータ確認
        if ("state" not in form) or ("datetime" not in form):
            raise Exception("Invalid Parameter")

        state = int(form.getvalue("state", 0))
        datetime = int(form.getvalue("datetime", 0))

        with open("state.csv", "w") as file:
            file.write(f"{state},{datetime}")

        result_json = {
            "is_done": True,
            "response_time": unixTime,
        }
        result_json = json.dumps(result_json)

        print("Access-Control-Allow-Origin: *")
        print("Access-Control-Allow-Headers: *")
        print("Access-Control-Allow-Methods: PUT, GET, POST, DELETE, OPTIONS")
        print("Content-type: application/json; charset=UTF-8")
        print("")
        print(result_json)
    except Exception as e:
        result_json = {
            "is_done": False,
            "response_time": unixTime,
            "error_message": str(e),
        }
        result_json = json.dumps(result_json)
        print("Access-Control-Allow-Origin: *")
        print("Access-Control-Allow-Headers: *")
        print("Access-Control-Allow-Methods: PUT, GET, POST, DELETE, OPTIONS")
        print("Status: 400 Bad Request")
        print("Content-type: application/json; charset=UTF-8")
        print("")
        print(result_json)
        sys.exit(1)


if __name__ == "__main__":
    main()
Bot側
LINE通知には公式が提供している line-bot-sdk ライブラリを使いました。
実際にメッセージを送るには、チャネルアクセストークンと送る先のグループIDが必要になります。
チャンネルアクセストークンの取得については公式ドキュメントをご確認ください。
グループIDについては公式ドキュメントに
Webhookイベントオブジェクトのsourceオブジェクトで確認できます。
とあるように、一度webhookを送ってそのレスポンスから確認する必要があります。
以下の記事が参考になりました。
Webhookは、以下のサービスを使うと簡単にエンドポイントの発行とレスポンスの確認ができるので便利です。
Python で使用するコマンドは以下の通りです。
| コマンド | 内容 |
|---|---|
pip install -r requirements.txt |
必要なライブラリをインストール |
python auto_check.py |
経過時間を確認・必要に応じてLINE通知 |
実装したコード
LINE_CHANNEL_ACCESS_TOKEN=xxxxxx
LINE_GROUP_ID=xxxxxx
requests==2.32.4
python-dotenv==1.1.1
line-bot-sdk==3.18.1
import os
import requests
from datetime import datetime
from dotenv import load_dotenv
from linebot.v3.messaging import (
    Configuration,
    TextMessage,
    PushMessageRequest,
    MessagingApi,
    ApiClient,
)

API_URL = "https://<APIのエンドポイント>/get.py"
LAST_SEND_LOG_FILE = "last_send_datetime.log"


def get_time_difference(current_time, last_operation_time):
    """経過時間を計算して、適切な形式で返す"""
    time_diff = current_time - last_operation_time

    if time_diff.total_seconds() < 60:
        return f"{int(time_diff.total_seconds())}秒前"
    elif time_diff.total_seconds() < 3600:
        return f"{int(time_diff.total_seconds() // 60)}分前"
    else:
        return f"{int(time_diff.total_seconds() // 3600)}時間前"


def get_state_text(state):
    """状態をテキストに変換"""
    return "OPEN" if state == 1 else "CLOSE"


def read_last_send_datetime():
    """最後に通知を送信した時刻を読み込む"""
    try:
        if os.path.exists(LAST_SEND_LOG_FILE):
            with open(LAST_SEND_LOG_FILE, "r") as f:
                content = f.read().strip()
                if content:
                    return float(content)
    except (ValueError, IOError) as e:
        print(f"last_send_datetime.logの読み込みエラー: {e}")
    return None


def write_last_send_datetime():
    """現在時刻をlast_send_datetime.logに保存"""
    try:
        current_timestamp = datetime.now().timestamp()
        with open(LAST_SEND_LOG_FILE, "w") as f:
            f.write(str(current_timestamp))
        print(f"✅️ 通知時刻を{LAST_SEND_LOG_FILE}に保存しました")
    except IOError as e:
        print(f"❌️ {LAST_SEND_LOG_FILE}への書き込みエラー: {e}")


def should_send_notification():
    """通知を送信すべきかどうかを判定"""
    last_send_timestamp = read_last_send_datetime()

    if last_send_timestamp is None:
        # ファイルが存在しない場合は通知を送信
        return True

    # 最後の通知から12時間経過しているかチェック
    current_time = datetime.now()
    last_send_time = datetime.fromtimestamp(last_send_timestamp)
    time_diff_hours = (current_time - last_send_time).total_seconds() / 3600

    return time_diff_hours >= 12


def check_refrigerator_status():
    """冷蔵庫の状態をチェック"""
    try:
        response = requests.get(API_URL, timeout=10)
        response.raise_for_status()
        data = response.json()

        if not data.get("is_done", False):
            print("APIからの応答が正常ではありません")
            return None

        result = data.get("result", {})
        last_datetime = result.get("datetime")
        state = result.get("state")

        if last_datetime is None or state is None:
            print("必要なデータが取得できませんでした")
            return None

        return {"datetime": last_datetime, "state": state}

    except requests.exceptions.RequestException as e:
        print(f"APIリクエストエラー: {e}")
        return None
    except ValueError as e:
        print(f"JSONパースエラー: {e}")
        return None


def main():
    load_dotenv()
    channel_access_token = os.getenv("LINE_CHANNEL_ACCESS_TOKEN")
    group_id = os.getenv("LINE_GROUP_ID")

    if not channel_access_token or not group_id:
        print("環境変数が設定されていません")
        return

    # 冷蔵庫の状態を取得
    status = check_refrigerator_status()
    if not status:
        print("状態の取得に失敗しました")
        return

    # 現在時刻と最終操作時刻を比較
    current_time = datetime.now()
    last_operation_time = datetime.fromtimestamp(status["datetime"])

    # 12時間(43200秒)以上経過しているかチェック
    time_diff_hours = (current_time - last_operation_time).total_seconds() / 3600

    last_operation_time_text = last_operation_time.strftime("%Y/%m/%d %H:%M:%S")

    # 経過時間の表示用テキスト
    time_display = get_time_difference(current_time, last_operation_time)

    print(f"最終操作日時:{last_operation_time_text}({time_display})")

    if time_diff_hours >= 12:
        # 通知を送信すべきかチェック
        if should_send_notification():
            # LINEメッセージを送信
            configuration = Configuration(access_token=channel_access_token)
            api_client = ApiClient(configuration=configuration)
            messaging_api = MessagingApi(api_client)

            # 状態の表示用テキスト
            state_display = get_state_text(status["state"])

            # メッセージの構築
            message = f"""⚠️ 最後に冷蔵庫が操作されてから12時間以上経過しています!

↓ 最終操作日時
{last_operation_time_text}({time_display})

↓ 現在の状態
{state_display}"""

            try:
                messaging_api.push_message(
                    PushMessageRequest(
                        to=group_id,
                        messages=[TextMessage(text=message)],
                    )
                )
                print("✅️ LINEメッセージを送信しました")
                # 通知送信時刻を記録
                write_last_send_datetime()
            except Exception as e:
                print(f"❌️ LINEメッセージの送信に失敗しました: {e}")
        else:
            print("✅️ 前回の通知から12時間経過していないため、通知をスキップします")
    else:
        print(f"✅️ 12時間経過していません")


if __name__ == "__main__":
    main()
あとはこれをcronで自動実行するように設定しておきます。
実行頻度は1時間ごとの H * * * * で設定しました。
フロントエンド
Cursor でぱぱっと作りました。
使用するコマンドは以下の通りです。
| コマンド | 内容 |
|---|---|
npm install |
必要なパッケージをインストール |
npm run dev |
開発用サーバーの起動 |
npm run build |
静的ファイルをビルド |
実装したコード
import { useState, useEffect } from "react";
import "./App.css";

interface ApiResponse {
  is_done: boolean;
  response_time: number;
  result: {
    state: number;
    datetime: number;
  };
}

function App() {
  const [fridgeState, setFridgeState] = useState<number>(0);
  const [lastUpdate, setLastUpdate] = useState<Date>(new Date());
  const [isLoading, setIsLoading] = useState<boolean>(true);

  useEffect(() => {
    const fetchData = async () => {
      try {
        const timestamp = Math.floor(Date.now() / 1000);
        const response = await fetch(
          `https://<APIのエンドポイント>/get.py?dummy=${timestamp}`
        );
        const data: ApiResponse = await response.json();

        if (data.is_done) {
          const newState = data.result.state;
          const newDateTime = new Date(data.result.datetime * 1000);

          // 状態が変化した場合のみ更新
          if (newState !== fridgeState) {
            console.log(`状態が変化しました: ${fridgeState} → ${newState}`);
            setFridgeState(newState);
          }

          // 日時も更新
          setLastUpdate(newDateTime);
        }
      } catch (error) {
        console.error("データの取得に失敗しました:", error);
      } finally {
        setIsLoading(false);
      }
    };

    // 初回実行
    fetchData();

    // 1秒おきに実行
    const interval = setInterval(fetchData, 1000);

    return () => clearInterval(interval);
  }, [fridgeState]);

  // 画面の向き変更時の処理
  useEffect(() => {
    const handleOrientationChange = () => {
      // 画面の向きが変わった時に少し待ってからレイアウトを調整
      setTimeout(() => {
        window.scrollTo(0, 0);
      }, 100);
    };

    window.addEventListener("orientationchange", handleOrientationChange);
    return () =>
      window.removeEventListener("orientationchange", handleOrientationChange);
  }, []);

  const formatDateTime = (date: Date): string => {
    const year = date.getFullYear();
    const month = String(date.getMonth() + 1).padStart(2, "0");
    const day = String(date.getDate()).padStart(2, "0");
    const hours = String(date.getHours()).padStart(2, "0");
    const minutes = String(date.getMinutes()).padStart(2, "0");
    const seconds = String(date.getSeconds()).padStart(2, "0");

    return `${year}/${month}/${day} ${hours}:${minutes}:${seconds}`;
  };

  const getRelativeTime = (date: Date): string => {
    const now = new Date();
    const diffInSeconds = Math.floor((now.getTime() - date.getTime()) / 1000);

    if (diffInSeconds < 60) {
      return `${diffInSeconds}秒前`;
    }
    if (diffInSeconds < 3600) {
      const minutes = Math.floor(diffInSeconds / 60);
      return `${minutes}分前`;
    }
    const hours = Math.floor(diffInSeconds / 3600);
    return `${hours}時間前`;
  };

  const formatDateTimeWithRelative = (date: Date): string => {
    const absoluteTime = formatDateTime(date);
    const relativeTime = getRelativeTime(date);
    return `${absoluteTime}(${relativeTime})`;
  };

  const getStatusMessage = (state: number): string => {
    return state === 0 ? "CLOSE" : "OPEN";
  };

  const getBackgroundColor = (state: number): string => {
    return state === 0 ? "#808080" : "#0066cc";
  };

  if (isLoading) {
    return (
      <div className="app-container" style={{ backgroundColor: "#f0f0f0" }}>
        <div className="loading">読み込み中...</div>
      </div>
    );
  }

  return (
    <div
      className="app-container"
      style={{ backgroundColor: getBackgroundColor(fridgeState) }}
    >
      <div className="status-container">
        <div className="status-message">{getStatusMessage(fridgeState)}</div>
        <div className="last-update">
          最終操作日時: {formatDateTimeWithRelative(lastUpdate)}
        </div>
      </div>
    </div>
  );
}

export default App;
🚗 動作確認
実際に冷蔵庫に取り付けて動作を確認しました。
扉の開閉が正しく検知され、Web画面上でリアルタイムに状態が反映されることを確認しました🙌
| 扉を閉じた状態 | WEB画面 |
|---|---|
 |
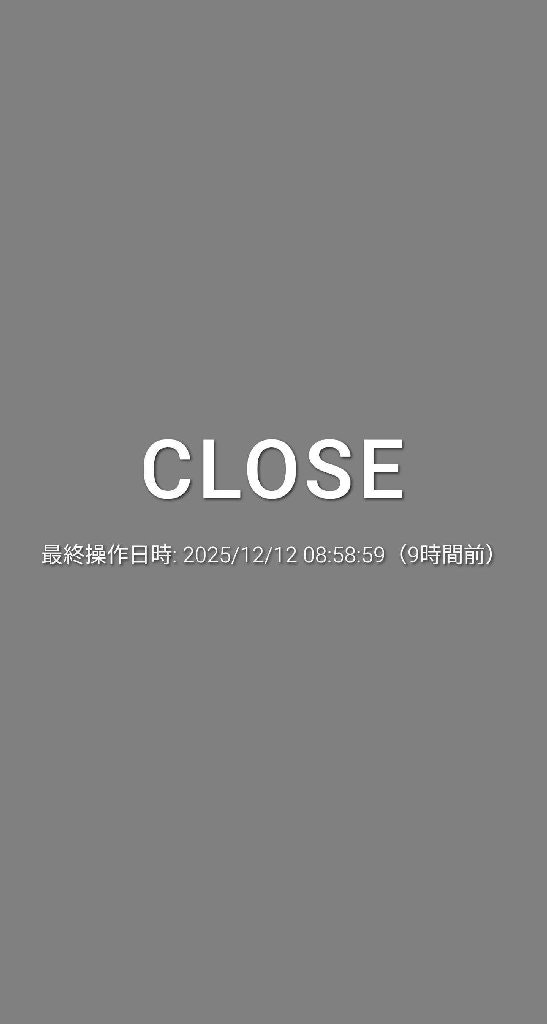 |
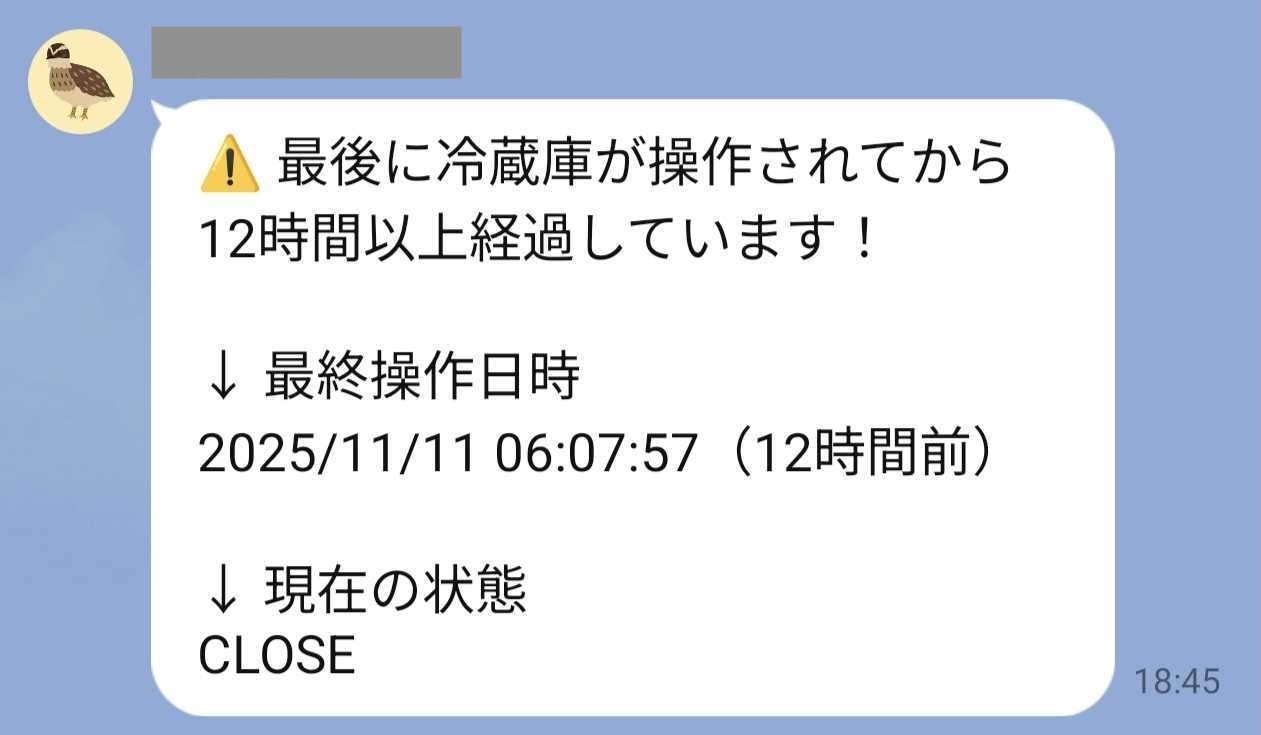
また、12時間ずっと開けずにそのままになっていた日には、しっかりLINEで通知が届きました!
(確認したところ、この日は外出していたので問題ありませんでした👍️)
🚀 まとめ
Seeed Studio XIAO を使用することで、手軽に実用的な見守りシステムを実現することができました。
国内での入手性も良いことから、日本語での解説記事も多かったのが助かりました。
祖母も安心していたので良かったです😊
▼ 新卒エンジニア研修のご紹介
レアゾン・ホールディングスでは、2025年新卒エンジニア研修にて「個のスキル」と「チーム開発力」の両立を重視した育成に取り組んでいます。 実際の研修の様子や、若手エンジニアの成長ストーリーは以下の記事で詳しくご紹介していますので、ぜひご覧ください!
▼ 採用情報
レアゾン・ホールディングスは、「世界一の企業へ」というビジョンを掲げ、「新しい"当たり前"を作り続ける」というミッションを推進しています。 現在、エンジニア採用を積極的に行っておりますので、ご興味をお持ちいただけましたら、ぜひ下記リンクからご応募ください。