はじめに
この資料は、JAWS DAYS 2017 ハンズオン RaspberryPi で 自作Echoを作ろう! 向けに作成したものです。
ハンズオンで質問があった内容について、本記事を修正しています。
ぜひ、ご自宅でもがんばってみてほしいです。
技術要素
2017.04.12 に行われたJAWS-DAYS 2017 の Recupでお話する機会をいただきました。
ハンズオンのテック的なところをまとめました。参考になれば幸いです。
お家で利用するために
参加された方には、会場wifiが設定されたSDカードをお配りしています。
ご自宅で利用するためには、wifi設定の変更が必要です。
- ラズパイにHDMIモニタ、キーボード、マウスを接続して直接ログインします。
- 無線LANのSSID,password を設定します。
以下のコマンドを実行します。
sudo wpa_passphrase YourSSID YourPassword >> /etc/wpa_supplicant/wpa_supplicant.conf
/etc/wpa_supplicant/wpa_supplicant.conf を確認します。
sudo cat /etc/wpa_supplicant/wpa_supplicant.conf
/etc/wpa_supplicant/wpa_supplicant.conf は以下のようになっているはずです。
:
network={
	ssid="jawsdays-handson"
	psk=a3e953830a2e9aee70e67f7290e0a8e5ce75df53e79df8d61d2d91bfee72699b
}

network={
	ssid="YourSSID"
    # psk="yyyyyyyyy"
	psk=xxxxxxxxxxxxxxxxxxxxxxxxxxxxxxxxxxxxxxxxxxx
}
エディタで/etc/wpa_supplicant/wpa_supplicant.confを開き、jaws-days-handsonを削除します。
$ sudo vi /etc/dhcpcd.conf
編集後の/etc/wpa_supplicant/wpa_supplicant.confは以下のようになっているはずです。
:
network={
	ssid="YourSSID"
    # psk="yyyyyyyyy"
	psk=xxxxxxxxxxxxxxxxxxxxxxxxxxxxxxxxxxxxxxxxxxx
}
- /etc/dhcpcd.conf を編集します。
SDカードには固定IPが設定されていますので、これを変更します。
以下のコマンドを実行します。
sudo vi /etc/dhcpcd.conf
以下の部分を変更します。
interface wlan0
static ip_address=192.168.0.101/24 <-- 変更 設定したいIPアドレス
static routers=192.168.0.1 <-- 変更 ご自宅ネットワークのデフォルトゲートウェイ
static domain_name_servers=8.8.8.8 <-- ご自宅ネットワークのネームサーバー
reboot して、設定したIPアドレスにpingが疎通するか確認しましょう。
疎通していれば、ssh接続できます。
SORACOMについて(重要)
お渡ししたSORACOMのSIMをSORACOMのユーザーコンソールで登録された方は、月々の基本料金がかかります。
利用されない場合は、かならずユーザーコンソールから解除をしてください。
概要
RaspberryPi に Alexa のインターフェース部分にあたる Alexa Voice Service を組み込みます。
Alexa Voice Service を 組み込んだあとは、SORACOM ドングルをRaspberryPiに設定し、どこでも alexa に話しかけられる状態にします。

使用する機材
- RaspberryPi3
- 電源(2.5A以上のもの、* RaspberryPi2の場合は2.0A以上のもの)
- microSDカード
- マイク(USB接続のもの)
- スピーカー(3.5mmステレオミニジャック)
- SORACOM Air SIM 及び アダプター
- 3Gドングル
- wifiドングル(RaspberryPi2のみ必要)
- AlexaPi(Pythohで作られた Alexa Voice Serviceクライアント)
ハンズオン手順
- SORACOM ドングルのセットアップ
- developer.amazon.com アカウントとセキュリティプロファイルの作成
- Alexa Client の環境作成
- 4 Alexa と戯れる
1. SORACOM ドングルのセットアップ
sudo apt-get install -y wvdial usb-modeswitch
curl -O http://soracom-files.s3.amazonaws.com/connect_air.sh
chmod +x connect_air.sh
sudo mv connect_air.sh /usr/local/sbin/
sudo reboot
sudo /usr/local/sbin/connect_air.sh
以下エラーが出ることがあります。
Reading package lists... Done
Building dependency tree
Reading state information... Done
usb-modeswitch is already the newest version.
wvdial is already the newest version.
You might want to run 'apt-get -f install' to correct these:
The following packages have unmet dependencies:
 wvdial : Depends: ppp (>= 2.3.0) but it is not going to be installed
E: Unmet dependencies. Try 'apt-get -f install' with no packages (or specify a solution).
そのときは、メッセージの最後にあります以下を実行します。
apt-get -y install
3Gドングルが赤色に点滅しなければ成功です。(ドングルの種類によります)
CTRL+Cをクリックして一旦終了します。
自動起動するようにしましょう。
sudo vi /etc/rc.local
最後の行に以下を追加して保存(exitの前)
/usr/local/sbin/connect_air.sh

sudo reboot
3Gドングルが正しくチカチカしていれば成功です。(ドングルの種類によります)
もし起動していないときは。。。以下のコマンドを実行して、再起動します。
chmod +x /etc/rc.local
参考:
http://qiita.com/j3tm0t0/items/08c199fb8863b69e1139
2. developer.amazon.com アカウントとセキュリティプロファイルの作成
2.1 developer.amazon.comにログイン

*1 AVS Terms and Agreementsの質問にいくつか答える必要があります。
*2 amazon.comのアカウントとパスワードでログインします

2.2 ALEXA を選択

2.3 Alexa Voice Service を選択

2.4 Register a Product Type で Device を選択

2.5 デバイスのメタデータを登録
Device Type Info

Security Profile
Create a new profile を選択し、 Security Profile Name と Security Profile Description を指定します。
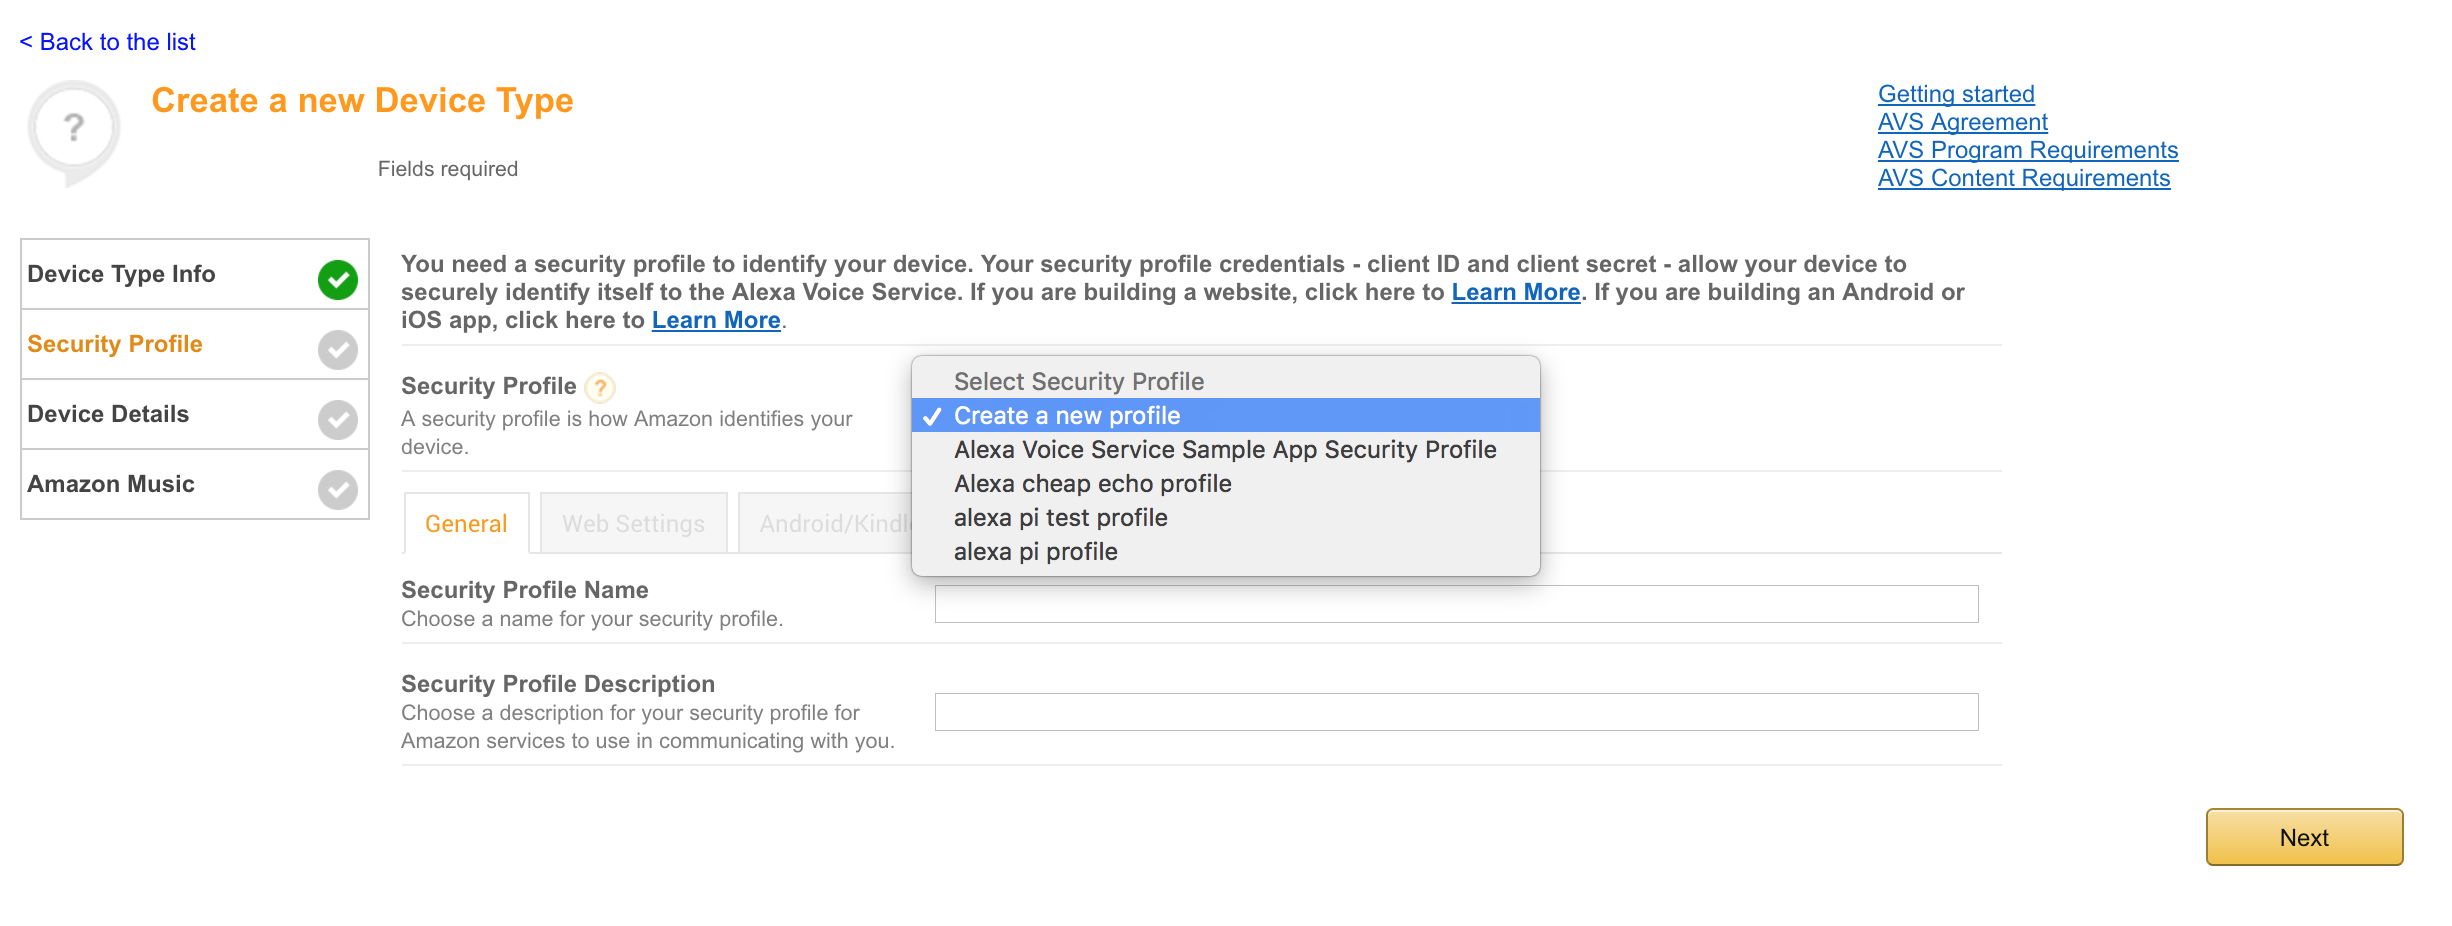

Security Profile ID, Client ID, Client Secret が生成されます。

Security Profile Description, Security Profile ID, Client ID, Client Secret は、後で使います。
Web Setting

XXX は、配布したSIMに振られているIPアドレスを記入します。
Device Details

Image には、142x130 の画像が必要です。
https://placehold.jp/ で作成したものをアップロードするのが簡単です。
Amazon Music

no を選択して、Submitします。
2.6 セキュリティプロファイルの有効化
[Enable Security Profile](Security [https://developer.amazon.com/lwa/sp/overview.html]
)


150x150の画像が必要です。
今回入力するURLは架空のもので構いません。
参考:
https://github.com/alexa/alexa-avs-sample-app/wiki/Create-Security-Profile
3. Alexa Client の環境作成
3.1 git, pyenv, virtualenv
以下のコマンドを順に入力していきます。
git
sudo apt-get install git
git clone https://github.com/yyuu/pyenv.git ~/.pyenv
pyenv, virtual-env
git clone https://github.com/yyuu/pyenv-virtualenv.git ~/.pyenv/plugins/pyenv-virtualenv
以下4行はまるっとコピペして実行します。
echo export PYENV_ROOT=$HOME/.pyenv
export PATH=$PYENV_ROOT/bin:$PATH
eval "$(pyenv init -)"
eval "$(pyenv virtualenv-init -)"' >> ~/.bashrc
exec $SHELL
実行例)
pi@itopi:~ $ git clone https://github.com/yyuu/pyenv.git ~/.pyenv
Cloning into '/home/pi/.pyenv'...
remote: Counting objects: 14511, done.
remote: Compressing objects: 100% (8/8), done.
remote: Total 14511 (delta 0), reused 0 (delta 0), pack-reused 14503
Receiving objects: 100% (14511/14511), 2.58 MiB | 1.05 MiB/s, done.
Resolving deltas: 100% (9970/9970), done.
Checking connectivity... done.
pi@itopi:~ $ git clone https://github.com/yyuu/pyenv-virtualenv.git ~/.pyenv/plugins/pyenv-virtualenv
Cloning into '/home/pi/.pyenv/plugins/pyenv-virtualenv'...
remote: Counting objects: 1865, done.
remote: Total 1865 (delta 0), reused 0 (delta 0), pack-reused 1865
Receiving objects: 100% (1865/1865), 531.61 KiB | 476.00 KiB/s, done.
Resolving deltas: 100% (1277/1277), done.
Checking connectivity... done.
pi@itopi:~ $ echo 'export PYENV_ROOT=$HOME/.pyenv
> export PATH=$PYENV_ROOT/bin:$PATH
> eval "$(pyenv init -)"
> eval "$(pyenv virtualenv-init -)"' >> ~/.bashrc
exec $SHELL
pi@itopi:~ $
3.2 実行環境(python)の構築
コマンドリスト
sudo apt-get install libssl-dev
pyenv install 2.7.13
pyenv virtualenv 2.7.13 alexa
pyenv activate alexa
実行例)
pi@itopi:~ $ sudo apt-get install libssl-dev
パッケージリストを読み込んでいます... 完了
依存関係ツリーを作成しています
状態情報を読み取っています... 完了
以下の追加パッケージがインストールされます:
  libssl-doc
以下のパッケージが新たにインストールされます:
  libssl-dev libssl-doc
アップグレード: 0 個、新規インストール: 2 個、削除: 0 個、保留: 0 個。
2,263 kB のアーカイブを取得する必要があります。
この操作後に追加で 6,480 kB のディスク容量が消費されます。
続行しますか? [Y/n] Y
取得:1 http://mirrordirector.raspbian.org/raspbian/ jessie/main libssl-dev armhf 1.0.1t-1+deb8u6 [1,095 kB]
取得:2 http://mirrordirector.raspbian.org/raspbian/ jessie/main libssl-doc all 1.0.1t-1+deb8u6 [1,168 kB]
2,263 kB を 2秒 で取得しました (1,062 kB/s)
以前に未選択のパッケージ libssl-dev:armhf を選択しています。
(データベースを読み込んでいます ... 現在 112361 個のファイルとディレクトリがインストールされています。)
.../libssl-dev_1.0.1t-1+deb8u6_armhf.deb を展開する準備をしています ...
libssl-dev:armhf (1.0.1t-1+deb8u6) を展開しています...
以前に未選択のパッケージ libssl-doc を選択しています。
.../libssl-doc_1.0.1t-1+deb8u6_all.deb を展開する準備をしています ...
libssl-doc (1.0.1t-1+deb8u6) を展開しています...
man-db (2.7.0.2-5) のトリガを処理しています ...
libssl-dev:armhf (1.0.1t-1+deb8u6) を設定しています ...
libssl-doc (1.0.1t-1+deb8u6) を設定しています ...
pi@itopi:~ $ pyenv install 2.7.13
Downloading Python-2.7.13.tar.xz...
-> https://www.python.org/ftp/python/2.7.13/Python-2.7.13.tar.xz
Installing Python-2.7.13...
WARNING: The Python readline extension was not compiled. Missing the GNU readline lib?
WARNING: The Python bz2 extension was not compiled. Missing the bzip2 lib?
WARNING: The Python sqlite3 extension was not compiled. Missing the SQLite3 lib?
Installed Python-2.7.13 to /home/pi/.pyenv/versions/2.7.13
pi@itopi:~ $ pyenv virtualenv 2.7.13 alexa
Collecting virtualenv
  Downloading virtualenv-15.1.0-py2.py3-none-any.whl (1.8MB)
    100% |████████████████████████████████| 1.8MB 138kB/s
Installing collected packages: virtualenv
Successfully installed virtualenv-15.1.0
New python executable in /home/pi/.pyenv/versions/2.7.13/envs/alexa/bin/python2.7
Also creating executable in /home/pi/.pyenv/versions/2.7.13/envs/alexa/bin/python
Installing setuptools, pip, wheel...done.
Requirement already satisfied: setuptools in /home/pi/.pyenv/versions/2.7.13/envs/alexa/lib/python2.7/site-packages
Requirement already satisfied: pip in /home/pi/.pyenv/versions/2.7.13/envs/alexa/lib/python2.7/site-packages
Requirement already satisfied: six>=1.6.0 in /home/pi/.pyenv/versions/2.7.13/envs/alexa/lib/python2.7/site-packages (from setuptools)
Requirement already satisfied: packaging>=16.8 in /home/pi/.pyenv/versions/2.7.13/envs/alexa/lib/python2.7/site-packages (from setuptools)
Requirement already satisfied: appdirs>=1.4.0 in /home/pi/.pyenv/versions/2.7.13/envs/alexa/lib/python2.7/site-packages (from setuptools)
Requirement already satisfied: pyparsing in /home/pi/.pyenv/versions/2.7.13/envs/alexa/lib/python2.7/site-packages (from packaging>=16.8->setuptools)
pi@itopi:~ $ pyenv activate alexa
pyenv-virtualenv: prompt changing will be removed from future release. configure `export PYENV_VIRTUALENV_DISABLE_PROMPT=1' to simulate the behavior.
(alexa) pi@itopi:~ $
3.3 Alexa Pi
AlexaPi
コマンドリスト
git clone -b jaws-days-2017 https://github.com/jaws-ug-kobe/AlexaPi.git
cd AlexaPi
sudo ./setup.sh
対話式になっています。前の手順で作成したDevice Type ID, Security Profile Name, Security Profile Description, Client ID, Client Secret を入力します。
その後、Webサーバーが起動します。
(実行例を参照してください。)
SIMのIPアドレス:5000にアクセスします。

成功するとトークンが取得できます。

実行中のsetup.shは実行画面で止まっています。CTRL+Cで終了してください。
setup.sh を実行すると、~/AlexaPi/creds.py というファイルが作成されます。
何回もsetup.shを実行していると、このファイルに認証情報が追記されます。setup.shをもう一度実行する場合は、creds.pyがあれば、削除してから、再実行してください。
実行例)
pi@itopi:~ $ git clone -b jaws-days-2017 https://github.com/jaws-ug-kobe/AlexaPi.git
Cloning into 'AlexaPi'...
remote: Counting objects: 860, done.
remote: Compressing objects: 100% (19/19), done.
remote: Total 860 (delta 4), reused 0 (delta 0), pack-reused 841
Receiving objects: 100% (860/860), 3.42 MiB | 1.30 MiB/s, done.
Resolving deltas: 100% (531/531), done.
Checking connectivity... done.
pi@itopi:~ $ cd AlexaPi
pi@itopi:~/AlexaPi $ sudo ./setup.sh
取得:1 http://mirrordirector.raspbian.org jessie InRelease [14.9 kB]
取得:2 http://archive.raspberrypi.org jessie InRelease [22.9 kB]
取得:3 http://mirrordirector.raspbian.org jessie/main armhf Packages [8,980 kB]
取得:4 http://archive.raspberrypi.org jessie/main armhf Packages [147 kB]
ヒット http://archive.raspberrypi.org jessie/ui armhf Packages
無視 http://archive.raspberrypi.org jessie/main Translation-ja_JP
:
:
    warning: no files found matching 'MakeFile'
    warning: no previously-included files matching '*.pyc' found anywhere in distribution
    warning: no previously-included files matching '.gitignore' found anywhere in distribution
    warning: no previously-included files matching '.DS_Store' found anywhere in distribution
Successfully installed Wave python-memcached CherryPy hyper cheroot portend h2 hyperframe tempora hpack enum34 pytz
Cleaning up...
Enter your ProductID:
jaws_days_alexa
Enter your Security Profile Description:
jaws-days-2017-alexa
Enter your Security Profile ID:
amzn1.application.XXXXXXXXXXXXXXXXXXXXXXXXXXXXX
Enter your Security Client ID:
amzn1.application-oa2-client.XXXXXXXXXXXXXXXXXXXXXXXXXXX
Enter your Security Client Secret:
XXXXXXXXXXXXXXXXXXXXXXXXXXXXXXXXXXXXXXXXXXXXXXXXXXXXXXX
Open http://:5000
[06/Mar/2017:01:13:39] ENGINE Listening for SIGHUP.
[06/Mar/2017:01:13:39] ENGINE Listening for SIGTERM.
[06/Mar/2017:01:13:39] ENGINE Listening for SIGUSR1.
[06/Mar/2017:01:13:39] ENGINE Bus STARTING
CherryPy Checker:
The Application mounted at '' has an empty config.

[06/Mar/2017:01:13:39] ENGINE Started monitor thread 'Autoreloader'.
[06/Mar/2017:01:13:39] ENGINE Started monitor thread '_TimeoutMonitor'.
[06/Mar/2017:01:13:39] ENGINE Serving on http://0.0.0.0:5000
[06/Mar/2017:01:13:39] ENGINE Bus STARTED

<<< 以降は、AWSの認証が通った後で出力されます。>>>

192.168.0.27 - - [06/Mar/2017:01:19:32] "GET / HTTP/1.1" 303 776 "" "Mozilla/5.0 (Macintosh; Intel Mac OS X 10_12_3) AppleWebKit/537.36 (KHTML, like Gecko) Chrome/56.0.2924.87 Safari/537.36"
192.168.0.27 - - [06/Mar/2017:01:21:27] "GET / HTTP/1.1" 303 776 "" "Mozilla/5.0 (Macintosh; Intel Mac OS X 10_12_3) AppleWebKit/537.36 (KHTML, like Gecko) Chrome/56.0.2924.87 Safari/537.36"
192.168.0.27 - - [06/Mar/2017:01:22:31] "GET / HTTP/1.1" 303 776 "" "Mozilla/5.0 (Macintosh; Intel Mac OS X 10_12_3) AppleWebKit/537.36 (KHTML, like Gecko) Chrome/56.0.2924.87 Safari/537.36"
192.168.0.27 - - [06/Mar/2017:01:23:38] "GET / HTTP/1.1" 303 776 "" "Mozilla/5.0 (Macintosh; Intel Mac OS X 10_12_3) AppleWebKit/537.36 (KHTML, like Gecko) Chrome/56.0.2924.87 Safari/537.36"
192.168.0.27 - - [06/Mar/2017:01:23:59] "GET /code?code=ANbwxgWLdezBprNPdPfa&scope=alexa%3Aall HTTP/1.1" 200 656 "" "Mozilla/5.0 (Macintosh; Intel Mac OS X 10_12_3) AppleWebKit/537.36 (KHTML, like Gecko) Chrome/56.0.2924.87 Safari/537.36"
192.168.0.27 - - [06/Mar/2017:01:23:59] "GET /favicon.ico HTTP/1.1" 200 1406 "http://192.168.0.17:5000/code?code=ANbwxgWLdezBprNPdPfa&scope=alexa%3Aall" "Mozilla/5.0 (Macintosh; Intel Mac OS X 10_12_3) AppleWebKit/537.36 (KHTML, like Gecko) Chrome/56.0.2924.87 Safari/537.36"
[06/Mar/2017:01:23:59] ENGINE Restarting because /home/pi/AlexaPi/creds.py changed.
[06/Mar/2017:01:23:59] ENGINE Stopped thread 'Autoreloader'.
[06/Mar/2017:01:23:59] ENGINE Bus STOPPING
[06/Mar/2017:01:24:04] ENGINE HTTP Server cherrypy._cpwsgi_server.CPWSGIServer(('0.0.0.0', 5000)) shut down
[06/Mar/2017:01:24:04] ENGINE Stopped thread '_TimeoutMonitor'.
[06/Mar/2017:01:24:04] ENGINE Bus STOPPED
[06/Mar/2017:01:24:04] ENGINE Bus EXITING
[06/Mar/2017:01:24:04] ENGINE Bus EXITED
[06/Mar/2017:01:24:04] ENGINE Waiting for child threads to terminate...
[06/Mar/2017:01:24:04] ENGINE Re-spawning python ./auth_web.py
[06/Mar/2017:01:24:06] ENGINE Listening for SIGHUP.
[06/Mar/2017:01:24:06] ENGINE Listening for SIGTERM.
[06/Mar/2017:01:24:06] ENGINE Listening for SIGUSR1.
[06/Mar/2017:01:24:06] ENGINE Bus STARTING
CherryPy Checker:
The Application mounted at '' has an empty config.

[06/Mar/2017:01:24:06] ENGINE Started monitor thread 'Autoreloader'.
[06/Mar/2017:01:24:06] ENGINE Started monitor thread '_TimeoutMonitor'.
[06/Mar/2017:01:24:06] ENGINE Serving on http://0.0.0.0:5000
[06/Mar/2017:01:24:06] ENGINE Bus STARTED
^C[06/Mar/2017:01:26:51] ENGINE Keyboard Interrupt: shutting down bus
[06/Mar/2017:01:26:51] ENGINE Bus STOPPING
[06/Mar/2017:01:26:51] ENGINE HTTP Server cherrypy._cpwsgi_server.CPWSGIServer(('0.0.0.0', 5000)) shut down
[06/Mar/2017:01:26:51] ENGINE Stopped thread '_TimeoutMonitor'.
[06/Mar/2017:01:26:51] ENGINE Stopped thread 'Autoreloader'.
[06/Mar/2017:01:26:51] ENGINE Bus STOPPED
[06/Mar/2017:01:26:51] ENGINE Bus EXITING
[06/Mar/2017:01:26:51] ENGINE Bus EXITED
[06/Mar/2017:01:26:51] ENGINE Waiting for child threads to terminate...
You can now reboot
rebootします。
sudo reboot
sudo apt-get install swig3.0 python-pyaudio python3-pyaudio sox
sudo apt-get install portaudio19-dev
pip install pyaudio
sudo apt-get install libatlas-base-dev
pip install RPi.GPIO
~/.asoundrc の変更
再生デバイスと録音デバイスを変更します。
(alexa) pi@itopi:~ $ aplay -l
**** ハードウェアデバイス PLAYBACK のリスト ****
カード 0: ALSA [bcm2835 ALSA], デバイス 0: bcm2835 ALSA [bcm2835 ALSA]
  サブデバイス: 8/8
  サブデバイス #0: subdevice #0
  サブデバイス #1: subdevice #1
  サブデバイス #2: subdevice #2
  サブデバイス #3: subdevice #3
  サブデバイス #4: subdevice #4
  サブデバイス #5: subdevice #5
  サブデバイス #6: subdevice #6
  サブデバイス #7: subdevice #7
カード 0: ALSA [bcm2835 ALSA], デバイス 1: bcm2835 ALSA [bcm2835 IEC958/HDMI]
  サブデバイス: 1/1
  サブデバイス #0: subdevice #0
カード 1: Device [USB PnP Sound Device], デバイス 0: USB Audio [USB Audio]
  サブデバイス: 1/1
  サブデバイス #0: subdevice #0
(alexa) pi@itopi:~ $ arecord -l
**** ハードウェアデバイス CAPTURE のリスト ****
カード 1: Device [USB PnP Sound Device], デバイス 0: USB Audio [USB Audio]
  サブデバイス: 1/1
  サブデバイス #0: subdevice #0
(alexa) pi@itopi:~ $
~/.asoundrc
pcm.!default{
  type asym
  playback.pcm{
    type plug
    slave.pcm "hw:0,0"
  }
  capture.pcm{
    type plug
    slave.pcm "hw:1,0"
  }
}
参考:
http://qiita.com/haruharuharuby/items/c1b7e023cb9ec209ccd9
4 Alexa と戯れる
実行
cd AlexaPi
python wakeword_detection.py
言ってみましょう。
「alexa, what time is it now?」
alexa というワードを検知できたら、beep音がなります。
その後に、話しかけてください。
実行例)
(alexa) pi@itopi:~/AlexaPi $ python wakeword_detection.py
ALSA lib confmisc.c:1286:(snd_func_refer) Unable to find definition 'cards.bcm2835.pcm.front.0:CARD=0'
ALSA lib conf.c:4259:(_snd_config_evaluate) function snd_func_refer returned error: No such file or directory
ALSA lib conf.c:4738:(snd_config_expand) Evaluate error: No such file or directory
ALSA lib pcm.c:2239:(snd_pcm_open_noupdate) Unknown PCM front
ALSA lib pcm.c:2239:(snd_pcm_open_noupdate) Unknown PCM cards.pcm.rear
ALSA lib pcm.c:2239:(snd_pcm_open_noupdate) Unknown PCM cards.pcm.center_lfe
ALSA lib pcm.c:2239:(snd_pcm_open_noupdate) Unknown PCM cards.pcm.side
ALSA lib confmisc.c:1286:(snd_func_refer) Unable to find definition 'cards.bcm2835.pcm.surround51.0:CARD=0'
ALSA lib conf.c:4259:(_snd_config_evaluate) function snd_func_refer returned error: No such file or directory
ALSA lib conf.c:4738:(snd_config_expand) Evaluate error: No such file or directory
ALSA lib pcm.c:2239:(snd_pcm_open_noupdate) Unknown PCM surround21
ALSA lib confmisc.c:1286:(snd_func_refer) Unable to find definition 'cards.bcm2835.pcm.surround40.0:CARD=0'
ALSA lib conf.c:4259:(_snd_config_evaluate) function snd_func_refer returned error: No such file or directory
ALSA lib conf.c:4738:(snd_config_expand) Evaluate error: No such file or directory
ALSA lib pcm.c:2239:(snd_pcm_open_noupdate) Unknown PCM surround40
ALSA lib confmisc.c:1286:(snd_func_refer) Unable to find definition 'cards.bcm2835.pcm.surround51.0:CARD=0'
ALSA lib conf.c:4259:(_snd_config_evaluate) function snd_func_refer returned error: No such file or directory
ALSA lib conf.c:4738:(snd_config_expand) Evaluate error: No such file or directory
ALSA lib pcm.c:2239:(snd_pcm_open_noupdate) Unknown PCM surround41
ALSA lib confmisc.c:1286:(snd_func_refer) Unable to find definition 'cards.bcm2835.pcm.surround51.0:CARD=0'
ALSA lib conf.c:4259:(_snd_config_evaluate) function snd_func_refer returned error: No such file or directory
ALSA lib conf.c:4738:(snd_config_expand) Evaluate error: No such file or directory
ALSA lib pcm.c:2239:(snd_pcm_open_noupdate) Unknown PCM surround50
ALSA lib confmisc.c:1286:(snd_func_refer) Unable to find definition 'cards.bcm2835.pcm.surround51.0:CARD=0'
ALSA lib conf.c:4259:(_snd_config_evaluate) function snd_func_refer returned error: No such file or directory
ALSA lib conf.c:4738:(snd_config_expand) Evaluate error: No such file or directory
ALSA lib pcm.c:2239:(snd_pcm_open_noupdate) Unknown PCM surround51
ALSA lib confmisc.c:1286:(snd_func_refer) Unable to find definition 'cards.bcm2835.pcm.surround71.0:CARD=0'
ALSA lib conf.c:4259:(_snd_config_evaluate) function snd_func_refer returned error: No such file or directory
ALSA lib conf.c:4738:(snd_config_expand) Evaluate error: No such file or directory
ALSA lib pcm.c:2239:(snd_pcm_open_noupdate) Unknown PCM surround71
ALSA lib confmisc.c:1286:(snd_func_refer) Unable to find definition 'cards.bcm2835.pcm.iec958.0:CARD=0,AES0=4,AES1=130,AES2=0,AES3=2'
ALSA lib conf.c:4259:(_snd_config_evaluate) function snd_func_refer returned error: No such file or directory
ALSA lib conf.c:4738:(snd_config_expand) Evaluate error: No such file or directory
ALSA lib pcm.c:2239:(snd_pcm_open_noupdate) Unknown PCM iec958
ALSA lib confmisc.c:1286:(snd_func_refer) Unable to find definition 'cards.bcm2835.pcm.iec958.0:CARD=0,AES0=4,AES1=130,AES2=0,AES3=2'
ALSA lib conf.c:4259:(_snd_config_evaluate) function snd_func_refer returned error: No such file or directory
ALSA lib conf.c:4738:(snd_config_expand) Evaluate error: No such file or directory
ALSA lib pcm.c:2239:(snd_pcm_open_noupdate) Unknown PCM spdif
ALSA lib pcm.c:2239:(snd_pcm_open_noupdate) Unknown PCM cards.pcm.hdmi
ALSA lib pcm.c:2239:(snd_pcm_open_noupdate) Unknown PCM cards.pcm.hdmi
ALSA lib pcm.c:2239:(snd_pcm_open_noupdate) Unknown PCM cards.pcm.modem
ALSA lib pcm.c:2239:(snd_pcm_open_noupdate) Unknown PCM cards.pcm.modem
ALSA lib pcm.c:2239:(snd_pcm_open_noupdate) Unknown PCM cards.pcm.phoneline
ALSA lib pcm.c:2239:(snd_pcm_open_noupdate) Unknown PCM cards.pcm.phoneline
ALSA lib pulse.c:243:(pulse_connect) PulseAudio: Unable to connect: Connection refused

ALSA lib pulse.c:243:(pulse_connect) PulseAudio: Unable to connect: Connection refused

connect(2) call to /tmp/jack-1000/default/jack_0 failed (err=No such file or directory)
attempt to connect to server failed
[STATE:AVS] init Connection created.
multipart/related; boundary=------abcde123; type=application/json
------abcde123
[STATE:AVS] init downstream established. bounday=------abcde123
[STATE:AVS] init downstream polling start
[STATE:AVS] init synchronize to AVS succeeded.
['start']
[STATE:WAKE] detected alexa
[STATE:DEVICE_STATE] device status (2)
[STATE:DEVICE] recording started 3  seconds
[STATE:DEVICE] recording end
[STATE:AVS] customer voice arrival
[STATE:AVS] detected audio arrival
5
[STATE:AVS] recognize audio response present
multipart/related;boundary=c3d16bc3-40e9-44d4-90c7-5df56d8fcbc7;start=metadata.1488735023223;type="application/json"
c3d16bc3-40e9-44d4-90c7-5df56d8fcbc7
[STATE:AVS] directive
{u'directive': {u'header': {u'dialogRequestId': u'1', u'namespace': u'SpeechSynthesizer', u'name': u'Speak', u'messageId': u'88860faf-1fb0-460b-8b16-d2d48cb0b349'}, u'payload': {u'url': u'cid:DeviceTTSRenderer_d4aeda13-a963-47cd-b347-330bca95a1c9_86412852', u'token': u'amzn1.as-ct.v1.Domain:Application:Notifications#ACRI#DeviceTTSRenderer_d4aeda13-a963-47cd-b347-330bca95a1c9', u'format': u'AUDIO_MPEG'}}}
[STATE:AVS] directive

[STATE:AVS] expect speech False
うまく動かないとき
まずは、スピーカーとマイクが正しく機能していることを確認しましょう。
マイクの確認
以下のコマンドを実行します。
rec hoge.wav
録音のプロンプトが開きます。マイクに向かって話してください。
インジケーターが反応すれば、マイクは音を拾えています。
反応しない場合は、手順「3. Alexa Client の環境作成」からやり直します。
(ハンズオンでは、python 環境構築のシェルコマンドが一部間違っており、環境が正しくできていない可能性があります。)
スピーカーの確認
以下のコマンドを実行します。(上で録音した音を再生してみます)
aplay hoge.wav
音が再生されれば、スピーカーは機能しています。
ボリュームコントロール
スピーカーから出る音が小さい場合は、以下のコマンドでボリュームを上げます。
alsamixer
インジケーターが表示されるので、↑↓キーでボリュームを調整します。
画面を抜けるにはESCキーを押します。
[Extra] SORACOMで通信してAlexaと戯れる。
$ sudo route del default dev wlan0
$ sudo route add default dev ppp0
別のターミナルでログインして。。。
cd AlexaPi
sudo ./run.sh
Alexaと戯れることができれば成功です。
おつかれさまでした。