前回Lambda+APIGateway+Cloudfront+S3で画像圧縮APIを作ったのですが、横向きの画像がそのままという問題が残りました。
(前回)【3時間でできる?】AWSでS3+Lambda+API Gateway+CloudFrontのCDN構築2018
Lambda以外の設定はこちらを参照してください。以下の説明はLambdaだけの話になります。
https://qiita.com/hardreggaecafe/items/b1947b5f90ee2dc3d516
Exifという画像の属性情報が正しく認識されないのが原因なのですが、Lambdaで元から使えるImageMagickもこれを補正するAutoOrient機能まではついてなくてどうしたものかと思っておりました。
で、nodeにはSharpというC++で作られたネイティブモジュールが存在するらしくこれを使ったら自動で画像の向きを補正してくれるだけでなくて、圧縮スピードも4〜5倍ImageMagickより早いらしいとか。
(Sharpのサイトに記載あり)
ここでもゴールは
https://xxx.cloudfront.net/somefile.jpeg?w=600
のようなURLからimagemagickよりも高速で、画像の向きも正しいものが作られるAPIを作ることになります。
Sharp
nodeのバージョン管理ツールnodebrewでローカルを6.10に設定
[Mac, Homebrew] Node.jsのバージョン管理ツール、nodebrew導入手順
https://qiita.com/mii-chan/items/f3291ae8bbbf788c8aa3
$nodebrew ls-remote # インストール可能なモジュールの一覧を確認
$nodebrew install-binary v6.10.1 # バイナリのインストール
Dockerの設定
Lambdaをローカル環境で開発するにはDockerを使う必要があるようです。
が以下の様なことをやるだけならDockerわざわざ入れないでもOKかも。
念のため
https://www.docker.com/
からDockerをインストールして、今回の開発用にディレクトリを作成してその中で作業してください。
(FYI)世の中にあるLambdaのローカル開発環境
AWS-SAM
https://aws.amazon.com/jp/blogs/news/new-aws-sam-local-beta-build-and-test-serverless-applications-locally/
LocalStack
https://dev.classmethod.jp/cloud/aws/localstack-lambda/
ということで作業ディレクトリに以下の2つのファイル(Dockerfile, package.json)を用意してください。
Dockerfile
FROM amazonlinux:latest
MAINTAINER Noriaki Takamizawa

RUN ["/bin/bash", "-c", "curl -s https://rpm.nodesource.com/setup_6.x | bash -"]
RUN ["/bin/bash", "-c", "yum install -y gcc-c++ nodejs"]
Package.json
{
  "name": "resize_by_sharp",
  "version": "1.0.0",
  "description": "",
  "main": "index.js",
  "scripts": {
    "test": "echo \"Error: no test specified\" && exit 1"
  },
  "author": "",
  "license": "ISC",
  "dependencies": {
    "sharp": "^0.20.1"
  }
}
モジュールをビルド
上記を用意したらsharpをnode6.10バージョンでビルドします。
docker run -v "$PWD":/var/task lambci/lambda:build-nodejs6.10 npm install
うまくいくと作業ディレクトリの下に node_module が出来てsharp以外のライブラリもまとめてインストールされているはず。
$ ls node_modules/
ansi-regex		color-string		fs-copy-file-sync	isarray			npmlog			readable-stream		string-width		which-pm-runs
aproba			console-control-strings	fs-minipass		mimic-response		number-is-nan		safe-buffer		string_decoder		wide-align
are-we-there-yet	core-util-is		gauge			minimist		object-assign		semver			strip-ansi		wrappy
bl			decompress-response	github-from-package	minipass		once			set-blocking		strip-json-comments	xtend
chownr			deep-extend		has-unicode		minizlib		os-homedir		sharp			tar			yallist
code-point-at		delegates		inherits		mkdirp			prebuild-install	signal-exit		tar-fs
color			detect-libc		ini			nan			process-nextick-args	simple-concat		tar-stream
color-convert		end-of-stream		is-arrayish		node-abi		pump			simple-get		tunnel-agent
color-name		expand-template		is-fullwidth-code-point	noop-logger		rc			simple-swizzle		util-deprecate
Sharp導入後の画像圧縮のサンプルNode.jsプログラム
Sharpが入ったらindex.jsを以下のように書き換えます。
細かい箇所は適宜書き換えてください。
'use strict';

const aws = require('aws-sdk');
const sharp = require('sharp');

const s3 = new aws.S3({ apiVersion: '2006-03-01' });


exports.handler = (event, context, callback) => {
    //console.log('Received event:', JSON.stringify(event, null, 2));

    // Get the object from the event and show its content type
    const filename = event.path.replace(/^\//, "");
    const bucket = 'some-bucket';
    const width = event.queryStringParameters.w;
    console.log("file="+filename+" bucket="+bucket);
    const params = {
        Bucket: bucket,
        Key: 'images/' +filename.split('-')[1]+'/'+filename.split('-')[2],
    };
    s3.getObject(params, (err, data) => {
        if (err) {
            console.log(err);
            var message = "Error getting object " + filename + " from bucket " + bucket +
                ". Make sure they exist and your bucket is in the same region as this function.";
            console.log(message);
            context.fail(message);
        } else {
            var contentType = data.ContentType;
            var extension = contentType.split('/').pop();

            sharp(data.Body)
                        .rotate()
                        .resize(parseInt(width, 10))
                        .withMetadata()
                        .toBuffer(function(err, stdout, stderr) {
                if(err) {
                    context.fail(err);
                    return;
                }
                var contentType;
                if ( filename.endsWith('jpg') || filename.endsWith('jpeg') ){
                  contentType = "image/jpeg";
                } else if ( filename.endsWith('png') ){
                  contentType = "image/png";
                } else if ( filename.endsWith('gif')) {
                  contentType = "image/gif";
                }
                callback(null, {
                    "isBase64Encoded": true,
                    "statusCode": 200,
                    "headers": { "Content-Type": contentType },
                    "body": new Buffer(stdout, 'binary').toString('base64')
                });
            });
        }
    });
};
(重要なお知らせ)面倒な方にはこちら!全部入っています
上記のようなDockerやらC++でビルドとかしなくてもこれだけでOKなパッケージを作成しました。
https://github.com/hardreggaecafe/resizeimage_sharp
使い方
-
git cloneでローカルに落としてくる cd resizeimage_sharp- index.js を自分の環境に合わせてカスタマイズ
-
zip -r sharp.zip index.js node_modulesでアーカイブ - AWSのS3に4.で作成したzipファイルをアップロード
- AWS Lambdaでfunctionを作成
- functionにzipファイルをアップロード
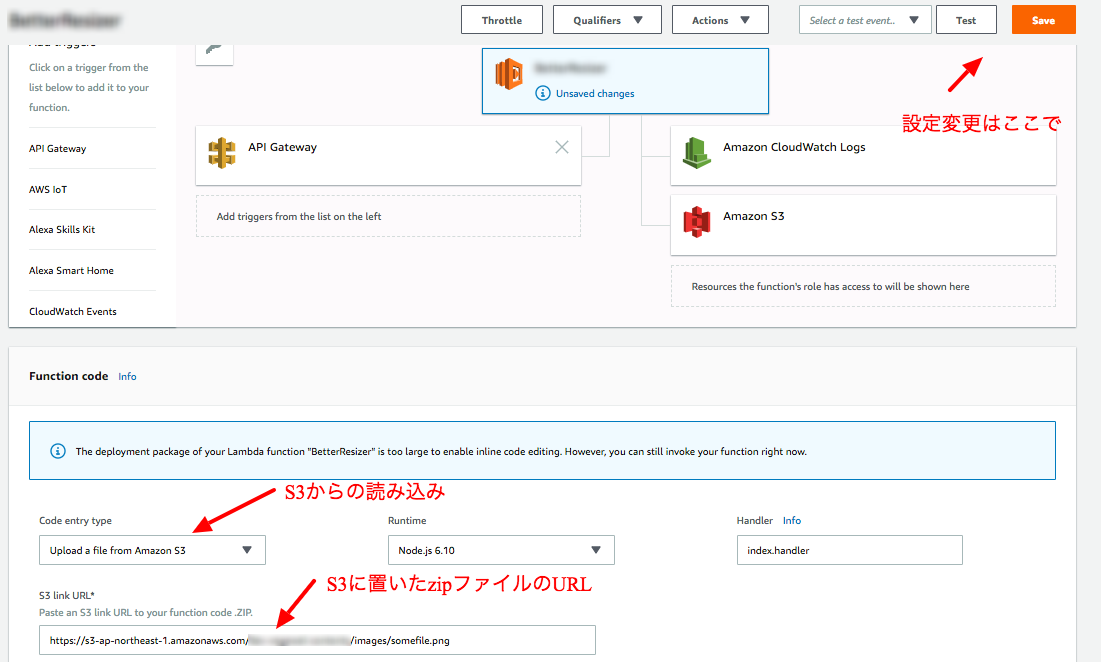
- APIを実行して縮小されるかテスト
まとめ
正直、最後のやつだけやればOKですがプロセスにこだわりたいヒトはDockerからモジュールをビルドするのもいいと思います。ただ、全体的にデバッグはやりづらいです。アクセスして不具合出ればCloudWatchを見に行くという流れですが、正直野暮ったいです。
皆さんのお役に立てれば幸いです。