ここ最近React Nativeアプリのe2eテスト導入を試行錯誤しているんだけども、Detox, Appiumに続きMaestroを試してみる。
Maestroは比較的新しいテストツールのようで、React Nativeの公式でも3番目に紹介されていた。あまり期待はせずにとりあえず試してみる。
まずはブランクプロジェクトが動くように
例によって、Expoのブランクプロジェクトが動くところまでセットアップする
$ expo init ExpoMaestro
$ expo eject
$ npx pod-install
$ npx react-native run-ios --simulator="iPhone 14"
起動できるところまで確認。
こちらの記事を参考に、テストの挙動を確かめるための簡単なデモ画面を作成する。
https://dev.to/b42/test-your-react-native-app-with-maestro-5bfj
import { StatusBar } from 'expo-status-bar';
import { useState } from 'react';
import { StyleSheet, Text, TextInput, TouchableOpacity, View } from 'react-native';

export default function App() {
  const [username, setUsername] = useState<string>("");
  const [password, setPassword] = useState<string>("");
  const [valid, setValid] = useState(false);

  return (
    <View style={styles.container}>
      <View style={styles.inputGroup}>
        <Text style={styles.label}>Username</Text>
        <TextInput
          style={styles.input}
          placeholder="Username"
          onChange={(e) => setUsername(e.nativeEvent.text)}
          testID="usernameInput"
        />
      </View>
      <View style={styles.inputGroup}>
        <Text style={styles.label}>Password</Text>
        <TextInput
          style={styles.input}
          placeholder="Password"
          secureTextEntry
          onChange={(e) => setPassword(e.nativeEvent.text)}
          testID="passwordInput"
        />
      </View>
      <TouchableOpacity
        style={styles.button}
        onPress={() => {
          if (username.length > 0 && password.length > 0) {
            setValid(true);
          } else {
            setValid(false);
          }
        }}
        testID="signInButton"
      >
        <Text style={styles.buttonText}>Sign in</Text>
      </TouchableOpacity>
      {valid ? <Text style={styles.successText}>Sign in successfully</Text> : null}
      <StatusBar style="auto" />
    </View>
  );
}

const styles = StyleSheet.create({
  container: {
    flex: 1,
    padding: 24,
    backgroundColor: "#fff",
    justifyContent: "center",
  },
  inputGroup: {
    marginBottom: 16,
  },
  label: {
    fontSize: 12,
    fontWeight: "bold",
    marginBottom: 6,
  },
  input: {
    borderRadius: 8,
    borderWidth: 1,
    borderColor: "gray",
    padding: 12,
    width: "100%",
    fontSize: 18,
  },
  button: {
    borderRadius: 8,
    padding: 12,
    backgroundColor: "black",
    alignItems: "center",
    marginBottom: 8,
  },
  buttonText: {
    fontSize: 16,
    fontWeight: "bold",
    color: "white",
  },
  successText: {
    fontSize: 16,
    color: "green",
    alignSelf: 'center',
  },
});
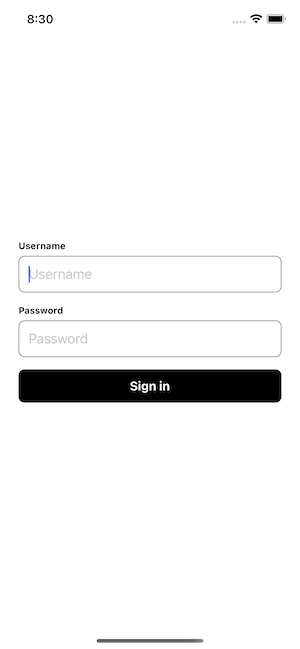
こんな感じのログイン画面っぽいものが出来る。
Maestroの導入
この辺の記事を参考にMaestroをインストールする。
https://dev.to/b42/test-your-react-native-app-with-maestro-5bfj
$ curl -Ls "https://get.maestro.mobile.dev" | bash
$ brew tap facebook/fb
$ brew install facebook/fb/idb-companion
Mac OSX Ventura 13.4.1で作業しているが、javaが入っていないらしい。
$ maestro -v
The operation couldn’t be completed. Unable to locate a Java Runtime.
Please visit http://www.java.com for information on installing Java.
Homebrewでjavaをインストールする。けっこう時間かかる。
$ brew install java
インストールしたのにまだ同じエラーが出る。どうやらパスが通ってないらしい。
$ java --version
The operation couldn’t be completed. Unable to locate a Java Runtime.
Please visit http://www.java.com for information on installing Java.
ので、シンボリックリンクを作る。
$ sudo ln -sfn /opt/homebrew/opt/openjdk/libexec/openjdk.jdk /Library/Java/JavaVirtualMachines/openjdk.jdk ✘ 130
よろしい。
$ java --version
openjdk 20.0.1 2023-04-18
OpenJDK Runtime Environment Homebrew (build 20.0.1)
OpenJDK 64-Bit Server VM Homebrew (build 20.0.1, mixed mode, sharing)
maestroコマンドも実行できるようになった。
$ maestro -v
1.29.0
maestro studioはGUIから操作をレコードしてエクスポート出来るツールっぽいけど、いまいち操作方法がわからんので、今回はあまり深掘りしないでおこう。
$ maestro studio
適当にテストを書いてみる。この程度ならとてもシンプルな記述で済む。
appId: com.a.harada.ExpoMaestro
---
- launchApp

- tapOn:
    id: "usernameInput"
- inputText: "userhogehoge"

- tapOn:
    id: "passwordInput"
- inputText: "password"

- tapOn: "Sign in"
- assertVisible: "Sign in successfully"
シミュレータを起動してテストを実行。
$ npx react-native run-ios --simulator="iPhone 14"
$ maestro test e2e/login.yml
Running on iPhone 14 - iOS 16.2 - A2DAC637-2858-4DA1-B49C-6A35FE539845
Running on iPhone 14 - iOS 16.2 - A2DAC637-2858-4DA1-B49C-6A35FE539845

 ║
 ║  > Flow
 ║
 ║    ✅  Launch app "com.a.harada.ExpoMaestro"
 ║    ✅  Tap on id: usernameInput
 ║    ✅  Input text userhogehoge
 ║    ✅  Tap on id: passwordInput
 ║    ✅  Input text password
 ║    ✅  Tap on "Sign in"
 ║    ✅  Assert that "Sign in successfully" is visible
よっしゃ、簡単なテストが動いた。他のテストフレームワークに比べると圧倒的に導入が簡単だったけど、npmとかでインストールするわけではないし、javaを入れなきゃいけないので、チームで使うには環境構築のハードルがちょっと上がる気はする。
次はこれでちょっと実践のテストコードを書いてみる。


