最新版は以下に記載しました。
https://hana-shin.hatenablog.com/entry/2023/02/07/200802
#1 wipefsコマンドとは?
デバイスからファイルシステム,RAID,パーティションテーブルの
シグネチャを消去(*)するコマンドです。
ファイルシステムそのものや、ファイルシステムのデータは消去しません。
(*) シグネチャを0x00で置き換えるという意味で使っています。
wipefs can erase filesystem, raid or partition-table signatures (magic strings)
from the specified device to make the signatures invisible for libblkid.
wipefs does not erase the filesystem itself nor any other data from the device.
なお、シグネチャは、ファイルシステムの管理領域(スーパブロック)に定義されています。
| ファイルシステム | シグネチャ | 備考 |
|---|---|---|
| ext3/ext4 | 0xEF53 |
|
| xfs | "XFSB" |
16進数で表すと58 46 53 42になります。 |
| btrfs | "_BHRfS_M" |
16進数で表すと5f 42 48 52 66 53 5f 4dになります。 |
#2 環境
VMware Workstation 14 Player上の仮想マシンを使っています。
[root@server ~]# cat /etc/redhat-release
CentOS Linux release 7.4.1708 (Core)

[root@server ~]# uname -r
3.10.0-693.el7.x86_64
[root@server ~]# yum -y info util-linux
[root@server ~]# wipefs -V
wipefs from util-linux 2.23.2
#3 オプション一覧
[root@server ~]# wipefs -h

Usage:
 wipefs [options] <device>

オプション:
 -a, --all           wipe all magic strings (BE CAREFUL!)
 -f, --force         force erasure
 -h, --help          show this help text
 -n, --no-act        do everything except the actual write() call
 -o, --offset <num>  offset to erase, in bytes
 -p, --parsable      print out in parsable instead of printable format
 -q, --quiet         suppress output messages
 -t, --types <list>  limit the set of filesystem, RAIDs or partition tables
 -V, --version       output version information and exit

詳細情報は、wipefs(8) を確認してください。
#4 事前準備
ファイルシステムの中身を16進表示するため、xxdというコマンドを使います。
xxdは、以下のようにしてインストールします。
[root@server ~]# yum -y install vim-common
[root@server ~]# xxd -v
xxd V1.10 27oct98 by Juergen Weigert
#5 デバイスの情報を表示する方法
オプションを何も指定しないと、デバイスの情報を表示することができます。
私の環境では、以下のデバイスがあります。
[root@server ~]# lsblk -ifp
NAME        FSTYPE  LABEL           UUID                                 MOUNTPOINT
/dev/sda
|-/dev/sda1 xfs                     7bd0c5ce-21ab-4964-871d-61d04a09cc8c /boot
|-/dev/sda2 swap                    708d5fef-16c1-4e0b-86ae-06e09153b155 [SWAP]
`-/dev/sda3 xfs                     a4951ce9-0d6e-4550-9460-dfbae7ea82c7 /
/dev/sr0    iso9660 CentOS 7 x86_64 2017-09-06-10-51-00-00
/dev/sdaに対して、wipefsコマンドを実行してみます。
offsetは、シグネチャが格納されている場所(offset)を表しています。
typeは、シグネチャを表しています。
[root@server ~]# wipefs /dev/sda
offset               type
----------------------------------------------------------------
0x1fe                dos   [partition table]
/dev/sda1に対して、wipefsコマンドを実行してみます。
[root@server ~]# wipefs /dev/sda1
offset               type
----------------------------------------------------------------
0x0                  xfs   [filesystem]
                     UUID:  7bd0c5ce-21ab-4964-871d-61d04a09cc8c
/dev/sr0に対して、wipefsコマンドを実行してみます。
[root@server ~]# wipefs /dev/sr0
offset               type
----------------------------------------------------------------
0x1fe                dos   [partition table]

0x8001               iso9660   [filesystem]
                     LABEL: CentOS 7 x86_64
                     UUID:  2017-09-06-10-51-00-00
#6 シグネチャを消去する方法(-a)
これ以降は、テスト用に作成するループバックデバイスを使用します。
OS等が入っているデバイスを誤って使用しないように注意してください。
##6.1 事前準備
ループバックデバイスに使用するファイルを作成します。
fallocateコマンドは、ここ(すぐ忘れてしまう、仕事で使う技)を参照してください。
[root@server ~]# pwd
/root
[root@server ~]# fallocate -l 1G disk.img
[root@server ~]# ls -l disk.img
-rw-r--r--. 1 root root 1073741824  5月  3 21:24 disk.img
作成したファイルをループバックデバイスとして登録します。
losetupコマンドは、ここ(losetupコマンドの使い方)を参照してください。
[root@server ~]# losetup -f /root/disk.img
[root@server ~]# losetup
NAME       SIZELIMIT OFFSET AUTOCLEAR RO BACK-FILE
/dev/loop0         0      0         0  0 /root/disk.img
/dev/loop0のファイルシステムを確認します。
/dev/loop0には、ファイルシステムが作成されていないことがわかります(FSTYPE列が空欄)。
[root@server ~]# lsblk -ifp
NAME        FSTYPE  LABEL           UUID                                 MOUNTPOINT
/dev/sda
|-/dev/sda1 xfs                     7bd0c5ce-21ab-4964-871d-61d04a09cc8c /boot
|-/dev/sda2 swap                    708d5fef-16c1-4e0b-86ae-06e09153b155 [SWAP]
`-/dev/sda3 xfs                     a4951ce9-0d6e-4550-9460-dfbae7ea82c7 /
/dev/sr0    iso9660 CentOS 7 x86_64 2017-09-06-10-51-00-00
/dev/loop0
ここでは、ループバックデバイスにxfsファイルシステムを作成してみます。
[root@server ~]# mkfs.xfs /dev/loop0
meta-data=/dev/loop0             isize=512    agcount=4, agsize=65536 blks
         =                       sectsz=512   attr=2, projid32bit=1
         =                       crc=1        finobt=0, sparse=0
data     =                       bsize=4096   blocks=262144, imaxpct=25
         =                       sunit=0      swidth=0 blks
naming   =version 2              bsize=4096   ascii-ci=0 ftype=1
log      =internal log           bsize=4096   blocks=2560, version=2
         =                       sectsz=512   sunit=0 blks, lazy-count=1
realtime =none                   extsz=4096   blocks=0, rtextents=0
/dev/loop0のファイルシステムを確認します。
/dev/loop0に、xfsファイルシステムが作成されたことがわかります。
[root@server ~]# lsblk -ifp
NAME        FSTYPE  LABEL           UUID                                 MOUNTPOINT
/dev/sda
|-/dev/sda1 xfs                     7bd0c5ce-21ab-4964-871d-61d04a09cc8c /boot
|-/dev/sda2 swap                    708d5fef-16c1-4e0b-86ae-06e09153b155 [SWAP]
`-/dev/sda3 xfs                     a4951ce9-0d6e-4550-9460-dfbae7ea82c7 /
/dev/sr0    iso9660 CentOS 7 x86_64 2017-09-06-10-51-00-00
/dev/loop0  xfs                     de536a22-e58c-4c12-b370-c723a4bc963c
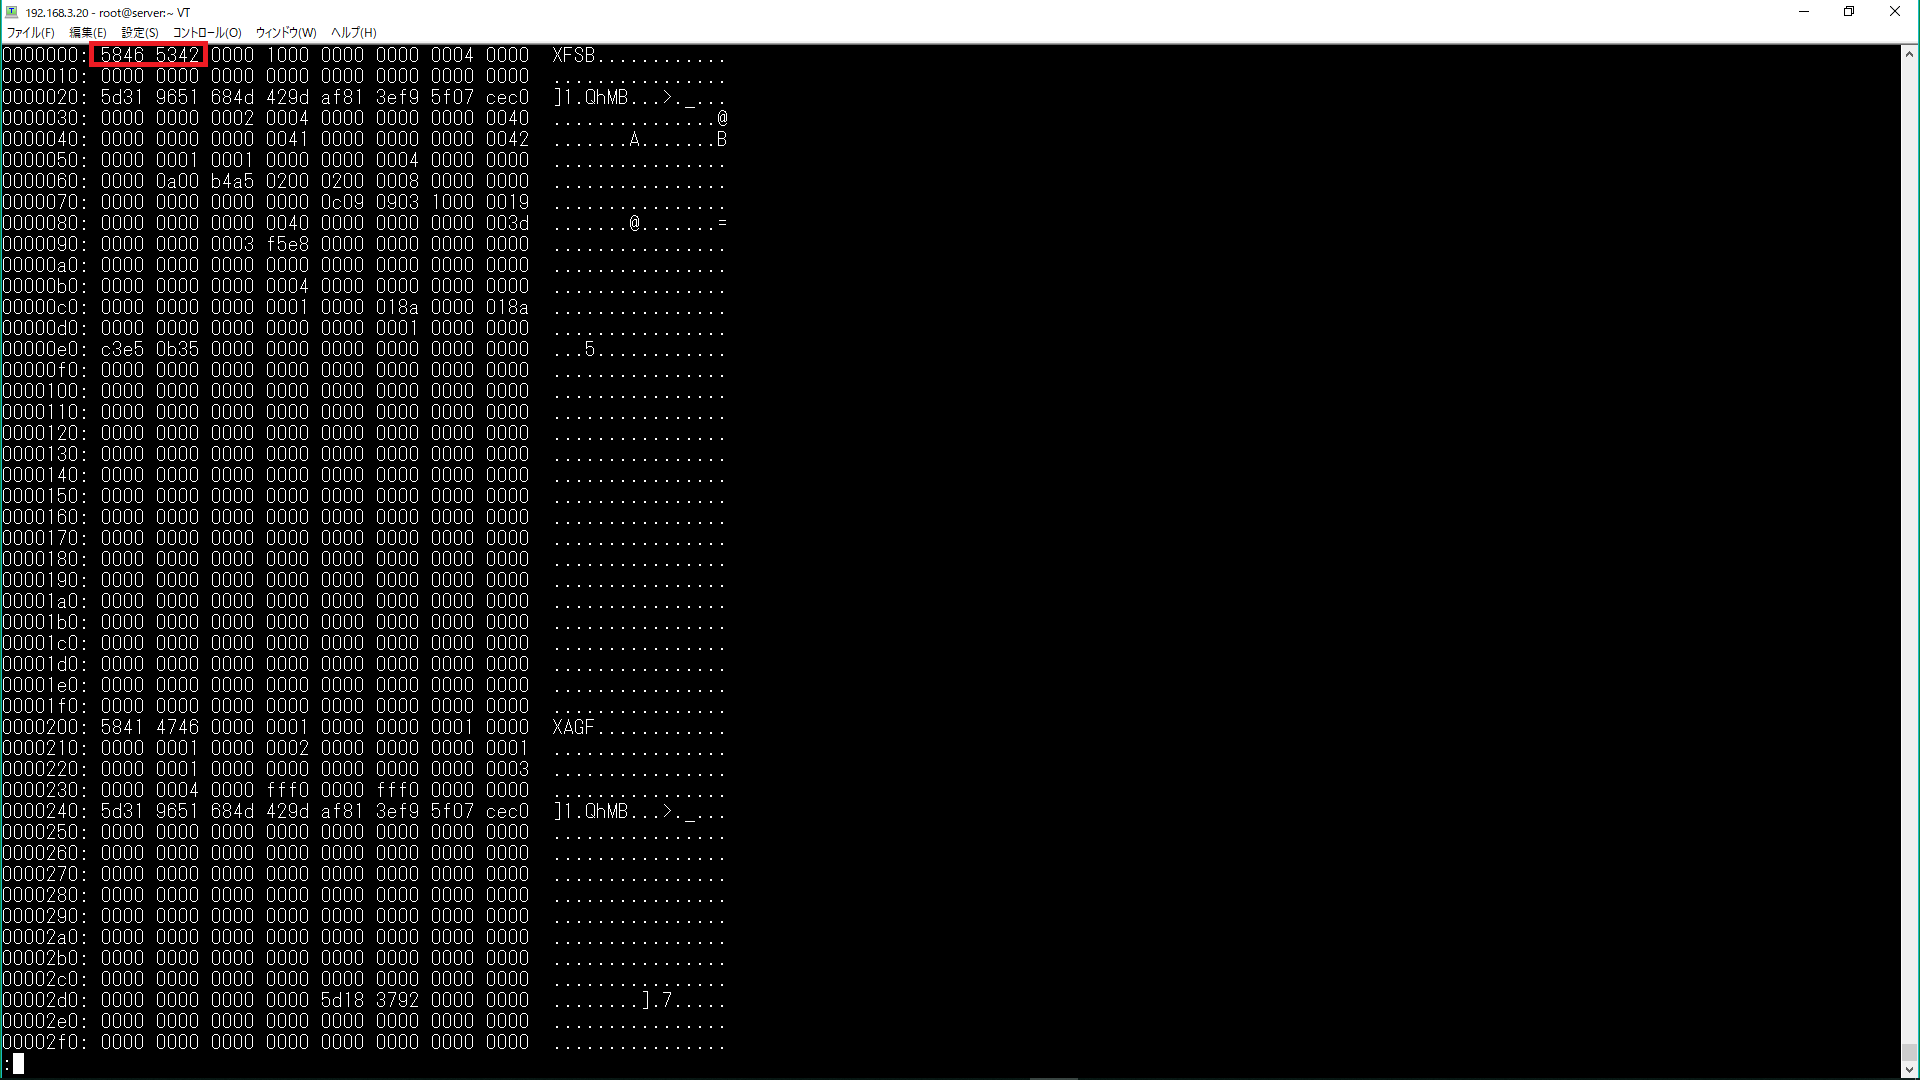
xxdコマンドを使って、/dev/loop0のシグネチャを確認してみます。
xfsのシグネチャが、オフセット0から16進数で58 46 53 42と設定されています。
##6.2 シグネチャの消去
[root@server ~]# wipefs -a /dev/loop0
/dev/loop0: 4 bytes were erased at offset 0x00000000 (xfs): 58 46 53 42
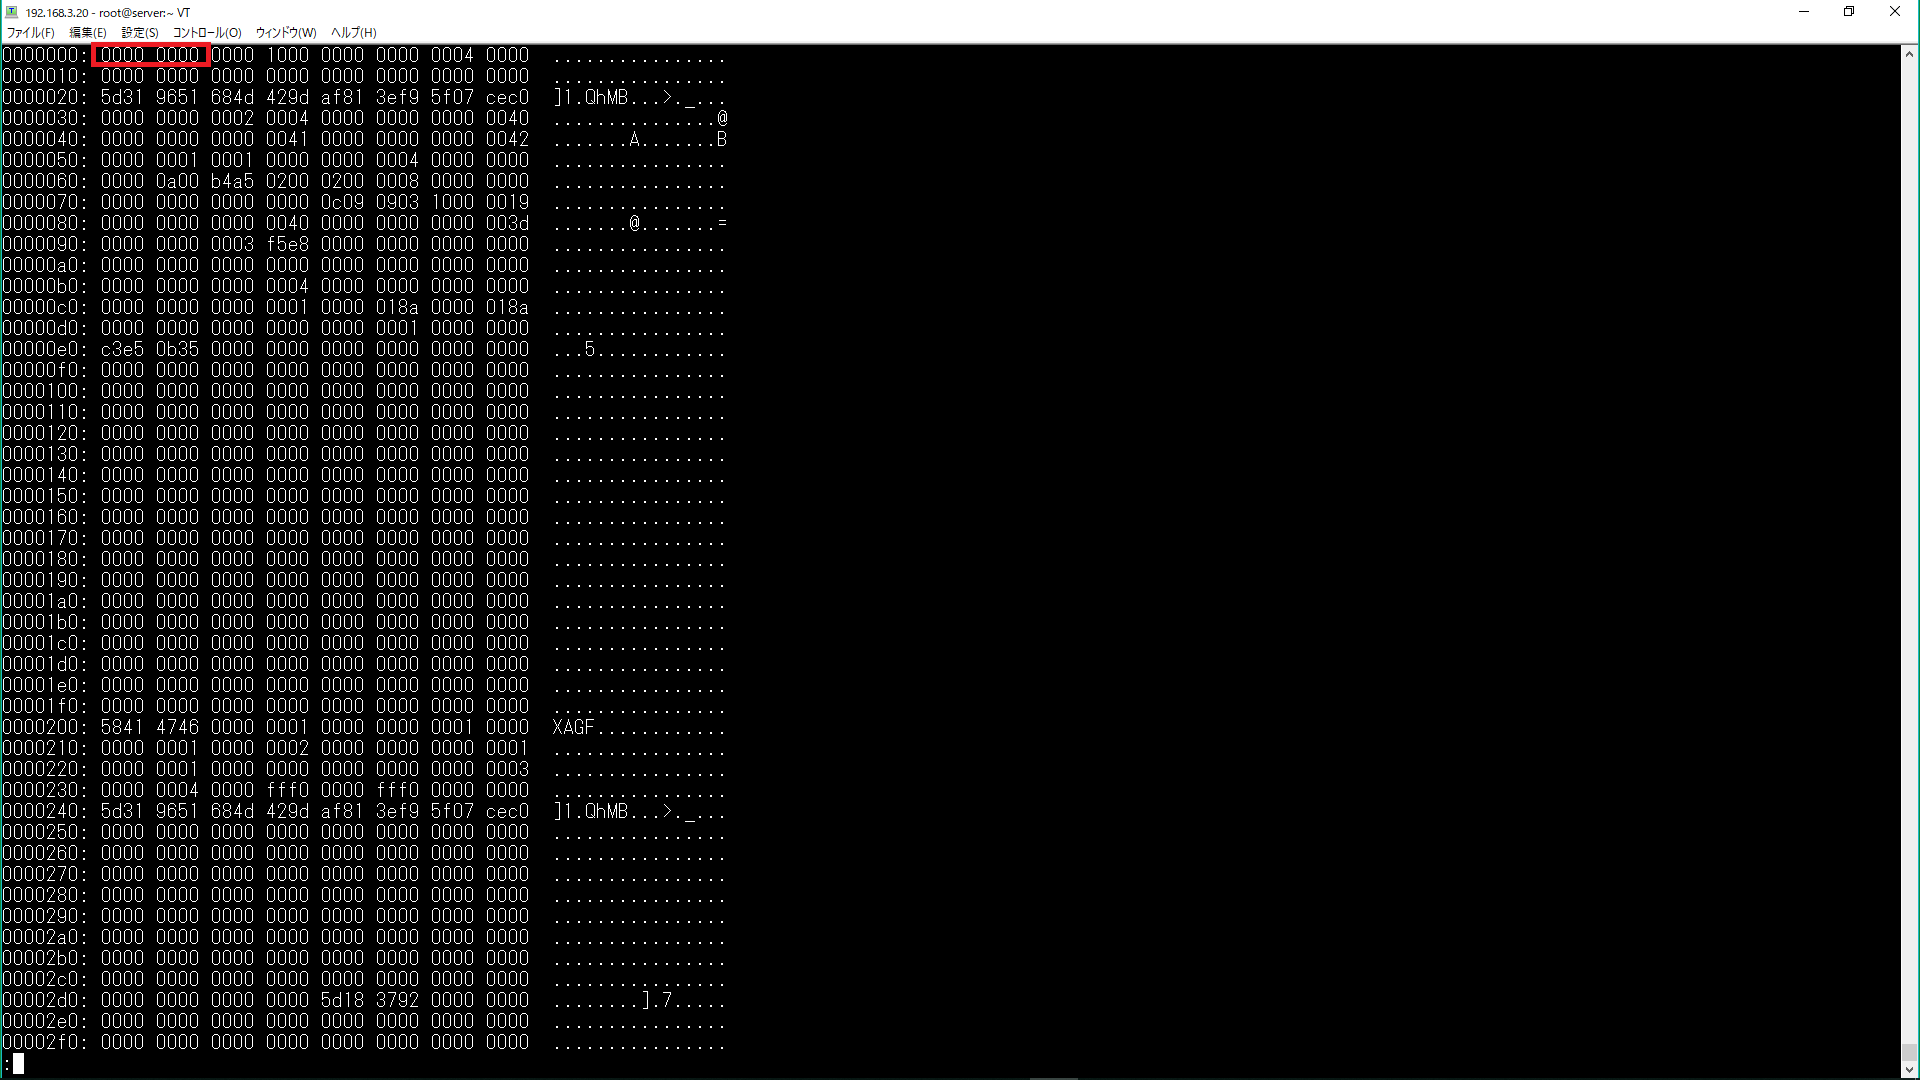
xxdコマンドを使って、/dev/loop0のシグネチャを確認してみます。
シグネチャが消去されていることがわかります。
他の部分は変化していません。つまり、wipefsはシグネチャのみ消去していることがわかります。
/dev/loop0のファイルシステムを確認します。
/dev/loop0にファイルシステムが存在しないことがわかります。
[root@server ~]# lsblk -ifp
NAME        FSTYPE  LABEL           UUID                                 MOUNTPOINT
/dev/sda
|-/dev/sda1 xfs                     7bd0c5ce-21ab-4964-871d-61d04a09cc8c /boot
|-/dev/sda2 swap                    708d5fef-16c1-4e0b-86ae-06e09153b155 [SWAP]
`-/dev/sda3 xfs                     a4951ce9-0d6e-4550-9460-dfbae7ea82c7 /
/dev/sr0    iso9660 CentOS 7 x86_64 2017-09-06-10-51-00-00
/dev/loop0
##6.3 後始末
[root@server ~]# losetup -D
デバイスを確認する。ループバックデバイスが削除されたことがわかります。
[root@server ~]# lsblk -ifp
NAME        FSTYPE  LABEL           UUID                                 MOUNTPOINT
/dev/sda
|-/dev/sda1 xfs                     7bd0c5ce-21ab-4964-871d-61d04a09cc8c /boot
|-/dev/sda2 swap                    708d5fef-16c1-4e0b-86ae-06e09153b155 [SWAP]
`-/dev/sda3 xfs                     a4951ce9-0d6e-4550-9460-dfbae7ea82c7 /
/dev/sr0    iso9660 CentOS 7 x86_64 2017-09-06-10-51-00-00
#7 ファイルシステムの情報表示方法(-p)
ファイルシステムに関する情報(*)を表示してみます。
(*) シグネチャの格納位置(offset),uuid,ラベル,ファイルシステム
##7.1 ext3の場合
[root@server ~]# mkfs.ext3 /dev/loop0
[root@server ~]# wipefs -p /dev/loop0
# offset,uuid,label,type
0x438,5995d5d4-e9ba-4697-8382-3aaac23e8844,,ext3
[root@server ~]# wipefs -a /dev/loop0
/dev/loop0: 2 bytes were erased at offset 0x00000438 (ext3): 53 ef
##7.2 ext4の場合
[root@server ~]# mkfs.ext4 /dev/loop0
[root@server ~]# wipefs -p /dev/loop0
# offset,uuid,label,type
0x438,460b8ccf-afcf-46d6-a03f-947efa2c9491,,ext4
[root@server ~]# wipefs -a /dev/loop0
/dev/loop0: 2 bytes were erased at offset 0x00000438 (ext4): 53 ef
##7.3 xfsの場合
[root@server ~]# mkfs.xfs /dev/loop0
[root@server ~]# wipefs -p /dev/loop0
# offset,uuid,label,type
0x0,58de97e5-1582-4a2b-ab56-66e3af002062,,xfs
[root@server ~]# wipefs -a /dev/loop0
/dev/loop0: 4 bytes were erased at offset 0x00000000 (xfs): 58 46 53 42
##7.4 btrfsの場合
[root@server ~]# mkfs.btrfs /dev/loop0
[root@server ~]# wipefs -p /dev/loop0
# offset,uuid,label,type
0x10040,4fc7f4fb-7d3f-4471-9d02-e1ab830b3186,,btrfs
[root@server ~]# wipefs -a /dev/loop0
/dev/loop0: 8 bytes were erased at offset 0x00010040 (btrfs): 5f 42 48 52 66 53 5f 4d
#Z 参考情報
Ext4 Disk Layout
brkt/fuse-xfs
How do I find the offset of an ext4 filesystem?