#1 環境
[root@master ~]# cat /etc/redhat-release
CentOS Linux release 7.3.1611 (Core)

[root@master ~]# uname -r
3.10.0-514.el7.x86_64
#2 ファイルの作成
##2.1 ddコマンドを使う方法
10バイトのファイルを作成する。
[root@master ~]# dd if=/dev/zero of=a.txt bs=10 count=1
1+0 レコード入力
1+0 レコード出力
10 バイト (10 B) コピーされました、 0.000778742 秒、 12.8 kB/秒

ファイルサイズを確認する。10バイトであることがわかる。
[root@master ~]# ls -l a.txt
-rw-r--r--. 1 root root 10  3月 30 23:10 a.txt
##2.2 fallocateコマンドを使う方法
fallocate -l <ファイルサイズ> <ファイル名>
10バイトのファイルを作成する。
[root@server test]# fallocate -l 10 a.txt
[root@server test]# ls -l
合計 4
-rw-r--r-- 1 root root 10 10月 29 19:48 a.txt

1Kのファイルを作成する。
[root@server test]# fallocate -l 1K 1K.txt
[root@server test]# ls -l 1K.txt
-rw-r--r-- 1 root root 1024 10月 29 19:53 1K.txt

1Mのファイルを作成する。
[root@server test]# fallocate -l 1M 1M.txt
[root@server test]# ls -l 1M.txt
-rw-r--r-- 1 root root 1048576 10月 29 19:53 1M.txt

1Gのファイルを作成する。
[root@server test]# fallocate -l 1G 1G.txt
[root@server test]# ls -l 1G.txt
-rw-r--r-- 1 root root 1073741824 10月 29 19:53 1G.txt
##2.3 headコマンドを使う方法
1Mのファイルを作成する。
[root@master test]# head -c 1m /dev/urandom > 1m.txt
[root@master test]# ls -l 1m.txt
-rw-r--r--. 1 root root 1048576  3月 30 23:22 1m.txt

10バイトのファイルを作成する。
[root@master test]# head -c 10 /dev/zero > 10.txt

ファイルサイズを確認する。10バイトであることがわかる。
[root@master test]# ls -l 10.txt
-rw-r--r--. 1 root root 10  3月 30 23:33 10.txt
##2.4 大量のファイルを作成する方法(bashのブレース展開を使う)
大量のファイルを作成する方法はここを参考にしました。
[root@server file]# touch test_{1..10}.dat
[root@server file]# ls -l
合計 0
-rw-r--r-- 1 root root 0 11月  8 19:46 test_1.dat
-rw-r--r-- 1 root root 0 11月  8 19:46 test_10.dat
-rw-r--r-- 1 root root 0 11月  8 19:46 test_2.dat
-rw-r--r-- 1 root root 0 11月  8 19:46 test_3.dat
-rw-r--r-- 1 root root 0 11月  8 19:46 test_4.dat
-rw-r--r-- 1 root root 0 11月  8 19:46 test_5.dat
-rw-r--r-- 1 root root 0 11月  8 19:46 test_6.dat
-rw-r--r-- 1 root root 0 11月  8 19:46 test_7.dat
-rw-r--r-- 1 root root 0 11月  8 19:46 test_8.dat
-rw-r--r-- 1 root root 0 11月  8 19:46 test_9.dat

桁を揃える。
[root@server file]# touch test_{01..10}.dat
[root@server file]# ls -l
合計 0
-rw-r--r-- 1 root root 0 11月  8 19:49 test_01.dat
-rw-r--r-- 1 root root 0 11月  8 19:49 test_02.dat
-rw-r--r-- 1 root root 0 11月  8 19:49 test_03.dat
-rw-r--r-- 1 root root 0 11月  8 19:49 test_04.dat
-rw-r--r-- 1 root root 0 11月  8 19:49 test_05.dat
-rw-r--r-- 1 root root 0 11月  8 19:49 test_06.dat
-rw-r--r-- 1 root root 0 11月  8 19:49 test_07.dat
-rw-r--r-- 1 root root 0 11月  8 19:49 test_08.dat
-rw-r--r-- 1 root root 0 11月  8 19:49 test_09.dat
-rw-r--r-- 1 root root 0 11月  8 19:49 test_10.dat

アルファベットと組み合わせることもできる。
[root@server file]# touch test_{1..3}-{a..z}.dat
[root@server file]# ls
test_1-a.dat  test_1-m.dat  test_1-y.dat  test_2-k.dat  test_2-w.dat  test_3-i.dat  test_3-u.dat
test_1-b.dat  test_1-n.dat  test_1-z.dat  test_2-l.dat  test_2-x.dat  test_3-j.dat  test_3-v.dat
test_1-c.dat  test_1-o.dat  test_2-a.dat  test_2-m.dat  test_2-y.dat  test_3-k.dat  test_3-w.dat
test_1-d.dat  test_1-p.dat  test_2-b.dat  test_2-n.dat  test_2-z.dat  test_3-l.dat  test_3-x.dat
test_1-e.dat  test_1-q.dat  test_2-c.dat  test_2-o.dat  test_3-a.dat  test_3-m.dat  test_3-y.dat
test_1-f.dat  test_1-r.dat  test_2-d.dat  test_2-p.dat  test_3-b.dat  test_3-n.dat  test_3-z.dat
test_1-g.dat  test_1-s.dat  test_2-e.dat  test_2-q.dat  test_3-c.dat  test_3-o.dat
test_1-h.dat  test_1-t.dat  test_2-f.dat  test_2-r.dat  test_3-d.dat  test_3-p.dat
test_1-i.dat  test_1-u.dat  test_2-g.dat  test_2-s.dat  test_3-e.dat  test_3-q.dat
test_1-j.dat  test_1-v.dat  test_2-h.dat  test_2-t.dat  test_3-f.dat  test_3-r.dat
test_1-k.dat  test_1-w.dat  test_2-i.dat  test_2-u.dat  test_3-g.dat  test_3-s.dat
test_1-l.dat  test_1-x.dat  test_2-j.dat  test_2-v.dat  test_3-h.dat  test_3-t.dat
##2.5 ファイル名に日付を付加する方法
[root@server file]# touch test-`date +%Y%m%d`.dat
[root@server file]# ls
test-20171108.dat
##2.6 バイナリファイルの作成方法
[root@server ~]# echo -en "\x10\x11\x12\x13\x14\x15\x16\x17\x18\x19\x1a\x1b\x1c\x1d\x1e\x1f" > test.bin
[root@server ~]# hexdump -C test.bin
00000000  10 11 12 13 14 15 16 17  18 19 1a 1b 1c 1d 1e 1f  |................|
00000010
[root@server ~]# echo -en "\x20\x21\x22\x23\x24\x25\x26\x27\x28\x29\x2a\x2b\x2c\x2d\x2e\x2f" >> test.bin
[root@server ~]# hexdump -C test.bin
00000000  10 11 12 13 14 15 16 17  18 19 1a 1b 1c 1d 1e 1f  |................|
00000010  20 21 22 23 24 25 26 27  28 29 2a 2b 2c 2d 2e 2f  | !"#$%&'()*+,-./|
00000020
##2.7 バイナリファイルの編集方法
xxdコマンドを使うので、vim-commonパッケージをインストールする。
[root@server file]# yum -y install vim-common
バイナリモードでviを起動する。
[root@server ~]# vi -b test.bin
コマンドモードに移行して、%!xxdと入力します。
0000000: 1122 3344                                ."3D
~
-snip-
~
:%!xxd
バイナリファイルを編集します。
ここでは、バイナルファイルの末尾に0x55を追加しました。
0000000: 1122 3344 55                                ."3D
~
-snip-
~
-- INSERT --
コマンドモードに移行して、%!xxd -rと入力します。
0000000: 1122 3344 55                                ."3D
~
-snip-
~
:%!xxd -r
変更したバイナリファイルを保存する。
^Q"3DU
~
-snip-
~
:wq
参考情報
http://d.hatena.ne.jp/R-H/20101225/1293295620
##2.8 任意の文字列生成ツール
ランダム文字列ジェネレーター
文字列ジェネレーター
random string generator
##2.9 ファイル名の一部を一括で変換する方法
ファイル名の一部の文字列を変換してみます。
http://171rr.blog.fc2.com/blog-entry-31.html
[root@server test]# pwd
/root/test
[root@server test]# ls -l
合計 0
-rw-r--r--. 1 root root 0  5月 16 19:01 aa-test1.txt
-rw-r--r--. 1 root root 0  5月 16 19:01 aa-test2.txt
-rw-r--r--. 1 root root 0  5月 16 19:01 aa-test3.txt
[root@server test]# find . -type f|sed 'p;s/aa/bb/'|xargs -n 2 mv
[root@server test]# ls -l
合計 0
-rw-r--r--. 1 root root 0  5月 16 19:01 bb-test1.txt
-rw-r--r--. 1 root root 0  5月 16 19:01 bb-test2.txt
-rw-r--r--. 1 root root 0  5月 16 19:01 bb-test3.txt
#3 計算
##3.1 exprコマンドを使う方法
[root@server ~]# expr 1 + 2
3
[root@server ~]# expr 5 - 2
3
[root@server ~]# expr 10 / 3
3
[root@server ~]# expr 10 % 3
1
掛け算は少し注意が必要です。
*がメタキャラとして解釈されないように、\でエスケープします
[root@server ~]# expr 3 \* 5
15
##3.2 bcコマンドを使う方法
[root@server ~]# bc
1+2
3
[root@server ~]# bc
5-2
3
[root@server ~]# bc
10/3
3
[root@server ~]# bc
10%3
1
[root@server ~]# bc
3*5
15
#4 sed
##4.1 特定期間のログを抽出する方法
[root@master ~]# cat /var/log/messages|sed -n '/Apr  1 19:57:54/,/Apr  1 19:58:31/p'
Apr  1 19:57:54 master etcd: sync duration of 1.085836196s, expected less than 1s
Apr  1 19:58:05 master kube-apiserver: E0401 19:58:05.767501    1132 repair.go:133] the cluster IP 10.254.0.1 for service kubernetes/default is not within the service CIDR 172.18.254.0/24; please recreate
Apr  1 19:58:31 master systemd: Created slice user-0.slice.
[root@master ~]#
##4.2 ログから特定部分を抜き出して表示する方法
[root@server ~]# cat /var/log/httpd/access_log|sed -n 's/^.*\(http.*html\).*$/\1/p'
http://192.168.0.100/linux-3.10.0-514.el7.centos.x86_64/HTML/search.html
http://192.168.0.100/linux-3.10.0-514.el7.centos.x86_64/HTML/search.html
http://192.168.0.100/linux-3.10.0-514.el7.centos.x86_64/HTML/search.html
#5 連結(paste )
テスト用のファイルを作成する。
[root@master test]# seq 1 5 > a.txt
[root@master test]# seq 6 10 > b.txt
[root@master test]# seq 11 15 > c.txt

a.txtの中身を確認する。
[root@master test]# cat a.txt
1
2
3
4
5

b.txtの中身を確認する。
[root@master test]# cat b.txt
6
7
8
9
10

c.txtの中身を確認する。
[root@master test]# cat c.txt
11
12
13
14
15

pasteを実行する。
[root@master test]# paste a.txt b.txt
1       6
2       7
3       8
4       9
5       10

pasteを実行する。
[root@master test]# paste a.txt b.txt c.txt
1       6       11
2       7       12
3       8       13
4       9       14
5       10      15
#6 合計、最大、最小
##6.1 合計
テスト用ファイルの中身を確認する。
[root@master test]# cat test.txt
1       6
2       7
3       8
4       9
5       10

1列目の合計を求める。
[root@master test]# cat test.txt |awk '{total += $1} END {print total}'
15

2列目の合計を求める。
[root@master test]# cat test.txt |awk '{total += $2} END {print total}'
40
##6.2 最大
テスト用ファイルの中身を確認する。
[root@master test]# cat test.txt
1       6
2       7
3       8
4       9
5       10

1列目の最大値を求める。
[root@master test]# cat test.txt |awk '{if(m<$1) m=$1} END{ print m}'
5

2列目の最大値を求める。
[root@master test]# cat test.txt |awk '{if(m<$2) m=$2} END{ print m}'
10
##6.3 最小
最小値を求める場合、初期値のとりかたに注意する必要がある。
ここの例では、初期値は1000000です。
テスト用ファイルの中身を確認する。
[root@master test]# cat test.txt
1       6
2       7
3       8
4       9
5       10

1列目の最小値を求める。
[root@master test]# cat test.txt |awk 'BEGIN{m=1000000} {if(m>$1) m=$1} END{ print m}'
1

2列目の最小値を求める。
[root@master test]# cat test.txt |awk 'BEGIN{m=1000000} {if(m>$2) m=$2} END{ print m}'
6

最小値を求める場合、注意が必要です。たとえば、2列目の最小値を求める場合、初期値を1にすると、
最小値が6ではなく1になってしまう。
[root@master test]# cat test.txt |awk 'BEGIN{m=1} {if(m>$2) m=$2} END{ print m}'
1

初期値を2,3,4,5,6,7と変化させて場合、以下のようになる。
[root@master test]# cat test.txt |awk 'BEGIN{m=2} {if(m>$2) m=$2} END{ print m}'
2
[root@master test]# cat test.txt |awk 'BEGIN{m=3} {if(m>$2) m=$2} END{ print m}'
3
[root@master test]# cat test.txt |awk 'BEGIN{m=4} {if(m>$2) m=$2} END{ print m}'
4
[root@master test]# cat test.txt |awk 'BEGIN{m=5} {if(m>$2) m=$2} END{ print m}'
5
[root@master test]# cat test.txt |awk 'BEGIN{m=6} {if(m>$2) m=$2} END{ print m}'
6
[root@master test]# cat test.txt |awk 'BEGIN{m=7} {if(m>$2) m=$2} END{ print m}'
6
#7 ファイルの作成日時順で表示する方法
man lsより抜粋
-t sort by modification time, newest first
-r, --reverse reverse order while sorting
ファイルの修正時刻が最も新しいものから表示する。
[root@master test]# ls -t --full-time /usr/bin
lrwxrwxrwx.   1 root root            3 2017-03-26 21:20:15.425989284 +0900 pftp -> ftp
lrwxrwxrwx.   1 root root            4 2017-03-14 21:10:01.598765634 +0900 nc -> ncat
lrwxrwxrwx.   1 root root            8 2017-03-11 15:13:48.545480516 +0900 sepolgen -> sepolicy
lrwxrwxrwx.   1 root root            8 2017-03-11 15:11:17.543490830 +0900 systemd-loginctl -> loginctl
-以下、略-

修正時刻が最も古い(-r)ものから表示する.
[root@master test]# ls -tr --full-time /usr/bin
-rwxr-xr-x.   1 root root         3858 2001-06-28 13:39:47.000000000 +0900 cscope-indexer
-rwxr-xr-x.   1 root root         2953 2008-10-11 02:40:36.000000000 +0900 zipgrep
-rwxr-xr-x.   1 root root        12751 2014-01-25 08:01:40.000000000 +0900 msghack
-rwxr-xr-x.   1 root root         5940 2014-06-10 03:45:48.000000000 +0900 unwrapdiff
-以下、略-
#8 ベンダコードを調べる方法
[root@master test]# wget http://standards.ieee.org/develop/regauth/oui/oui.txt
[root@master test]# ls

[root@master test]# less oui.txt
oui.txt
OUI/MA-L                                                    Organization
company_id                                                  Organization
                                                            Address

E0-43-DB   (hex)                Shenzhen ViewAt Technology Co.,Ltd.
E043DB     (base 16)            Shenzhen ViewAt Technology Co.,Ltd.
                                9A,Microprofit,6th Gaoxin South Road, High-Tech Industrial Park, Nanshan, Shenzhen, CHINA.
-以下、略-

oui.txtファイルの2列目を削除する。
[root@master test]# grep '(hex)' oui.txt |awk '{ $2="" ; print $0 }'
E0-43-DB  Shenzhen ViewAt Technology Co.,Ltd.
24-05-F5  Integrated Device Technology (Malaysia) Sdn. Bhd.
2C-30-33  NETGEAR
3C-D9-2B  Hewlett Packard
9C-8E-99  Hewlett Packard
-以下、略-
#9 圧縮,解凍
##9.1 圧縮方法
[root@centos74 test]# ls
test1.dat  test2.dat  test3.dat

[root@centos74 test]# tar cvfz test.tar.gz *
test1.dat
test2.dat
test3.dat

[root@centos74 test]# file test.tar.gz
test.tar.gz: gzip compressed data, from Unix, last modified: Wed May 16 16:59:52 2018
[root@centos74 test]# ls
test1.dat  test2.dat  test3.dat

[root@centos74 test]# tar cvfj test.tar.bz2 *
test1.dat
test2.dat
test3.dat
[root@centos74 test]# file test.tar.bz2
test.tar.bz2: bzip2 compressed data, block size = 900k
[root@centos74 test]# ls
test1.dat  test2.dat  test3.dat

[root@centos74 test]# tar cvfJ test.tar.xz *
test1.dat
test2.dat
test3.dat
[root@centos74 test]# file test.tar.xz
test.tar.xz: XZ compressed data
##9.2 解凍方法
解凍する場合、圧縮形式の指定は不要です。
[root@centos74 test]# tar xvf test.tar.gz
test1.dat
test2.dat
test3.dat
[root@centos74 test]# tar xvf test.tar.bz2
test1.dat
test2.dat
test3.dat
[root@centos74 test]# tar xvf test.tar.xz
test1.dat
test2.dat
test3.dat
##9.3 圧縮ファイルの中身を確認する方法
テスト用のファイルを作成する。
[root@master gzip]# seq 1 5 > test1.txt
[root@master gzip]# seq 6 10 > test2.txt
[root@master gzip]# ls
test1.txt  test2.txt

作成したファイルをアーカイブしてgzip形式に圧縮する。
[root@master gzip]# tar cvfz test.tar.gz *
test1.txt
test2.txt

[root@master gzip]# ls
test.tar.gz  test1.txt  test2.txt

圧縮ファイルのタイプを確認する。gzip形式であることがわかる。
[root@master gzip]# file test.tar.gz
test.tar.gz: gzip compressed data, from Unix, last modified: Sat Apr  8 17:37:18 2017

圧縮ファイルの中身を確認する。なぜかテキストファイルの先頭文字("1"と"6")がずれて表示されてしまう。
[root@master gzip]# zcat test.tar.gz
test1.txt0000644000000000000000000000001213072117022011341 0ustar  rootroot1 ★ズレている。
2
3
4
5
test2.txt0000644000000000000000000000001313072117030011342 0ustar  rootroot6 ★ズレている。
7
8
9
10
[root@master gzip]#

zgrepで"10"を検索する。テキストファイルもバイナリ(gz)も検索できる。
[root@master gzip]# zgrep 10 *
test.tar.gz:バイナリファイル (標準入力) に一致しました
test2.txt:10
テスト用のファイルを作成する。
[root@master gzip]# seq 1 5 > test1.txt
[root@master gzip]# seq 6 10 > test2.txt
[root@master gzip]# ls
test1.txt  test2.txt

作成したファイルをアーカイブしてbzip2形式に圧縮する。
[root@master gzip]# tar cvfj test.tar.bz2 *
test1.txt
test2.txt

[root@master gzip]# ls
test.tar.bz2  test1.txt  test2.txt

圧縮ファイルのタイプを確認する。bzip2形式であることがわかる。
[root@master gzip]# file test.tar.bz2
test.tar.bz2: bzip2 compressed data, block size = 900k

圧縮ファイルの中身を確認する。なぜかテキストファイルの先頭文字("1"と"6")がずれて表示されてしまう。
[root@master gzip]# bzcat test.tar.bz2
test1.txt0000644000000000000000000000001213072121605011343 0ustar  rootroot1 ★ズレている。
2
3
4
5
test2.txt0000644000000000000000000000001313072121611011342 0ustar  rootroot6 ★ズレている。
7
8
9
10
[root@master gzip]#


[root@master gzip]# bzgrep 10 test.tar.bz2
バイナリファイル (標準入力) に一致しました
[root@master gzip]#
#10 lsofの使い方
lsofの使い方は、以下に移行しました。
https://hana-shin.hatenablog.com/entry/2021/12/26/192307
#11 grepの使い方
##11.1 指定した桁数の検索
テスト用ファイルの中身を確認する。
[root@master ~]# cat test.txt
1
22
333
4444
55555

1桁の数字だけを表示する。
[root@master ~]# grep -E '^[0-9]{1}$' test.txt
1

2桁の数字だけを表示する。
[root@master ~]# grep -E '^[0-9]{2}$' test.txt
22

3桁の数字だけを表示する。
[root@master ~]# grep -E '^[0-9]{3}$' test.txt
333

4桁の数字だけを表示する。
[root@master ~]# grep -E '^[0-9]{4}$' test.txt
4444

5桁の数字だけを表示する。
[root@master ~]# grep -E '^[0-9]{5}$' test.txt
55555

1,2桁の数字だけを表示する。
[root@master ~]# grep -E '^[0-9]{1,2}$' test.txt
1
22

1,2,3桁の数字だけを表示する。
[root@master ~]# grep -E '^[0-9]{1,3}$' test.txt
1
22
333

1,2,3,4桁の数字だけを表示する。
[root@master ~]# grep -E '^[0-9]{1,4}$' test.txt
1
22
333
4444

1,2,3,4,5桁の数字だけを表示する。
[root@master ~]# grep -E '^[0-9]{1,5}$' test.txt
1
22
333
4444
55555
##11.2 IPv4アドレスの検索
[root@master ~]# ip a|grep -E -w '[0-9]{1,3}\.[0-9]{1,3}\.[0-9]{1,3}\.[0-9]{1,3}'
    inet 127.0.0.1/8 scope host lo
    inet 172.18.0.10/16 brd 172.18.255.255 scope global eth0
    inet 192.168.0.10/24 brd 192.168.0.255 scope global eth0
    inet 172.18.10.1/24 brd 172.18.10.255 scope global cbr0

以下のように、"999.999.999.999"のようにIPアドレスとして正しくないものも検索にヒットしてしまう。
[root@master ~]# echo 999.999.999.999 |grep -E -w '[0-9]{1,3}\.[0-9]{1,3}\.[0-9]{1,3}\.[0-9]{1,3}'
999.999.999.999

ipcalcコマンドを使って、検索した数値が正しいIPアドレスかどうかを判定する。
[root@master ~]# echo 999.999.999.999 |grep -E -w '[0-9]{1,3}\.[0-9]{1,3}\.[0-9]{1,3}\.[0-9]{1,3}'|xargs ipcalc -c
ipcalc: bad IPv4 address: 999.999.999.999

正しい場合は、何もエラーが表示されない。
[root@master ~]# echo 0.0.0.0 |grep -E -w '[0-9]{1,3}\.[0-9]{1,3}\.[0-9]{1,3}\.[0-9]{1,3}'|xargs ipcalc -c
[root@master ~]#
##11.3 空行でない行の表示
^は行頭、$は行末を表す。
コメント行以外を表示する。
[root@master ~]# cat /etc/chrony.conf |grep -v ^#
server 0.centos.pool.ntp.org iburst
server 1.centos.pool.ntp.org iburst
server 2.centos.pool.ntp.org iburst
server 3.centos.pool.ntp.org iburst

stratumweight 0

driftfile /var/lib/chrony/drift
-以下、略-

コメント行と空行は表示しないようにする。
[root@master ~]# cat /etc/chrony.conf |grep -v ^#|grep -v ^$
server 0.centos.pool.ntp.org iburst
server 1.centos.pool.ntp.org iburst
server 2.centos.pool.ntp.org iburst
server 3.centos.pool.ntp.org iburst
stratumweight 0
driftfile /var/lib/chrony/drift
rtcsync
makestep 10 3
bindcmdaddress 127.0.0.1
bindcmdaddress ::1
keyfile /etc/chrony.keys
commandkey 1
generatecommandkey
noclientlog
logchange 0.5
logdir /var/log/chrony
[root@master ~]#
#12 シェルスクリプト
以下に移動しました。
bashスクリプトの書き方
bash変数展開の使い方
#13 sysctl
##13.1 単一の値を変更する場合
設定値を確認する。
[root@node1 ~]# sysctl net.ipv4.ip_forward
net.ipv4.ip_forward = 0

設定値を変更(-w)する。
[root@node1 ~]# sysctl -w net.ipv4.ip_forward=1
net.ipv4.ip_forward = 1

設定値を確認する。
[root@node1 ~]# sysctl net.ipv4.ip_forward
net.ipv4.ip_forward = 1
##13.2 範囲を変更する場合
[root@node1 ~]# sysctl -w net.ipv4.ip_local_port_range="33333 33335"
net.ipv4.ip_local_port_range = 33333 33335

[root@node1 ~]# sysctl net.ipv4.ip_local_port_range
net.ipv4.ip_local_port_range = 33333    33335
#14 並列処理
parallelを使って、複数のCPUを同時に使った検索処理を実行してみます。
[root@server ~]# yum -y install parallel
[root@server ~]# parallel --bibtex
Academic tradition requires you to cite works you base your article on.
When using programs that use GNU Parallel to process data for publication
please cite:
-中略
Type: 'will cite' and press enter.
> will cite  <===will citeと入力してEnterキーを押下する。
CPU数を確認します。CPUは2個であることがわかります。
[root@server ~]# cat /proc/cpuinfo |grep processor
processor       : 0
processor       : 1
[root@server ~]# seq 0 99 > test1.txt
[root@server ~]# seq 100 199 > test2.txt
[root@server ~]# seq 200 299 > test3.txt
[root@server ~]# seq 300 399 > test4.txt
[root@server ~]# ls
test1.txt  test2.txt  test3.txt  test4.txt
全てのCPU(-j +0)を使ってgrepによる検索を行う。
[root@server ~]# ls *|parallel --tagstring  "{}:" --line-buffer -j +0 grep -w 50 {}
test1.txt:      50

[root@server ~]# ls *|parallel --tagstring  "{}:" --line-buffer -j +0 grep -w 150 {}
test2.txt:      150

[root@server ~]# ls *|parallel --tagstring  "{}:" --line-buffer -j +0 grep -w 250 {}
test3.txt:      250

[root@server ~]# ls *|parallel --tagstring  "{}:" --line-buffer -j +0 grep -w 350 {}
test4.txt:      350

[root@server ~]# ls *|parallel --tagstring  "{}:" --line-buffer -j +0 grep -w 400 {}
[root@server ~]#
#15 プロセス名の検索、プロセスへのシグナル送信
##15.1 プロセス名検索(pgrep)
"do"を含むプロセスのPIDとプロセス名を表示する。
[root@node2 ~]# pgrep -fl do
10 watchdog/0
11 watchdog/1
21933 docker-containe
24843 docker-current

"docker"を含むプロセスのPIDとプロセス名を表示する。
[root@node2 ~]# pgrep -fl docker
21933 docker-containe
24843 docker-current
##15.2 プロセスへのシグナル送信(pkill)
docker-containeプロセスの状態を表示する。
[root@node2 ~]# ps -C dockerd-current -o comm,pid,state
COMMAND            PID S
dockerd-current  21919 S

プロセスを停止状態(SIGSTOP)にする。stateが"T"になったことがわかる。
[root@node2 ~]# pkill -SIGSTOP dockerd-current
[root@node2 ~]# ps -C dockerd-current -o comm,pid,state
COMMAND            PID S
dockerd-current  21919 T

プロセスを起動(SIGCONT)する。stateが"S"に戻ったことがわかる。
[root@node2 ~]# pkill -SIGCONT dockerd-current
[root@node2 ~]# ps -C dockerd-current -o comm,pid,state
COMMAND            PID S
dockerd-current  21919 S

プロセスにSIGKILL(9)を送信する。
ユニット定義ファイルにRestart=on-abnormalが設定されているので、SIGKILLを受信しても再起動する。
[root@node2 ~]# pkill -SIGKILL dockerd-current
[root@node2 ~]# ps -C dockerd-current -o comm,pid,state
COMMAND            PID S
dockerd-current  27040 S

プロセスにSIGTERM(15)を送信する。
正常終了の場合は、再起動しないことがわかる。
[root@node2 ~]# pkill -SIGTERM dockerd-current
[root@node2 ~]# ps -C dockerd-current -o comm,pid,state
COMMAND            PID S
[root@node2 ~]#
#16 bashコマンドの履歴を検索する方法(history |grep xxxではないよ)
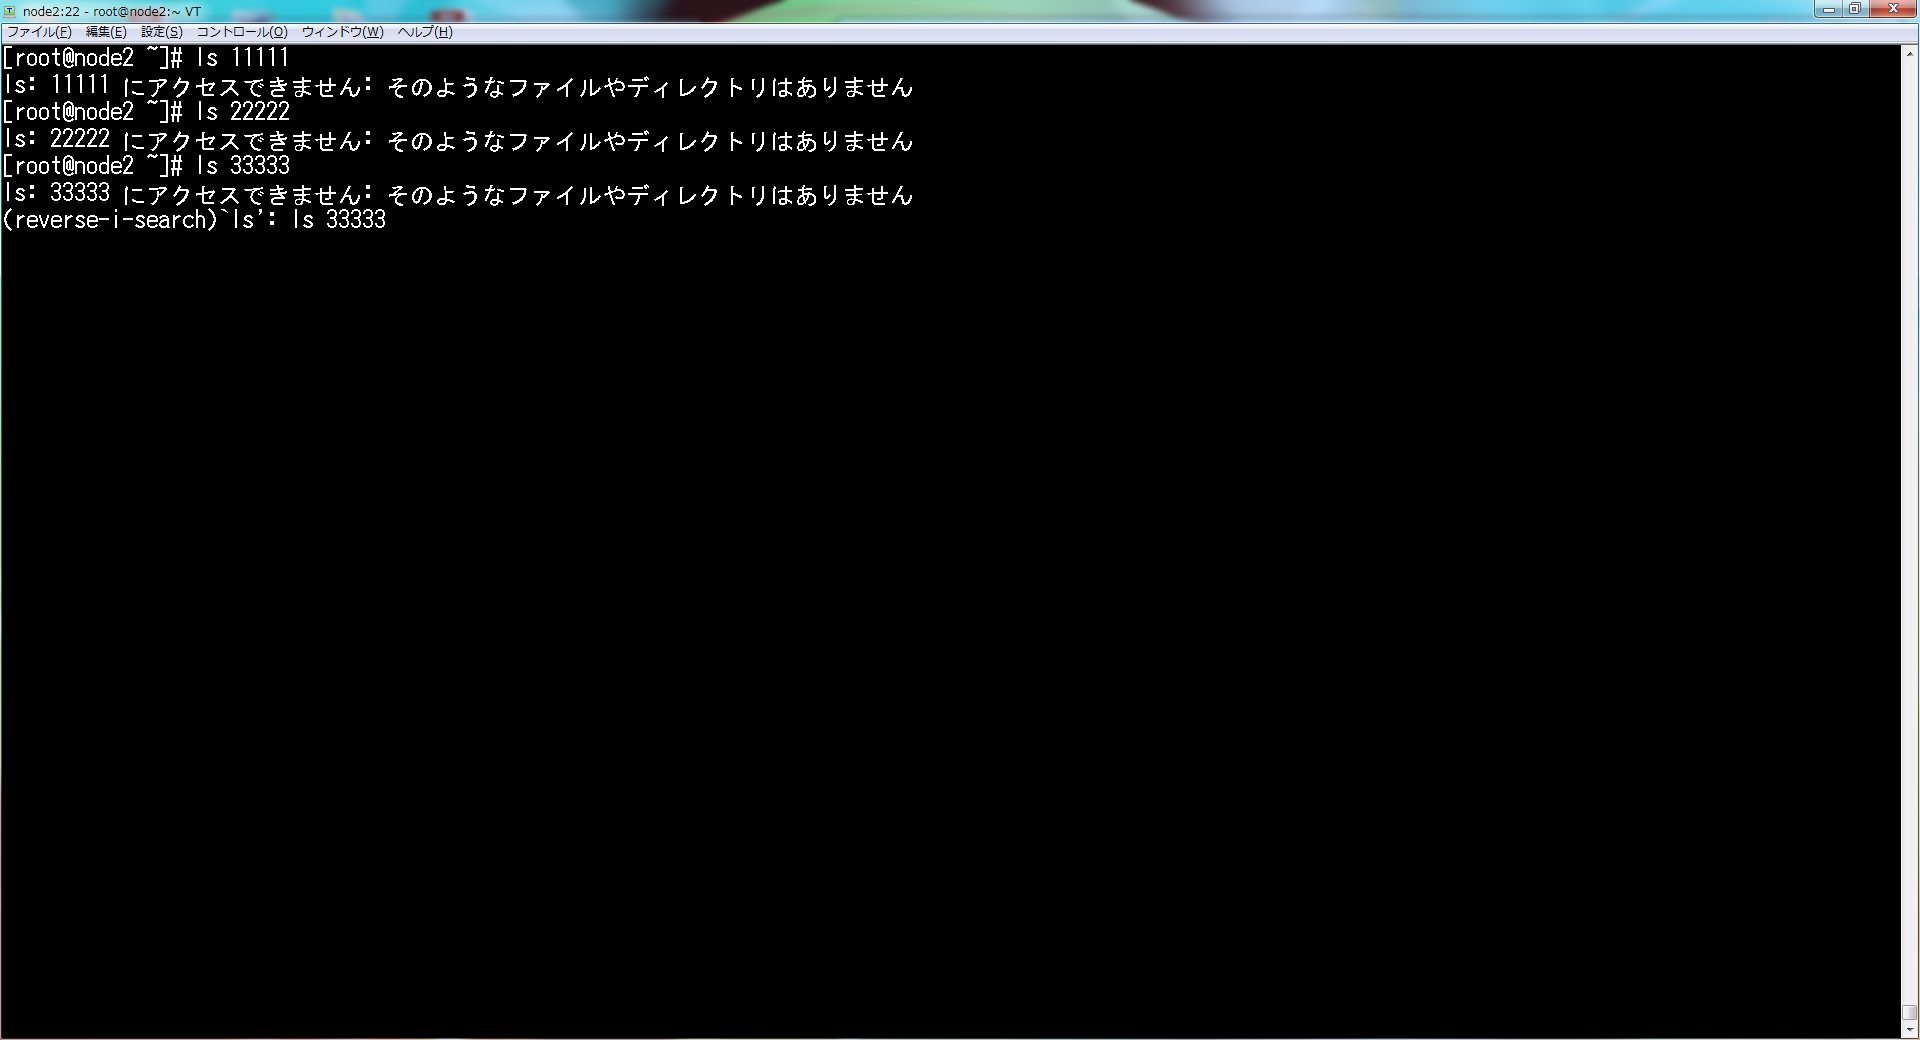
テスト用にコマンドを実行する。
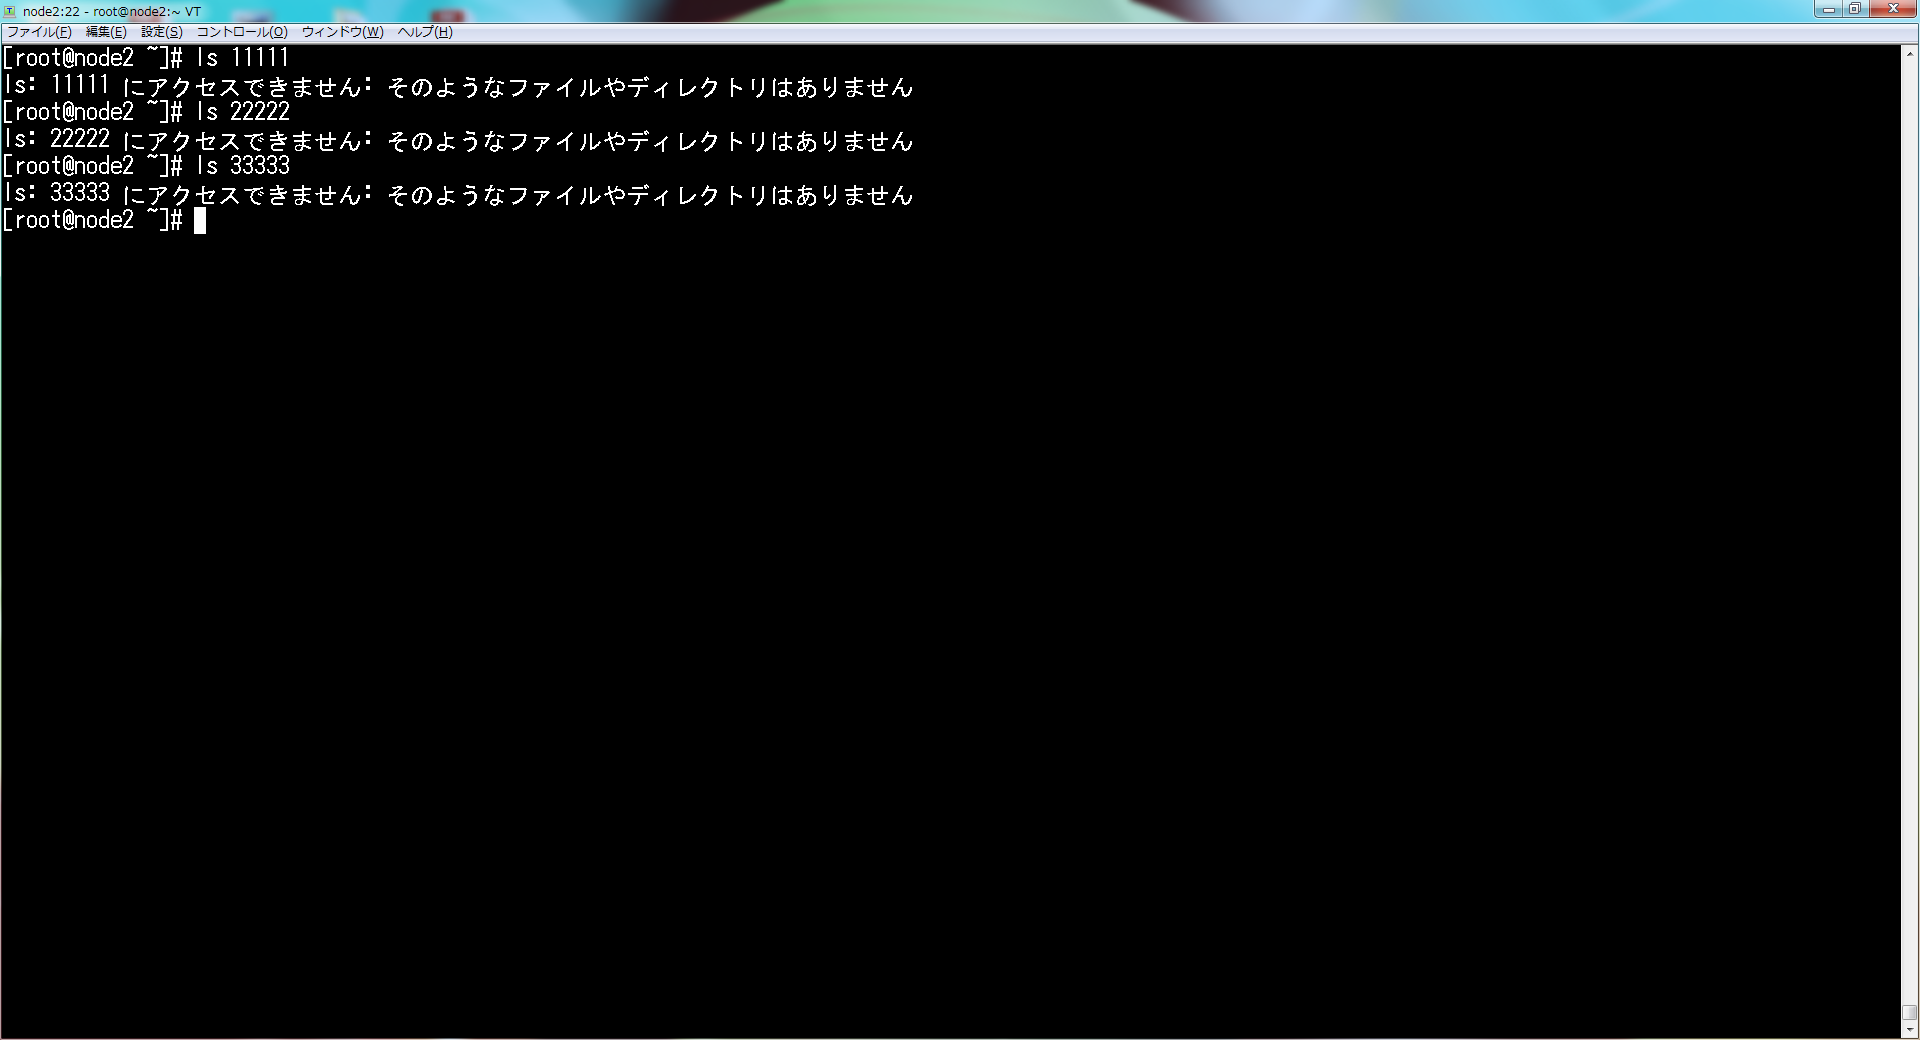
Ctrlキーを押しながらRキーを押と、"reverse-i-search"プロンプトが表示される。

後方検索をする。
"ls"と入力すると、以下の画面になる。
さらに、Ctrlキーを押下しながら、Rキーを押下すると、2つ前のlsコマンド(ls 22222)が表示される。
さらに、Ctrlキーを押下しながら、Rキーを押下すると、3つ前のlsコマンド(ls 11111)が表示される。
実行したいコマンドが表示されたら、TABキーを押す。
前方検索を有効にする場合は、以下のようにstty stop undefコマンドを実行してから、Ctrl + Rを押下する。
元に戻す場合は、stty stop ^S を実行する

#17 ブートするカーネルを変更する方法
ここ(grubbyコマンドの使い方)に記事を作成しました。
#18 ログインの自動スクリプト(TeraTermマクロ)
TeraTermマクロをクリックすることで、仮想マシンにログインできるようになります。
ログイン先のマシンが沢山ある場合や、ログイン先の環境の認証方式(パスワード認証、公開鍵認証等)が異なる場合など、
TeraTermマクロを作成しておくと非常に便利です。
TeraTermマクロの中身は以下のとおり。以下はパスワード認証の場合です。
"192.168.0.1"はログイン先のマシンのIPアドレス、user,passwdは、ユーザIDとパスワードです。

connect '192.168.0.1:22 /ssh /2 /auth=password /user=user2 /passwd=22222'
#19 ルータとして動かす方法
ホストとルータから構成するネットワークは、ネームスペースを使って作ることができます。
作り方は、ここ(ip netnsコマンドの使い方(ネットワークの実験の幅が広がるなぁ~))を
参照してください。
#20 スケジューリング
##20.1 リアルタイムスケジューリング
[root@admin ps]# cat rt.c
#include <stdio.h>
#include <sched.h>
#include <stdlib.h>
#include <unistd.h>

int main(int argc, char *argv[])
{
    struct sched_param sp;
    int policy;

    if(argv[1][0] == 'r')
        policy = SCHED_RR ;
    else if (argv[1][0] == 'f')
        policy = SCHED_FIFO ;
    else {
        fprintf(stderr, "Error\n") ;
        exit(1);
    }

    sp.sched_priority = atoi(argv[2]);
    printf("policy=%d,priority=%d\n", policy,sp.sched_priority);

    sched_setscheduler(0, policy, &sp);
    sleep(60*10) ;

    return 0;
}
[root@admin ps]# gcc -Wall -o rt rt.c
[root@admin ps]# ./rt f 10
policy=1,priority=10

[root@admin ps]# ps -C rt -o comm,sched,cls,pri,rtprio,ni
COMMAND         SCH CLS PRI RTPRIO  NI
rt                1  FF  50     10   -
[root@admin ps]# ./rt r 20
policy=2,priority=20

[root@admin ps]# ps -C rt -o comm,sched,cls,pri,rtprio,ni
COMMAND         SCH CLS PRI RTPRIO  NI
rt                2  RR  60     20   -
[root@admin ps]# ./rt r 99
policy=2,priority=99

[root@admin ps]# ps -C rt -o comm,sched,cls,pri,rtprio,ni
COMMAND         SCH CLS PRI RTPRIO  NI
rt                2  RR 139     99   -
[root@admin ps]# ps -C watchdog/0 -o comm,sched,cls,pri,rtprio,ni
COMMAND         SCH CLS PRI RTPRIO  NI
watchdog/0        1  FF 139     99   -
##20.2 タイムスライススケジューリング
[root@admin ps]# cat tp.c
#include <stdio.h>
#include <unistd.h>
#include <stdlib.h>
#include <sys/resource.h>

int main(int argc, char *argv[])
{
    int nice;

    printf("Initial nice value is %d\n", getpriority(0, 0)) ;

    setpriority(0, 0, atoi(argv[1]));
    nice = getpriority(0, 0) ;
    printf("nice value is %d\n", nice) ;

    sleep(60*10) ;
    return 0;
}
[root@admin ps]# gcc -Wall -o tp tp.c
------------------------
1. NICE値=-20(最高優先度)
------------------------
[root@admin ps]# ./tp -20
Initial nice value is 0
nice value is -20

[root@admin ps]# ps -C tp -o comm,sched,cls,pri,rtprio,ni
COMMAND         SCH CLS PRI RTPRIO  NI
tp                0  TS  39      - -20

------------------------
2. NICE値=0(デフォルト)
------------------------
[root@admin ps]# ./tp 0
Initial nice value is 0
nice value is 0

[root@admin ps]# ps -C tp -o comm,sched,cls,pri,rtprio,ni
COMMAND         SCH CLS PRI RTPRIO  NI
tp                0  TS  19      -   0

------------------------
3. NICE値=19(最低優先度)
------------------------
[root@admin ps]# ./tp 19
Initial nice value is 0
nice value is 19

[root@admin ps]# ps -C tp -o comm,sched,cls,pri,rtprio,ni
COMMAND         SCH CLS PRI RTPRIO  NI
tp                0  TS   0      -  19
#22 nmコマンドの使い方
##22.1 シンボルがどのモジュールに含まれているかを調べる方法
ここでは、kernel/net/ipv4/netfilter配下で、nf_conntrack_inというシンボルが、
どのモジュールに含まれているかを調べてみます。
現在いるディレクトリを確認する。
[root@server netfilter]# pwd
/lib/modules/3.10.0-514.el7.x86_64/kernel/net/ipv4/netfilter

nf_conntrack_inというシンボルが、どのモジュールに含まれているかを検索する。
nf_conntrack_ipv4.koというモジュールに含まれていることがわかる。
[root@server netfilter]# find . -type f -name "*.ko" -exec nm -A {} \;|grep nf_conntrack_in
./nf_conntrack_ipv4.ko:                 U nf_conntrack_in
#23 カーネルソースコードでIPアドレスの表示や比較方法
How to printk with IP address or MAC address in Linux Kernel Source Code
struct iphdr *iph = ip_hdr(skb);
printk(KERN_DEBUG "%pI4", iph->saddr);


 948 static int __init ic_bootp_recv(struct sk_buff *skb, struct net_device *dev, struct packet_type *pt, struct net_device *orig_dev)

1083 #ifdef IPCONFIG_DEBUG
1084                                 printk("DHCP: Offered address %pI4 by server %pI4\n",
1085                                        &ic_myaddr, &b->iph.saddr);
1086 #endif
#24 ユーザ管理
##24.1 ユーザの追加、削除
[root@server ~]# useradd user1
[root@server ~]# id user1
uid=1006(user1) gid=1010(user1) groups=1010(user1)
[root@server ~]# userdel -r user1
userdel: user1 のメールスプール (/var/spool/mail/user1) がありません
[root@server ~]# id user1
id: user1: no such user
##24.2 グループの追加、削除
[root@server ~]# groupadd staff
[root@server ~]# getent group|grep staff
staff:x:1007:
[root@server ~]# groupdel staff
[root@server ~]# getent group|grep staff
[root@server ~]#
##24.3 グループへのユーザ追加、削除
[root@server ~]# useradd user1
[root@server ~]# useradd user2
[root@server ~]# groupadd staff
[root@server ~]# usermod -aG staff user1
[root@server ~]# usermod -aG staff user2
[root@server ~]# getent group staff
staff:x:1009:user1,user2
[root@server ~]# gpasswd -d user1 staff
ユーザ user1 をグループ staff から削除
[root@server ~]# getent group staff
staff:x:1009:user2
user1のパスワード(11111)を設定します。
[root@server ~]# echo "11111" | passwd user1 --stdin
ユーザー user1 のパスワードを変更。
passwd: すべての認証トークンが正しく更新できました。
ローカルホストにsshでログインしてみます。
[root@server ~]# ssh -l user1 localhost
Password:
Last login: Sun Nov 22 16:08:56 2020 from localhost
[user1@server ~]$
##24.3 パスワードなしでログインする方法
[root@server ~]# useradd user1
[root@server ~]# id user1
uid=1000(user1) gid=1000(user1) groups=1000(user1)
[root@server ~]# cat /etc/shadow|grep user1
user1:!!:18633:0:99999:7:::
[root@server ~]# passwd -d user1
ユーザー user1 のパスワードを削除。
passwd: 成功
[root@server ~]# cat /etc/shadow|grep user1
user1::18633:0:99999:7:::
[root@server ~]# diff -Nur /etc/ssh/sshd_config.org /etc/ssh/sshd_config
--- /etc/ssh/sshd_config.org    2021-01-06 19:25:54.712678519 +0900
+++ /etc/ssh/sshd_config        2021-01-06 19:26:07.111745867 +0900
@@ -62,7 +62,7 @@
 # To disable tunneled clear text passwords, change to no here!
 #PasswordAuthentication yes
 ## mod by kaki
-PermitEmptyPasswords no
+PermitEmptyPasswords yes
 PasswordAuthentication yes
[root@server ~]# systemctl restart sshd
sshでログインしてみます。
パスワードを求められることなく、localhostにログインできることがわかります。
[root@server ~]# ssh localhost -l user1
[user1@server ~]$
#25 ネットワークトラブル時に使うコマンド
[root@server ~]# ip -s link show dev ens33
2: ens33: <BROADCAST,MULTICAST,UP,LOWER_UP> mtu 1500 qdisc pfifo_fast state UP mode DEFAULT group default qlen 1000
    link/ether 00:0c:29:da:26:ce brd ff:ff:ff:ff:ff:ff
    RX: bytes  packets  errors  dropped overrun mcast
    76438      932      0       0       0       0
    TX: bytes  packets  errors  dropped carrier collsns
    118570     613      0       0       0       0
[root@server ~]# ethtool -S ens33
NIC statistics:
     rx_packets: 1149
     tx_packets: 763
     rx_bytes: 98667
     tx_bytes: 127998
     rx_broadcast: 0
     tx_broadcast: 0
     rx_multicast: 0
     tx_multicast: 0
     rx_errors: 0
     tx_errors: 0
     tx_dropped: 0
     multicast: 0
     collisions: 0
     rx_length_errors: 0
     rx_over_errors: 0
     rx_crc_errors: 0
     rx_frame_errors: 0
     rx_no_buffer_count: 0
     rx_missed_errors: 0
     tx_aborted_errors: 0
     tx_carrier_errors: 0
     tx_fifo_errors: 0
     tx_heartbeat_errors: 0
     tx_window_errors: 0
     tx_abort_late_coll: 0
     tx_deferred_ok: 0
     tx_single_coll_ok: 0
     tx_multi_coll_ok: 0
     tx_timeout_count: 0
     tx_restart_queue: 0
     rx_long_length_errors: 0
     rx_short_length_errors: 0
     rx_align_errors: 0
     tx_tcp_seg_good: 9
     tx_tcp_seg_failed: 0
     rx_flow_control_xon: 0
     rx_flow_control_xoff: 0
     tx_flow_control_xon: 0
     tx_flow_control_xoff: 0
     rx_long_byte_count: 98667
     rx_csum_offload_good: 1009
     rx_csum_offload_errors: 0
     alloc_rx_buff_failed: 0
     tx_smbus: 0
     rx_smbus: 0
     dropped_smbus: 0
#X 参考情報
ipコマンド チートシート
逆引きシェルスクリプト
Linuxコマンドでテキストデータを自在に操る
正規表現
正規表現
date コマンド