概要
今回はTerraformを使ってAWS Amplifyを構築し、Reactアプリケーションを自動でデプロイする方法について解説していきたいと思います。
目次
やったこと
-
TerrafoemでAmplifyを構築する
-
構築したAmplifyに対して、Reactアプリをデプロイする
今回は「1」について解説する内容となっております。
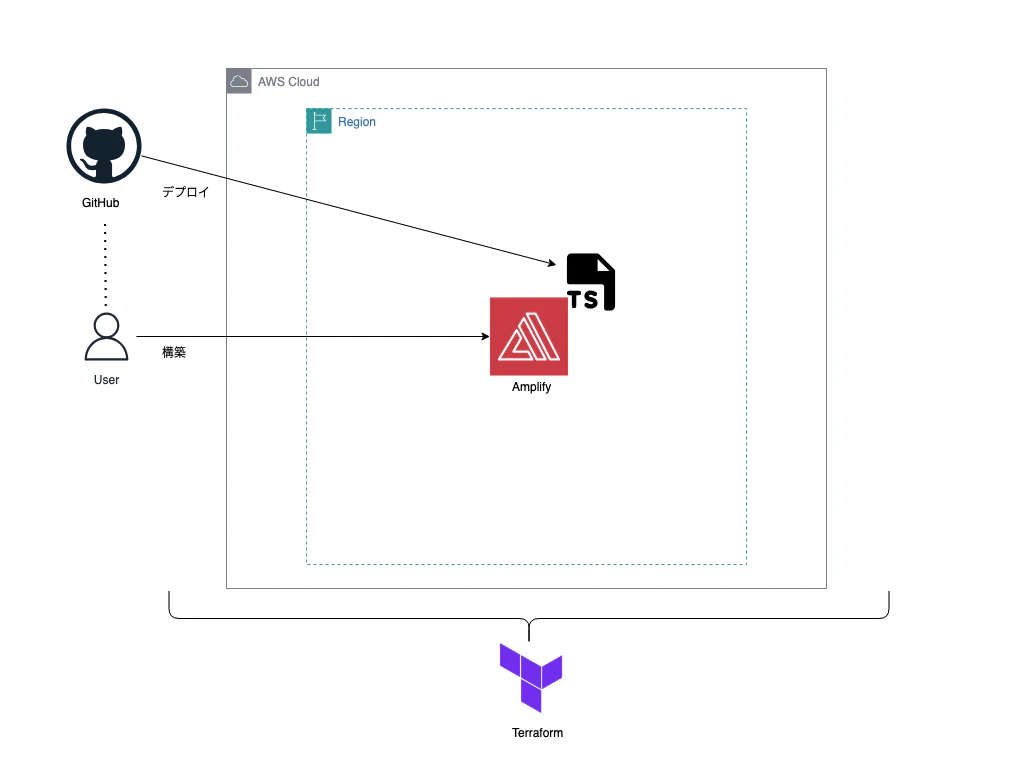
構成イメージ
構成イメージは下記になります。
手順
ステップ1:ディレクトリ及びファイルの作成
最初にgithub上にリモートリポジトリを作成し、ローカルにクローンしましょう。
gh repo create [リポジトリ名] --[オプション]
## リポジトリ命名規則:[小文字]-[小文字]-project
## public:公開
## private:非公開
gh repo clone <ユーザ名>/<リポジトリ名>
次に、作成したプロジェクト配下に以下ディレクトリ及びファイル作成します。
├── app/                  # デプロイするアプリケーション用のディレクトリ
│
└── infra/
    ├── main.tf           # プロバイダの定義とTerraformバージョン
    ├── amplify.tf        # AWS Amplifyのリソース定義
    ├── variables.tf      # 変数定義
    ├── outputs.tf        # デプロイ後の出力
    └── terraform.tfvars  # githubのURL・PAT
ステップ2:ファイル記入
main.tf
インフラ全体の基本設定(Terraformのバージョン要件、使用プロバイダー、AWS接続情報)を定義します。
terraform {
  required_version = ">= 1.0.0"
  required_providers {
    aws = {
      source  = "hashicorp/aws"
      version = "~> 5.0"
    }
  }
}

provider "aws" {
  region     = var.aws_region
  access_key = var.aws_access_key_id
  secret_key = var.aws_secret_access_key
}
amplify.tf
AWS Amplify を使ったフロントエンドのホスティング環境を定義します。IAMロールの作成からAmplifyアプリ・デプロイブランチの設定まで一括で管理します。
# IAM Role for Amplify
resource "aws_iam_role" "amplify_service_role" {
  name = "${var.amplify_app_name}-amplify-service-role"

  assume_role_policy = jsonencode({
    Version = "2012-10-17"
    Statement = [
      {
        Effect = "Allow"
        Principal = {
          Service = "amplify.amazonaws.com"
        }
        Action = "sts:AssumeRole"
      }
    ]
  })
}

# Attach AdministratorAccess-Amplify managed policy
resource "aws_iam_role_policy_attachment" "amplify_admin" {
  role       = aws_iam_role.amplify_service_role.name
  policy_arn = "arn:aws:iam::aws:policy/AdministratorAccess-Amplify"
}

# Amplify Resource
resource "aws_amplify_app" "temp_amplify_app" {
  name                 = var.amplify_app_name
  repository           = var.github_repository_url
  oauth_token          = var.github_oauth_token
  platform             = "WEB"
  iam_service_role_arn = aws_iam_role.amplify_service_role.arn

  # The default build_spec added by the Amplify Console for React.
  build_spec = <<-EOT
    version: 1
    applications:
      - backend:
          phases:
            build:
              commands:
                - cd app
                - npm install
                - npm install --save-dev @aws-amplify/backend@1.16.1 @aws-amplify/backend-cli@1.8.0
                - npx ampx pipeline-deploy --branch $AWS_BRANCH --app-id $AWS_APP_ID
        frontend:
          phases:
            build:
              commands:
                - npm run build
          artifacts:
            baseDirectory: app/dist
            files:
              - '**/*'
          cache:
            paths:
              - app/node_modules/**/*
  EOT
}

# Deployment branch
resource "aws_amplify_branch" "main_branch_deployment" {
  app_id      = aws_amplify_app.temp_amplify_app.id
  branch_name = var.amplify_branch_name
  stage       = "PRODUCTION"
}
Amplify がアプリケーションをビルドするための詳細な手順をbuild_specで定義します。
backendではappディレクトリにパッケージとツールをインストールし、AWSにバックエンドリソースをデプロイする内容になっています。
frontendではアプリをビルドし、成果物をAmplifyにホスティングします。
  build_spec = <<-EOT
    version: 1
    applications:
      - backend:
          phases:
            build:
              commands:
                - cd app
                - npm install
                - npm install --save-dev @aws-amplify/backend@1.16.1 @aws-amplify/backend-cli@1.8.0
                - npx ampx pipeline-deploy --branch $AWS_BRANCH --app-id $AWS_APP_ID
        frontend:
          phases:
            build:
              commands:
                - npm run build
          artifacts:
            baseDirectory: app/dist
            files:
              - '**/*'
          cache:
            paths:
              - app/node_modules/**/*
  EOT
output.tf
デプロイされたリソースの情報を確認しやすくするために、実行後に出力する値を定義します。
output "amplify_app_url" {
  description = "The default URL of the deployed Amplify application."
  value       = aws_amplify_app.temp_amplify_app.default_domain
}

output "amplify_app_id" {
  description = "The ID of the Amplify App."
  value       = aws_amplify_app.temp_amplify_app.id
}
variables.tf
Terraform全体で使用する変数を定義します。
variable "aws_region" {
  description = "To deploy resources."
  type        = string
  default     = "ap-northeast-1"
}

# Name of Amplify App
variable "amplify_app_name" {
  description = "The name of the Amplify App."
  type        = string
  default     = "temp-amplify-app"
}

# GitHub Repo URL
variable "github_repository_url" {
  description = "The URL of the GitHub repository containing the React app."
  type        = string
  default     = "https://github.com/AegisPuman/20260307_Amplify_Test"
}

# GitHub OAuth Token
variable "github_oauth_token" {
  description = "GitHub OAuth Token with 'repo' scope for Amplify to access the repository."
  type        = string
  sensitive   = true
}

variable "amplify_branch_name" {
  description = "The branch name to deploy in Amplify."
  type        = string
  default     = "main"
}

variable "aws_access_key_id" {
  description = "The ID of the Amplify App."
  type        = string
  sensitive   = true
}

variable "aws_secret_access_key" {
  description = "The secret access key of the Amplify App."
  type        = string
  sensitive   = true
}
terraform.trvars
variables.tf で定義された変数に実際の値を代入します。
github_oauth_token    = "githubトークン"
github_repository_url = "リポジトリのURL"
aws_access_key_id     = "AWSアクセスキー"
aws_secret_access_key = "AWSシークレットアクセスキー"
警告
機密情報が含まれているため、.gitignoreでステージングされないようにしましょう。
ステップ3:Amplify構築
準備が整いましたので、下記コマンドでAmplifyを構築します。
cd infra
terraform init
terraform apply
下記画像のようにマネコン上にてAmplifyが構築されたことを確認できました。

まとめ
今回はTerraformを活用してAmplifyを構築しました。
簡易的な手順でAmplifyをコード管理することができてとても満足しています。
次回はReactアプリをデプロイしてみたいと思います。