修正履歴
- 2017/02/11: コマンドラインやNSCに関する誤記を修正.NetAnimのgifアニメを追加.新シナリオスクリプトの作成および実行方法を追加.
- 2017/02/13: シナリオスクリプトを実行する≒ネットワークシミュレーション,である旨を追記.
1. はじめに
ネットワークシミュレーションとは,文字通り,通信ネットワークをPC上で模擬して,性能や動作を評価することです.有料・無料のもの含め,たくさんのネットワークシミュレータが存在するみたいですが,今回は無料かつオープンソースのns-3をインストールし,NetAnimのexampleスクリプトで遊んでみます.
2. ns-3 (Network Simulator 3)
ns-3は,オープンソースの離散事象ネットワークシミュレータです.研究や教育用途での使用を目的に開発されています.なお本記事では,2017/2/4時点の最新版である,ns-3.26を想定します.
3. 環境構築
3.1 環境
- OS: Ubuntu 14.04 LTS, 64bit
- Memory: 15.6GiB
- Processor: Intel Core i7-5820K CPU @3.30GHz*12
他のLinuxディストリビューションや,Windowsや,Macへのインストール方法は,公式インストールガイドをご参照ください.
3.2 パッケージの準備
公式インストールガイドを見ながら,必要なパッケージを準備します.
$ apt-get install gcc g++ python # c++
$ apt-get install gcc g++ python python-dev # python
$ apt-get install qt4-dev-tools libqt4-dev # qt4 development tools (netanimに必要だそうです)
$ apt-get install mercurial # mercurial
$ apt-get install bzr # python bindings
$ apt-get install gdb valgrind # debugging
$ apt-get install gsl-bin libgsl0-dev libgsl0ldbl # GNU Scientific Library (GSL) for Wifi error models
$ apt-get install flex bison libfl-dev # for Network Simulation Cradle (nsc)
$ apt-get install tcpdump # read pcap files
$ apt-get install sqlite sqlite3 libsqlite3-dev # database support for statistics framework
$ apt-get install libxml2 libxml2-dev # xml-based version
$ apt-get install libgtk2.0-0 libgtk2.0-dev # a GTK-based configuration system
$ apt-get install vtun lxc # virtual machines
$ apt-get install uncrustify # support for utils/check-style.py
$ apt-get install doxygen graphviz imagemagick # doxygen
$ apt-get install texlive texlive-extra-utils texlive-latex-extra texlive-font-utils texlive-lang-portuguese dvipng # doxygen
$ apt-get install python-sphinx dia # ns3-manual and tutorial written by them
3.3 インストール
Bakeという便利ツールを利用して,ns-3をインストールします.なお,以降は新規ディレクトリ~/ns-3.26配下にインストールする前提で話を進めます.
まずは,Bake自体をインストールします.Python2.6以上とmercurialが必要みたいです.
$ mkdir ns-3.26 #ns-3用ディレクトリを作成
$ cd ns-3.26 #ns-3用ディレクトリに移動
$ hg clone http://code.nsnam.org/bake #Bakeを入手
BakeにPATHを通します.
$ export BAKE_HOME=`pwd`/bake
$ export PATH=$PATH:$BAKE_HOME
$ export PYTHONPATH=$PYTHONPATH:$BAKE_HOME
ns-3インストールに必要なパッケージに漏れがないか,確認します.次のように出力されたらおけです.
$ bake.py check
  > Python - OK
  > GNU C++ compiler - OK
  > Mercurial - OK
  > CVS - OK
  > GIT - OK
  > Bazaar - OK
  > Tar tool - OK
  > Unzip tool - OK
  > Unrar tool - OK
  > 7z  data compression utility - OK
  > XZ data compression utility - OK
  > Make - OK
  > cMake - OK
  > patch tool - OK
  > autoreconf tool - OK
  > Path searched for tools: /usr/lib64/qt-3.3/bin
/usr/lib64/ccache /usr/local/bin  /usr/bin/bin/usr/local/sbin /usr/sbin.
/sbin /user/dcamara/home/scripts/user/dcamara/home/INRIA/Programs/bin
/user/dcamara/home/INRIA/repos/llvm/build/Debug+Asserts/bin
うちの環境では,CVSとUnrar toolと7z data compression utilityが足りないと怒られました.
$ bake.py check

...
> CVS - is missing
...
> Unrar tool - is missing
> 7z  data compression utility - is missing
...
google先生に相談したところ,下記で解決できました.
$ apt-get install cvs #CVS
$ apt-get install unrar #Unrar
$ apt-get install p7zip-full p7zip-rar #7z
Bakeに,欲しいns-3のバージョンを設定します.公式スタートガイドによると,必要に応じて,下記のいずれかのオプションを選択できるようです.
ns-3.26ns-3-devns-allinone-3.26ns-allinone-3
OpenFlowや,Network Simulation Cradleを使ってみたいので,全部入りのns-allinone-3.26を選択します.
$ bake.py configure -e ns-allinone-3.26
追加されたモジュールや,システム要件等を確認してみます.
$ bake.py show

module: setuptools (enabled)
  No dependencies!
module: pygoocanvas (enabled)
  No dependencies!
module: pygraphviz (enabled)
  No dependencies!
module: python-dev (enabled)
  No dependencies!
module: gccxml-ns3 (enabled)
  No dependencies!
module: libxml2-dev (enabled)
  No dependencies!
module: click-ns-3.25 (enabled)
  No dependencies!
module: BRITE (enabled)
  No dependencies!
module: qt4 (enabled)
  No dependencies!
module: nsc-0.5.3 (enabled)
  No dependencies!
module: g++ (enabled)
  No dependencies!
module: pyviz-prerequisites (enabled)
  depends on:
     python-dev (optional:True)
     pygraphviz (optional:True)
     pygoocanvas (optional:True)
module: pygccxml-1.0.0 (enabled)
  depends on:
     gccxml-ns3 (optional:False)
     setuptools (optional:False)
module: pygccxml (enabled)
  depends on:
     gccxml-ns3 (optional:False)
     setuptools (optional:False)
module: openflow-ns-3.25 (enabled)
  depends on:
     libxml2-dev (optional:False)
module: netanim-3.107 (enabled)
  depends on:
     qt4 (optional:False)
     g++ (optional:False)
module: pybindgen-0.17.0.post57+nga6376f2 (enabled)
  depends on:
     pygccxml (optional:True)
     python-dev (optional:True)
     setuptools (optional:False)
module: ns-3.26 (enabled)
  depends on:
     netanim-3.107 (optional:True)
     pybindgen-0.17.0.post57+nga6376f2 (optional:True)
     pyviz-prerequisites (optional:True)
module: ns-allinone-3.26 (enabled)
  depends on:
     netanim-3.107 (optional:True)
     nsc-0.5.3 (optional:True)
     pybindgen-0.17.0.post57+nga6376f2 (optional:True)
     pyviz-prerequisites (optional:True)
     click-ns-3.25 (optional:True)
     openflow-ns-3.25 (optional:True)
     pygccxml-1.0.0 (optional:True)
     gccxml-ns3 (optional:True)
     BRITE (optional:True)
     ns-3.26 (optional:False)

-- System Dependencies --
 > g++ - OK
 > libxml2-dev - OK
 > pygoocanvas - OK
 > pygraphviz - OK
 > python-dev - OK
 > qt4 - OK
 > setuptools - OK
なんだかよさ気なので,進みます.
$ bake.py deploy
$ bake.py download
$ bake.py build
これでns-3のビルド完了です.ns-3公式チュートリアルによると,bake.pyは内部でwafというビルドツールを呼び出しているようです.設定を色々変更してビルドしたい場合は,下記のようにすれば良いみたいです(よくわかってない).
$ cd ~/ns-3.26/source/ns-3.26
$ ./waf clean # clean the project
$ ./waf -d debug --enable-examples --enable-tests configure # 設定例)デバッグ版,exampleおよびtest有効化
$ ./waf # ビルド
詳細は,ns-3公式チュートリアルや,下記ヘルプをご参照ください.
$ ./waf --help
3.4 Test
ns-3公式チュートリアルに従い,ns-3のunit testを行います.
$ cd ~/ns-3.26/source/ns-3.26
$ ./test.py -c core
Waf: Entering directory `~/ns-3.26/source/ns-3.26/build'
Waf: Leaving directory `~/ns-3.26/source/ns-3.26/build'
Build commands will be stored in build/compile_commands.json
'build' finished successfully (0.426s)

Modules built:
antenna                   aodv                      applications
bridge                    brite (no Python)         buildings
click                     config-store              core
csma                      csma-layout               dsdv
dsr                       energy                    fd-net-device
flow-monitor              internet                  internet-apps
lr-wpan                   lte                       mesh
mobility                  mpi                       netanim (no Python)
network                   nix-vector-routing        olsr
point-to-point            point-to-point-layout     propagation
sixlowpan                 spectrum                  stats
tap-bridge                test (no Python)          topology-read
traffic-control           uan                       virtual-net-device
wave                      wifi                      wimax

Modules not built (see ns-3 tutorial for explanation):
openflow                  visualizer

PASS: TestSuite object-name-service
PASS: TestSuite ptr
...
PASS: TestSuite lte-frequency-reuse
235 of 235 tests passed (235 passed, 0 skipped, 0 failed, 0 crashed, 0 valgrind errors)
問題なさそうです.
3.5 Hello Simulator!
それでは,初シナリオスクリプトを実行します.ns-3では,./waf --run <シナリオスクリプト名>でシナリオを実行します.
$ ./waf --run hello-simulator
下記のように表示されたら,ひとまず環境構築完了です.お疲れ様でした.
Hello Simulator
4. 実験
ns-3では,シナリオスクリプトと呼ばれる.ccファイルを(作成・修正・)実行することで,ネットワークシミュレーションを行います.
3.3節の./waf configureで--enable-examples を指定することで,src/*/example/配下の全てのシナリオスクリプトを呼び出し可能になります.本記事では,見た目が派手なnetanimモジュール(src/netanim/example)を動かしてみます.NetAnimとは,シナリオスクリプトを実行する際に生成されるトレースファイルを利用して,アニメーションを表示するためのツールです.詳しい使い方は,ns3教科書もご参照ください.
また,既存のシナリオスクリプトのバグ修正を通し,新たなシナリオスクリプトの作成方法についてご紹介します.
シナリオスクリプトの中身の解説は別途….
4.1 既存のシナリオスクリプト(dumbbell-animation.cc)の実行
~/ns-3.26/source/ns-3.26に移動し,下記のコマンドで,dumbbell-animation.ccを実行します.(.ccがつかないことにご注意ください.)実行後,dumbbell-animation.xmlが生成されます.
$ ./waf --run dumbbell-animation
次に,NetAnimを起動します.
$ cd ~/ns-3.26/source/netanim-3.107
$ ./NetAnim
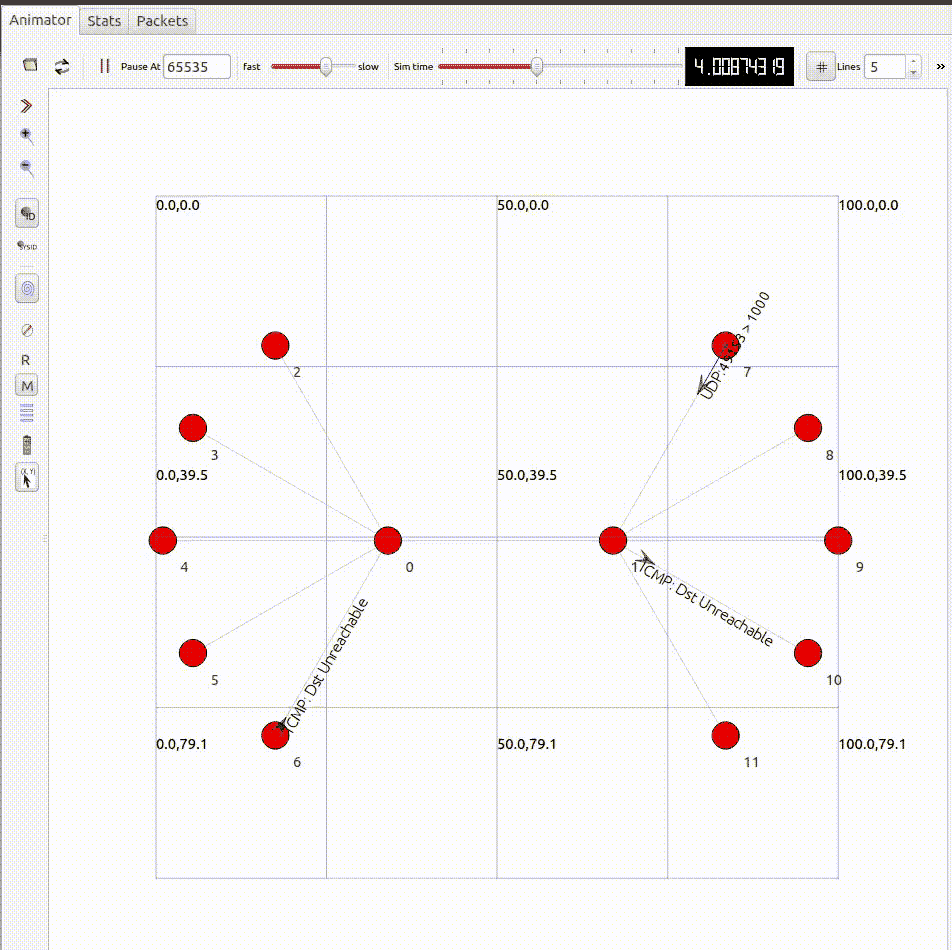
GUIの左上のOpen XML trace fileをクリックし,先ほどのdumbbell-animation.xmlを選択します.Play animationをクリックすると,アニメーションが始まります.
4.2 コマンドライン引数
シナリオスクリプト中でCommandLine.AddValue()された引数は,run時に値を渡すことができます.例えば,dumbbell-animation.ccは,次のコマンドライン引数を用意しています.
 CommandLine cmd;
 cmd.AddValue ("nLeftLeaf", "Number of left side leaf nodes", nLeftLeaf);
 cmd.AddValue ("nRightLeaf","Number of right side leaf nodes", nRightLeaf);
 cmd.AddValue ("nLeaf",     "Number of left and right side leaf nodes", nLeaf);
 cmd.AddValue ("animFile",  "File Name for Animation Output", animFile);
nLeftLeafはダンベルの左側のノード数を指定する変数(デフォルトは5),nRightLeafはダンベルの右側のノード数を指定する変数(デフォルトは5),nLeafはダンベルの左右のノード数を一度に指定する変数(デフォルトは0),そしてanimFileは出力する.xmlファイルの名前を指定する変数(デフォルトはdumbbell-animation.xml)です.次のように指定可能です.シナリオスクリプト名からコマンドライン引数まで""で囲っていることに注意してください.
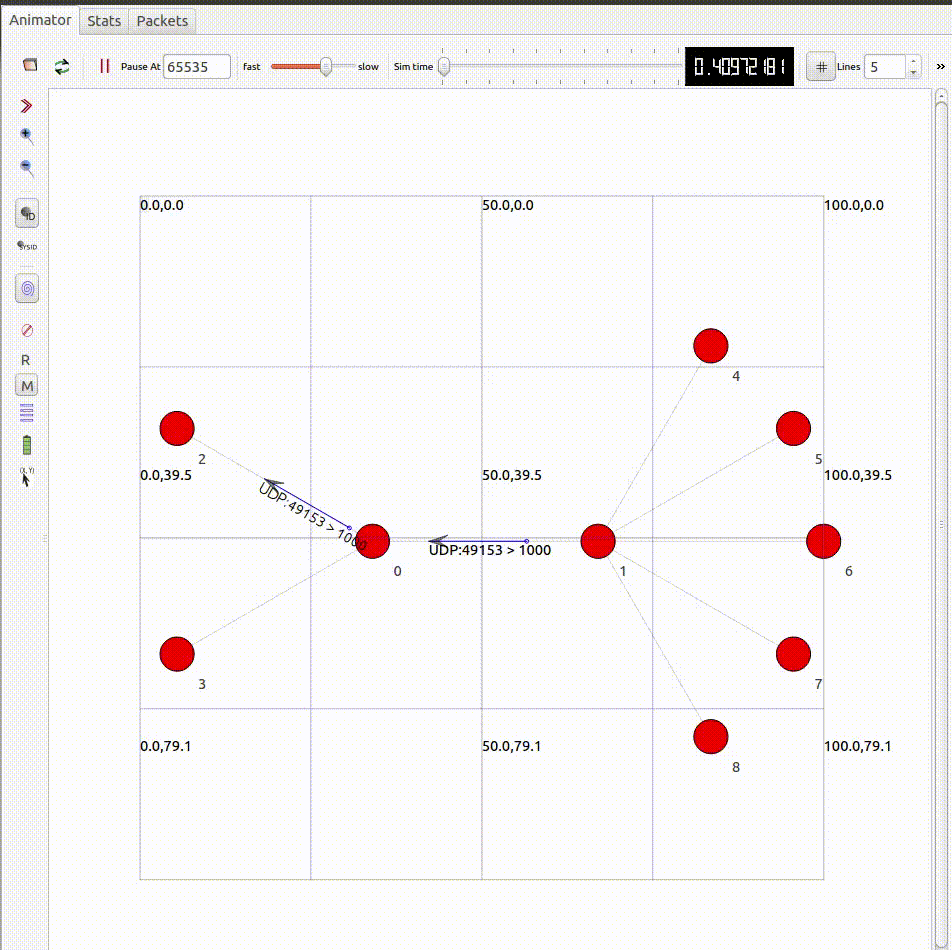
$ ./waf --run "dumbbell-animation --nLeaf=2"

左右のノード数が2つになりました.
4.3 新シナリオスクリプト(my-dumbbell-animation.cc)の作成と実行
dumbbell-animation.ccのバグを見つけたので,修正します.良い機会なので,新シナリオスクリプトの作成および実行方法をご紹介します.
$ ./waf --run "dumbbell-animation --nLeftLeaf=2"
Waf: Entering directory '~/ns-3.26/source/ns-3.26/build'
Waf: Leaving directory '~/ns-3.26/source/ns-3.26/build'
Build commands will be stored in build/compile_commands.json
'build' finished successfully (2.154s)
Command ['~/ns-3.26/source/ns-3.26/build/src/netanim/examples/ns3.26-dumbbell-animation-debug', '--nLeftLeaf=2'] terminated with signal SIGSEGV. Run it under a debugger to get more information (./waf --run <program> --command-template="gdb --args %s <args>").
上記のようにnLeftLeafをnRightLeafより小さくすると,エラーが発生します.これは,ダンベルの右側のi番目のノードから送信するパケットの宛先を設定するために,左側のi番目のノードのIPアドレスを取得する(d.GetLeftIpv4Address(i))仕組みとなっていることが原因です.
for (uint32_t i = 0; i < d.RightCount (); ++i)
  {
  // Create an on/off app sending packets to the same leaf right side
  AddressValue remoteAddress (InetSocketAddress (d.GetLeftIpv4Address (i), 1000));
  clientHelper.SetAttribute ("Remote", remoteAddress);
  clientApps.Add (clientHelper.Install (d.GetRight (i)));
  }
そこで,上記のエラーに対応した新シナリオスクリプトmy-dumbbell-animation.ccを作成します.
まず,新シナリオスクリプトを,~/ns-3.26/source/ns-3.26/scratchに配置します.
$ cd ~/ns-3.26/source/ns-3.26
$ cp src/netanim/examples/dumbbell-animation.cc scratch/my-dumbbell-animation.cc
d.GetLeftIpv4Address(i)の引数を,iからi%d.LeftCount()に修正します.
for (uint32_t i = 0; i < d.RightCount (); ++i)
  {
  // Create an on/off app sending packets to the same leaf right side
  AddressValue remoteAddress (InetSocketAddress (d.GetLeftIpv4Address (i%d.LeftCount ()), 1000));
  clientHelper.SetAttribute ("Remote", remoteAddress);
  clientApps.Add (clientHelper.Install (d.GetRight (i)));
  }
新シナリオスクリプトを作成したら,~/ns-3.26/source/ns-3.26でwafを実行します.
$ ./waf
Waf: Entering directory '~/ns-3.26/source/ns-3.26/source/ns-3.26/build'
[ 986/2812] Compiling scratch/my-dumbbell-animation.cc
[2754/2812] Linking build/scratch/my-dumbbell-animation
Waf: Leaving directory '~/ns-3.26/source/ns-3.26/source/ns-3.26/build'
Build commands will be stored in build/compile_commands.json
'build' finished successfully (4.025s)

Modules built:
antenna                   aodv                      applications
bridge                    brite (no Python)         buildings
click                     config-store              core
csma                      csma-layout               dsdv
dsr                       energy                    fd-net-device
flow-monitor              internet                  internet-apps
lr-wpan                   lte                       mesh
mobility                  mpi                       netanim (no Python)
network                   nix-vector-routing        olsr
point-to-point            point-to-point-layout     propagation
sixlowpan                 spectrum                  stats
tap-bridge                test (no Python)          topology-read
traffic-control           uan                       virtual-net-device
wave                      wifi                      wimax
xgpon (no Python)

Modules not built (see ns-3 tutorial for explanation):
openflow                  visualizer
あとは,既存のシナリオスクリプトと同様に実行することができます.
$ ./waf --run "my-dumbbell-animation --nLeftLeaf=2"
左側のノード数を,右側のノード数より小さくすることができました.
5. おわりに
ひとまず,ns-3のインストールから,exampleスクリプトの実行までをまとめてみました.私自身まだまだ完全に理解していないのですが,使ってみるとネットワークの勉強になって面白いです!ただ,英語はできるだけ読みたくない私としては,銭飛先生の教科書は必須かなと思ってます.
今後は,NSC(Network Simulation Cradle)を使ったTCP/IPスタックエミュレーションだとか,tcpの輻輳制御アルゴリズムの比較だとか,そういった実験をやっていこうかなと思ってます.
参考
- A Survey of Network Simulation Tools: Current Status and Future Developments:ネットワークシミュレータの比較論文
- ns-3:ns-3公式ページ.
- ns-3-tutorial:ns-3公式チュートリアル.
- ns-3-manual:デベロッパー用ns-3公式マニュアル
- ns-3 installation instruction:ns-3公式インストールガイド
- ns-3 getting started:ns-3公式スタートガイド.
- ns3によるネットワークシミュレーション:日本語の,代表的な教科書