
憧れのMIDI。
昔からパソコン、プログラミングには親しんできたのですが、音楽系にはほとんど触れて来ませんでした。
朧げな理解しかありませんが、MIDIが使えるようになれば手軽に音楽が鳴らせるように、なる、はず!
ひとまずM5 Stackのオプションとして発売されているMIDI音源モジュール「M5Stack用MIDIシンセサイザユニット(SAM2695)」を使ってみました。
接続&動作動画
接続といってもGrove端子なのでケーブルでつなぐだけ。
超簡単です。
(ATOM用バッテリーを ATOM Matrixの下に付けています)
サンプルプログラム
ATOM Matrixのボタン(BtnA)を押すと音が鳴ります。
最初に4つ順番に鳴り、最後に4つ同時に鳴ります。
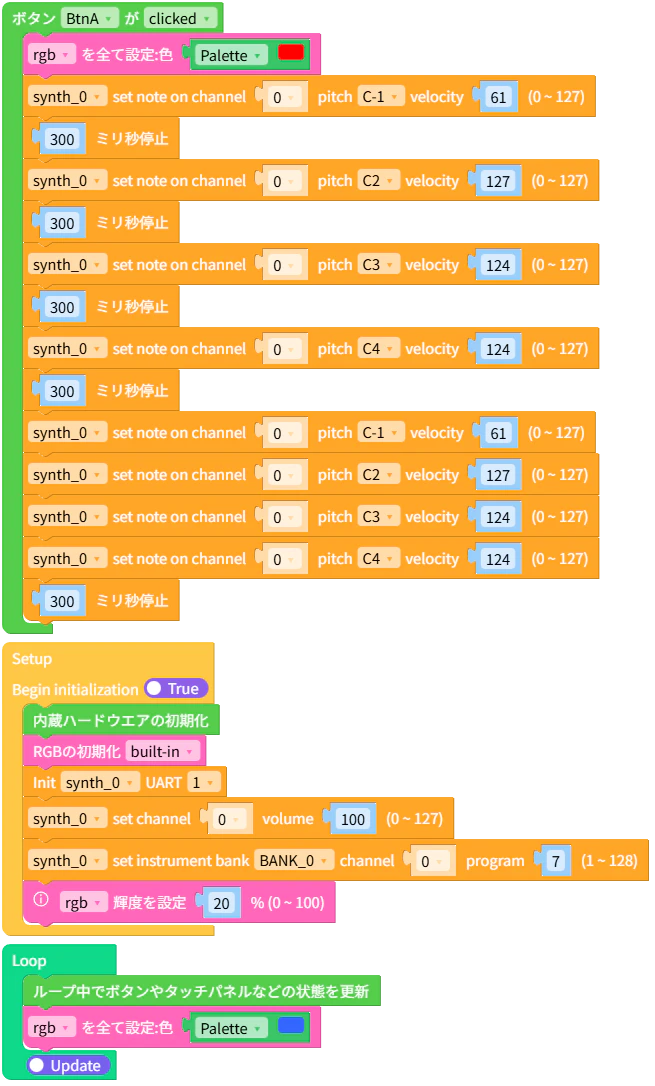
サンプルコード
UiFlow2に直接下記コードをコピペすれば動きます。
sample.py
import os, sys, io
import M5
from M5 import *
from hardware import RGB
from unit import SynthUnit
import time


rgb = None
synth_0 = None


def btnA_wasClicked_event(state):
  global rgb, synth_0
  rgb.fill_color(0xff0000)
  synth_0.set_note_on(0, 0, 61)
  time.sleep_ms(300)
  synth_0.set_note_on(0, 36, 127)
  time.sleep_ms(300)
  synth_0.set_note_on(0, 48, 124)
  time.sleep_ms(300)
  synth_0.set_note_on(0, 60, 124)
  time.sleep_ms(300)
  synth_0.set_note_on(0, 0, 61)
  synth_0.set_note_on(0, 36, 127)
  synth_0.set_note_on(0, 48, 124)
  synth_0.set_note_on(0, 60, 124)
  time.sleep_ms(300)


def setup():
  global rgb, synth_0

  M5.begin()
  Widgets.fillScreen(0x000000)

  BtnA.setCallback(type=BtnA.CB_TYPE.WAS_CLICKED, cb=btnA_wasClicked_event)

  rgb = RGB()
  rgb.set_screen([0, 0, 0, 0, 0, 0, 0, 0, 0, 0, 0, 0, 0, 0, 0, 0, 0, 0, 0, 0, 0, 0, 0, 0, 0])
  synth_0 = SynthUnit(1, port=(32, 26))
  synth_0.set_channel_volume(0, 100)
  synth_0.set_instrument(0, 0, 7)
  rgb.set_brightness(20)


def loop():
  global rgb, synth_0
  M5.update()
  rgb.fill_color(0x3366ff)


if __name__ == '__main__':
  try:
    setup()
    while True:
      loop()
  except (Exception, KeyboardInterrupt) as e:
    try:
      from utility import print_error_msg
      print_error_msg(e)
    except ImportError:
      print("please update to latest firmware")