2019年4月にLINE Thingsの自動通信機能がリリースされました。
https://engineering.linecorp.com/ja/blog/line-things-automatic-communication/
これを使えば、Wi-Fiが届きにくい環境でもIoTデバイスを利用できるという利点があります。
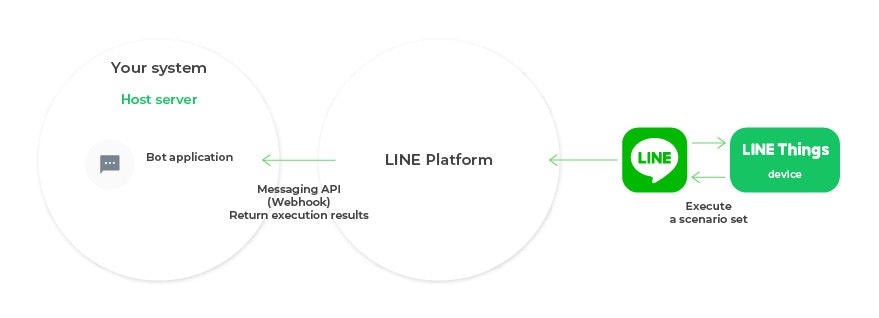
※LINE Engineerブログより
M5StickCについて
2019年5月4日〜5日に開催されたMaker Faire Kyotoにて先行発売されていたM5StickCを運良くゲットできました。
これまでは技適が通っていなかったため日本での発売ができなかったのですが、この度認証されて日本で販売されました。
M5Stickゲットだぜ!#MFKyoto2019 pic.twitter.com/a7waw4jqds
— がおまる@スマートスピーカーアプリ開発入門発売中! (@gaomar) May 4, 2019
M5StickCはこちらを確認してください
https://docs.m5stack.com/#/ja/core/m5stickc
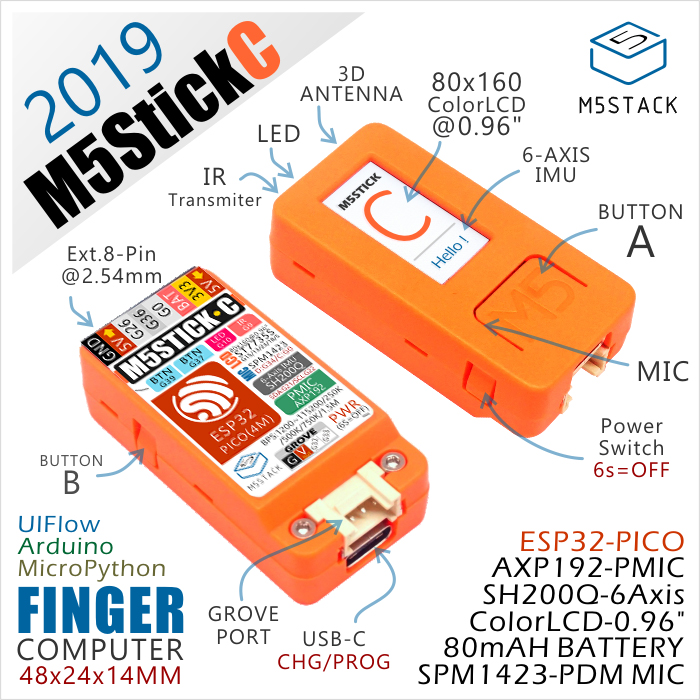
これだけ充実した機能が揃って会場価格で¥1,500でした。とってもお安いですね!
サービス例
ボタンが押されたらAmazon Connectから電話がかかってきたりと、色々な展開をすることができますよ。
LINE Thingsの自動通信機能とAmazon Connect連携してみた。ボタンを押すと携帯に電話がかかってきます。#LINEThings #M5StickC #AmazonConnect pic.twitter.com/8hW5f16EEr
— がおまる@スマートスピーカーアプリ開発入門発売中! (@gaomar) May 9, 2019
今回やるデモ
M5StickCでBボタンが押されたら数値をカウントアップをして、Aボタンが押されたらLINE Thingsの自動通信機能を使ってWebhook URLへデータを送信するところを行います。
Webhook先URLはお好きなものを指定すれば良いですが、今回はAPI Gateway と AWS Lambdaで実装しました。
1. LIFF設定
LINE DeveloperページでLIFFの設定を行います。
BLE futureはONにしておきます。エンドポイントURLは適当で構いません。
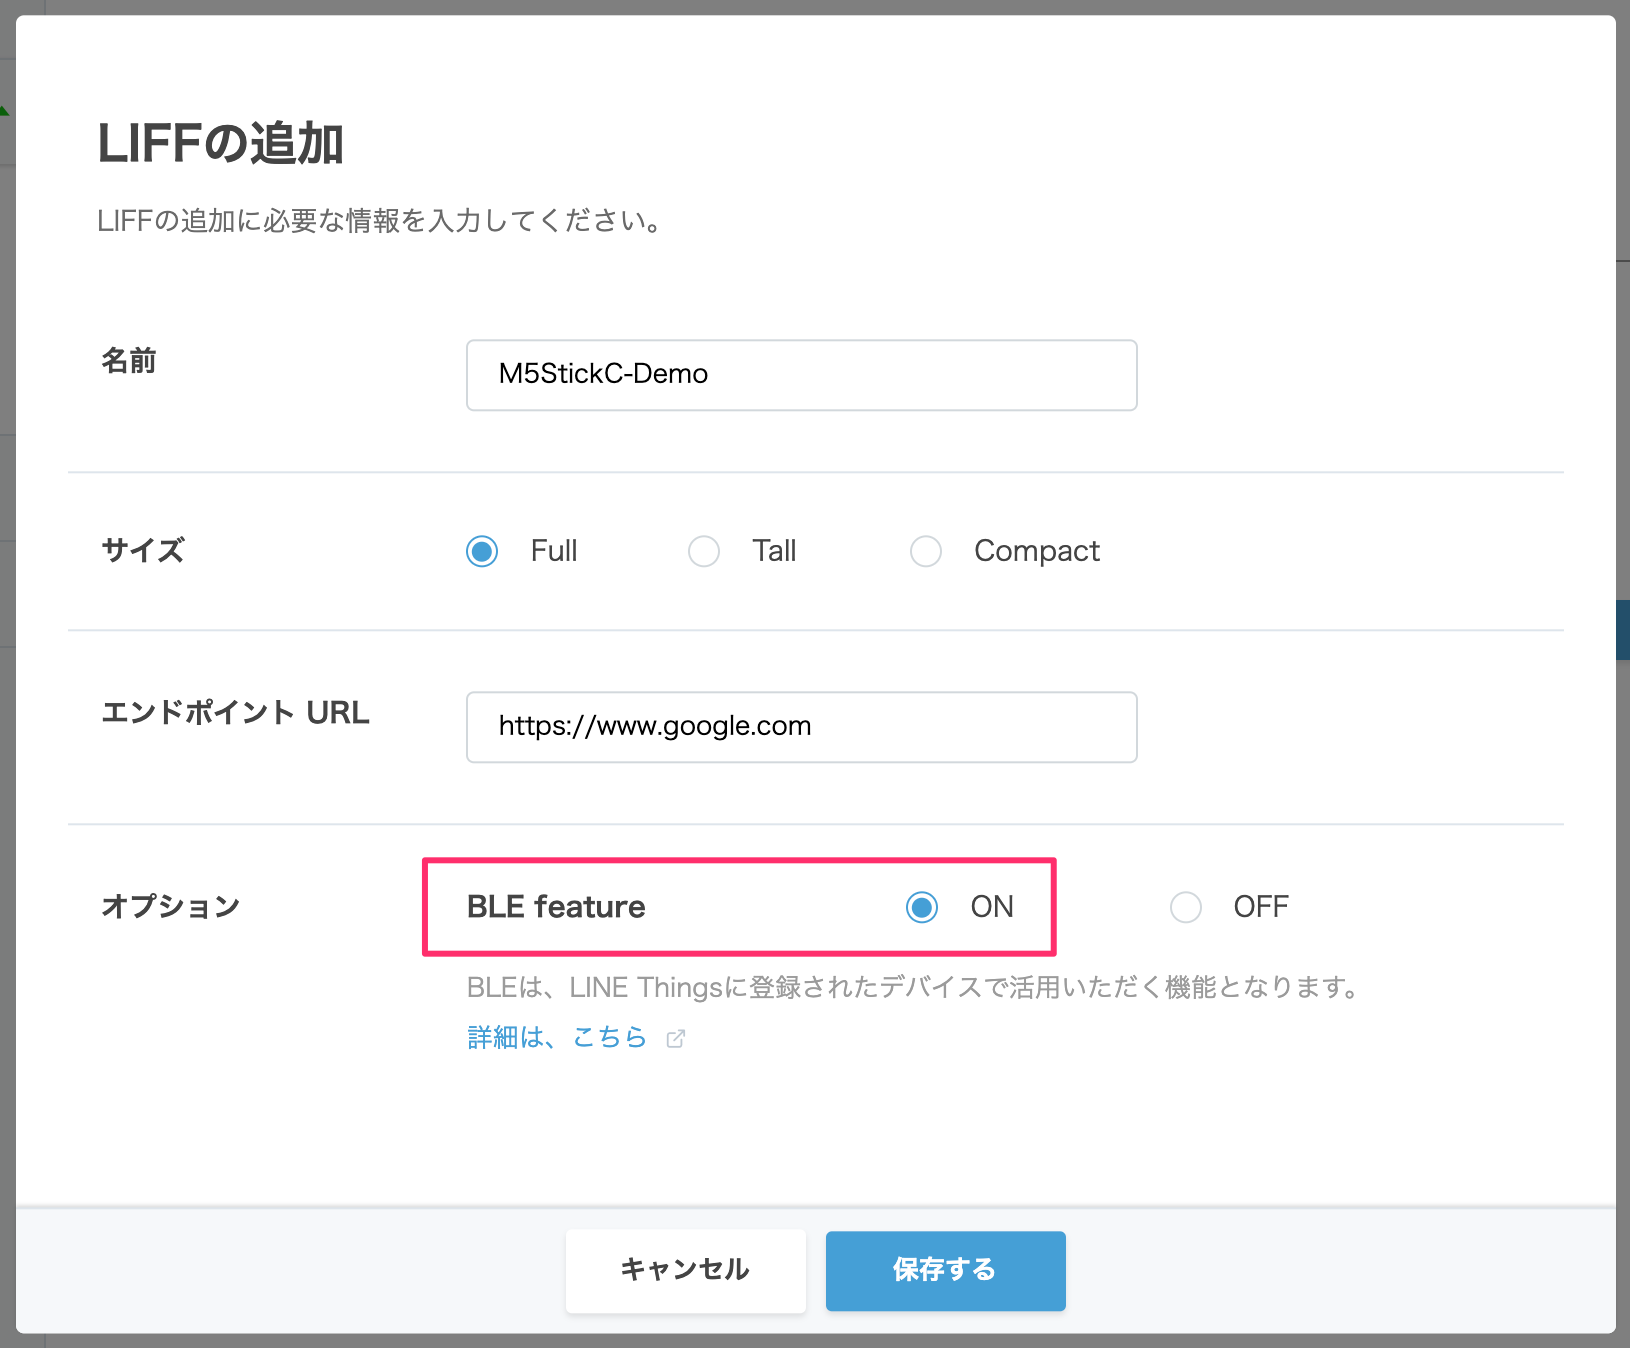
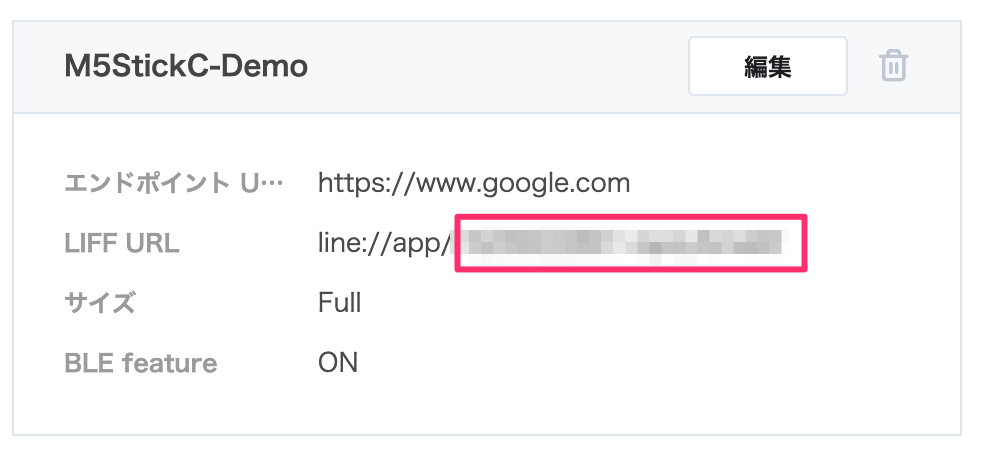
発行されるLIFFのID(XXXXXXXXXX-XXXXXXXX)をメモしておきます。
2. LINE Thingsの設定を行う
2-1. トライアルプロダクト情報を作成する
ターミナルを開いて、下記コマンドを実行します。先程発行されたLIFFのIDを指定します。
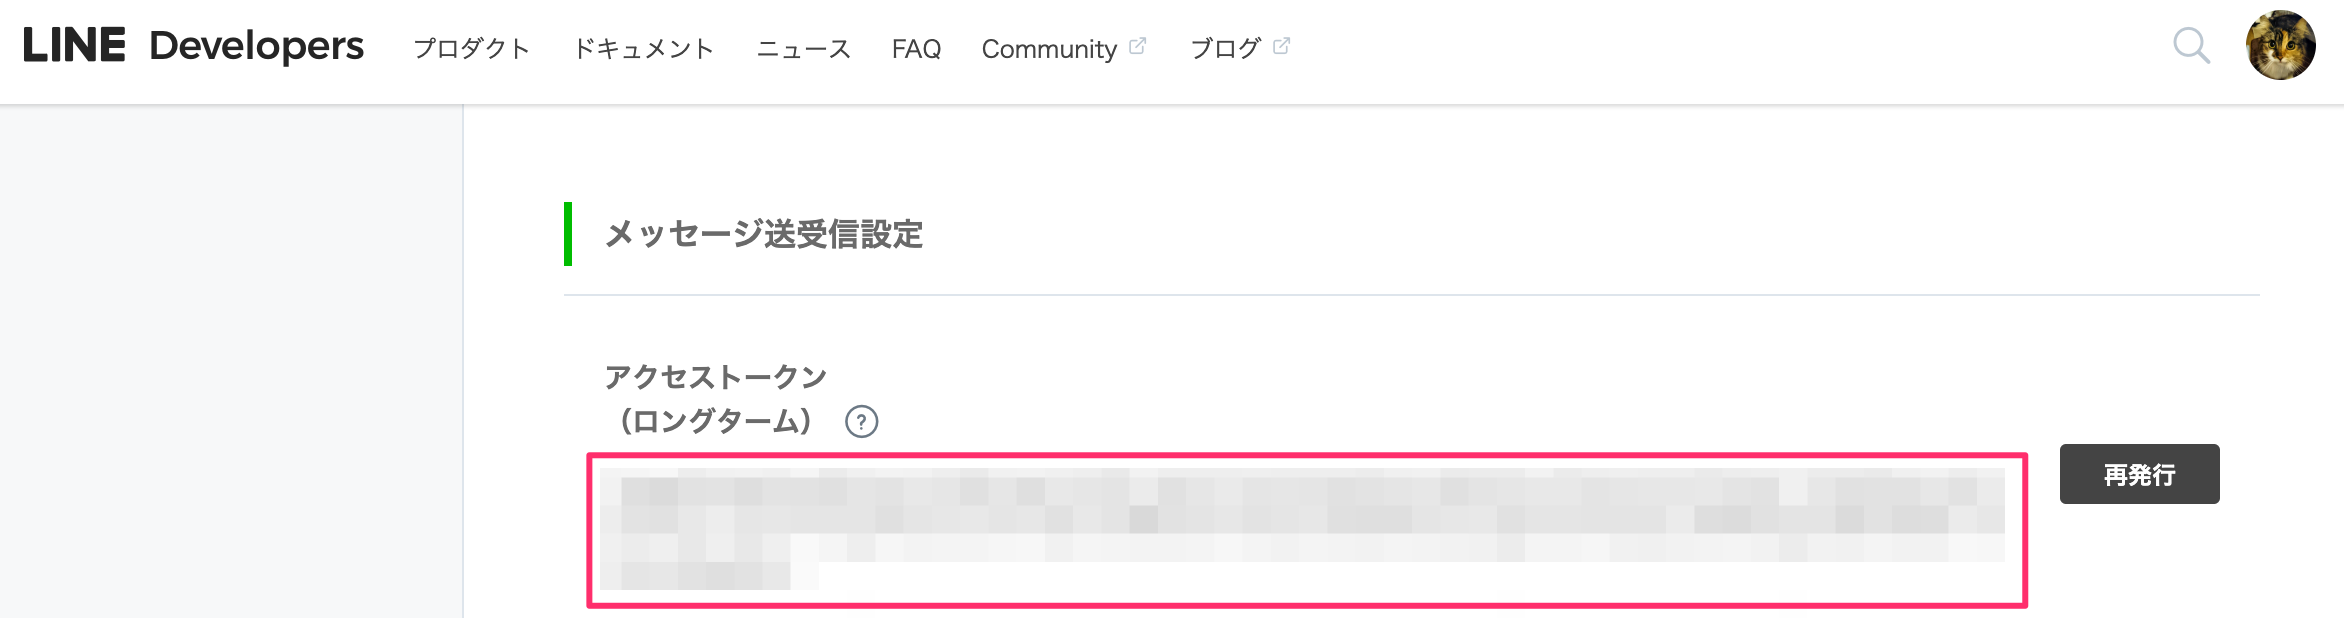
LINE Botのアクセストークンをコピペします。
詳細はこちら
https://developers.line.biz/ja/reference/line-things/#post-trial-products
curl -X POST https://api.line.me/things/v1/trial/products \
-H 'Authorization: Bearer {LINE Botのアクセストークン}' \
-H 'Content-Type:application/json' \
-d '{
  "name": "{ お好きな名前 }",
  "liffId": "{ LIFFのID }"
}'
コマンドを実行するとJSONでレスポンスが返ってきます。
プロダクトIDとサービスUUIDは後ほど使用するのでメモしておきます。
{
    "id": { プロダクトID },
    "name": "{ お好きな名前 }",
    "type": "BLE",
    "channelId": xxxxxxxxxx,
    "actionUri": "line://app/xxxxxxxxxx-xxxxxxxx",
    "serviceUuid": "{ サービスUUID }",
    "psdiServiceUuid": "e625601e-9e55-4597-a598-76018a0d293d",
    "psdiCharacteristicUuid": "26e2b12b-85f0-4f3f-9fdd-91d114270e6e"
}
2-2. シナリオセットの登録
シナリオと呼ばれる自動通信機能を登録します。
詳細はこちら
https://developers.line.biz/ja/reference/line-things/#create-scenario-set
下記コマンドを実行します。
プロダクトID、LINE Botのアクセストークン、サービスUUIDは2-1で取得した値を設定してください。
characteristicUuidはM5StickCからデータを送受信する際に必要なUUIDです。
トライアル版なので、この値はこのまま変更せずに設定します。
curl -v -X PUT https://api.line.me/things/v1/products/{ プロダクトID }/scenario-set \
-H "Authorization: Bearer { LINE Botのアクセストークン }" \
-H 'Content-Type:application/json' \
-d '
{
  "autoClose": false,
  "suppressionInterval": 0,
  "scenarios": [
    {
      "trigger": {
        "type": "BLE_NOTIFICATION",
        "serviceUuid": "{ サービスUUID }",
        "characteristicUuid": "62FBD229-6EDD-4D1A-B554-5C4E1BB29169"
      },
      "actions": [
      ]
    }
  ]
}'
3. Lambdaプログラム
サーバー側のプログラムも記述しておきます。今回は簡単な例で、コンソールにログが表示されるだけのシンプルな例です。
Lambdaにプログラムを書き込みます。
LINE Thingsから送られてくる値(bleNotificationPayload)はBase64のバイナリデータが飛んできますので、
読み取れるようにデコードしています。
exports.handler = async (event) => {
    const body = JSON.parse(event.body);
    const thingsData = body.events[0].things.result;

    const response = {
        statusCode: 200,
        body: JSON.stringify('Hello from M5StickC!'),
    };

    // bleNotificationPayloadにデータが来る
    if (thingsData.bleNotificationPayload) {
        const blePayload = thingsData.bleNotificationPayload;
        var buffer1 = new Buffer(blePayload, 'base64');
        var stickData = buffer1.toString('ascii');  //Base64をデコード
        console.log("M5StickC-Payload=" + stickData);
    }
    return response;
};
4. M5StickCにプログラムを書き込む
では、M5StickCにプログラムを書き込んでいきます。Arduinoi IDEを開いて下記プログラムを書き込んでみます。
11行目のサービスUUIDは2-1で取得したserviceUuidの値を指定します。
# include <BLEDevice.h>
# include <BLEServer.h>
# include <BLEUtils.h>
# include <BLE2902.h>
# include <M5StickC.h>

// Device Name: Maximum 30 bytes
# define DEVICE_NAME "LINE Things Trial M5Stick"

// あなたのサービスUUIDを貼り付けてください
# define USER_SERVICE_UUID "{ あなたのサービスUUID }"
// Notify UUID: トライアル版は値が固定される
# define NOTIFY_CHARACTERISTIC_UUID "62FBD229-6EDD-4D1A-B554-5C4E1BB29169"
// PSDI Service UUID: トライアル版は値が固定される
# define PSDI_SERVICE_UUID "E625601E-9E55-4597-A598-76018A0D293D"
// PSDI CHARACTERISTIC UUID: トライアル版は値が固定される
# define PSDI_CHARACTERISTIC_UUID "26E2B12B-85F0-4F3F-9FDD-91D114270E6E"

BLEServer* thingsServer;
BLESecurity* thingsSecurity;
BLEService* userService;
BLEService* psdiService;
BLECharacteristic* psdiCharacteristic;
BLECharacteristic* notifyCharacteristic;

bool deviceConnected = false;
bool oldDeviceConnected = false;

class serverCallbacks: public BLEServerCallbacks {
  void onConnect(BLEServer* pServer) {
   deviceConnected = true;
  };

  void onDisconnect(BLEServer* pServer) {
    deviceConnected = false;
  }
};

void setup() {
  Serial.begin(115200);

  BLEDevice::init("");
  BLEDevice::setEncryptionLevel(ESP_BLE_SEC_ENCRYPT_NO_MITM);

  // Security Settings
  BLESecurity *thingsSecurity = new BLESecurity();
  thingsSecurity->setAuthenticationMode(ESP_LE_AUTH_BOND);
  thingsSecurity->setCapability(ESP_IO_CAP_NONE);
  thingsSecurity->setInitEncryptionKey(ESP_BLE_ENC_KEY_MASK | ESP_BLE_ID_KEY_MASK);

  setupServices();
  startAdvertising();

  // M5Stack LCD Setup
  M5.begin(true, false, false);
  M5.Lcd.setRotation(3);

  // ボタン初期化
  pinMode(M5_BUTTON_HOME, INPUT);
  pinMode(M5_BUTTON_RST, INPUT);

  M5.Lcd.fillScreen(TFT_BLACK);
  M5.Lcd.setTextColor(YELLOW);
  M5.Lcd.setCursor(0, 0);
  M5.Lcd.print("Ready to Connect");
  Serial.println("Ready to Connect");
}

int btnValue = 0;

void loop() {

  if(digitalRead(M5_BUTTON_RST) == LOW) {
    // カウントアップ
    btnValue++;
    M5.Lcd.fillScreen(TFT_BLACK);
    M5.Lcd.setTextSize(2);
    M5.Lcd.setCursor(0, 0);
    M5.Lcd.print("Count");
    M5.Lcd.setTextColor(GREEN);
    M5.Lcd.setCursor(30, 40);
    M5.Lcd.printf("%d", btnValue);

    // ボタンが離されるまでループ
    while(digitalRead(M5_BUTTON_RST) == LOW);
  }

  if(digitalRead(M5_BUTTON_HOME) == LOW) {
    // LINE Botに紐づくWebhookにデータ送信
    const char *newValue=((String)btnValue).c_str();
    notifyCharacteristic->setValue(newValue);
    notifyCharacteristic->notify();

    M5.Lcd.fillScreen(TFT_BLACK);
    M5.Lcd.setTextSize(2);
    M5.Lcd.setCursor(0, 0);
    M5.Lcd.print("Send!!");

    // ボタンが離されるまでループ
    while(digitalRead(M5_BUTTON_HOME) == LOW);

    // カウント初期化
    btnValue = 0;
    delay(3000);
    M5.Lcd.fillScreen(TFT_BLACK);
    M5.Lcd.setCursor(0, 0);
    M5.Lcd.print("Count");
    M5.Lcd.setTextColor(GREEN);
    M5.Lcd.setCursor(30, 40);
    M5.Lcd.printf("%d", btnValue);
  }

  // Disconnection
  if (!deviceConnected && oldDeviceConnected) {
    delay(500); // Wait for BLE Stack to be ready
    thingsServer->startAdvertising(); // Restart advertising
    oldDeviceConnected = deviceConnected;
    M5.Lcd.fillScreen(TFT_BLACK);
    M5.Lcd.setTextColor(YELLOW);
    M5.Lcd.setCursor(0, 0);
    M5.Lcd.print("Ready to Connect");
  }
  // Connection
  if (deviceConnected && !oldDeviceConnected) {
    oldDeviceConnected = deviceConnected;
    M5.Lcd.fillScreen(TFT_BLACK);
    M5.Lcd.setTextColor(GREEN);
    M5.Lcd.setCursor(0, 0);
    M5.Lcd.print("Connected");
  }
}

// サービス初期化
void setupServices(void) {
  // Create BLE Server
  thingsServer = BLEDevice::createServer();
  thingsServer->setCallbacks(new serverCallbacks());

  // Setup User Service
  userService = thingsServer->createService(USER_SERVICE_UUID);

  // Notifyセットアップ
  notifyCharacteristic = userService->createCharacteristic(NOTIFY_CHARACTERISTIC_UUID, BLECharacteristic::PROPERTY_NOTIFY);
  notifyCharacteristic->setAccessPermissions(ESP_GATT_PERM_READ_ENCRYPTED | ESP_GATT_PERM_WRITE_ENCRYPTED);
  BLE2902* ble9202 = new BLE2902();
  ble9202->setNotifications(true);
  ble9202->setAccessPermissions(ESP_GATT_PERM_READ_ENCRYPTED | ESP_GATT_PERM_WRITE_ENCRYPTED);
  notifyCharacteristic->addDescriptor(ble9202);

  // Setup PSDI Service
  psdiService = thingsServer->createService(PSDI_SERVICE_UUID);
  psdiCharacteristic = psdiService->createCharacteristic(PSDI_CHARACTERISTIC_UUID, BLECharacteristic::PROPERTY_READ);
  psdiCharacteristic->setAccessPermissions(ESP_GATT_PERM_READ_ENCRYPTED | ESP_GATT_PERM_WRITE_ENCRYPTED);

  // Set PSDI (Product Specific Device ID) value
  uint64_t macAddress = ESP.getEfuseMac();
  psdiCharacteristic->setValue((uint8_t*) &macAddress, sizeof(macAddress));

  // Start BLE Services
  userService->start();
  psdiService->start();
}

void startAdvertising(void) {
  // Start Advertising
  BLEAdvertisementData scanResponseData = BLEAdvertisementData();
  scanResponseData.setFlags(0x06); // GENERAL_DISC_MODE 0x02 | BR_EDR_NOT_SUPPORTED 0x04
  scanResponseData.setName(DEVICE_NAME);

  thingsServer->getAdvertising()->addServiceUUID(userService->getUUID());
  thingsServer->getAdvertising()->setScanResponseData(scanResponseData);
  thingsServer->getAdvertising()->start();
}
5. 動作確認
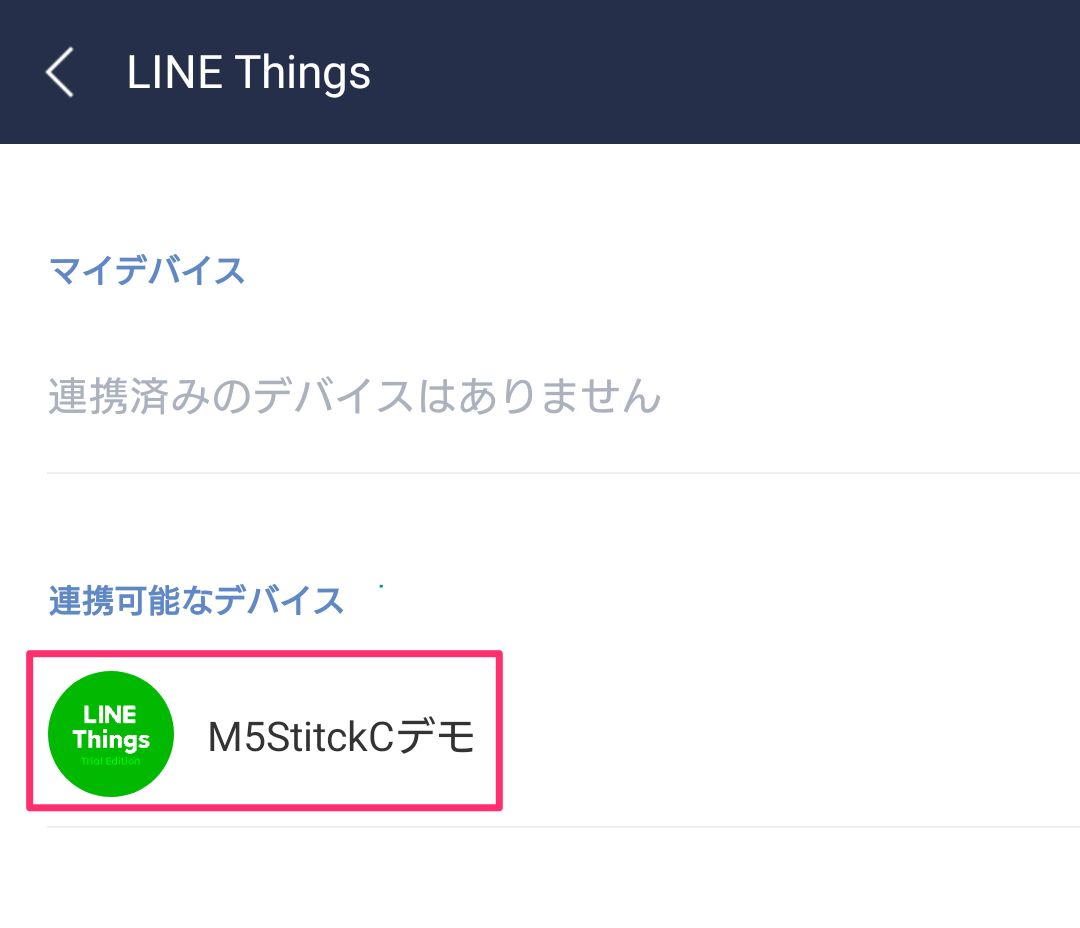
ボードに書き込んだらLINEアプリを開きます。LINE Thingsに連携可能なデバイスが表示されます。
タッチして、マイデバイスに設定しておきます。
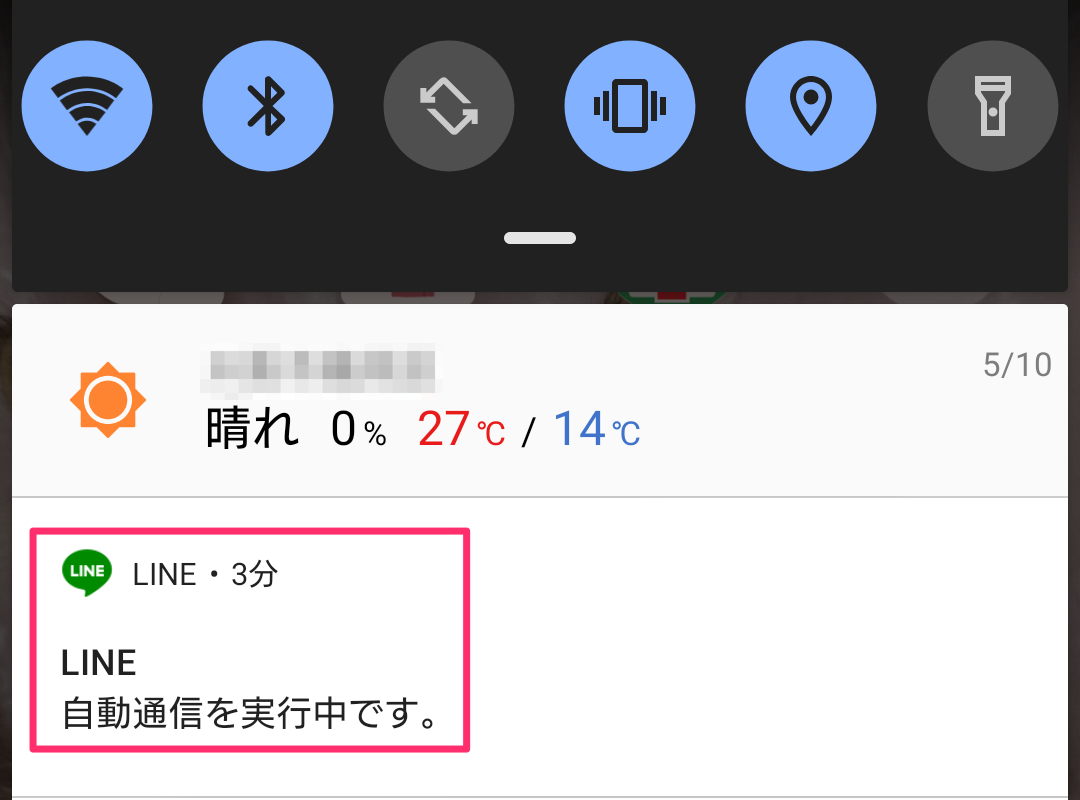
Android端末だとうまく接続されると、自動通信を実行中です。と表示されます。
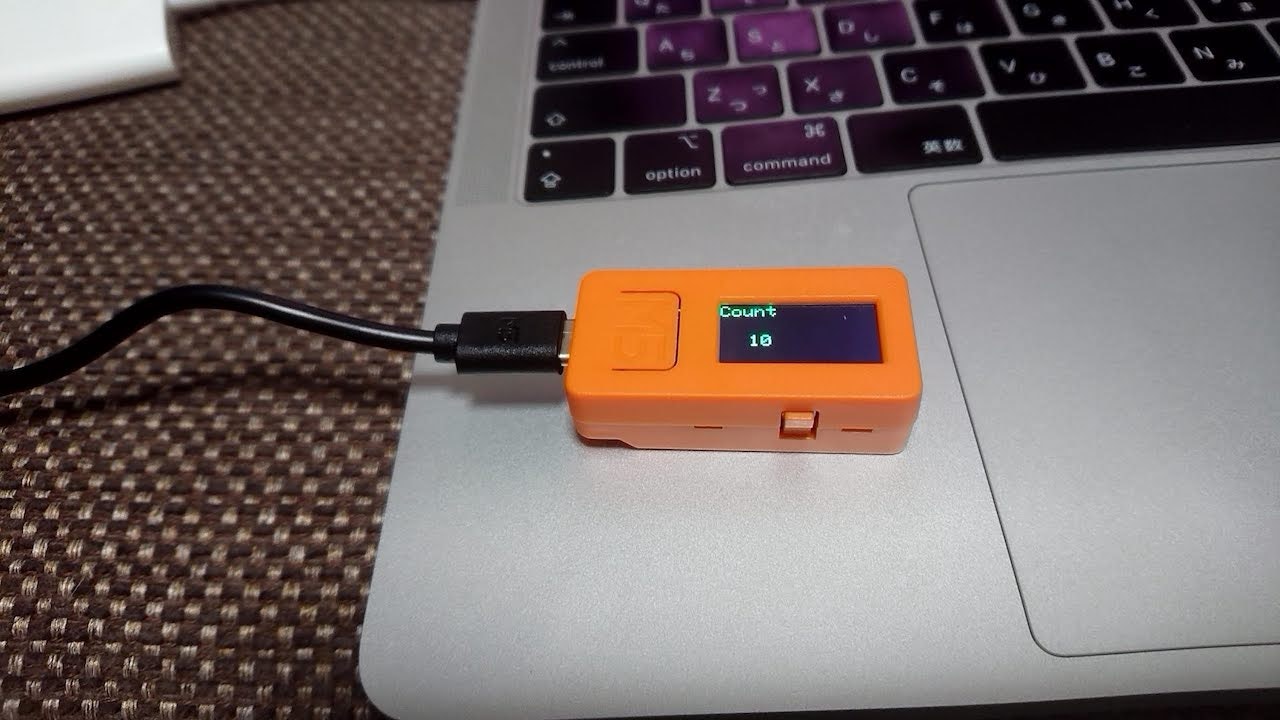
Bボタンを押して数字をカウントアップします。
Aボタンを押すと数字がAWS Lambdaに送信されます。
CloudWatchでログを確認すると、ちゃんとデータが送られてきているのがわかりますね。

まとめ
簡単なデモを試してみましたが、もっと幅広い展開をすることだってできます。
Wi-Fiが届きにくい環境でもBluetoothの電波が届く範囲ならばIoT機器を動作させることができます。
センサーの異常値の時にLINE Botへ通知を送ったり、Amazon Connectと連携して電話をかけてもらったり色々なことができます。
LINE Thingsを使って良きIoTライフを!
システム化のご検討やご相談は弊社までお問い合わせください。
https://i-enter.co.jp/contact/