はじめに
TensorFlowを触ってみたくてとりあえずチュートリアルを動かしたい。
せっかくなのでGPUで!
と思ったのですが、動くようにするまでに少し苦戦したので情報を残しておきます。
誰向け?
- TensorFlowをGPUで動かしたい人
概要
基本的にはTensorFlowの公式チュートリアルに沿って進めます
ビギナーと書いてあるだけあって上手くいけば簡単!
https://www.tensorflow.org/tutorials/quickstart/beginner
下記の環境で動かしました。
- OS:Windows10
- Ptython:Python 3.10.6
- TensorFlow:tensorflow-gpu 2.9.1
- グラフィックボード:RTX2070Super
Pythonの仮想環境を作る
ライブラリや各種バージョンで環境を汚すと面倒なので仮想環境を作成するのがおすすめらしいです。
こちらも公式でやり方書いてあるのでリンクを貼っておきます。
https://www.tensorflow.org/install/pip?hl=ja
チュートリアルのソースを打ち込んで動かしてみるが。。
下記チュートリアルのソースを打ち込んで実行するもエラー
https://www.tensorflow.org/tutorials/quickstart/beginner
- Cannot dlopen some GPU libraries. Please make sure the missing libraries mentioned above are installed properly if you would like to use GPU. Follow the guide at https://www.tensorflow.org/install/gpu for how to download and setup the required libraries for your platform. alled properly if you would like to use GPU. Follow the guide
- Skipping registering GPU devices...
- 2022-07-25 17:44:34.995926: I tensorflow/core/platform/cpu_feature_guard.cc:193] This TensorFlow binary is optimized with oneAPI Deep Neural Network Library (oneDNN) to use the following CPU instructions in performance-critical operations:  AVX AVX2 wing CPU instructions in performance-critical operations:  AVX
- To enable them in other operations, rebuild TensorFlow with the appropriate compiler flags.
- <TensorSliceDataset element_spec=TensorSpec(shape=(), dtype=tf.int32, name=None)>
CUDA Toolkitのインストール
私の場合はGPUで動かそうとしていたので、GPU用のライブラリをインストールする必要がありました。
nvidiaのページからダウンロードしてインストールします!
https://developer.nvidia.com/cuda-downloads
インストール後に確認すると別のエラーが。。
- W tensorflow/stream_executor/platform/default/dso_loader.cc:64] Could not load dynamic library 'cudart64_110.dll'; dlerror: cudart64_110.dll not found
DLLの読み込みを追加
windows版のPython3.8以降はDLL読み込みは個別に必要になるそうです。
CUDAの環境変数が自動で作成されているので、importを追加します。
(ここでだいぶはまりました)
コードの最初に下記を追加
import os; os.add_dll_directory(os.path.join(os.environ['CUDA_PATH'], 'bin'));
これで解決と思いきやさらにエラー
- W tensorflow/stream_executor/platform/default/dso_loader.cc:64] Could not load dynamic library 'cudnn64_8.dll'; dlerror: cudnn64_8.dll not found
CUDA8系DLLを導入
最初から入れておいてほしい。。という思いを抑えて下記からダウンロードします。
https://developer.nvidia.com/cuda-80-ga2-download-archive
ZIPを解凍して下記へエラーメッセージのDLLをコピーします。
C:\Program Files\NVIDIA GPU Computing Toolkit\CUDA\v11.7\bin
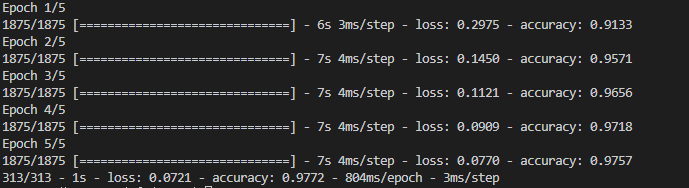
やっと動いた!
上記対応を行って実行するとターミナルに学習の進捗状況が表示されました!
というわけで、下記を注意すればTensorFlowは無事動いてくれるようです。
- CUDA Toolkitをインストールする
- CUDA8系のDLLも入れる
- CUDAのパスをインポートする(Windowsの場合)
ちょっと工夫する
チュートリアルは動いたのですが。。
正解率とかだけ見ていてもあんまり面白くないので少し改造
- テストデータを選んで画像を表示(pyplot)
- 一番確率が高い予想を表示
結果を画像で確認したかっただけなので、やり方が適当なのはあしからず。。
最終的なコードは下記になりました↓
import os; os.add_dll_directory(os.path.join(os.environ['CUDA_PATH'], 'bin')); # GPUを使用するためのDLL読み込み設定
import tensorflow as tf
import matplotlib.pyplot as plt
import numpy as np
mnist = tf.keras.datasets.mnist

(x_train, y_train), (x_test_org, y_test) = mnist.load_data()
x_train, x_test = x_train / 255.0, x_test_org / 255.0

model = tf.keras.models.Sequential([
    tf.keras.layers.Flatten(input_shape=(28, 28)),
    tf.keras.layers.Dense(128, activation='relu'),
    tf.keras.layers.Dropout(0.2),
    tf.keras.layers.Dense(10)
])

predictions = model(x_train[:1]).numpy()
tf.nn.softmax(predictions).numpy()
print(predictions)

loss_fn = tf.keras.losses.SparseCategoricalCrossentropy(from_logits=True)
# print(loss_fn(y_train[:1], predictions).numpy())

model.compile(optimizer='adam',
                loss=loss_fn,
                metrics=['accuracy'])
model.fit(x_train, y_train, epochs=5)
model.evaluate(x_test, y_test, verbose=2)

probability_model = tf.keras.Sequential([
    model,
    tf.keras.layers.Softmax()
])
target = 0
while target >= 0:
    target = int(input("テスト画像のindexを入力してね"))
    if target < 0:
        next
    plt.imshow(x_test_org[target],
                cmap=plt.cm.binary)
    plt.show()
    testdata = x_test[target:target+1]
    ans = probability_model(testdata)
    ans_idx = np.argmax(ans[0])
    print("この文字は" + str(ans_idx) + "だと思う")
    print(y_test[target:target+1])