Raspberry PiでArUcoを使ってみる
少し古い技術ですが、ロボット系の自己位置推定で見かけることがある
ARマーカーを試してみたくなり
入手したRaspberryPiでArUcoを認識させてみました。
やったこと
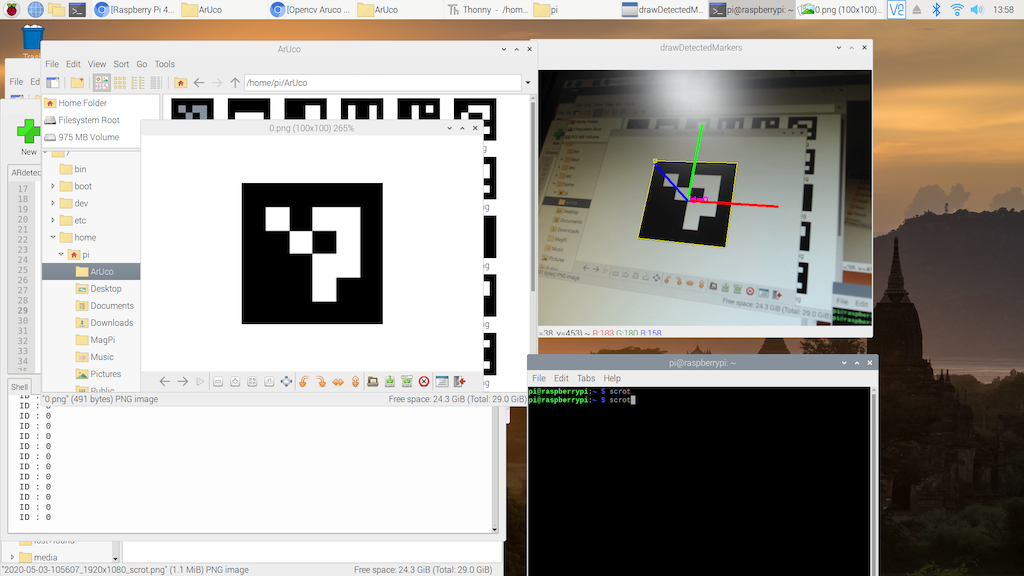
実行結果の見ためはこんな感じ。(https://www.youtube.com/watch?v=aepFM_JsxbU)
マーカーの輪郭とID,xyz軸を表示しています。 ピッチロールヨーも取得できるので
様々な用途に使えそう。

環境
・RasPi4 (RasPi3でも動くはずです)
・USBカメラ(Logicool) → Raspi camでも可能。
RasPiのセットアップ
まずは”からあげ”さんの下記の記事通りセットアップ。
認識にはOpenCVが必要です。
非常にスムーズにできました。いつも感謝です。
・Raspberry Pi 4のディープラーニングで画像認識する環境をゼロから1時間で構築する方法
git clone https://github.com/karaage0703/raspberry-pi-setup
cd raspberry-pi-setup && ./setup-opencv-raspbian-buster.sh
追加でパッケージをインストール
記事通り、いったん全部入れました。
-
Raspberry Pi 4の強化学習用のセットアップ
※追記 pipだけでもよい。 - Raspberry Pi 4 に OpenCV を楽に入れる
pip3 install opencv-contrib-python==4.1.0.25
旧手順
sudo apt-get install libjpeg-dev libtiff5-dev libjasper-dev libpng-dev
sudo apt-get install libavcodec-dev libavformat-dev libswscale-dev libv4l-dev
sudo apt-get install libxvidcore-dev libx264-dev
sudo apt-get install libatlas-base-dev gfortran
sudo apt-get install libhdf5-dev libhdf5-serial-dev libhdf5-103
sudo apt-get install libqtgui4 libqtwebkit4 libqt4-test python3-pyqt5
pip3 install opencv-contrib-python==4.1.0.25
python3 check_cv.py
import cv2
print(cv2.__version__)

camera = cv2.VideoCapture(0)
while True:
   _, im_org = camera.read()
   cv2.imshow('check_cv', im_org)
   cv2.waitKey(1)
これで準備完了。
ARマーカーを認識する手順
マーカーの生成 →生成は下記リンク参照.
・(カメラキャリブレーション) → 取りあえず動かすなら後回し。
・マーカーの認識
・pythonでARマーカーの姿勢推定
実装
・コピペで使えるはずです。
#!/usr/bin/env python
# -*- coding: utf-8 -*

import numpy as np
import cv2
from cv2 import aruco

def main():
    cap = cv2.VideoCapture(1) #使うカメラによって数値を変更
    # マーカーサイズ
    marker_length = 0.056 # [m]
    # マーカーの辞書選択
    dictionary = aruco.getPredefinedDictionary(aruco.DICT_4X4_50)

    #camera_matrix = np.load("mtx.npy")
    #distortion_coeff = np.load("dist.npy")
    #カメラキャリブレーションを行った場合、上記を使用。
    camera_matrix = np.array( [[1.42068235e+03,0.00000000e+00,9.49208512e+02],
    [0.00000000e+00,1.37416685e+03,5.39622051e+02],
    [0.00000000e+00,0.00000000e+00,1.00000000e+00]] )
    distortion_coeff = np.array( [1.69926613e-01,-7.40003491e-01,-7.45655262e-03,-1.79442353e-03, 2.46650225e+00] )

    while True:
        ret, img = cap.read()
        corners, ids, rejectedImgPoints = aruco.detectMarkers(img, dictionary)
        aruco.drawDetectedMarkers(img, corners, ids, (0,255,255))

        if len(corners) > 0:
            # マーカーごとに処理
            for i, corner in enumerate(corners):

                rvec, tvec, _ = aruco.estimatePoseSingleMarkers(corner, marker_length, camera_matrix, distortion_coeff)

                # 不要なaxisを除去
                tvec = np.squeeze(tvec)
                rvec = np.squeeze(rvec)
                # 回転ベクトルからrodoriguesへ変換
                rvec_matrix = cv2.Rodrigues(rvec)
                rvec_matrix = rvec_matrix[0] # rodoriguesから抜き出し
                # 並進ベクトルの転置
                transpose_tvec = tvec[np.newaxis, :].T
                # 合成
                proj_matrix = np.hstack((rvec_matrix, transpose_tvec))
                # オイラー角への変換
                euler_angle = cv2.decomposeProjectionMatrix(proj_matrix)[6] # [deg]

                print("ID : " + str(ids[i]))

                # 可視化
                draw_pole_length = marker_length/2 # 現実での長さ[m]
                aruco.drawAxis(img, camera_matrix, distortion_coeff, rvec, tvec, draw_pole_length)

        cv2.imshow('drawDetectedMarkers', img)
        if cv2.waitKey(10) & 0xFF == ord('q'):
            break
    cv2.destroyAllWindows()

if __name__ == '__main__':
    main()
マーカー (テスト用)
生成が面倒な場合にお使いください。
マーカーの生成
#!/usr/bin/env python3
# -*- coding: utf-8 -*-

import cv2

aruco = cv2.aruco
dictionary = aruco.getPredefinedDictionary(aruco.DICT_4X4_50)

def arGenerator():
    fileName = "ar.png"
    # 0: ID番号,100x100ピクセル
    generator = aruco.drawMarker(dictionary, 0, 100)
    cv2.imwrite(fileName, generator)

    img = cv2.imread(fileName)
    cv2.imshow('ArMarker',img)
    cv2.waitKey(0)
arGenerator()
10枚のマーカー作成し、それらを5×5に配置して1枚の画像として出力
import cv2.aruco
import numpy as np

aruco = cv2.aruco
dictionary = aruco.getPredefinedDictionary(aruco.DICT_4X4_50)
SIZE = 150
ImgList1 = []
ImgList2 = []
WiteList = []
def arGenerator():
    img_white = np.ones((SIZE,SIZE, 3),np.uint8)*255
    for i in range(1,6):
        fileName = "ar_" + str(i) + ".png"
        generator = aruco.drawMarker(dictionary, i, SIZE)
        cv2.imwrite(fileName, generator)
        ImgList1.append(cv2.imread(fileName))
        ImgList1.append(img_white)
        WiteList.append(img_white)
        WiteList.append(img_white)
        convImg1 = cv2.hconcat(ImgList1)
        convWhite = cv2.hconcat(WiteList)
    for i in range(6,11):
        fileName = "ar_" + str(i) + ".png"
        generator = aruco.drawMarker(dictionary, i, SIZE)
        cv2.imwrite(fileName, generator)
        ImgList2.append(cv2.imread(fileName))
        ImgList2.append(img_white)
        convImg2 = cv2.hconcat(ImgList2)
    TestList = [convImg1, convWhite, convImg2]
    convImg3 = cv2.vconcat(TestList)
    cv2.imshow('ArMarker1',convImg3)
    cv2.imwrite("Result.jpg", convImg3)
    cv2.waitKey(0)

arGenerator()
参考サイト
- Detection of ArUco Markers {#tutorial_aruco_detection}
- Aruco in OpenCV の解説
- ArUco マーカーの検出
- Detection of ArUco Markers
- ArUcoマーカーでカメラ位置姿勢の取得
- ARマーカー作成とARでの画像表示
マーカーについて
※Aruco in OpenCV の解説から転記
dictionary(マーカのセット)は2種類
- predefined dictionary: あらかじめ用意されているマーカ
- custom dictionary: 自作するdictionary
Predefined dictionaryは2種類
- Aruco Original: 標準セット
- AprilTag: AprilTag
cv2.aruco.getPredefinedDictionary()を使って取得.
AprilTagは異なるマーカ間のハミング距離が保証されている一方で,Arucoの標準セットはされていないっぽい*.
Aruco Original dictionaryはビット数が異なる4種類
- DICT_4X4_*: 16 ( = 4x4)ビット
- DICT_5X5_*: 25 ( = 5x5)ビット
- DICT_6X6_*: 36 ( = 6x6)ビット
- DICT_7X7_*: 49 ( = 7x7)ビット
AprilTagはビット数・最小ハミング距離が異なる4種類
"%dh%d"という表記になっているが,前半はビット数,後半は異なるマーカ間の最小ハミング距離.
最小ハミング距離とマーカの数はdictionary.hppの159−162行に書いてある.
この表を見る限り,36h11を使うべきかなぁ.
()内の数字はマーカの数
- DICT_APRILTAG_16h5 (30)
- DICT_APRILTAG_25h9 (35)
- DICT_APRILTAG_36h10 (2320)
- DICT_APRILTAG_36h11 (587)
custom dictionaryは自作マーカ用
cv2.aruco.custom_dictionary(nMarkers, markerSize, randomSeed)関数を使えば作れる.
この関数で作られるマーカ(おそらくAruco標準マーカも)は回転の不変性を考慮し,1つのコードに対して4パターン(0,90,180,270度回転)のコードを保持する.
- nMarkers: マーカの数
- markerSize: 1次元のビット数 (markerSize x markerSizeのマーカを作成)
- randomSeed: 乱数のシード
bytesList
生成された2次元コードの情報を保持する.
3次元numpy.array型のオブジェクト.
dictionary.hppの51-60行に書いてあるけど,bytesList[i, j, k]はk番目に回転したi番目のマーカのj番目のバイトを表す.
その他
※'20 5/12コード内の不要な文字削除
※'22 11/7 追加調査内容を追記
以上、参考になれば。
