仮想マシン(VM)全体を単一のエージェントに割り当てることは、、コストがかかり、また、(あなたにとって)あまり重要でない多くのレイヤーをコントロールすることになるかもしれません。 たとえば、オペレーティング システム(OS)を最新の状態に保つ必``要があります。 コストと運用作業を削減するため、Azure コンテナインスタンスを構成してエージェントを実行することができます。
Azure Container インスタンスとは何ですか?
Azure Container Instance(ACI)は、仮想マシンやアプリケーションサービスプランなどの既存のインフラストラクチャなしで、オンデマンドでコンテナをスピンアップできるサービスです。 価格は、毎秒割り当てられた仮想中央処理装置(vCPU)とギガバイト(GB)のメモリ数によって異なります。 以下の表を参考にすると、AZI を使用することで、パフォーマンスを低下させることなく VM よりも 日本円で最大9.470まで節約できます。
Azure DevOps エージェントと Docker イメージ
Azure DevOps は、各エージェントを個別に管理するのではなく、プールにグループ化します。 CI/CD パイプラインがトリガーされると、その機能とパイプラインの要件に従って、設定済みプールからエージェントを選択します。 各エージェントの機能は、専用ページで確認できます。
Azure でリソースのプロビジョニングを開始する前に、Azure DevOps にセルフホスト エージェントを追加する標準的な手順を確認しましょう。
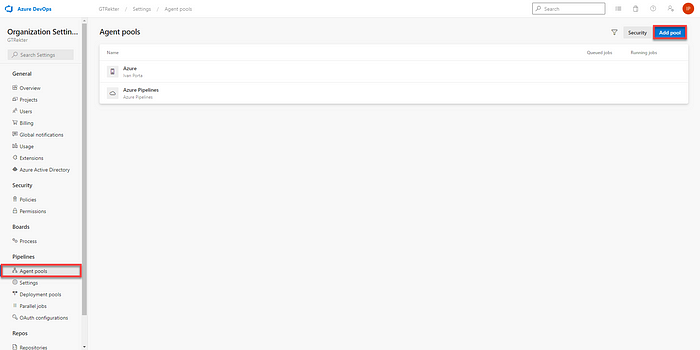
- Azure DevOps ポータルにアクセスし、Organization settingsをクリックします。
- Agents poolsを選択して、プールの追加をクリックします。
- Self-hosted を選択し、Create をクリックします。
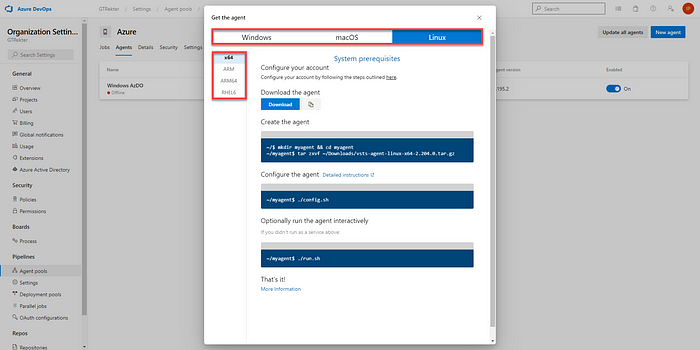
- エージェントの名前をクリックすると、その詳細が表示されます。
- New agentをクリックして、ターゲットシステムのOSとアーキテクチャを選択します。
- ターゲットマシンでエージェントをダウンロードします。
- ./config.sh コマンド を実行してエージェントを設定します。
$ ./config.sh
___                      ______ _            _ _
 / _ \                     | ___ (_)          | (_)
/ /_\ \_____   _ _ __ ___  | |_/ /_ _ __   ___| |_ _ __   ___  ___
|  _  |_  / | | | '__/ _ \ |  __/| | '_ \ / _ \ | | '_ \ / _ \/ __|
| | | |/ /| |_| | | |  __/ | |   | | |_) |  __/ | | | | |  __/\__ \
\_| |_/___|\__,_|_|  \___| \_|   |_| .__/ \___|_|_|_| |_|\___||___/
                                   | |
        agent v2.204.0             |_|          (commit 166abe8)
>> End User License Agreements:
Building sources from a TFVC repository requires accepting the Team Explorer Everywhere End User License Agreement. This step is not required for building sources from Git repositories.
A copy of the Team Explorer Everywhere license agreement can be found at:
  /home/gtrekter/agent/license.html
Enter (Y/N) Accept the Team Explorer Everywhere license agreement now? (press enter for N) > y
>> Connect:
Enter server URL > https://dev.azure.com/GTRekter
Enter authentication type (press enter for PAT) > PAT
Enter personal access token > ****************************************************
Connecting to server ...
>> Register Agent:
Enter agent pool (press enter for default) > Azure
Enter agent name (press enter for samplevm) > vm-prod-wus-01
Scanning for tool capabilities.
Connecting to the server.
Successfully added the agent
Testing agent connection.
Enter work folder (press enter for _work) >
2022-05-28 12:51:15Z: Settings Saved.
最後に ./run.sh コマンドを実行してサーバに接続し、キューに入れられたジョブの実行を開始します。 コンテナはステートレスであり、コンテナが停止するとベース イメージに含まれていないすべてのデータは破棄されるため、エージェントがすでに設定されているカスタム イメージを作成する必要があります。 または、コンテナの起動時にエージェントを自動的に設定する仕組みを作ることもできます。
$ sudo docker run -it busybox
/ # mkdir sample
/ # ls
bin     dev     etc     home    proc    root    sample  sys     tmp     usr     var
/ # exit
$ sudo docker run -it busybox
/ # ls
bin   dev   etc   home  proc  root  sys   tmp   usr   var
Docker ファイルを作成する
Docker を使用すると、同期的に実行されるコマンドのプリセットリストを定義し、Dockerイメージを組み立てることができます。 この場合は、まずUbuntu 18.04のベースイメージをダウンロードします。 次に、エージェントの実行に必要なすべてのパッケージをインストールします。 最後に、エージェントをダウンロードして設定するバッチ スクリプトを実行します。
FROM ubuntu:18.04
RUN apt-get update && apt-get install -y --no-install-recommends ca-certificates curl jq git iputils-ping libcurl4 libicu60 libunwind8 netcat libssl1.0
WORKDIR /agent
COPY ./start.sh .
RUN chmod +x start.sh
ENTRYPOINT ["./start.sh"]
エージェントをダウンロードして設定するスクリプトを作成します
エージェントのコンフィギュレーションShellスクリプトで使用可能なパラメータを見てみましょう:
$ ./config.sh --help
./config.sh [options]
For unconfigure help, see: ./config.sh remove --help
Common options:
 --url <url>                       URL of the server. For example: https://myaccount.visualstudio.com or http://onprem:8080/tfs
 --auth <type>                     Authentication type. Valid values are:
                                   pat      (Personal access token)
                                   negotiate(Kerberos or NTLM)
                                   alt      (Basic authentication)
                                   integrated (Windows default credentials)
 --token <token>                   Used with --auth pat. Personal access token.
 --userName <userName>             Used with --auth negotiate or --auth alt. Specify the Windows user name in the format: domain\userName or userName@domain.com
 --password <password>             Used with --auth negotiate or --auth alt.
 --unattended                      Unattended configuration. You will not be prompted. All answers must be supplied to the command line.
 --version                         Prints the agent version
 --commit                          Prints the agent commit
 --help                            Prints the help
Configure options:
 --pool <pool>                     Pool name for the agent to join
 --agent <agent>                   Agent name
 --replace                         Replace the agent in a pool. If another agent is listening by that name, it will start failing with a conflict.
 --work <workDirectory>            Work directory where job data is stored. Defaults to _work under the root of the agent directory. The work directory is owned by a given agent and should not share between multiple agents.
 --acceptTeeEula                   macOS and Linux only. Accept the TEE end user license agreement.
 --gitUseSChannel                  Windows only. Tell Git to use Windows' native cert store.
 --alwaysExtractTask               Perform an unzip for tasks for each pipeline step.
Startup options (Windows only):
 --runAsService                    Configure the agent to run as a Windows service. Requires administrator permission.
 --preventServiceStart             Configure Windows service to not run immediately after configuration.
 --runAsAutoLogon                  Configure auto logon and run the agent on startup. Requires administrator permission.
 --windowsLogonAccount <account>   Used with --runAsService or --runAsAutoLogon. Specify the Windows user name in the format: domain\userName or userName@domain.com
 --windowsLogonPassword <password> Used with --runAsService or --runAsAutoLogon. Windows logon password.
 --overwriteAutoLogon              Used with --runAsAutoLogon. Overwrite any existing auto logon on the machine.
 --noRestart                       Used with --runAsAutoLogon. Do not restart after configuration completes.
Deployment group options:
 --deploymentGroup                 Configure the agent as a deployment group agent.
 --projectName <name>              Used with --deploymentGroup. Team project name.
 --addDeploymentGroupTags          Used with --deploymentGroup. Specify to add deployment group tags.
 --deploymentGroupName <name>      Used with --deploymentGroup. Deployment group for the agent to join.
 --deploymentGroupTags <tags>      Used with --addDeploymentGroupTags. A comma separated list of tags for the deployment group agent. For example "web, db".
Environment variables:
Any command line argument can be specified as an environment variable. Use the format  VSTS_AGENT_INPUT_<ARGUMENT_NAME>. For example: VSTS_AGENT_INPUT_PASSWORD
スクリプトでは、少なくとも次のパラメータを定義する必要があります:
--url <url>
--auth <token>
--token <token> (or --userName <userName> --password <password>)
--pool <pool>
--agent <agent>
--work <workDirectory>
--unattended
アーキテクチャと OS で実行されるエージェントを自動的にダウンロードする方法を見つける必要があります。 そのためには、Azure DevOps API、特に以下を活用することができます:
GET https://dev.azure.com/{organization}/_apis/distributedtask/packages/agent
この API は、特定のプラットフォームに関連するエージェントをダウンロードするための URL を含む配列またはオブジェクトを返します。
{"type":"agent","platform":"win-x64","createdOn":"2022-05-19T12:15:11.28Z","version":{"major":2,"minor":204,"patch":0},"downloadUrl":"https://vstsagentpackage.azureedge.net/agent/2.204.0/vsts-agent-win-x64-2.204.0.zip","hashValue":"c3ecb1b3fd9d8470723d02a5d7d28c162056b6f96943b6507dd838e0d8287a54","infoUrl":"https://go.microsoft.com/fwlink/?LinkId=798199","filename":"vsts-agent-win-x64-2.204.0.zip"}
必要な情報をすべて手に入れたので、新しいコンテナがイメージを実行したときに実行される bash スクリプトを作成できます。
#!/bin/bash
echo -e "0. Validate parameters..."
if [ -z "$AZDO_URL" ]; then
  echo "error: missing AZDO_URL environment variable"
  exit 1
fi
if [ -z "$AZDO_TOKEN" ]; then
  echo "error: missing AZDO_TOKEN environment variable"
  exit 1
fi
if [ -z "$AZDO_POOL" ]; then
  echo "error: missing AZDO_POOL environment variable"
  exit 1
else
  AZDO_AGENTPOOLS_API_URL="$AZDO_URL/_apis/distributedtask/pools"
  AZDO_AGENTPOOLS=$(curl -LsS \
      -u user:$AZDO_TOKEN \
      -H 'Accept:application/json;' \
      $AZDO_AGENTPOOLS_API_URL)
  AZDO_AGENTPOOLS_LENGTH=$(echo "$AZDO_AGENTPOOLS" | jq -r '[.value[] | select(.name == "$AZDO_POOL")] | length')
  if [ -z "$AZDO_AGENTPOOLS_LENGTH" ]; then
    echo "error: AZDO_POOL not found"
    exit 1
  fi
fi
if [ "$AZDO_WORK" ]; then
  mkdir -p "$AZDO_WORK"
fi
echo -e "1. Identifying latest Azure DevOps agent..."
TARGET_ARC=$(dpkg --print-architecture | sed "s/amd/x/g")
echo -e "architecture: $TARGET_ARC"
AZDO_AGENT_API_URL="$AZDO_URL/_apis/distributedtask/packages/agent?platform=linux-$TARGET_ARC&top=1"
echo -e "sending request to $AZDO_AGENT_API_URL"
AZDO_AGENT_PACKAGES=$(curl -LsS \
    -u user:$AZDO_TOKEN \
    -H 'Accept:application/json;' \
    $AZDO_AGENT_API_URL)
AZDO_AGENT_PACKAGE_LATEST_URL=$(echo "$AZDO_AGENT_PACKAGES" | jq -r '.value[0].downloadUrl')
if [ -z "$AZDO_AGENT_PACKAGE_LATEST_URL" -o "$AZDO_AGENT_PACKAGE_LATEST_URL" == "null" ]; then
  echo "error: could not determine a matching Azure Pipelines agent"
  echo "check that account '$AZDO_URL' is correct and the token is valid for that account"
  exit 1
fi
echo -e "2. Downloading and extracting Azure DevOps agent..."
echo -e "downloading agent from $AZDO_AGENT_PACKAGE_LATEST_URL"
curl -LsS $AZDO_AGENT_PACKAGE_LATEST_URL | tar -xz & wait $!
echo -e "3. Configuring Azure Pipelines agent..."
export AGENT_ALLOW_RUNASROOT="1"
./config.sh --unattended \
  --agent "${AZDO_AGENT_NAME:-$(hostname)}" \
  --url "$AZDO_URL" \
  --auth PAT \
  --token $AZDO_TOKEN \
  --pool "$AZDO_POOL" \
  --work "${AZDO_WORK:-_work}" \
  --replace \
  --acceptTeeEula & wait $!
echo -e "4. Running Azure Pipelines agent..."
chmod +x ./run-docker.sh
./run-docker.sh "$@" & wait $!
次に、スクリプトに対して実行する権限を付与します:
$ chmod u+x start.sh
これ以上移動する前に、スクリプトが期待どおりに動作しているかどうかをテストします。 まず、次のコマンドを使用して環境変数を設定します:
$ export AZDO_URL=https://dev.azure.com/GTRekter
$ export AZDO_TOKEN=xxxxxxxxxxxxxxxxxxxxxxxxxxxx
$ export AZDO_POOL=Azure
最後に、スクリプトを実行して、新しいエージェントが正常に作成されたことを再度確認します。
$ ./start.sh
新しいパーソナル アクセス トークンの作成
デフォルトでは、Azure DevOps エージェントには Personal Access Token(PAT; パーソナル アクセス トークン)、ネゴシエート、および Windows クレデンシャルの 3 つの認証タイプがあります。 選択した認証タイプに応じて、トークンまたはユーザ名とパスワードの組み合わせを使用できます。 このデモでは、個人用のアクセストークンを使用しています。 新しいトークンを生成する手順は、次のとおりです:
- [User Settings] ドロップダウンを展開し、[Personal access token] を選択します。
- [New Token] をクリックします。
- トークン作成ペインで、トークンの名前を指定し、スコープを選択して有効期限を設定し、エージェントプール(読み取り、管理)を与えます。
- [Create] をクリックし、プロンプトが表示されたらトークンをコピーします。 このトークンが与えられるのはこれが最初で最後です。
DockerイメージをビルドしてAzureに保存する
これですべての準備が整ったので、Dockerファイルから新しいイメージをビルドし、レジストリに保存します。Docker Hubでも、Azure Container Registryでも、その他のコンテナ・ストレージ・サービスでも構いません。このデモでは、Azure Container Registryを使います。
Azure Container Registryの作成とセットアップ
Azure Container Registryを設定するには、次の手順に従って、まず Azure サブスクリプションで新しい Azure コンテナ レジストリを作成します::
- Azure ポータルにアクセスし、資格情報なしでログインします。
- 指定されたリソースグループに新しいリソースを追加し、コンテナのフィルタを適用して、コンテナレジストリを選択します。
- レジストリ名を指定し、Standard SKU を選択します。 SKU を高く設定すると、ストレージ、パフォーマンス、およびGeo Replication サポートが提供されますが、これらの機能は必要ありません。
- [Review] + [Create] をクリックし、次に [Create] をクリックします。
Azure コンテナ レジストリによる認証
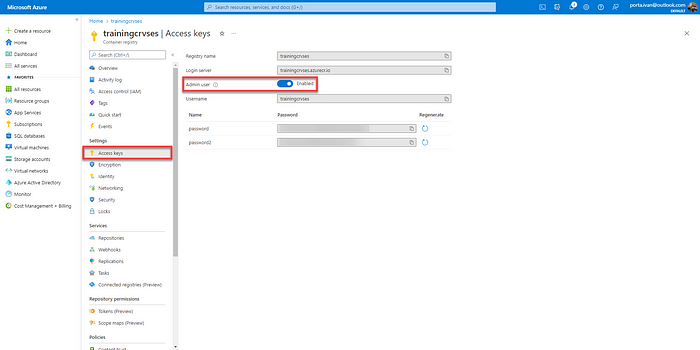
レジストリを直接操作し、イメージをプル/プッシュするには、自身の ID を認証する必要があります。 これには、個別のログインを使用するか、管理者アカウントを有効にするか、Azure AD App の登録を介して行うことができます。 ただし、コンテナインスタンスの作成中にコンテナインスタンスがイメージにアクセスできるようにするには、管理者ユーザーを有効にする必要があります:
- Azure Container Registry を参照します。
- [Access Keys] を選択し、[Admin user] を有効にします。
これらの資格情報を使用して、Azure Container Registry にログインできるようになりました。
$ docker login trainingcrvses.azurecr.io --username trainingcrvses --password xxxxxxxxxxxxxxxxxxxxxxxxx
次に、以下のコマンドを使用してイメージを構築します:
$ docker build -t trainingcrvses.azurecr.io/azdoagent:1.0 .
重要:レジストリへの完全修飾パスのエイリアスを作成することがベスト プラクティスです。
最後に、イメージをレジストリにプッシュします。
$ docker push trainingcrvses.azurecr.io/azdoagent:1.0
マシンに Docker がない場合は、Docker ファイルとスクリプトを含むディレクトリで以下のコマンドを実行して、Azure Container Registryに直接イメージをプッシュしてビルドできます:
$ az acr build --registry trainingcrvses --image azdoagent:1.0 .
エージェントの起動と設定
これで、イメージが Azure Container Registry にアクセス可能な場所に正常に保存されたので、Azure Container Instanceをプロビジョニングします。 そのためには、次の手順を実行します:
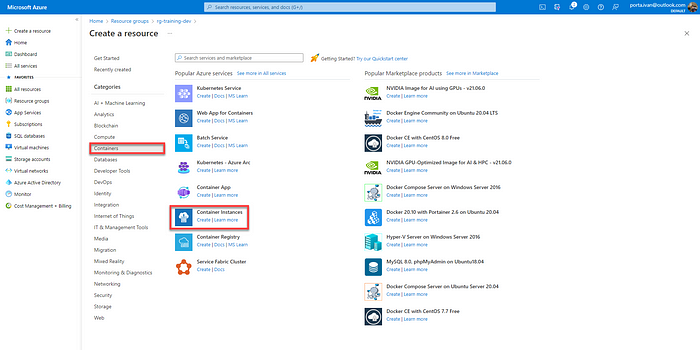
- Azure ポータルにアクセスし、認証情報なしでログインします。
- 指定されたリソースグループで新しいリソースを追加し、「Container」をフィルタして、「Container Instance」を選択します。
- [Basics] タブでコンテナ インスタンスに名前を付け、イメージのソースとして [Azure Container Registry] を選択し、以前レジストリにプッシュしたイメージを選択します。
[Advanced] タブで、シェル スクリプトで定義した環境変数を設定する必要があります。 これは、docker run の " - env" コマンドライン引数に似ています。
重要: Azure DevOps トークンをセキュアにマークすると、コンテナのプロパティからトークンが非表示になります。
- [Review] + [create] をクリックし、[Create] をクリックします。
デプロイ完了後、[Container Instance] ページを参照するとインスタンスの実行を確認できます。
さらに、[Logs] タブを選択すると、コンテナ内で何が起こっているかが表示されます。
おめでとうございます。 新しい Azure DevOps エージェントを Azure コンテナ インスタンスに正常に構成できました。
参考資料
- Azure DevOps Agent API: https://docs.microsoft.com/en-us/rest/api/azure/devops/distributedtask/agents/get
- Azure DevOps Personal Access Token: https://docs.microsoft.com/en-us/azure/devops/pipelines/agents/agents?view=azure-devops
- Azure DevOps Self-Hosted Agents and Docker: https://docs.microsoft.com/en-us/azure/devops/pipelines/agents/docker
- Azure Container Registry and Docker CLI: https://docs.microsoft.com/en-us/azure/container-registry/container-registry-get-started-docker-cli


