はじめに
jupyterからMariaDBを使用できるよう環境を構築します。
参考
- MariaDB10.1のインストール方法
- MariaDB Package Repository Setup and Usage
- MariaDBをCentOSに導入してみた
- MySqlのソケットエラーを解決する
- MySQL 5.7 をインストールしたら最初に行うセットアップ
- MariaDB ColumnStore を Jupyter Notebook から使う
環境
- Amazon Linux 2
- jupyterはインストール済み
手順
MariaDBのインストール
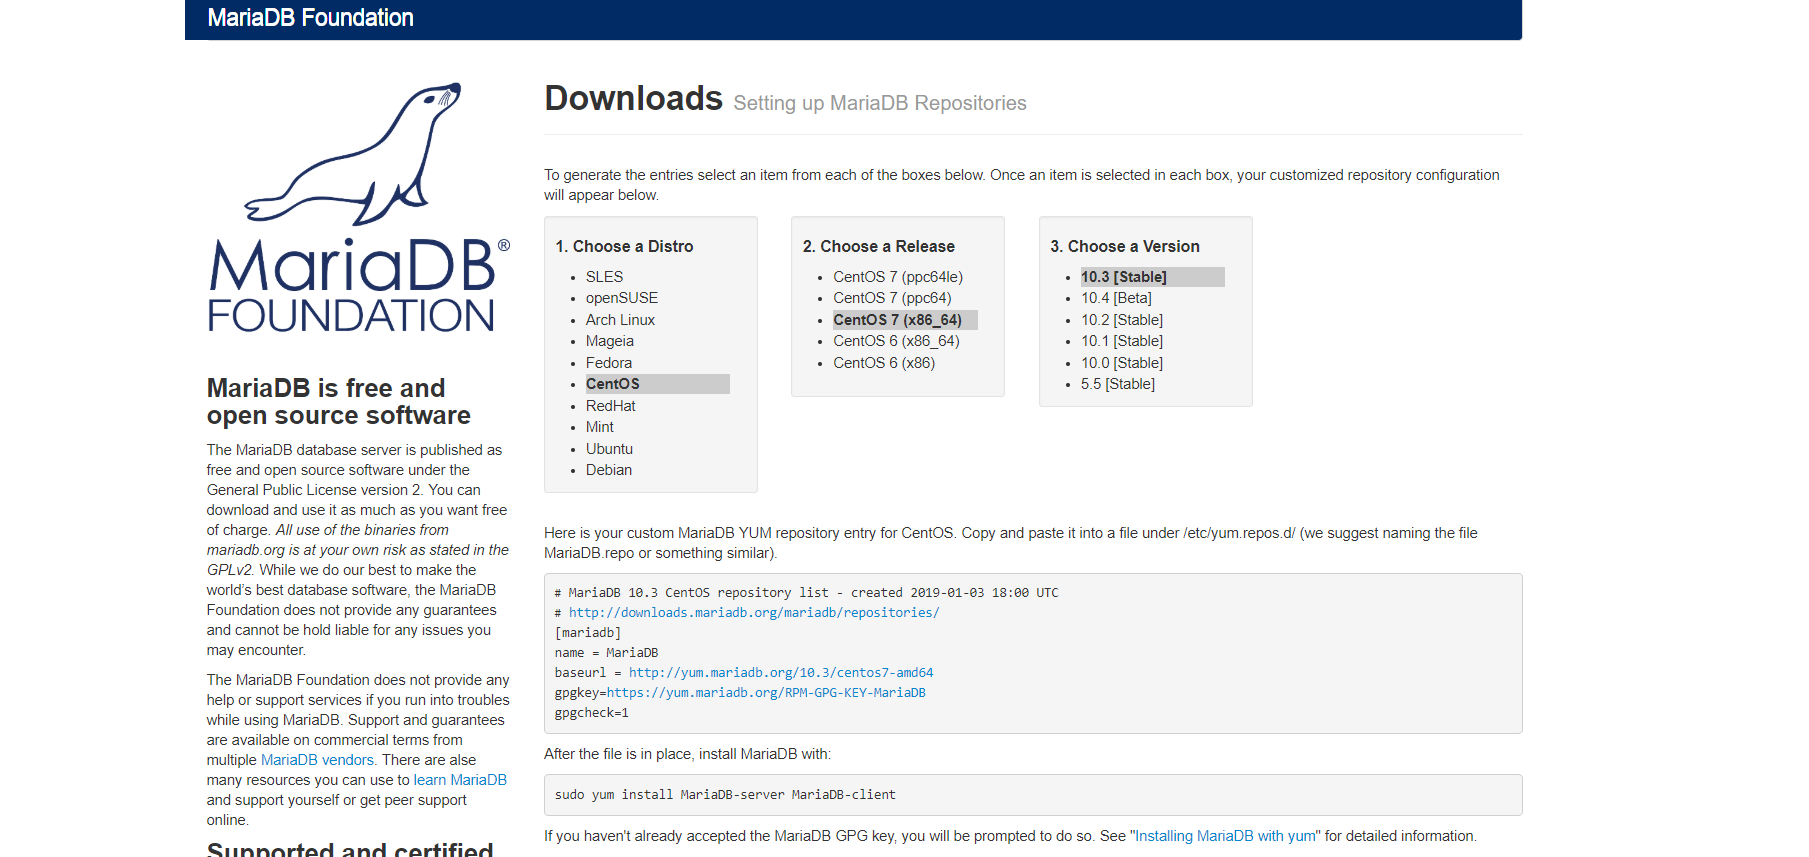
MariaDBのリリース状況はこちらにあります。2018/01ではcurrent stable releaseは10.3です。
インストールの方法はMariaDB Package Repository Setup and Usageのサイトに記載してあります。
次のコマンドをルートで実行します。
# curl -sS https://downloads.mariadb.com/MariaDB/mariadb_repo_setup | sudo bash

[error] Could not identify OS type or version.
[error] The MariaDB Repository supports these Linux OSs, on x86-64 only:
    * RHEL/CentOS 6 & 7
    * Ubuntu 14.04 LTS (trusty), 16.04 LTS (xenial), & 18.04 LTS (bionic)
    * Debian 8 (jessie) & 9 (stretch)
    * SLES 12 & 15
駄目でした。Amazon Linux 2はサポート外なのでこの方法は使えないようです。
なのでyumリポジトリを手動で書き換えてインストールします。こちらにリポジトリの設定ファイルの書き方が掲載されてます。
ファイルを新規作成します。
# vi /etc/yum.repos.d/mariadb.repo

# MariaDB 10.3 CentOS repository list - created 2019-01-03 18:00 UTC
# http://downloads.mariadb.org/mariadb/repositories/
[mariadb]
name = MariaDB
baseurl = http://yum.mariadb.org/10.3/centos7-amd64
gpgkey=https://yum.mariadb.org/RPM-GPG-KEY-MariaDB
gpgcheck=1
一応yumのキャッシュを削除します。
# yum clean all
yumでインストールします。
# sudo yum install MariaDB-server MariaDB-client

読み込んだプラグイン:extras_suggestions, langpacks, priorities, update-motd
amzn2-core                                               | 2.4 kB     00:00
mariadb                                                  | 2.9 kB     00:00
pgdg11                                                   | 4.1 kB     00:00
(1/6): amzn2-core/2/x86_64/group_gz                        | 2.4 kB   00:00
(2/6): amzn2-core/2/x86_64/updateinfo                      |  69 kB   00:00
(3/6): amzn2-core/2/x86_64/primary_db                      |  25 MB   00:00
(4/6): pgdg11/x86_64/group_gz                              |  245 B   00:00
(5/6): mariadb/primary_db                                  |  50 kB   00:01
(6/6): pgdg11/x86_64/primary_db                            | 141 kB   00:01
7 packages excluded due to repository priority protections
依存性の解決をしています
--> トランザクションの確認を実行しています。
---> パッケージ MariaDB-client.x86_64 0:10.3.11-1.el7.centos を インストール
--> 依存性の処理をしています: MariaDB-common のパッケージ: MariaDB-client-10.3.11-1.el7.centos.x86_64
--> 依存性の処理をしています: libncurses.so.5()(64bit) のパッケージ: MariaDB-client-10.3.11-1.el7.centos.x86_64
--> 依存性の処理をしています: libtinfo.so.5()(64bit) のパッケージ: MariaDB-client-10.3.11-1.el7.centos.x86_64
---> パッケージ MariaDB-server.x86_64 0:10.3.11-1.el7.centos を インストール
--> 依存性の処理をしています: perl(DBI) のパッケージ: MariaDB-server-10.3.11-1.el7.centos.x86_64
--> 依存性の処理をしています: galera のパッケージ: MariaDB-server-10.3.11-1.el7.centos.x86_64
--> 依存性の処理をしています: perl(Data::Dumper) のパッケージ: MariaDB-server-10.3.11-1.el7.centos.x86_64
--> トランザクションの確認を実行しています。
---> パッケージ MariaDB-common.x86_64 0:10.3.11-1.el7.centos を インストール
--> 依存性の処理をしています: MariaDB-compat のパッケージ: MariaDB-common-10.3.11-1.el7.centos.x86_64
---> パッケージ galera.x86_64 0:25.3.24-1.rhel7.el7.centos を インストール
--> 依存性の処理をしています: libboost_program_options.so.1.53.0()(64bit) のパッケージ: galera-25.3.24-1.rhel7.el7.centos.x86_64
---> パッケージ ncurses-compat-libs.x86_64 0:6.0-8.20170212.amzn2.1.2 を インス トール
---> パッケージ perl-DBI.x86_64 0:1.627-4.amzn2.0.2 を インストール
--> 依存性の処理をしています: perl(RPC::PlServer) >= 0.2001 のパッケージ: perl-DBI-1.627-4.amzn2.0.2.x86_64
--> 依存性の処理をしています: perl(RPC::PlClient) >= 0.2000 のパッケージ: perl-DBI-1.627-4.amzn2.0.2.x86_64
---> パッケージ perl-Data-Dumper.x86_64 0:2.145-3.amzn2.0.2 を インストール
--> トランザクションの確認を実行しています。
---> パッケージ MariaDB-compat.x86_64 0:10.3.11-1.el7.centos を 非推奨
---> パッケージ boost-program-options.x86_64 0:1.53.0-27.amzn2.0.3 を インストール
---> パッケージ mariadb-libs.x86_64 1:5.5.60-1.amzn2 を 不要
---> パッケージ perl-PlRPC.noarch 0:0.2020-14.amzn2 を インストール
--> 依存性の処理をしています: perl(Net::Daemon) >= 0.13 のパッケージ: perl-PlRPC-0.2020-14.amzn2.noarch
--> 依存性の処理をしています: perl(Net::Daemon::Test) のパッケージ: perl-PlRPC-0.2020-14.amzn2.noarch
--> 依存性の処理をしています: perl(Net::Daemon::Log) のパッケージ: perl-PlRPC-0.2020-14.amzn2.noarch
--> 依存性の処理をしています: perl(Compress::Zlib) のパッケージ: perl-PlRPC-0.2020-14.amzn2.noarch
--> トランザクションの確認を実行しています。
---> パッケージ perl-IO-Compress.noarch 0:2.061-2.amzn2 を インストール
--> 依存性の処理をしています: perl(Compress::Raw::Zlib) >= 2.061 のパッケージ: perl-IO-Compress-2.061-2.amzn2.noarch
--> 依存性の処理をしています: perl(Compress::Raw::Bzip2) >= 2.061 のパッケージ: perl-IO-Compress-2.061-2.amzn2.noarch
---> パッケージ perl-Net-Daemon.noarch 0:0.48-5.amzn2 を インストール
--> トランザクションの確認を実行しています。
---> パッケージ perl-Compress-Raw-Bzip2.x86_64 0:2.061-3.amzn2.0.2 を インストール
---> パッケージ perl-Compress-Raw-Zlib.x86_64 1:2.061-4.amzn2.0.2 を インストー ル
--> 依存性解決を終了しました。

依存性を解決しました

================================================================================
 Package                  アーキテクチャー
                                  バージョン                  リポジトリー
                                                                           容量
================================================================================
インストール中:
 MariaDB-client           x86_64  10.3.11-1.el7.centos        mariadb      53 M
 MariaDB-compat           x86_64  10.3.11-1.el7.centos        mariadb     2.8 M
     mariadb-libs.x86_64 1:5.5.60-1.amzn2 を入れ替えます
 MariaDB-server           x86_64  10.3.11-1.el7.centos        mariadb     123 M
依存性関連でのインストールをします:
 MariaDB-common           x86_64  10.3.11-1.el7.centos        mariadb     157 k
 boost-program-options    x86_64  1.53.0-27.amzn2.0.3         amzn2-core  163 k
 galera                   x86_64  25.3.24-1.rhel7.el7.centos  mariadb     8.1 M
 ncurses-compat-libs      x86_64  6.0-8.20170212.amzn2.1.2    amzn2-core  314 k
 perl-Compress-Raw-Bzip2  x86_64  2.061-3.amzn2.0.2           amzn2-core   32 k
 perl-Compress-Raw-Zlib   x86_64  1:2.061-4.amzn2.0.2         amzn2-core   58 k
 perl-DBI                 x86_64  1.627-4.amzn2.0.2           amzn2-core  804 k
 perl-Data-Dumper         x86_64  2.145-3.amzn2.0.2           amzn2-core   48 k
 perl-IO-Compress         noarch  2.061-2.amzn2               amzn2-core  260 k
 perl-Net-Daemon          noarch  0.48-5.amzn2                amzn2-core   51 k
 perl-PlRPC               noarch  0.2020-14.amzn2             amzn2-core   36 k

トランザクションの要約
================================================================================
インストール  3 パッケージ (+11 個の依存関係のパッケージ)

総ダウンロード容量: 189 M
Is this ok [y/d/N]: y
Downloading packages:
警告: /var/cache/yum/x86_64/2/mariadb/packages/MariaDB-10.3.11-centos73-x86_64-common.rpm: ヘッダー V4 DSA/SHA1 Signature、鍵 ID 1bb943db: NOKEY
MariaDB-10.3.11-centos73-x86_64-common.rpm の公開鍵がインストールされていません
(1/14): MariaDB-10.3.11-centos73-x86_64-common.rpm         | 157 kB   00:01
(2/14): MariaDB-10.3.11-centos73-x86_64-compat.rpm         | 2.8 MB   00:04
(3/14): boost-program-options-1.53.0-27.amzn2.0.3.x86_64.r | 163 kB   00:00
(4/14): MariaDB-10.3.11-centos73-x86_64-client.rpm         |  53 MB   00:29
(5/14): ncurses-compat-libs-6.0-8.20170212.amzn2.1.2.x86_6 | 314 kB   00:00
(6/14): perl-Compress-Raw-Bzip2-2.061-3.amzn2.0.2.x86_64.r |  32 kB   00:00
(7/14): perl-Compress-Raw-Zlib-2.061-4.amzn2.0.2.x86_64.rp |  58 kB   00:00
(8/14): perl-Data-Dumper-2.145-3.amzn2.0.2.x86_64.rpm      |  48 kB   00:00
(9/14): perl-DBI-1.627-4.amzn2.0.2.x86_64.rpm              | 804 kB   00:00
(10/14): perl-Net-Daemon-0.48-5.amzn2.noarch.rpm           |  51 kB   00:00
(11/14): perl-IO-Compress-2.061-2.amzn2.noarch.rpm         | 260 kB   00:00
(12/14): perl-PlRPC-0.2020-14.amzn2.noarch.rpm             |  36 kB   00:00
(13/14): MariaDB-10.3.11-centos73-x86_64-server.rpm        | 123 MB   00:26
(14/14): galera-25.3.24-1.rhel7.el7.centos.x86_64.rpm      | 8.1 MB   00:03
--------------------------------------------------------------------------------
合計                                               5.7 MB/s | 189 MB  00:32
https://yum.mariadb.org/RPM-GPG-KEY-MariaDB から鍵を取得中です。
Importing GPG key 0x1BB943DB:
 Userid     : "MariaDB Package Signing Key <package-signing-key@mariadb.org>"
 Fingerprint: 1993 69e5 404b d5fc 7d2f e43b cbcb 082a 1bb9 43db
 From       : https://yum.mariadb.org/RPM-GPG-KEY-MariaDB
上記の処理を行います。よろしいでしょうか? [y/N]y
Running transaction check
Running transaction test
Transaction test succeeded
Running transaction
  インストール中          : MariaDB-compat-10.3.11-1.el7.centos.x86_64     1/15
  インストール中          : MariaDB-common-10.3.11-1.el7.centos.x86_64     2/15
  インストール中          : perl-Data-Dumper-2.145-3.amzn2.0.2.x86_64      3/15
  インストール中          : perl-Compress-Raw-Bzip2-2.061-3.amzn2.0.2.x    4/15
  インストール中          : ncurses-compat-libs-6.0-8.20170212.amzn2.1.    5/15
  インストール中          : MariaDB-client-10.3.11-1.el7.centos.x86_64     6/15
  インストール中          : boost-program-options-1.53.0-27.amzn2.0.3.x    7/15
  インストール中          : galera-25.3.24-1.rhel7.el7.centos.x86_64       8/15
  インストール中          : perl-Net-Daemon-0.48-5.amzn2.noarch            9/15
  インストール中          : 1:perl-Compress-Raw-Zlib-2.061-4.amzn2.0.2.   10/15
  インストール中          : perl-IO-Compress-2.061-2.amzn2.noarch         11/15
  インストール中          : perl-PlRPC-0.2020-14.amzn2.noarch             12/15
  インストール中          : perl-DBI-1.627-4.amzn2.0.2.x86_64             13/15
  インストール中          : MariaDB-server-10.3.11-1.el7.centos.x86_64    14/15
chown: ユーザ指定が不正: `mysql'


PLEASE REMEMBER TO SET A PASSWORD FOR THE MariaDB root USER !
To do so, start the server, then issue the following commands:

'/usr/bin/mysqladmin' -u root password 'new-password'
'/usr/bin/mysqladmin' -u root -h ip-172-31-23-119.ap-northeast-1.compute.internal password 'new-password'

Alternatively you can run:
'/usr/bin/mysql_secure_installation'

which will also give you the option of removing the test
databases and anonymous user created by default.  This is
strongly recommended for production servers.

See the MariaDB Knowledgebase at http://mariadb.com/kb or the
MySQL manual for more instructions.

Please report any problems at http://mariadb.org/jira

The latest information about MariaDB is available at http://mariadb.org/.
You can find additional information about the MySQL part at:
http://dev.mysql.com
Consider joining MariaDB's strong and vibrant community:
https://mariadb.org/get-involved/

  削除中                  : 1:mariadb-libs-5.5.60-1.amzn2.x86_64          15/15
  検証中                  : MariaDB-common-10.3.11-1.el7.centos.x86_64     1/15
  検証中                  : 1:perl-Compress-Raw-Zlib-2.061-4.amzn2.0.2.    2/15
  検証中                  : perl-IO-Compress-2.061-2.amzn2.noarch          3/15
  検証中                  : perl-Net-Daemon-0.48-5.amzn2.noarch            4/15
  検証中                  : MariaDB-client-10.3.11-1.el7.centos.x86_64     5/15
  検証中                  : perl-Data-Dumper-2.145-3.amzn2.0.2.x86_64      6/15
  検証中                  : galera-25.3.24-1.rhel7.el7.centos.x86_64       7/15
  検証中                  : MariaDB-compat-10.3.11-1.el7.centos.x86_64     8/15
  検証中                  : boost-program-options-1.53.0-27.amzn2.0.3.x    9/15
  検証中                  : MariaDB-server-10.3.11-1.el7.centos.x86_64    10/15
  検証中                  : ncurses-compat-libs-6.0-8.20170212.amzn2.1.   11/15
  検証中                  : perl-Compress-Raw-Bzip2-2.061-3.amzn2.0.2.x   12/15
  検証中                  : perl-DBI-1.627-4.amzn2.0.2.x86_64             13/15
  検証中                  : perl-PlRPC-0.2020-14.amzn2.noarch             14/15
  検証中                  : 1:mariadb-libs-5.5.60-1.amzn2.x86_64          15/15

インストール:
  MariaDB-client.x86_64 0:10.3.11-1.el7.centos
  MariaDB-compat.x86_64 0:10.3.11-1.el7.centos
  MariaDB-server.x86_64 0:10.3.11-1.el7.centos

依存性関連をインストールしました:
  MariaDB-common.x86_64 0:10.3.11-1.el7.centos
  boost-program-options.x86_64 0:1.53.0-27.amzn2.0.3
  galera.x86_64 0:25.3.24-1.rhel7.el7.centos
  ncurses-compat-libs.x86_64 0:6.0-8.20170212.amzn2.1.2
  perl-Compress-Raw-Bzip2.x86_64 0:2.061-3.amzn2.0.2
  perl-Compress-Raw-Zlib.x86_64 1:2.061-4.amzn2.0.2
  perl-DBI.x86_64 0:1.627-4.amzn2.0.2
  perl-Data-Dumper.x86_64 0:2.145-3.amzn2.0.2
  perl-IO-Compress.noarch 0:2.061-2.amzn2
  perl-Net-Daemon.noarch 0:0.48-5.amzn2
  perl-PlRPC.noarch 0:0.2020-14.amzn2

置換:
  mariadb-libs.x86_64 1:5.5.60-1.amzn2

完了しました!
サービス起動します。
# sudo systemctl start mariadb
サービスの自動起動を設定します。
# sudo systemctl enable mariadb
データベースに接続します。
# mysql
ERROR 2002 (HY000): Can't connect to local MySQL server through socket '/var/lib/mysql/mysql.sock' (2)
socketファイルがないことによるエラーが発生しました。通常はサービスを再起動すればソケットファイルが作成されるようです。今回も再起動したらソケットファイルが作成されました。
もう一度接続してみます。パスワードを要求されますが、何も入力せずEnterで問題ありません。
# mysql

Welcome to the MariaDB monitor.  Commands end with ; or \g.
Your MariaDB connection id is 8
Server version: 10.3.11-MariaDB MariaDB Server

Copyright (c) 2000, 2018, Oracle, MariaDB Corporation Ab and others.

Type 'help;' or '\h' for help. Type '\c' to clear the current input statement.

MariaDB [(none)]>
初期設定をする
mysql_secure_installationで初期設定を行います。今回はパスワードはmysqlとしました。
参考:mysql_secure_installation
- root アカウントのパスワードをセットすることができます
- ローカルホストの外からアクセス可能な root アカウントを削除することができます
- 匿名ユーザアカウントを削除することができます
- 匿名ユーザが既定でアクセス可能な test データベースを削除することができます
# mysql_secure_installation

NOTE: RUNNING ALL PARTS OF THIS SCRIPT IS RECOMMENDED FOR ALL MariaDB
      SERVERS IN PRODUCTION USE!  PLEASE READ EACH STEP CAREFULLY!

In order to log into MariaDB to secure it, we'll need the current
password for the root user.  If you've just installed MariaDB, and
you haven't set the root password yet, the password will be blank,
so you should just press enter here.

Enter current password for root (enter for none):
OK, successfully used password, moving on...

Setting the root password ensures that nobody can log into the MariaDB
root user without the proper authorisation.

Set root password? [Y/n] y
New password:
Re-enter new password:
Password updated successfully!
Reloading privilege tables..
 ... Success!


By default, a MariaDB installation has an anonymous user, allowing anyone
to log into MariaDB without having to have a user account created for
them.  This is intended only for testing, and to make the installation
go a bit smoother.  You should remove them before moving into a
production environment.

Remove anonymous users? [Y/n] y
 ... Success!

Normally, root should only be allowed to connect from 'localhost'.  This
ensures that someone cannot guess at the root password from the network.

Disallow root login remotely? [Y/n] y
 ... Success!

By default, MariaDB comes with a database named 'test' that anyone can
access.  This is also intended only for testing, and should be removed
before moving into a production environment.

Remove test database and access to it? [Y/n] y
 - Dropping test database...
 ... Success!
 - Removing privileges on test database...
 ... Success!

Reloading the privilege tables will ensure that all changes made so far
will take effect immediately.

Reload privilege tables now? [Y/n] y
 ... Success!

Cleaning up...

All done!  If you've completed all of the above steps, your MariaDB
installation should now be secure.

Thanks for using MariaDB!
サンプルデータベース作成
こちらからsakila databaseをzipでダウンロードし、サーバに配備します。今回はec2-userのhomeディレクトリに配備しました。
unzipで解凍します。
# ls
sakila-data.sql  sakila-schema.sql  sakila.mwb
mysqlに接続します。
# mysql -u root -p

Enter password:
MariaDB [(none)]>
sakila-schema.sql、sakila-data.sqlの順で実行します。
MariaDB [(none)]> source /home/ec2-user/sakila-db/sakila-schema.sql;
MariaDB [sakila]> source /home/ec2-user/sakila-db/sakila-data.sql;
これでデータベースをリストアできました。
データベース一覧を見てみます。sakilaが追加されています。
MariaDB [sakila]> show databases;
+--------------------+
| Database           |
+--------------------+
| information_schema |
| mysql              |
| performance_schema |
| sakila             |
+--------------------+
4 rows in set (0.000 sec)
テーブルも確認してみましょう。
MariaDB [sakila]> show tables;
+----------------------------+
| Tables_in_sakila           |
+----------------------------+
| actor                      |
| actor_info                 |
| address                    |
| category                   |
| city                       |
| country                    |
| customer                   |
| customer_list              |
| film                       |
| film_actor                 |
| film_category              |
| film_list                  |
| film_text                  |
| inventory                  |
| language                   |
| nicer_but_slower_film_list |
| payment                    |
| rental                     |
| sales_by_film_category     |
| sales_by_store             |
| staff                      |
| staff_list                 |
| store                      |
+----------------------------+
23 rows in set (0.000 sec)
これでサンプルデータベースを追加できました。
pythonモジュールをインストール
MariaDB(MySQL)に接続するためのモジュールをインストールします。
pymysqlをcondaでインストールします。
# conda install pymysql

Solving environment: done

## Package Plan ##

  environment location: /root/anaconda3/envs/py37

  added / updated specs:
    - pymysql


The following packages will be downloaded:

    package                    |            build
    ---------------------------|-----------------
    pymysql-0.9.2              |           py36_0          82 KB
    python-3.6.8               |       h0371630_0        34.4 MB
    ------------------------------------------------------------
                                           Total:        34.5 MB

The following NEW packages will be INSTALLED:

    pymysql:         0.9.2-py36_0

The following packages will be UPDATED:

    cryptography:    2.3.1-py36hdffb7b8_0    conda-forge --> 2.4.2-py36h1ba5d50_0
    curl:            7.63.0-h74213dd_0       conda-forge --> 7.63.0-hbc83047_1000
    grpcio:          1.16.0-py36hd60e7a3_0   conda-forge --> 1.16.1-py36hf8bcb03_1
    libarchive:      3.3.3-h823be47_0        conda-forge --> 3.3.3-h5d8350f_5
    libcurl:         7.63.0-hbdb9355_0       conda-forge --> 7.63.0-h20c2e04_1000
    libpq:           10.6-he29860b_0         conda-forge --> 11.1-h20c2e04_0
    libssh2:         1.8.0-h5b517e9_3        conda-forge --> 1.8.0-h1ba5d50_4
    openssl:         1.0.2p-h470a237_1       conda-forge --> 1.1.1a-h7b6447c_0
    psycopg2:        2.7.6.1-py36hdffb7b8_0  conda-forge --> 2.7.6.1-py36h1ba5d50_0
    pycurl:          7.43.0.2-py36hb7f436b_0             --> 7.43.0.2-py36h1ba5d50_0
    python:          3.6.6-h5001a0f_3        conda-forge --> 3.6.8-h0371630_0
    qt:              5.9.6-h8703b6f_2                    --> 5.9.7-h5867ecd_1

The following packages will be DOWNGRADED:

    ca-certificates: 2018.11.29-ha4d7672_0   conda-forge --> 2018.03.07-0
    certifi:         2018.11.29-py36_1000    conda-forge --> 2018.11.29-py36_0
    krb5:            1.16.2-hbb41f41_0       conda-forge --> 1.16.1-h173b8e3_7

Proceed ([y]/n)? y


Downloading and Extracting Packages
pymysql-0.9.2        | 82 KB     | ##################################### | 100%
python-3.6.8         | 34.4 MB   | ##################################### | 100%
Preparing transaction: done
Verifying transaction: done
Executing transaction: done
ipython-sqlはcondaがないので、pipでインストールします。
# pip install ipython-sql
jupyter notebookでデータベースを操作(pymysql)
コネクションを張ります。
import pymysql

conn = pymysql.connect(
    host = 'localhost',
    port = 3306,
    user = 'root',
    passwd = 'mysql',
    db = 'sakila')
select文を実行してみます。
cursor = conn.cursor()
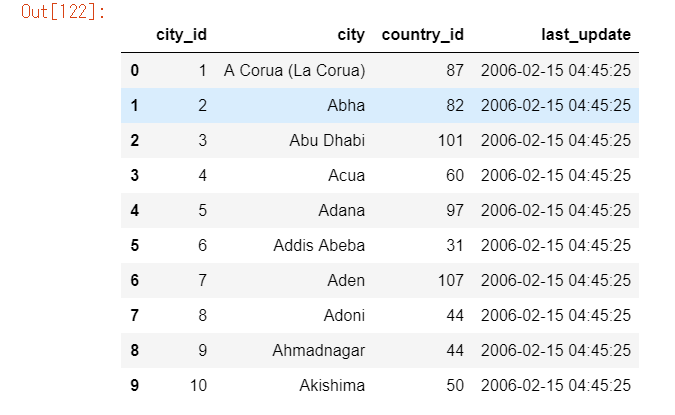
cursor.execute("SELECT * FROM city")
results = cursor.fetchall()
for row in results:
print(row)
conn.commit()
cursor.close()
# 以下出力
(1, 'A Corua (La Corua)', 87, datetime.datetime(2006, 2, 15, 4, 45, 25))
(2, 'Abha', 82, datetime.datetime(2006, 2, 15, 4, 45, 25))
(3, 'Abu Dhabi', 101, datetime.datetime(2006, 2, 15, 4, 45, 25))
(4, 'Acua', 60, datetime.datetime(2006, 2, 15, 4, 45, 25))
(5, 'Adana', 97, datetime.datetime(2006, 2, 15, 4, 45, 25))
(6, 'Addis Abeba', 31, datetime.datetime(2006, 2, 15, 4, 45, 25))
(7, 'Aden', 107, datetime.datetime(2006, 2, 15, 4, 45, 25))
(8, 'Adoni', 44, datetime.datetime(2006, 2, 15, 4, 45, 25))
(9, 'Ahmadnagar', 44, datetime.datetime(2006, 2, 15, 4, 45, 25))
(10, 'Akishima', 50, datetime.datetime(2006, 2, 15, 4, 45, 25))
...
pandasのpd.read_sql_queryでクエリ結果をデータフレームに変換できます。
import pandas as pd

df = pd.read_sql_query("SELECT * FROM city", conn)
df.head(10)
jupyter notebookでデータベースを操作(ipython-sql)
より直接的にSQLを書きたい場合はマジックコマンドを使用します。%load_ext sqlでSQL拡張します。
%load_ext sql
# dsl = 'mysql+pymysql://{user}:{password}@{host}:{port}/{database}'.format(**pgconfig)
dsl = 'mysql+pymysql://root:mysql@localhost:3306/sakila?charset=utf8mb4'.format(**pgconfig)
%sql $dsl

# 以下は出力
'Connected: root@sakila'
select文は次のように書きます。
%%sql
select * from actor order by actor_id limit 10

# 以下は出力
 * mysql+pymysql://root:***@localhost:3306/sakila?charset=utf8mb4
10 rows affected.

ちなみに実行結果は_に格納されています。
型はsql.run.ResultSetという型になっています。
もちろん変数に格納することもできます。%が二つから一つになります。
result = %sql select * from actor order by actor_id limit 10
.DataFrame()でデータフレームに変換できます。
result.DataFrame()
もしくは下記を書いておくことで自動でpandasに変換してくれます。
%config SqlMagic.autopandas = True

df = %sql select * from actor order by actor_id
type(df)
その他のコマンド
データベース操作やテーブル操作も受け付けます。
データベース一覧表示。
%%sql
show databases;
テーブル一覧表示。
%%sql
show tables;
おわりに
jupyterからMariaDBを使えるようにしました。これでSQLでのデータ成型とpandasやmatplotlibを用いた可視化など組み合わせて利用できるようになりました。