これは MIERUNE Advent Calendar 2024 のXX日目の記事です。
昨日は @nkmr_RL さんによる pyqgisでQGISの標準機能を呼び出す方法 でした。
はじめに
NGiC(一般財団法人 国土地盤情報センター)さんにて公開されている国土地盤情報データベースでは全国から集められたボーリングデータが公開されています。
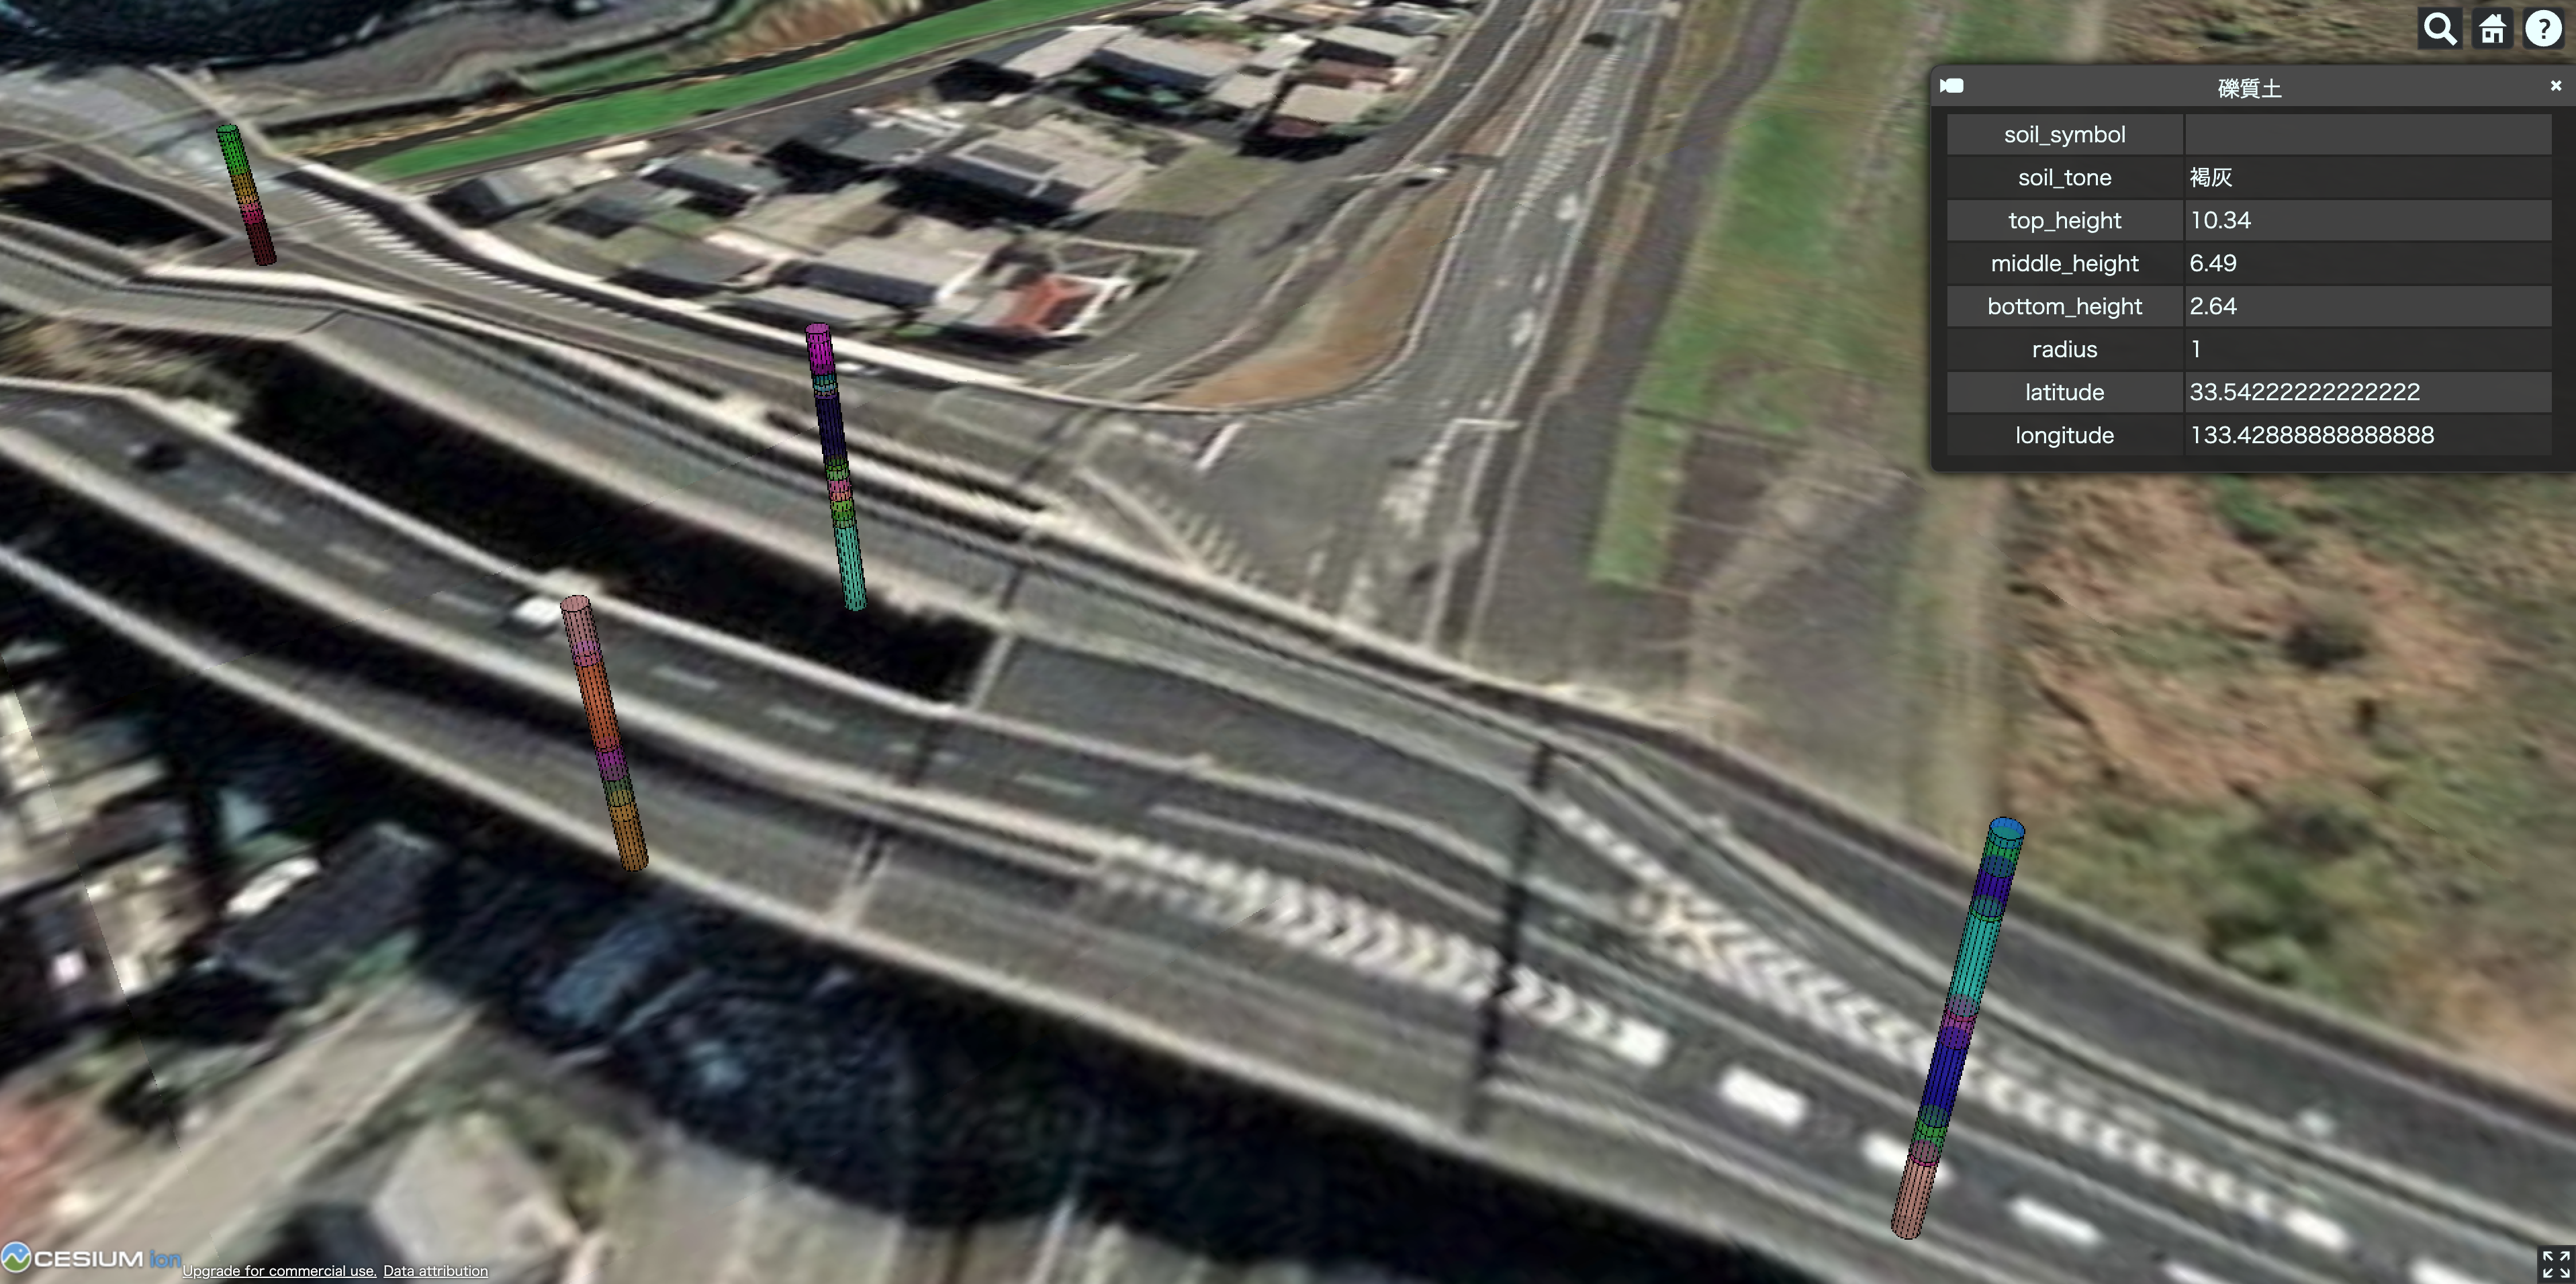
今回はそのオープンデータをCesiumを利用して可視化してみることにします。
もっと細かくいうと、「国土地盤情報データベースにてxml形式で公開されている柱状図データをパースして、Ruby on Railsで構築されたWebAPIにPythonを利用したスクリプトを利用してデータを登録し、Cesiumで可視化する」というのが今回やることです。
本記事で書くこと
- 利用技術や大まかな流れを書きます。実装の詳細についてはここでは深く触れることはしません
- 全てローカルで動作するように作成されています
利用する技術
- フロント: Cesium
- 今回の主役です。特に説明不要かと思います
- バックエンド: Ruby on Rails
- WebAPIサーバーとして利用します
- 私自身が慣れていることが主な要因ですので、別の技術を利用しても特に問題はありません
- DB: Postgres (PostGIS)
環境構築
- 主にDockerを利用して行います
- 下記に示しますので参考してください
services:
  front:
    image: node:latest
    tty: true
    working_dir: /app/vite-project
    volumes:
      - ./front:/app
    ports:
      - 5174:5173
    command: /bin/bash
    environment:
      - API_KEY={API_KEY}
    # command:
     - /bin/bash

  api:
    build:
      context: ./api
      dockerfile: Dockerfile
    ports:
      - 3000:3000
    volumes:
      - ./api:/api
      - ./xmls:/api/xmls
      - ./geojsons:/api/geojsons
    command: /bin/bash
    tty: true
    working_dir: /api
    environment:
      - DB_USERNAME=${POSTGRES_USER}
      - DB_PASSWORD=${POSTGRES_PASSWORD}
      - DB_HOST=db
      - DB_PORT=${POSTGRES_PORT}

  db:
    image: kartoza/postgis:16
    environment:
      - POSTGRES_USER=${POSTGRES_USER}
      - POSTGRES_PASSWORD=${POSTGRES_PASSWORD}
      - POSTGRES_DB=${POSTGRES_DB}
      - POSTGRES_MULTIPLE_EXTENSIONS=postgis
    volumes:
      - ./postgres_data:/data
    ports:
      - "15433:5432"
    healthcheck:
      test:
        [
          "CMD-SHELL",
          "PGPASSWORD=$${POSTGRES_PASSWORD} psql -h localhost -U $${POSTGRES_USER} -d $${POSTGRES_DB} -c 'SELECT 1' || exit 1",
        ]
      interval: 3s
      timeout: 5s
      retries: 5

volumes:
  postgres_data:
WebAPI
今回はRuby on Railsで書いていきます。
色々と言われていることが多いフレームワークだったりしますが、開発の初速が爆速なことや、良い意味で枯れている技術が多いので私は好みです。 (ポジショントーク)
下記のことができるWebAPIを書きます。
- xml形式で表現されている柱状図をパースし、PostgresDBに保存する
- BBoxをリクエストパラメータとして受け取り、その範囲の中にある柱状図をレスポンスとして返す
DBスキーマ定義
- 今回はPostgres (PostGIS) でGeometry型を利用しています
- Rails、Postgresをいい感じにするため
activerecord-postgis-adapterというGemを利用させていただきました - テーブルは2つしかありません。ボーリングデータをPOINT座標として扱い、そのデータに複数の層を紐づけることによって柱状図を表現しています
ActiveRecord::Schema[7.2].define(version: 2024_11_22_094000) do
  # These are extensions that must be enabled in order to support this database
  enable_extension "plpgsql"
  enable_extension "postgis"

  create_table "borings", force: :cascade do |t|
    t.string "dtd_version", null: false, comment: "DTDバージョン"
    t.string "btb_version", null: false, comment: "BTBバージョン"
    t.string "survey_name", null: false, comment: "調査名"
    t.geometry "latlon", limit: {:srid=>4326, :type=>"st_point"}, null: false, comment: "緯度経度"
    t.integer "kunijiban_id", null: false, comment: "国土地盤情報に格納されているXMLのID"
    t.datetime "created_at", null: false
    t.datetime "updated_at", null: false
  end

  create_table "layers", force: :cascade do |t|
    t.bigint "boring_id", null: false, comment: "ボーリングID"
    t.float "top", null: false, comment: "上部深度"
    t.float "bottom", null: false, comment: "下部深度"
    t.string "soil_name", null: false, comment: "土質名"
    t.string "soil_symbol", null: false, comment: "土質記号"
    t.string "soil_color", null: false, comment: "色調"
    t.index ["boring_id"], name: "index_layers_on_boring_id"
  end

  add_foreign_key "layers", "borings"
end
xmlの仕様
国土地盤情報データベースで公開されているxml (https://publicweb.ngic.or.jp/viewer/refer/?data=boring&type=xml&id=xxx で取得することができるもの) にはいくつかのバージョンが存在しており、1.10、2.00、2.01、2.10、3.00、4.00の計6つがあります。
ですので、パースしようとするとそれぞれに対応した実装が必要になります。この辺りは地道に資料を読み解いていくしかなく、以下を参考にすると良いと思います
-
電子納品要領とその旧版
- 最も基礎となる資料です。言ってしまえば全てがここに全てが書いてあります
-
ボーリングデータXML変換システム
- バージョンを変換できるexeファイルが配布されています
- こちらのマニュアルが大変参考になるので、見てみると良いと思います
WebAPIの実装 (ボーリングデータの登録)
-
routes.rb- 一応書いておきます
Rails.application.routes.draw do
  resources :borings
end
-
borings_controller.rb- ファイル名は国土地盤情報で管理されているidをそのまま利用しています
def create
require 'utils/latlon'
require 'layers_creator'

if Boring.exists?(kunijiban_id: boring_params[:kunijiban_id])
  # 409 Conflict
  render status: :conflict
  return
end

xml = nil
%w[.xml .XML].each do |tail|
  path = "./xmls/#{boring_params[:kunijiban_id]}#{tail}"
  if File.exist?(path)
    xml = File.read(path)
    break
  end
end

doc = Nokogiri::XML(xml)
lat = Ratlon.to_decimal(degree: doc.xpath('//緯度_度').text.to_i, minute: doc.xpath('//緯度_分').text.to_i,
                        second: doc.xpath('//緯度_秒').text.to_i)
lon = Ratlon.to_decimal(degree: doc.xpath('//経度_度').text.to_i, minute: doc.xpath('//経度_分').text.to_i,
                        second: doc.xpath('//経度_秒').text.to_i)
# TODO: 測地系変換

begin
  ActiveRecord::Base.transaction do
    boring = Boring.create!(
      dtd_version: doc.at_xpath('//ボーリング情報')['DTD_version'],
      btb_version: doc.internal_subset.system_id,
      survey_name: doc.at_xpath('//調査名').text,
      latlon: "POINT(#{lat} #{lon})",
      kunijiban_id: boring_params[:kunijiban_id].to_i
    )
    LayersCreator.new(doc:, boring:).call
  end
rescue StandardError => e
  raise e
end

# 201 Created
render status: :created
end
-
layers_creator.rb- いわゆるサービスクラスです
- 汚い実装ですが...
class LayersCreator
  def initialize(doc:, boring:)
    @doc = doc
    @boring = boring
  end

  def call
    create_layers
  end

  private

  def create_layers
    case @doc.at_xpath('//ボーリング情報')['DTD_version']
    when '1.10'
      LayersCreatorV1_10.new(doc: @doc, boring: @boring).call
    when '2.00'
      LayersCreatorV2_00.new(doc: @doc, boring: @boring).call
    when '2.01'
      LayersCreatorV2_01.new(doc: @doc, boring: @boring).call
    when '2.10'
      LayersCreatorV2_10.new(doc: @doc, boring: @boring).call
    when '3.00'
      LayersCreatorV3_00.new(doc: @doc, boring: @boring).call
    when '4.00'
      LayersCreatorV4_00.new(doc: @doc, boring: @boring).call
    else
      debugger
    end
  end
end

class BaseLayersCreator
  def initialize(doc:, boring:)
    @doc = doc
    @boring = boring
    @elevation = (@doc.xpath('//孔口標高').text.to_f * 1000).to_i
    @depth = (@doc.xpath('//総掘進長').text.to_f * 1000).to_i
    @top = @elevation
    @bottom = 0
  end

  def call
    create_layers
  end

  def create_layers
    params = determine_params
    layers = @doc.xpath("//#{params[:layer][:base]}")

    layers.each do |layer|
      next_depth = (layer.xpath("./#{params[:layer][:base]}_#{params[:layer][:bottom_depth]}").text.to_f * 1000).to_i
      @bottom = @elevation - next_depth

      created_layer = Layer.create!(
        boring_id: @boring.id,
        top: @top / 1000.0,
        bottom: @bottom / 1000.0,
        soil_name: layer.xpath("./#{params[:layer][:base]}_#{params[:layer][:name]}").text,
        soil_symbol: detect_soil_symbol(layer:, params:),
        soil_color: detect_soil_color(layer:, params:, next_depth:),
      )
      @top = @bottom
    end
  end

  def detect_soil_color(layer:, params:, next_depth:)
    debugger
    # 層の下端深度に色が記録されている
    # next_depthは現在の層の下端深度
    # 層の配列から現在の層の下端深度と一致する層を探し、その層の色を取得する
    element = @doc.xpath("//#{params[:color][:base]}").find do |color|
    (color.at_xpath("./#{params[:color][:base]}_#{params[:color][:bottom_depth]}").text.to_f * 1000).to_i == next_depth
    end

    if element.nil?
      ''
    else
      element.at_xpath("./#{params[:color][:base]}_#{params[:color][:name]}").text
    end
  end

  def detect_soil_symbol(layer:, params:)
    if layer.xpath("./#{params[:layer][:base]}_#{params[:layer][:symbol]}").text.present?
      layer.xpath("./#{params[:layer][:base]}_#{params[:layer][:symbol]}").text
    else
      # そもそもタグの中に設定されていないことがある
      ''
    end
  end

  def determine_params
    raise NotImplementedError
  end
end
ここのdetermine_paramsが肝で、xmlを解析したときに取得できるバージョンごとで実装が異なっている主なポイントです。
class LayersCreatorV2_00 < BaseLayersCreator
  def initialize(doc:, boring:)
    super
  end

  def determine_params
    {
      layer: {
        base: '土質岩種区分',
        bottom_depth: '下端深度',
        name: '土質岩種区分1',
        symbol: '土質岩種記号1',
      },
      color: {
        base: '色調',
        bottom_depth: '下端深度',
        name: '色調名',
      }
    }
  end
end
WebAPIの実装 (ボーリングデータを取得する)
-
borings_controller.rb- クエリパラメータでBBoxを受け取り、その範囲の中にあるボーリングデータをgeojsonに変換して返します
  def index
    require 'combine_geojson_generator'

    bbox = params.require(:bbox).split(',').map(&:to_f)
    min_lon, min_lat, max_lon, max_lat = bbox

    borings = Boring.includes(:layers).where(
      "ST_Contains(
        ST_MakeEnvelope(?, ?, ?, ?, 4326),
        latlon
      )",
      min_lat, min_lon, max_lat, max_lon
    )

    generator = CombineGeojsonGenerator.new(borings)
    geojson = generator.generate_geojson

    render json: JSON.pretty_generate(JSON.parse(geojson)), status: :ok
  end
combine_geojson_generator.rb
class CombineGeojsonGenerator
  def initialize(borings)
    @borings = borings
  end

  def generate_geojson
    {
      type: 'FeatureCollection',
      features: @borings.flat_map { |boring| format_boring_to_features(boring) }
    }.to_json
  end

  private

  def format_boring_to_features(boring)
    boring.layers.map do |layer|
      top = layer.top
      bottom = layer.bottom
      middle_height = (top + bottom) / 2

      {
        type: 'Feature',
        geometry: {
          type: 'Point',
          coordinates: [boring.latlon.y, boring.latlon.x] # GeoJSONは[lon, lat]順
        },
        properties: {
          soil_symbol: layer.soil_symbol,
          soil_name: layer.soil_name,
          soil_tone: layer.soil_color,
          top_height: top,
          middle_height: middle_hejjight,
          bottom_height: bottom,
          radius: 1,
          latitude: boring.latlon.x,
          longitude: boring.latlon.y
        }
      }
    end
  end
end
フロント
- Cesiumで表示します
- 全ての実装は示しません。核となるGeojsonの読み取り部分のみを記載します
- カメラの移動が終わるごとにこちらの関数が呼ばれ、柱状図データを更新しています
async function loadGeoJsonFromServer() {
    const cameraHeight = viewer.camera.positionCartographic.height;

    console.log(`現在のカメラの高さ: ${cameraHeight.toFixed(2)}m`);

    // 高さが指定した制限を超えている場合はリクエストを行わない
    if (cameraHeight > MAX_CAMERA_HEIGHT) {
        console.log(`高さが ${MAX_CAMERA_HEIGHT}m を超えているため、リクエストを行いません。`);
        return;
    }

    const bbox = createBBoxFromCenterCoordinates();

    if (!bbox) {
        console.error("bbox が生成されませんでした。");
        return;
    }
    const url = `http://localhost:3000/borings?bbox=${bbox}`;
    try {
        // サーバーから GeoJSON データを取得
        const response = await fetch(url);
        if (!response.ok) {
            throw new Error(`Failed to load GeoJSON: ${response.statusText}`);
        }

        const geoJson = await response.json();

        // Cesium に GeoJSON をロード
        const dataSource = await Cesium.GeoJsonDataSource.load(geoJson, {
            clampToGround: false,
            markerSize: 0,          // デフォルトのマーカーサイズを0にする
            markerSymbol: undefined, // デフォルトのマーカーシンボルを無効化
        });

        // 既存のデータソースをすべて削除
        viewer.dataSources.removeAll();

        // ビューアにデータソースを追加
        viewer.dataSources.add(dataSource);
        // データソースのエンティティ数を表示
        console.log(`エンティティ数: ${dataSource.entities.values.length}`);

        // 各エンティティに対してカスタマイズを適用
        dataSource.entities.values.forEach((entity) => {
            const topHeight = entity.properties?.top_height.getValue();
            const bottomHeight = entity.properties?.bottom_height.getValue();
            const middleHeight = entity.properties?.middle_height.getValue();
            const radius = entity.properties?.radius.getValue();
            const latitude = entity.properties?.latitude.getValue();
            const longitude = entity.properties?.longitude.getValue();

            // エンティティの位置とシリンダー形状を設定
            entity.position = Cesium.Cartesian3.fromDegrees(longitude, latitude, middleHeight);
            entity.cylinder = new Cesium.CylinderGraphics({
                length: topHeight - bottomHeight,
                topRadius: radius,
                bottomRadius: radius,
                material: Cesium.Color.fromRandom({ alpha: 0.6 }),
                outline: true,
                outlineColor: Cesium.Color.BLACK,
                outlineWidth: 2,
                numberOfVerticalLines: 16,
            });
        });
    } catch (error) {
        console.error("Error loading GeoJSON:", error);
    }
};
完成
改善点
書ききれないですが、まだまだ改善点があります。
- 色にルール付けができていない
- ボーリングデータバージョンごとに地質の区分を記述するルールが違うので、そちらを統一してあげる必要があります
- カメラの移動ごとに全てのボーリングデータが再ロード、サイレンダリングされる
- パフォーマンスがよろしくないので、是非とも改善したいポイントです
- 測地系の変換
- Tokyo DatumやJGD2000などで書かれたものも多数ありますので、これらをJGD2011に変換したいですね
感想
- Cesiumは表現の幅が非常に広くて楽しいです。位置情報Webアプリケーションではよく二次元的な地図が利用されますが、それに新たな表現手段をもたらしてくれます。楽しい!
- 柱状図をいくつか選択して断面図を作ってみたいですねー
明日は@soramiさんです ! お楽しみに!

