はじめに
みなさん、NestJSはご存じでしょうか。
TypeScriptでバッグエンド側、DB連携を扱う方はなじみがあるかもしれませんね。
今回、TypeScriptで何か書きたいなと新年早々ふと思ってしまったので、どうせならまだTodoアプリを作ってないなということでまだバックエンド側だけですが、書いてみました。
開発環境
- typescript@5.1.3
- nestjs@10.2.1
- nestjs/typeorm@10.0.1
- typeorm@0.3.17
- muysql2@3.6.5
NestJSについて
NestJSは、TypeScriptで構築されたバックエンド開発のためのフレームワークです。
基本的な構成
Controller
ルーティングを記述するところです。
リクエストを受け取って、レスポンスを返す役割を担っています。
@Controller('todo') のように@Controller()デコレーターでControllerとして定義することができ、Get()デコレーターで各HTTPメソッドのリクエストを記述することができます。
Modules
NestJSでは機能ごとに1つのモジュールとしてまとめているため(modular architectureというみたいです)、各機能のモジュールがあつまって、1つのアプリケーションになります。
ですので、Modulesとは、機能ごとのルーティングやロジックをまとめる役割を担っています。
Providers
Serviceファイルに記述された処理、ロジックを提供するところです。
- Controllers:リクエストを受け取る
- Providers:ロジック処理を行う
という感じですね。
Serviceファイルで@Injectable()デコレーターを付けることで、ProviderによってModuleに対してインジェクションしています。
準備
まず、NestJSのCLIをインストールして、プロジェクトを作っていきます。
# インストール
npm install -g @nestjs/cli

# プロジェクト作成:{project-name}には任意のプロジェクト名をいれてください
nest new {project-name}
ここまですると、テンプレートの構成ができています。
srcフォルダ配下を見てみましょう。
app.module.ts
import { Module } from '@nestjs/common';
import { AppController } from './app.controller';
import { AppService } from './app.service';

@Module({
  imports: [],
  controllers: [AppController],
  providers: [AppService],
})
export class AppModule {}
ルートモジュールです。@Moduleデコレーターでcontrollersやprovidersをまとめていますね。
app.controller.ts
import { Controller, Get } from '@nestjs/common';
import { AppService } from './app.service';

@Controller()
export class AppController {
  constructor(private readonly appService: AppService) {}

  @Get()
  getHello(): string {
    return this.appService.getHello();
  }
}
Get /でリクエストを受けた時にthis.appService.getHello();で記述された処理が実行されるように書かれていますね。
app.service.ts
import { Injectable } from '@nestjs/common';

@Injectable()
export class AppService {
  getHello(): string {
    return 'Hello World!';
  }
}
ロジックが記述されるServiceファイルです。
ここでは、先ほどのthis.appService.getHello();の内容が記述されています。
main.ts
import { NestFactory } from '@nestjs/core';
import { AppModule } from './app.module';

async function bootstrap() {
  const app = await NestFactory.create(AppModule);
  await app.listen(3000);
}
bootstrap();
エントリポイントです。
NestFactoryでインスタンスを作成し、listenメソッドで起動します(expressみたいですね)
実際にこれを実行するときは、npm run startでビルド、起動がされます。
起動したら、 http://localhost:3000/にアクセスすると、「Hello World!」と表示されるかと思います。
本題
今回は、「NestJSについて」のmain.tsとapp.module.tsだけ残して、todoアプリ用の構成を作りました
仕様
- [GET] /todo:todoの全件取得
- [GET] /todo/[:id]:指定のIDのtodoを取得
- [POST] /todo:todoの登録
- [PUT] /todo/[:id]:指定IDのtodoの更新
- [DELETE] /todo/[:id]:指定IDのtodoの削除
実装
todo.controller.ts
ルーティングを記述していきます。
仕様に記載した内容のルーティングを記述します。
todo.controller.ts
import { TodoService } from './todo.service';
import {
  Body,
  Controller,
  Delete,
  Get,
  Param,
  Post,
  Put,
} from '@nestjs/common';
import { Todo } from './todo.entity';

@Controller('todo')
export class TodoController {
  constructor(private todoService: TodoService) {}

  @Get()
  async findAll(): Promise<Todo[]> {
    return await this.todoService.findAll();
  }

  @Get(':id')
  async findOneBy(@Param('id') id: string): Promise<Todo> {
    return await this.todoService.findOneBy(id);
  }

  @Post()
  async add(@Body() todo: Todo): Promise<void> {
    await this.todoService.add(todo);
  }

  @Put(':id')
  async update(@Param('id') id: string): Promise<void> {
    await this.todoService.update(id);
  }

  @Delete(':id')
  async delete(@Param('id') id: string): Promise<void> {
    await this.todoService.delete(id);
  }
}
todo.service.ts
providersで提供で提供するロジック処理を記述します。
todo.service.ts
import { Injectable } from '@nestjs/common';
import { InjectRepository } from '@nestjs/typeorm';
import { Todo } from './todo.entity';
import { Repository } from 'typeorm';
import { ConfigService } from '@nestjs/config';

@Injectable()
export class TodoService {
  constructor(
    @InjectRepository(Todo)
    private todoRepository: Repository<Todo>,
    private configService: ConfigService,
  ) {}

  async findAll(): Promise<Todo[]> {
    return await this.todoRepository.find();
  }

  async findOneBy(id: string): Promise<Todo> {
    return await this.todoRepository.findOne({ where: { id } });
  }

  async add(todo: Todo): Promise<void> {
    await this.todoRepository.save(todo);
  }

  async update(id: string): Promise<void> {
    const item = await this.findOneBy(id);
    if (item) {
      return null;
    }
    await this.todoRepository.update(id, { completed: !item.completed });
  }

  async delete(id: string): Promise<void> {
    const item = await this.findOneBy(id);
    if (!item) {
      return null;
    }
    await this.todoRepository.delete(id);
  }
}
todo.module.ts
ここまでできたら、Moduleにまとめます。
import { Module } from '@nestjs/common';
import { TypeOrmModule } from '@nestjs/typeorm';
import { TodoService } from './todo.service';
import { TodoController } from './todo.controller';
import { Todo } from './todo.entity';
import { ConfigModule } from '@nestjs/config';

@Module({
  imports: [
    ConfigModule.forRoot({ isGlobal: true }),
    TypeOrmModule.forFeature([Todo]),
  ],
  providers: [TodoService],
  controllers: [TodoController],
})
export class TodoModule {}
すると、app.module.tsはこうなります。
import { Module } from '@nestjs/common';
import { TodoModule } from './todo/todo.module';
import { ConfigModule } from '@nestjs/config';
import { DatabaseModule } from './db/database.module';

@Module({
  imports: [
    ConfigModule.forRoot({ isGlobal: true }),
    DatabaseModule,
    TodoModule,
  ],
})
export class AppModule {}
import { DatabaseModule } from './db/database.module';
について触れていきます。
DBにアクセスするために今回はORマッパーとして、TypeORMを利用しました。
そのために、TypeORMで利用する設定回りをここで定義しています。
DBはMySQLを利用して、Dockerで構築しています。
TypeORMで利用する設定回りはこのようになりました。
これをapp.module.tsのimportsでインポートすることでDBアクセスができるようになるわけですね!
database.module.ts
database.module.ts
import { Module } from '@nestjs/common';
import { ConfigModule, ConfigService } from '@nestjs/config';
import { TypeOrmModule } from '@nestjs/typeorm';
import { Todo } from 'src/todo/todo.entity';

export const migrationFilesDir = 'src/database/migrations/*.ts';
export const entities = [Todo];

@Module({
  imports: [
    TypeOrmModule.forRootAsync({
      imports: [
        ConfigModule.forRoot({
          envFilePath: '.env',
          isGlobal: true,
        }),
      ],
      inject: [ConfigService],
      useFactory: (configService: ConfigService) => ({
        type: 'mysql',
        host: configService.get('DATABASE_HOST'),
        port: configService.get('DATABASE_PORT'),
        database: configService.get('DATABASE_DB'),
        username: configService.get('DATABASE_USER'),
        password: configService.get('DATABASE_PASSWORD'),
        entities: [Todo],
        synchronize: false,
        migrations: [migrationFilesDir],
      }),
    }),
  ],
})
export class DatabaseModule {}
todo.entity.ts
Entity定義を記述することでデータ定義ができます。今回はこのようにしました。
@EntityデコレーターでTypeORMに対して、これがエンティティクラスであることを示します。
主キーやカラムの定義も結構柔軟に書くことができます。
todo.entity.ts
import { TodoService } from './todo.service';
import {
  Body,
  Controller,
  Delete,
  Get,
  Param,
  Post,
  Put,
} from '@nestjs/common';
import { Todo } from './todo.entity';

@Controller('todo')
export class TodoController {
  constructor(private todoService: TodoService) {}

  @Get()
  async findAll(): Promise<Todo[]> {
    return await this.todoService.findAll();
  }

  @Get(':id')
  async findOneBy(@Param('id') id: string): Promise<Todo> {
    return await this.todoService.findOneBy(id);
  }

  @Post()
  async add(@Body() todo: Todo): Promise<void> {
    await this.todoService.add(todo);
  }

  @Put(':id')
  async update(@Param('id') id: string): Promise<void> {
    await this.todoService.update(id);
  }

  @Delete(':id')
  async delete(@Param('id') id: string): Promise<void> {
    await this.todoService.delete(id);
  }
}
リクエストを受けると、app.module.tsがtodo.module.ts呼び出します。
すると、todo.service.tsの処理をtodo.controller.tsが呼び出し、実際に処理が行われます。
動かしてみる
実際に動してみましょう。
npm run startで実行して、http://localhost:3000/todo/にアクセスすると、(あらかじめ1件だけ登録してます)
[
    {
        "id": "test",
        "title": "test",
        "description": "test",
        "completed": false,
        "createdAt": "2024-01-01T19:35:52.000Z",
        "updatedAt": "2024-01-01T19:35:52.000Z"
    }
]
ちゃんと、APIとして機能してるのが確認できます!
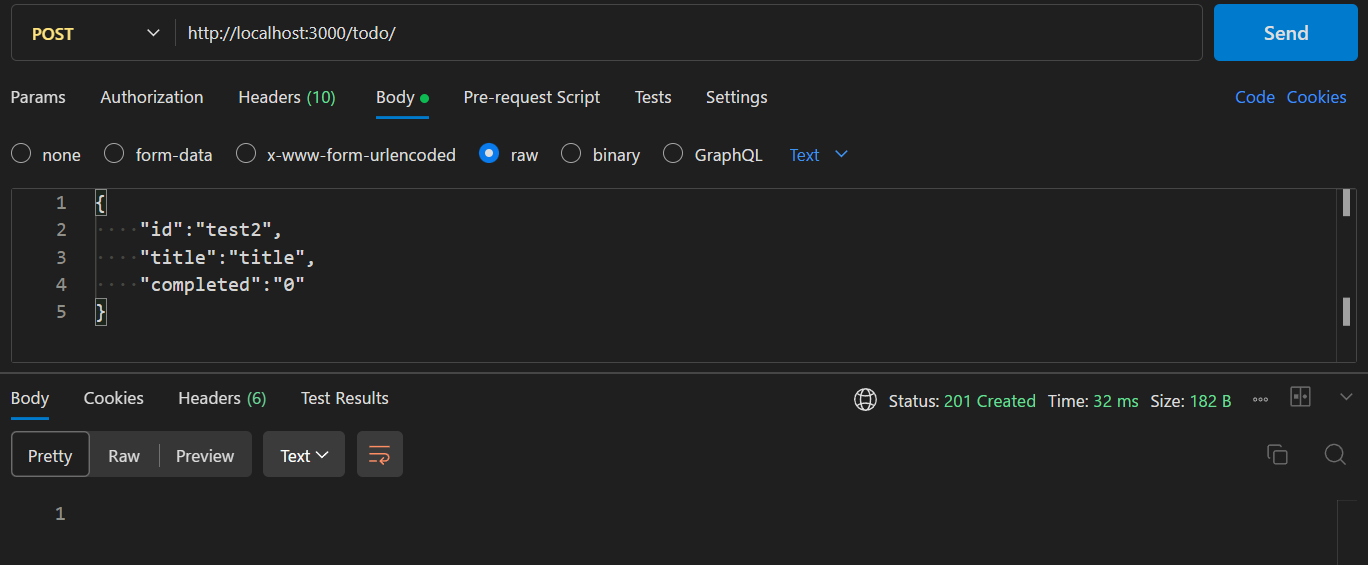
試しに1件登録してみると、201でレスポンスが返ってきて、
画面上でも、データが追加されていますね!
[
    {
        "id": "test",
        "title": "test",
        "description": "test",
        "completed": false,
        "createdAt": "2024-01-01T19:35:52.000Z",
        "updatedAt": "2024-01-01T19:35:52.000Z"
    },
    {
        "id": "test2",
        "title": "title",
        "description": null,
        "completed": false,
        "createdAt": "2024-01-01T22:21:44.000Z",
        "updatedAt": "2024-01-01T22:21:44.000Z"
    }
]
最後に
今回は、NestJSとTypeORMを利用してTodoアプリ(API)を作ってみました。
Swaggerを利用して、OpenAPIのAPI仕様書も作れるのでかなり推せますね!!
今後は、フロント部分の実装や、認証機能を追加していこうかなと考えてます。

