SPIRALは、主にエンタープライズ向けのローコードプラットフォームになります。ローコードプラットフォームなので、プログラミング知識がなくともWebアプリケーションを開発できるのが魅力です。
SPIRALでは、自社のシステムや外部システムと連携する場合を想定して、APIが公開されています。今回はそのAPIを使って、実験的にMCPサーバーからデータ取得を行ってみました。
準備
APIトークンの取得
SPIRALの管理画面で、APIトークンを作成します。ダッシュボードの開発メニュー内のAPIトークンにて、新しいAPIトークンを作成します。

作成後に入手できるAPIトークンと、APIトークンシークレットをメモしておきます。
SPIRALのテーブル
今回は通常DBとして、作成しています。項目はローコードプラットフォームSPIRALのAPIを利用する(一覧表データの取得) #PHP - Qiitaのものを使っています。
| フィールド名 | サンプル値 | 型 | 差し替えキーワード |
|---|---|---|---|
| 名前 | テキスト30文字前後 | テキストフィールド(64 bytes) | name |
| フリガナ | テキスト30文字前後 | テキストフィールド(32 bytes)かな | furigana |
| メールアドレス | aaa@bbb.cc.dd | メールアドレス(大・小文字を無視) | |
| 性別 | 男性、女性 | 性別 | gender |
| 年齢 | 0~99 | 数値 | ageyo |
| 誕生日 | yyyy年mm月dd日 | 日付(○年○月○日) | birthday |
| 婚姻状況 | 独身 | テキストフィールド(32 bytes) | maritalStat |
| 都道府県 | プルダウンから選択 | 都道府県 | prefecture |
| 電話番号 | 09012345678 | 電話番号 | telephone |
| キャリア | docomo、au、SoftBank | テキストフィールド(32 bytes) | carrier |
| スタイル | スタイル | テキストフィールド(32 bytes) | style |
データはダミーで生成したものが100件入っています。
マイエリアの作成
管理画面の Web にある マイエリア から、新しいマイエリアを作成します。会員専用のページの集まりのことです。マイエリア機能を用いることで、ノーコードで会員専用ページや会員専用アンケート、会員情報変更ページ等を構築できます。
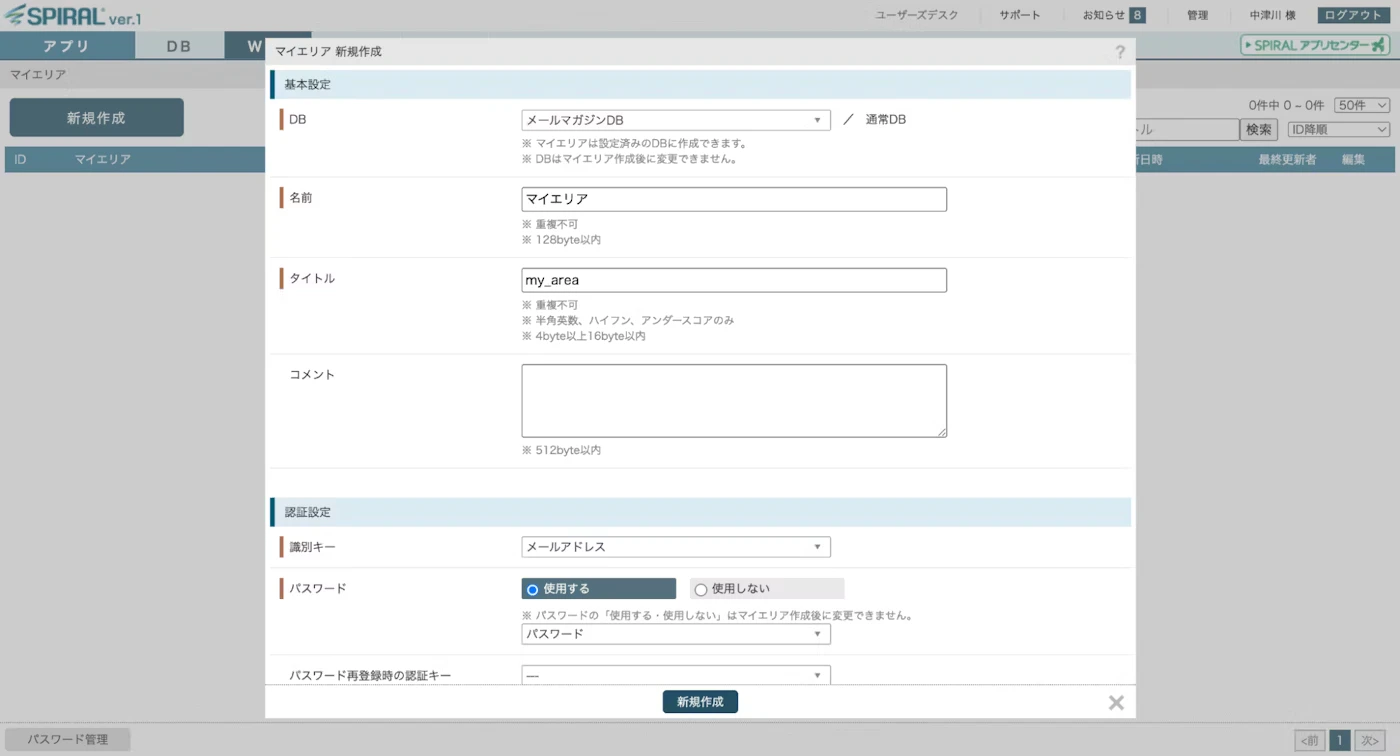
認証を行う際には、このマイエリアが必要になりますので、新しく作成します。今回は my_area という名前で作成しました。
MCPサーバーのセットアップ
今回はコマンドベースのMCPサーバーとなっています。言語はNode.jsです。まず、Node.jsプロジェクトを初期化し、必要なパッケージをインストールします。
mkdir spiral-mcp-server
cd spiral-mcp-server

npm init -y
npm install @modelcontextprotocol/sdk
npm install -D @types/node typescript
package.json の内容を編集します。
{
  "name": "mcp-server",
  "version": "1.0.0",
  "description": "",
  "bin": {
    "my-mcp-server": "./build/index.js"
  },
  "main": "index.js",
  "scripts": {
    "build": "tsc && chmod 755 build/index.js",
    "test": "echo \"Error: no test specified\" && exit 1"
  },
  "keywords": [],
  "author": "",
  "license": "MIT",
  "type": "module",
  "dependencies": {
    "@modelcontextprotocol/sdk": "^1.16.0",
    "tablemark": "^3.1.0"
  },
  "files": [
    "build"
  ],
  "devDependencies": {
    "@types/node": "^24.0.15",
    "typescript": "^5.8.3"
  }
}
TypeScriptの設定ファイル tsconfig.json を作成します。
{
  "compilerOptions": {
    "target": "ES2022",
    "module": "Node16",
    "moduleResolution": "Node16",
    "outDir": "./build",
    "rootDir": "./src",
    "strict": true,
    "esModuleInterop": true,
    "skipLibCheck": true,
    "forceConsistentCasingInFileNames": true
  },
  "include": ["src/**/*"],
  "exclude": ["node_modules"]
}
MCPサーバーの実装
次に、MCPサーバーの実装を行います。src/index.ts ファイルを作成し、必要なライブラリをインポートします。
import { McpServer } from "@modelcontextprotocol/sdk/server/mcp.js";
import crypto from 'crypto';
import { StdioServerTransport } from "@modelcontextprotocol/sdk/server/stdio.js";
import { z } from "zod";
import tablemark from 'tablemark';
次に定数を定義します。
const SPIRAL_LOCATOR_URL = "https://www.pi-pe.co.jp/api/locator";
const USER_AGENT = "spiral-app/1.0";
const token = process.env.API_TOKEN!;
const tokenSecret = process.env.API_TOKEN_SECRET!;
const id = process.env.ID!;
const password = process.env.PASSWORD!;
// データベースのフィールド名
const fields = ["id", "name", "furigana", "ageyo", "birthday", "email", "gender", "prefecture", "telephone"];
MCPサーバーのインスタンスを作成します。
// Create server instance
const server = new McpServer({
  name: "spiral",
  version: "1.0.0",
  capabilities: {
    resources: {},
    tools: {},
  },
});
そして、MCPサーバーを立ち上げます。
async function main() {
  const transport = new StdioServerTransport();
  await server.connect(transport);
}

main().catch((error) => {
  process.exit(1);
});
ツールの定義
MCPサーバーにツールを定義します。ここでは、SPIRALのデータを取得するためのツールを作成します。
server.tool(
  "get_data",  // MCPサーバーのツール名
  "Get data from Spiral",
  {
    // 指定できる入力パラメータ
    age: z.number().min(0).max(120).describe("Age of the user"), // 年齢
    birthday: z.string().optional().describe("Birthday of the user in YYYY-MM-DD format"), // 誕生日
  },
  // 処理
  async ({ age, birthday }, _extra) => {
    try {
      // ロケータURLを取得
      const url = await getLocatorUrl();
      // セッションIDを取得
      const sessionId = await getSessionId(url);
      // データを取得
      const data = await getData(url, sessionId, age, birthday);
      // データを整形
      const res: Record<string, any>[] = [];
      data.data.forEach((item: any) => {
        const formattedItem: Record<string, any> = {};
        fields.forEach((field, i) => {
          formattedItem[field] = item[i];
          res.push(formattedItem);
        });
      });
      return {
        content: [
          {
            type: "text",
            text: tablemark(res), // Markdownの表形式で出力
          },
        ],
      };
    } catch (error) {
      // エラー処理
      return {
        content: [
          {
            type: "text",
            text: "Failed to retrieve locator URL",
          },
        ],
      };
    }
  },
);
ロケータURLの取得
ここからはSPIRALのAPIを呼び出すための関数を実装します。ロケーター(APIエンドポイントURL)を取得する関数です。APIはSPIRAL ver.1 API リファレンスを利用しています。
interface LocatorResponse {
  code: number;
  message: string;
  location: string;
  default_version: number;
  supported_version: number[];
  use_client_crt: string;
}

async function getLocatorUrl(): Promise<string> {
  // リクエストヘッダーの設定
  const headers = {
    "X-SPIRAL-API": "locator/apiserver/request",
    "User-Agent": USER_AGENT,
    "Content-Type": "application/json; charset=UTF-8",
  };

  // リクエストボディ
  const parameters = {
    spiral_api_token: process.env.API_TOKEN,
  };

  const response = await fetch(SPIRAL_LOCATOR_URL, {
    method: 'POST',
    headers,
    body: JSON.stringify(parameters)
  });

  if (!response.ok) {
    throw new Error(`HTTP error! status: ${response.status}`);
  }

  const responseData = await response.json() as LocatorResponse;
  return responseData.location;
}
セッションIDの取得
次に、セッションIDを取得する関数です。これは、SPIRALのAPIにログインしてセッションを開始するためのものです。APIはSPIRAL ver.1 API リファレンスを利用しています。
interface SessionResponse {
  code: number;
  message: string;
  jsessionid: string;
  session_expire: number;
  url: string;
  auto_login_cookie: string;
  auto_login_limit: number;
}

async function getSessionId(url: string) {
  const headers = {
    "X-SPIRAL-API": "area/login/request",
    "Content-Type": "application/json; charset=UTF-8"
  };
  // リクエストパラメータ作成
  const passkey = Math.floor(Date.now() / 1000); // エポック秒(秒単位)
  const parameters = {
    spiral_api_token: token,
    passkey,
    my_area_title: "my_area",
    id,
    password,
    url_type: "2"
  } as Record<string, string | number>;

  // 署名の生成(HMAC-SHA1)
  const key = `${token}&${passkey}`;
  const signature = crypto
    .createHmac('sha1', tokenSecret)
    .update(key)
    .digest('hex');

  parameters.signature = signature;
  const response = await fetch(url, {
    method: 'POST',
    headers,
    body: JSON.stringify(parameters)
  });

  if (!response.ok) {
    throw new Error(`HTTP error! status: ${response.status}`);
  }

  const responseData = await response.json() as SessionResponse;
  // console.info("Response Data:", responseData);
  return responseData.jsessionid;
}
データの取得
最後に、SPIRALのデータを取得する関数です。ここでは、指定された条件に基づいてデータを取得します。APIはSPIRAL ver.1 API リファレンスを利用しています。
async function getData(url: string, jsessionid: string, age?: number, birthday?: string) {
  // リクエストヘッダー
  const headers = {
    "X-SPIRAL-API": "database/select/request",
    "Content-Type": "application/json; charset=UTF-8"
  };

  // エポック秒(秒単位)
  const passkey = Math.floor(Date.now() / 1000);
  // リクエストパラメータ
  const parameters = {
    spiral_api_token: token,
    passkey,
    db_title: "testdata",
    select_columns: fields,
    jsessionid,
  } as Record<string, string | number | string[] | { name: string; value: number | string }[]>;

  const searchCondition: { name: string; value: number | string; operator?: string }[] = [];
  if (age !== undefined) {
    searchCondition.push({
      name: "ageyo",
      value: age,
    });
  }
  if (birthday) {
    searchCondition.push({
      name: "birthday",
      value: birthday,
    });
  }
  // 署名生成
  const key = `${token}&${passkey}`;
  parameters.signature = crypto
    .createHmac('sha1', tokenSecret)
    .update(key)
    .digest('hex');

  const response = await fetch(url, {
    method: 'POST',
    headers,
    body: JSON.stringify(parameters)
  });

  if (!response.ok) {
    throw new Error(`HTTP error! status: ${response.status}`);
  }
  return await response.json();
}
ビルド
コードを記述したら、ビルドを行います。
npm run build
これで build/index.js が生成されます。
MCPサーバーの設定
今回はClaud Desktopに設定を行います。設定内容は以下の通りです。
{
  "mcpServers": {
    "spiral": {
      "command": "node",
      "args": ["/path/to/mcp-server/build/index.js"],
      "env": {
        "API_TOKEN": "API_TOKEN",
        "API_TOKEN_SECRET": "API_TOKEN_SECRET",
        "ID": "YOUR_EMAIL_ADDRESS",
        "PASSWORD": "YOUR_PASSWORD"
      }
    }
  }
}
設定したら、Claud Desktopを再起動します。
MCPサーバーの実行
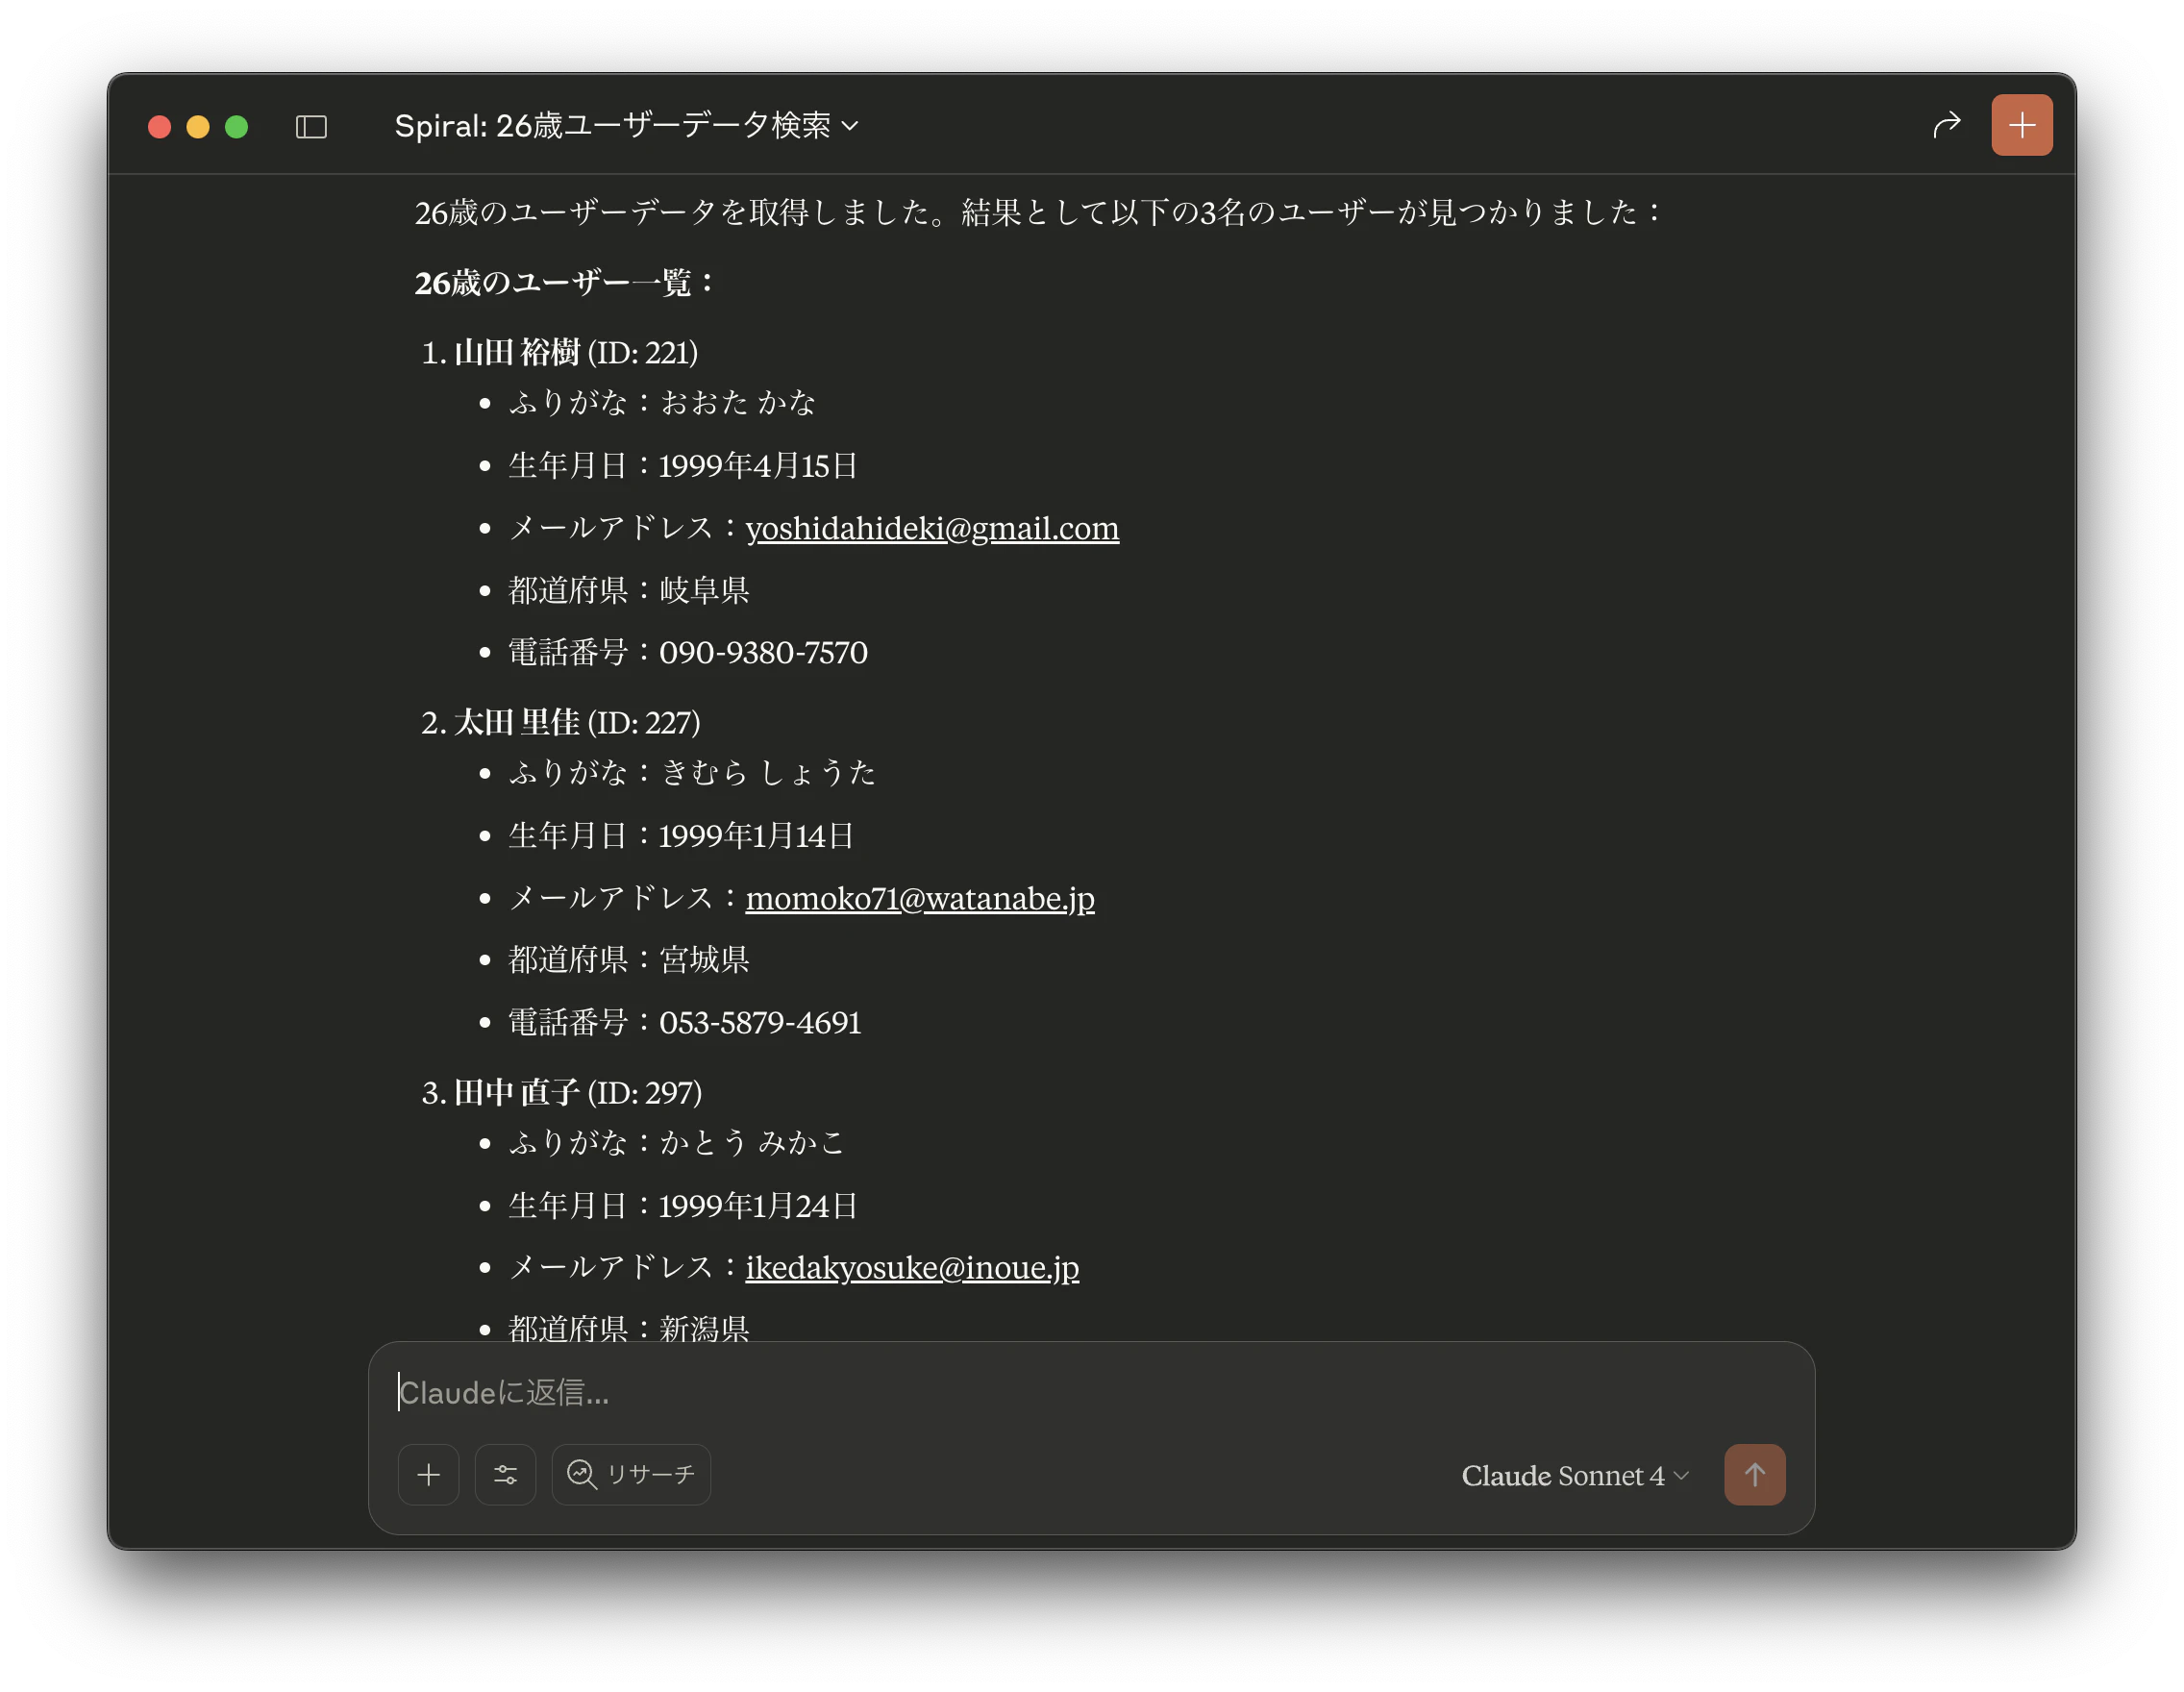
例えば以下のように聞いてみます。
Spiralで26歳のデータを抽出してください
そうすると、SPIRALの検索が行われて、該当データが出力されます(データはすべてダミーです)。
まとめ
今回はSPIRALのデータをMCPサーバーを介して検索しました。認証データなどが必要なので、個別に設定する必要があるかと思います。実装時には、セキュリティ面に注意してください。
なお、1分あたりのAPIのリクエスト数は、契約によって上限があります。ご注意ください(詳細はAPIのリクエスト数制限を知りたい SPIRAL ver.1 サポートサイトにて)。