NCMBのFlutter SDKを使ってカレンダーアプリを作ります。予定を登録したり、カレンダーライブラリ(table_calendar)を使って予定を表示できるというアプリです。
まず最初の記事では画面の説明とSDKの導入までを進めます。
コードについて
今回のコードはNCMBMania/flutter-calendarにアップロードしてあります。実装時の参考にしてください。
利用技術・ライブラリについて
今回は次のような組み合わせになっています。
- NCMB Flutter SDK
- table_calendar
- flutter_datetime_picker
- intl
仕様について
今回はNCMBのID/パスワード認証を利用しています。カレンダー表示についてはtable_calendarを利用し、アプリはFlutterで作成しています。
利用する機能について
カレンダーアプリで利用するNCMBの機能は次の通りです。
- 会員管理
- ID/パスワード認証
- データストア
- 予定の登録・更新・削除
- 予定の検索
画面について
今回は以下の5つのステートフルウィジェットがあります。
MyHomePage
メインのウィジェットです。認証状態によってログイン画面とカレンダー画面を出し分けています。
@override
Widget build(BuildContext context) {
	return _isLogin ? const CalendarPage() : LoginPage(onLogin: _onLogin);
}
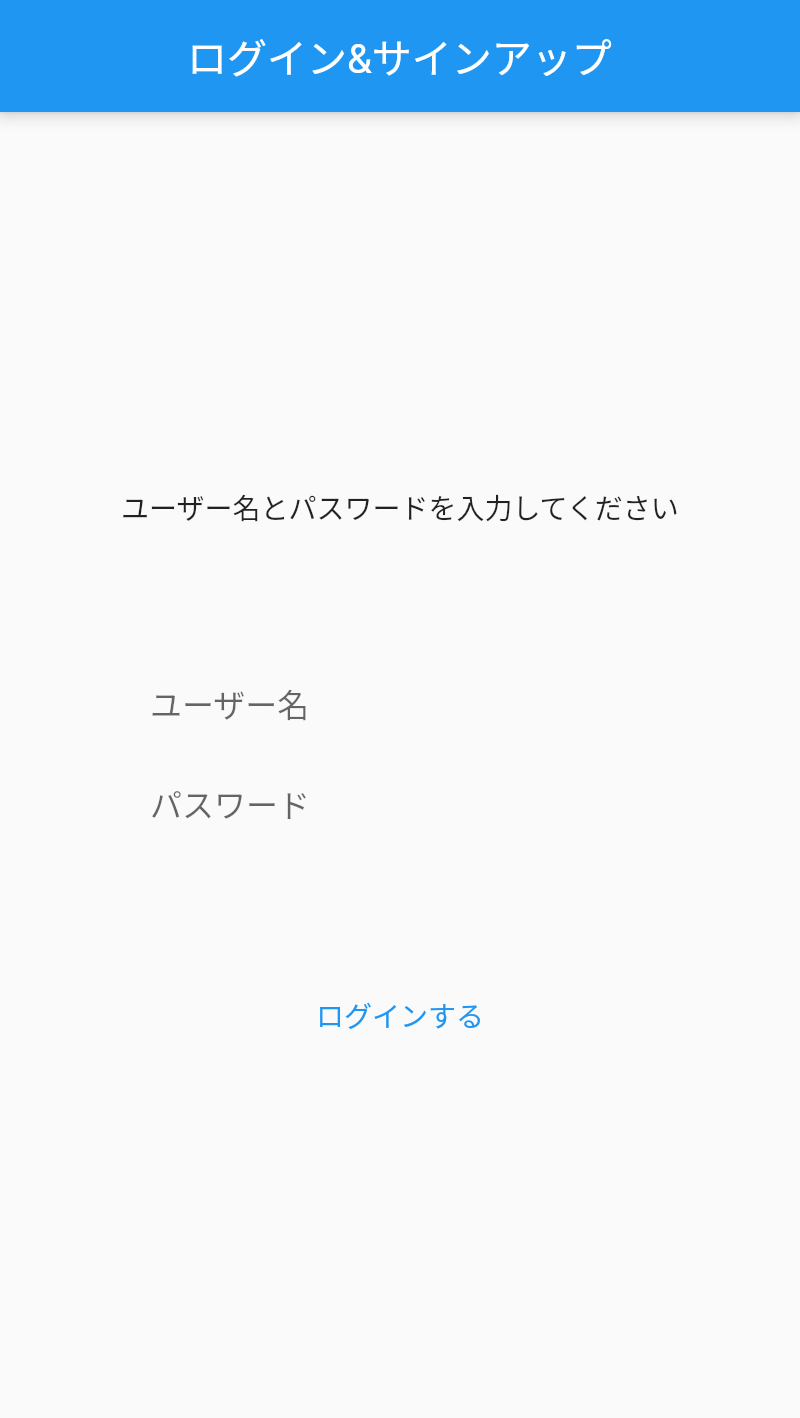
LoginPage
認証を行うウィジェットです。認証状態をMyHomePageにフィードバックしています。
@override
Widget build(BuildContext context) {
	return Scaffold(
			appBar: AppBar(title: const Text('ログイン&サインアップ')),
			body: Column(mainAxisAlignment: MainAxisAlignment.center, children: [
				Row(mainAxisAlignment: MainAxisAlignment.center, children: const [
					SizedBox(
							height: 100,
							child: Text(
								'ユーザー名とパスワードを入力してください',
							)),
				]),
				SizedBox(
						height: 50,
						width: 250,
						child: TextField(
							decoration: const InputDecoration.collapsed(hintText: 'ユーザー名'),
							onChanged: (value) {
								setState(() {
									_userName = value;
								});
							},
						)),
				SizedBox(
					width: 250,
					height: 100,
					child: TextField(
						obscureText: true,
						decoration: const InputDecoration.collapsed(hintText: 'パスワード'),
						onChanged: (value) {
							setState(() {
								_password = value;
							});
						},
					),
				),
				TextButton(onPressed: _login, child: const Text("ログインする"))
			]));
}
CalendarPage
カレンダー表示用のウィジェットです。日付を選択した際に、該当日のイベントを一覧表示します。一覧表示時の1行あたりのデータはScheduleListPageで表示します。
Widget build(BuildContext context) {
	return Scaffold(
			appBar: AppBar(
				title: const Text("カレンダー"),
				actions: [
					IconButton(
						icon: const Icon(Icons.add),
						onPressed: _addSchedule,
					)
				],
			),
			body: Column(children: [
				TableCalendar(
					locale: 'ja',
					eventLoader: _eventLoader,
					firstDay: DateTime.utc(2010, 10, 16, 10),
					lastDay: DateTime.utc(2030, 3, 14),
					focusedDay: _focusDate,
					onDaySelected: _onDaySelected,
				),
				_selectedSchedules.isEmpty
						? const Text("該当日にイベントはありません")
						: Expanded(
								child: ListView.builder(
										itemCount: _selectedSchedules.length,
										itemBuilder: (BuildContext context, int index) {
											final schedule = _selectedSchedules[index];
											return ScheduleListPage(
												schedule: schedule,
												onEdited: (NCMBObject schedule) {
													setState(() {
														_selectedSchedules[index] = schedule;
													});
												},
											);
										}))
			]));
}
ScheduleListPage
スケジュール一覧表示用のウィジェットです。NCMBObjectを受け取り、画面表示に利用します。
@override
Widget build(BuildContext context) {
	return GestureDetector(
			onTap: () async {
				var schedule = await Navigator.push(
						context,
						MaterialPageRoute(
								settings: const RouteSettings(name: '/new'),
								builder: (BuildContext context) =>
										ScheduleFormPage(schedule: widget.schedule)));
				if (schedule != null) {
					widget.onEdited(schedule);
				}
			},
			child: Container(
					decoration: const BoxDecoration(
						border: Border(
							bottom: BorderSide(color: Colors.black38),
						),
					),
					child: Column(
						children: [
							Row(
								children: [
									Text(widget.schedule
											.getString("title", defaultValue: "タイトルなし")),
									const Spacer(),
									Text(_viewTime())
								],
							),
							Container(
									alignment: Alignment.centerLeft,
									child: Text(
											widget.schedule.getString("body", defaultValue: "")))
						],
					)));
}
ScheduleFormPage
予定の入力・更新を行うウィジェットです。
@override
Widget build(BuildContext context) {
	return Scaffold(
			appBar: AppBar(
				title: const Text("予定の追加・編集"),
			),
			body: Row(mainAxisAlignment: MainAxisAlignment.center, children: [
				Column(mainAxisAlignment: MainAxisAlignment.center, children: [
					SizedBox(
							height: 50,
							width: 250,
							child: TextFormField(
								initialValue: _title,
								decoration: const InputDecoration.collapsed(hintText: 'タイトル'),
								onChanged: (value) {
									setState(() {
										_title = value;
									});
								},
							)),
					SizedBox(
							height: 50,
							width: 250,
							child: TextFormField(
								initialValue: _body,
								decoration: const InputDecoration.collapsed(hintText: '予定詳細'),
								maxLines: 10,
								onChanged: (value) {
									setState(() {
										_body = value;
									});
								},
							)),
					SizedBox(
							height: 50,
							width: 250,
							child: TextFormField(
									controller: _startDateController,
									decoration:
											const InputDecoration.collapsed(hintText: '開始日時'),
									maxLines: 10,
									enableInteractiveSelection: false,
									onTap: () => _showDateTimePicker("startDate"))),
					SizedBox(
							height: 50,
							width: 250,
							child: TextFormField(
									controller: _endDateController,
									decoration:
											const InputDecoration.collapsed(hintText: '終了日時'),
									maxLines: 10,
									enableInteractiveSelection: false,
									onTap: () => _showDateTimePicker("endDate"))),
					TextButton(onPressed: _save, child: const Text("保存する")),
				])
			]));
}
SDKのインストール
flutterコマンドを使って各種ライブラリ・SDKをインストールします。
flutter pub add ncmb
flutter pub add table_calendar
flutter pub add flutter_datetime_picker
flutter pub add intl
NCMBのAPIキーを取得
mBaaSでサーバー開発不要! | ニフクラ mobile backendにてアプリを作成し、アプリケーションキーとクライアントキーを作成します。
main.dartの修正
main.dartファイルを開いて、NCMB SDKの読み込みと初期化を行います。
import 'package:ncmb/ncmb.dart';
import 'package:intl/intl.dart';
import 'package:intl/date_symbol_data_local.dart';
import 'package:table_calendar/table_calendar.dart';
import 'package:flutter_datetime_picker/flutter_datetime_picker.dart';

void main() async {
  NCMB('YOUR_APPLICATION_KEY',
      'YOUR_CLIENT_KEY');
	// 言語設定
  await initializeDateFormatting("ja");
  runApp(const MyApp());
}
これでNCMBの初期化が完了します。
まとめ
今回はカレンダーアプリの仕様と画面、NCMBの初期化までを解説しました。次はログイン処理を実装します。


