Xamarin.FormsでAWSのAPIGatewayを叩いてみた
本記事は、[初心者さん・学生さん大歓迎!] Xamarin その1 Advent Calendar 2017 の2日目となります。
やること
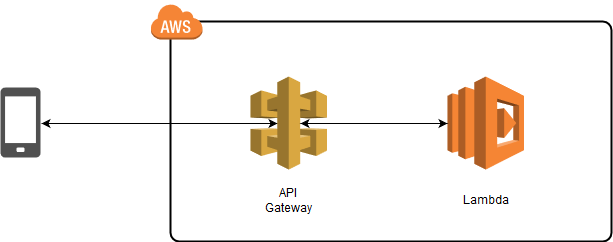
Xamarin.Forms製のアプリでWebAPIを叩き、結果を受け取って表示させてみます。
WebAPI(クラウド環境)はAWSのAPI Gatewayを使用します。
開発環境
クラウド
- Amazon Web Service
- API Gateway
- Lambda
ローカル
- Windows 10
- Visual Studio 2017 Community
- Nexus 5X (Android 8.0.0)
NuGetパッケージ
- Newtonsoft.Json
AWS
API GatewayとLambdaの準備
API Gateway と Lambda の2つのサービスを使用します。
環境構築などは以下を参照してください。
Lambdaのコード
API GatewayとLambdaを作成したら、Lambdaのコードを以下にします。(付け焼き刃の)Pythonです。
Param1とParam2を合計しているだけです。
import json

print('Loading function')

def lambda_handler(event, context):

    body = json.loads(event['body'])

    print(body)

    response = []

    for param in body:
        data = {}
        data['Id'] = param['Id']
        data['Sum'] = param['Param1'] + param['Param2']
        response.append(data)


    return {
        'statusCode': '200',
        'headers': {
            'Content-Type': 'application/json',
        },
        'body': json.dumps(response),
    }
以上でAWSの準備は完了です。
Xamarin.Forms
Xamarin.Formsの新規プロジェクトを作成します。
NuGetパッケージのインストール
Newtonsoft.Json を検索して追加します。
Xamarin.Formsのコード
パラメータを(今回は固定値ですが)表示し、ボタン押すとAPIGatewayを叩き、レスポンスの結果を表示します。
まずはXAMLからいきましょう。
<?xml version="1.0" encoding="utf-8" ?>
<ContentPage xmlns="http://xamarin.com/schemas/2014/forms"
             xmlns:x="http://schemas.microsoft.com/winfx/2009/xaml"
             xmlns:local="clr-namespace:TestAPIGateway"
             x:Class="TestAPIGateway.MainPage">
    <ContentPage.Content>
        <StackLayout Margin="20">
            <Label Text="'Id': 1, 'Param1': 1, 'Param2': 3"></Label>
            <Label Text="'Id': 2, 'Param1': 4, 'Param2': 7"></Label>
            <Label Text="'Id': 3, 'Param1': 2, 'Param2': 5"></Label>
            <Button Text="Click Me!" Clicked="Button_OnClicked"></Button>
            <Label x:Name="ResultStatus" Text="???"></Label>
            <Label x:Name="Id1Text" Text="???"></Label>
            <Label x:Name="Id2Text" Text="???"></Label>
            <Label x:Name="Id3Text" Text="???"></Label>
        </StackLayout>
    </ContentPage.Content>
</ContentPage>
次です。WebAPIの要求/応答パラメータのクラスを作成します。
public class RequestItem
{
    public int Id { get; set; }
    public int Param1 { get; set; }
    public int Param2 { get; set; }
}
public class ResponseItem
{
    public int Id { get; set; }
    public int Sum { get; set; }
}
そして最後に、ボタンを押した際の処理を作成します。
public partial class MainPage : ContentPage
{
    public MainPage()
    {
        InitializeComponent();
    }

    private async void Button_OnClicked(object sender, EventArgs e)
    {
        var httpClient = new HttpClient
        {
            Timeout = TimeSpan.FromSeconds(30)
        };

        /* 送信用データを作成 */
        var item = new List<RequestItem>
        {
            new RequestItem
            {
                Id = 1,
                Param1 = 1,
                Param2 = 3,
            },
            new RequestItem
            {
                Id = 2,
                Param1 = 4,
                Param2 = 7,
            },
            new RequestItem
            {
                Id = 3,
                Param1 = 2,
                Param2 = 5,
            }
        };

        var json = JsonConvert.SerializeObject(item, Formatting.Indented);

        var content = new StringContent(json, System.Text.Encoding.UTF8, "application/json");


        /* 送信(URIは適宜変更してください) */
        var response = await httpClient.PostAsync("https://xxxxxxxxx.execute-api.ap-northeast-1.amazonaws.com/prod/TestAPIGateway", content);


        if (response.IsSuccessStatusCode)
        {
            var result = await response.Content.ReadAsStringAsync();

            System.Diagnostics.Debug.WriteLine("Success Status");
            System.Diagnostics.Debug.WriteLine(result);


            var resultJson = JsonConvert.DeserializeObject<List<ResponseItem>>(result);

            ResultStatus.Text = "Success";
            Id1Text.Text = $"'Id': {resultJson[0].Id}, 'Sum': {resultJson[0].Sum}";
            Id2Text.Text = $"'Id': {resultJson[1].Id}, 'Sum': {resultJson[1].Sum}";
            Id3Text.Text = $"'Id': {resultJson[2].Id}, 'Sum': {resultJson[2].Sum}";
        }
        else
        {
            System.Diagnostics.Debug.WriteLine("Not Success Status: " + response.StatusCode.ToString() + "  -  Reason: " + response.ReasonPhrase);

            ResultStatus.Text = "Fail";
        }
    }
}
動作結果
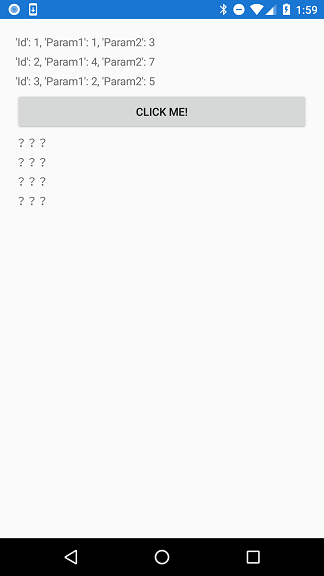
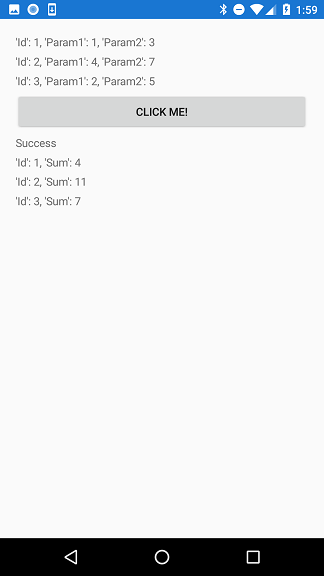
こうなります。
ボタンを押す前
ボタンを押した後
簡単ですね!
ソースコード
Githubに置いています。
まとめ
Xamarinと見せかけて、AWSとC#のお話になっていますが、これを応用すれば、
- アプリ内データをクラウドにバックアップする
- クラウドを経由した端末間のデータ移行
などが簡単に実現できます。
本例題アプリとは別のXamarin.Forms製アプリに組み込んで(API叩くだけですが)うまいこと動いています。リリース後、私以外は1度も使われてないですが……。
今回はAWSを使用しましたが、Azureでも同様の事ができるはずです。
Xamarinはいいぞ。これからももっと勉強していきます!
明日はKenshiro_Fukudaさんです。よろしくお願いします。


