はじめに
本記事は前回の続きとなります。
本記事に記載のコードは以下のnotebookに記載されています。
外部データなど不要ですので、とりあえずCGANを動かしてみたいという方は触ってみてください。
https://colab.research.google.com/drive/1fv1dLmGjChxKtkvomujlulQqc5zw5Pot?usp=sharing
CGANとは
CGANはConditional Generative Adversarial Networkの略であり、条件付き敵対的生成ネットワークと訳されます。
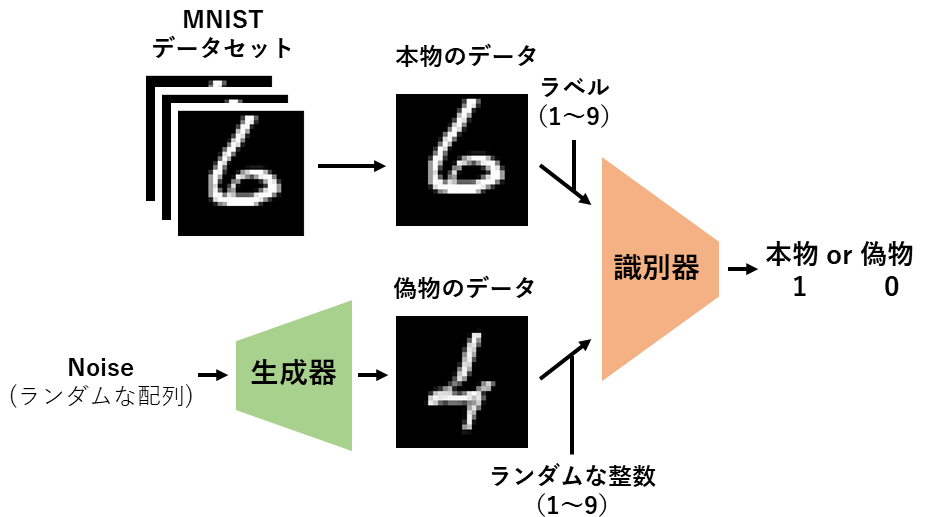
前回実装した単純なGANでは、狙った数字の画像を生成することはできませんでした。
しかしCGANでは画像のラベル(MNISTでは何の数字であるか)を学習に使用することで、特定の画像のみを生成することが可能となります。
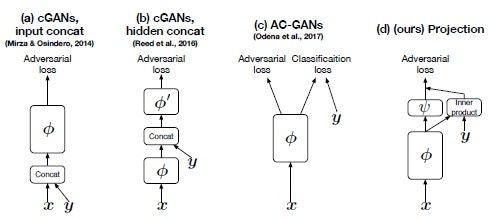
CGANにも様々な種類がありますが、今回は識別器のみにラベルを流し込むモデルを実装します。(一番右側のモデルです。)
構造としては出力層の直前でラベルを全結合層で埋め込み(図のy)、出力層までの出力ベクトルとの内積を計算して加算しています。
f(x,y) := y^TV\phi(x)(F_{i}) + \psi(\phi(x))
【原著論文】cGANs with Projection Discriminator
本モデルの学習は前回と同じ方法で行います。
データセット
MNISTを使用します。
MNISTは手書き数字(1~9)の画像とラベル(画像がどの数字であるか)がセットになったデータセットです。
環境
- Google Colaboratory Pro
コード
モジュールのimport
import pandas as pd
from matplotlib import pyplot as plt
import numpy as np
from torchvision.datasets import MNIST
from torch.utils.data import DataLoader
import torch
import torch.nn as nn
import torch.optim as optim
from torchvision import transforms
データセットの作成
pytorchのMNISTデータセットを使用します。
BATCH_SIZE = 16

train_data = MNIST("./data",
                   train=True,
                   download=True,
                   transform=transforms.ToTensor())

train_loader = DataLoader(train_data,
                          batch_size=BATCH_SIZE,
                          shuffle=True)
print("train data size: ",len(train_data))   #train data size:  60000
print("train iteration number: ",len(train_data)//BATCH_SIZE)   #train iteration number:  3750
データの内容は以下の通りです。
images, labels = next(iter(train_loader))
print("images_size:",images.size())   #images_size: torch.Size([16, 1, 28, 28])
print("label:",labels)   #label: tensor([7, 3, 0, 3, 7, 2, 5, 3, 2, 0, 8, 7, 4, 9, 5, 7])

image_numpy = images.detach().numpy().copy()
plt.imshow(image_numpy[0,0,:,:], cmap='gray')
識別器と生成器を作成します。
class TwoConvBlock_2D(nn.Module):
  def __init__(self, in_channels, out_channels):
    super().__init__()
    self.conv1 = nn.Conv2d(in_channels, out_channels, kernel_size = 3, padding="same")
    self.bn1 = nn.BatchNorm2d(out_channels)
    self.rl = nn.LeakyReLU()
    self.conv2 = nn.Conv2d(out_channels, out_channels, kernel_size = 3, padding="same")
    self.bn2 = nn.BatchNorm2d(out_channels)

  def forward(self, x):
    x = self.conv1(x)
    x = self.bn1(x)
    x = self.rl(x)
    x = self.conv2(x)
    x = self.bn2(x)
    x = self.rl(x)
    return x

class Discriminator(nn.Module):   #識別器
  def __init__(self):
    super().__init__()
    self.conv1 = TwoConvBlock_2D(1,64)
    self.conv2 = TwoConvBlock_2D(64, 128)
    self.conv3 = TwoConvBlock_2D(128, 256)

    self.avgpool_2D = nn.AvgPool2d(2, stride = 2)
    self.global_avgpool_2D = nn.AvgPool2d(7)

    self.l1 = nn.Linear(256, 20)
    self.l2 = nn.Linear(20, 1)
    self.rl = nn.LeakyReLU()
    self.dropout1 = nn.Dropout(0.5)
    self.dropout2 = nn.Dropout(0.1)
    self.embed = nn.Embedding(10, 256)

  def forward(self, x, y):
    x = self.conv1(x)
    x = self.avgpool_2D(x)
    x = self.conv2(x)
    x = self.avgpool_2D(x)
    x = self.conv3(x)
    x = self.global_avgpool_2D(x)
    x = x.view(-1, 256)
    _x = x
    x = self.dropout1(x)
    x = self.l1(x)
    x = self.rl(x)
    x = self.dropout2(x)
    x = self.l2(x)

    _y = self.embed(y)   #ラベルをembedding層で埋め込む
    xy = (_x*_y).sum(1, keepdim=True)   #出力ベクトルとの内積をとる

    x = x+xy   #内積を加算する
    x = torch.sigmoid(x)
    return x

class Generator(nn.Module):   #生成器
  def __init__(self):
    super().__init__()
    self.l = nn.Linear(110, 49)
    self.dropout = nn.Dropout(0.2)
    self.TCB1 = TwoConvBlock_2D(1,512)
    self.TCB2 = TwoConvBlock_2D(512,256)
    self.TCB3 = TwoConvBlock_2D(256,128)
    self.UC1 = nn.ConvTranspose2d(512, 512, kernel_size =2, stride = 2)
    self.UC2 = nn.ConvTranspose2d(256, 256, kernel_size =2, stride = 2)
    self.conv1 = nn.Conv2d(128, 1, kernel_size = 2, padding="same")


  def forward(self, x, y):
    y = torch.nn.functional.one_hot(y.long(), num_classes=10).to(torch.float32)
    x = torch.cat([x, y], dim= 1)
    x = self.dropout(x)
    x = self.l(x)
    x = torch.reshape(x, (-1, 1, 7, 7))
    x = self.TCB1(x)
    x = self.UC1(x)
    x = self.TCB2(x)
    x = self.UC2(x)
    x = self.TCB3(x)
    x = self.conv1(x)
    x = torch.sigmoid(x)
    return x
学習を行います。
device = torch.device("cuda:0" if torch.cuda.is_available() else "cpu")   #GPUを設定
model_D = Discriminator().to(device)
model_G = Generator().to(device)

true_labels = torch.ones(BATCH_SIZE).reshape(BATCH_SIZE, 1).to(device)   #1のラベル
fake_labels = torch.zeros(BATCH_SIZE).reshape(BATCH_SIZE, 1).to(device)   #0のラベル

criterion = nn.BCELoss()    #損失関数はBCE(Binary Cross Entropy)を使用

optimizer_D = optim.Adam(model_D.parameters(), lr=0.00001)   #最適化関数はAdamを使用
optimizer_G = optim.Adam(model_G.parameters(), lr=0.00001)

epoch_num = 100   #エポック数(同じデータセットを何回学習するか)
print_coef = 10
G_train_ratio = 2   #識別器の学習1回あたり生成器が学習する回数
train_length = len(train_data)

def calc_acc(pred):   #正解率の評価関数
  pred = torch.where(pred > 0.5, 1., 0.)
  acc = pred.sum()/pred.size()[0]
  return acc

history = {"loss_D": [], "loss_G": [], "acc_true": [], "acc_fake": []}
n = 0
m = 0

for epoch in range(epoch_num):
  train_loss_D = 0
  train_loss_G = 0
  train_acc_true = 0
  train_acc_fake = 0

  model_D.train()
  model_G.train()
  for i, data in enumerate(train_loader):
    optimizer_D.zero_grad()
    inputs, labels = data[0].to(device), data[1].to(device)

    #識別器の学習(1)
    outputs = model_D(inputs, labels)   #本物の画像が本物か偽物か判定
    loss_true = criterion(outputs, true_labels)   #本物のデータを本物と判定するように学習したいので1のラベルを使用
    acc_true = calc_acc(outputs)

    #識別器の学習(2)
    noise = torch.randn((BATCH_SIZE, 100), dtype=torch.float32).to(device)   #ランダムな配列を生成
    noise_label = torch.from_numpy(np.random.randint(0,10,BATCH_SIZE)).clone().to(device)   #1~9のランダムな整数を生成
    inputs_fake = model_G(noise, noise_label).to(device)   #偽物の画像を生成
    outputs_fake = model_D(inputs_fake.detach(), noise_label)   #偽物の画像が本物か偽物か判定
    loss_fake = criterion(outputs_fake, fake_labels)   #偽物の画像を偽物と判定する方向に学習したいので0のラベルを使用
    acc_fake = calc_acc(outputs_fake)
    loss_D = loss_true + loss_fake   #識別器の学習(1)・(2)の損失を足し合わせる
    loss_D.backward()
    optimizer_D.step()   #識別器のパラメータを更新する

    #生成器の学習
    for _ in range(G_train_ratio):   #G_train_ratioの回数分生成器の学習を繰り返す
      optimizer_G.zero_grad()
      noise = torch.randn((BATCH_SIZE, 100), dtype=torch.float32).to(device)  #ランダムな配列を生成
      noise_label = torch.from_numpy(np.random.randint(0,10,BATCH_SIZE)).clone().to(device)   #1~9のランダムな整数を生成
      inputs_fake = model_G(noise, noise_label).to(device)
      outputs_fake = model_D(inputs_fake, noise_label)
      loss_G = criterion(outputs_fake, true_labels)   #本物と判定される偽物の画像を生成したいので1のラベルを使用
      loss_G.backward()
      optimizer_G.step()   #生成器のパラメータを更新する

    #学習経過の保存
    train_loss_D += loss_D.item()
    train_loss_G += loss_G.item()
    train_acc_true += acc_true.item()
    train_acc_fake += acc_fake.item()
    n += 1
    history["loss_D"].append(loss_D.item())
    history["loss_G"].append(loss_G.item())
    history["acc_true"].append(acc_true.item())
    history["acc_fake"].append(acc_fake.item())

    if i % ((train_length//BATCH_SIZE)//print_coef) == (train_length//BATCH_SIZE)//print_coef - 1:
      print(f"epoch:{epoch+1}  index:{i+1}  loss_D:{train_loss_D/n:.10f}  loss_G:{train_loss_G/n:.10f}  acc_true:{train_acc_true/n:.10f}  acc_fake:{train_acc_fake/n:.10f}")

      n = 0
      train_loss_D = 0
      train_loss_G = 0
      train_acc_true = 0
      train_acc_fake = 0

print("finish training")
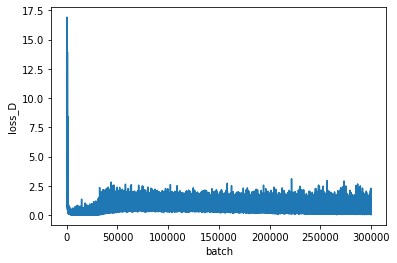
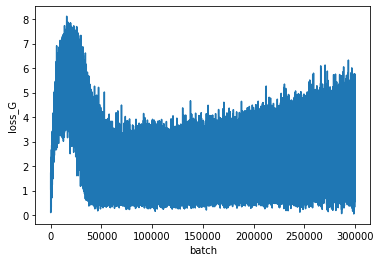
学習経過をプロットします。
plt.figure()
plt.plot(history["loss_D"])
plt.xlabel('batch')
plt.ylabel('loss_D')

plt.figure()
plt.plot(history["loss_G"])
plt.xlabel('batch')
plt.ylabel('loss_G')
上が識別器、下が生成器の損失を表します。
GANの学習は損失が一方向に低下するのではなく、振動する特徴があります。
生成画像をプロットします。
for i in range(10):
  intnp = np.random.randint(i ,i + 1 ,10)
  if i == 0:
    label_np = intnp
  else:
    label_np = np.concatenate([label_np, intnp], 0)

model_G.to("cpu")
with torch.no_grad():
  noise = torch.randn((100, 100), dtype=torch.float32)
  noise_label = torch.from_numpy(label_np).clone()
  syn_image = model_G(noise, noise_label)

  plt.figure()
  fig, ax = plt.subplots(10, 10, figsize=(15,15))
  for i in range(10):
    for j in range(10):
        ax[i,j].imshow(syn_image[i * 10 + j,0,:,:], cmap='gray')
        ax[i,j].axis("off")
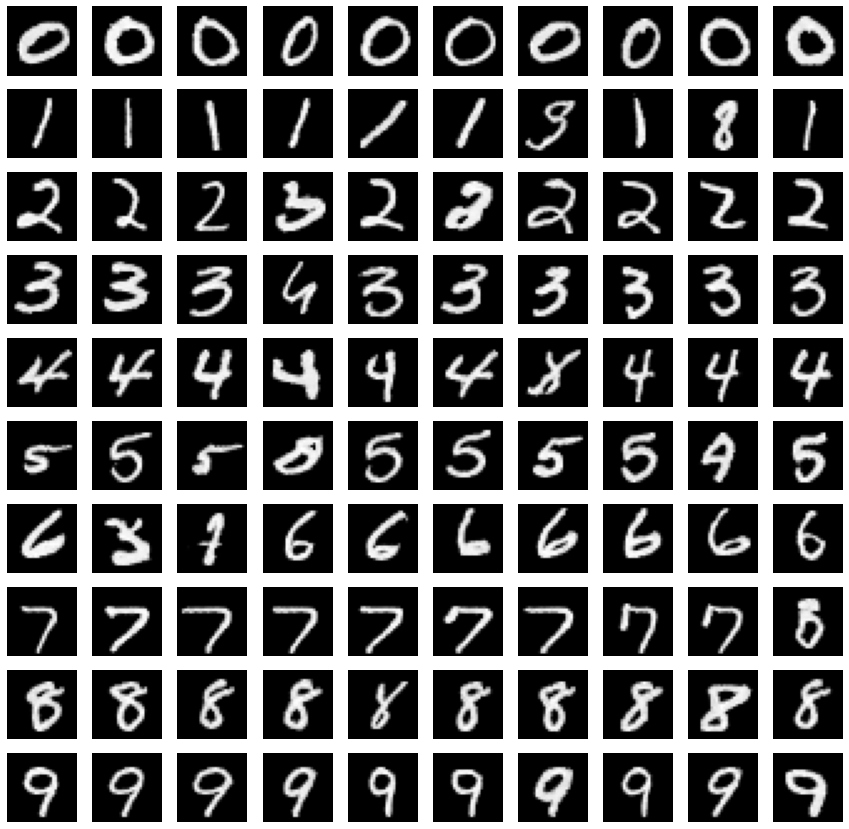
指定のラベル(上から0~9)ごとにMNISTらしい画像が生成されていますが、指定のラベルと異なる画像がいくつか生成されています。
学習が不十分であると考えられるので、epoch数を増やす、1エポック当りの生成器の学習回数を増やすなどで改善できると思います。
