2025年12月にラスベガスで開催されたAWS re:Invent 2025に参加してきました。数多くのアップデートの中でも、特に開発現場のプロセスを変える可能性を感じたAWS Security Agentについて、実際に検証していきたいと思います。
セキュリティテスト、後回しにしていませんか?
アプリケーション開発において、セキュリティテストはスケジュールの後ろの方に回りがちです。
特に、実際の攻撃を模したペネトレーションテスト(侵入テスト)は、セキュリティに関して高い専門性が必要なため外部ベンダーに委託するケースが一般的で、コストも高くどうしても後回しになりがちです。しかし、脆弱性が見つかれば手戻りも大きく、プロジェクト遅延のリスクに直結しますよね。
もっと手軽に、開発の早期に脆弱性を潰し込みたいという課題を解消するのがSecurity Agentです。「設計、実装、テスト」の全フェーズでAIエージェントが継続的なセキュリティチェックを行うことで、セキュリティのシフトレフトをサポートしてくれます。
Security Agentって具体的に何?
名前の通り、AIエージェント型のセキュリティツールで、単なる静的スキャンツールとは異なります。2025年12月のプレビュー時点の機能としては以下3つを備えています。
-
設計書レビュー
設計書や構成図をレビューし、設計段階でのセキュリティリスクを洗い出します。 -
コードレビュー
CI/CDパイプラインに統合可能で、プルリクエストに対してAIエージェントが自動的にセキュリティ観点でコードレビューを行います。修正提案まで出してくれます。 -
ペネトレーションテスト
今回紹介する機能です。 稼働しているアプリケーションに対して、実際に外部から擬似的な攻撃を行い、脆弱性を検出します。
今回は、特に気になっていた「ペネトレーションテスト機能」を実際に検証してみました。
プレビュー期間中は無料で利用可能
2025年12月現在、AWS Security Agentはプレビュー公開中であり、無料で試すことができます。
ペネトレーションテストを実際にやってみた
今回は、VPC内のプライベートな環境にあるアプリケーションに対して、Security Agentからペネトレーションテストを実行する手順を検証しました。
診断対象:DVWA on AWS
診断対象として、DVWA (Damn Vulnerable Web Application) を使用しました。これは、SQLインジェクションやXSS(クロスサイトスクリプティング)などの脆弱性があえて実装された、学習用のWebアプリケーションです。これをAWSのVPC内(プライベートサブネット)のEC2にデプロイし、Security Agentのテスト対象とします。
システム構成図
EC2(AmazonLinux2023)をプライベートサブネットに配置し、DockerでDVWAを稼働させました。
Route53のプライベートホストゾーンも作成していますが、Security Agentからの診断にはドメイン指定が必須のためです。パブリック公開されていない内部ドメインに対してもテストが可能なのは、実務利用を考えると非常に嬉しいポイントですね。
なお、DVWAのDocker Imageをpullする用途で利用するため、NATGWを配置しています。

【注意】VPC CIDRの制約について
For VPC penetration tests, VPC CIDR ranges that overlap with the 10.0.0.0/16 range are currently not supported. Additionally, if you have a VPC IP endpoint that falls within this CIDR range, it will also fail to resolve.
公式ドキュメントに上記の注意事項が記載されており、10.0.0.0/16のCIDRがサポートされていません(2025年12月時点)。ターゲットのIPがこの範囲にある場合はテストできませんので、別のCIDRを使うようにしてください。
参考:https://docs.aws.amazon.com/securityagent/latest/userguide/connect-agent-vpc.html
ちなみに、構成図には記載していませんが、EC2のOSログインと操作用にSSMのVPCエンドポイントも作成しています。
アプリケーションの構築
以下の手順で構築を行いましたが、結果として今回の私の環境ではSecurity Agentのテスト実行自体はエラーとなりました(後述)。
ただし、手順自体は標準的なものですので、検証の参考にしてください。
一撃CloudFormation
AWSリソースはすべてCloudFormationで作成しました。
こちらはAIに書かせたコードです。
CloudFormationのYaml. 長いので折りたたみ
AWSTemplateFormatVersion: '2010-09-09'
Description: 'AWS Security Agent - DVWA Penetration Test Environment (SSM Access) [CIDR 172.16.0.0/24]'

# ====================
# Parameters
# ====================
Parameters:
  PrivateDomainName:
    Description: Private domain name for DVWA
    Type: String
    Default: dvwa.internal

  PrivateHostname:
    Description: Hostname for DVWA application
    Type: String
    Default: app

# ====================
# Resources
# ====================
Resources:

  # --------------------
  # VPC
  # --------------------
  VPC:
    Type: AWS::EC2::VPC
    Properties:
      CidrBlock: 172.16.0.0/24
      EnableDnsHostnames: true
      EnableDnsSupport: true
      Tags:
        - Key: Name
          Value: security-agent-vpc

  # --------------------
  # Internet Gateway
  # --------------------
  InternetGateway:
    Type: AWS::EC2::InternetGateway
    Properties:
      Tags:
        - Key: Name
          Value: security-agent-igw

  AttachGateway:
    Type: AWS::EC2::VPCGatewayAttachment
    Properties:
      VpcId: !Ref VPC
      InternetGatewayId: !Ref InternetGateway

  # --------------------
  # Public Subnet (for NAT Gateway)
  # CIDR: 172.16.0.0/26
  # --------------------
  PublicSubnet:
    Type: AWS::EC2::Subnet
    Properties:
      VpcId: !Ref VPC
      CidrBlock: 172.16.0.0/26
      AvailabilityZone: !Select [0, !GetAZs '']
      MapPublicIpOnLaunch: true
      Tags:
        - Key: Name
          Value: public-subnet

  # --------------------
  # Private Subnet (for DVWA EC2)
  # CIDR: 172.16.0.64/26
  # --------------------
  PrivateSubnet:
    Type: AWS::EC2::Subnet
    Properties:
      VpcId: !Ref VPC
      CidrBlock: 172.16.0.64/26
      AvailabilityZone: !Select [0, !GetAZs '']
      Tags:
        - Key: Name
          Value: private-subnet

  # --------------------
  # Elastic IP for NAT Gateway
  # --------------------
  NATGatewayEIP:
    Type: AWS::EC2::EIP
    DependsOn: AttachGateway
    Properties:
      Domain: vpc
      Tags:
        - Key: Name
          Value: nat-gateway-eip

  # --------------------
  # NAT Gateway
  # --------------------
  NATGateway:
    Type: AWS::EC2::NatGateway
    Properties:
      AllocationId: !GetAtt NATGatewayEIP.AllocationId
      SubnetId: !Ref PublicSubnet
      Tags:
        - Key: Name
          Value: main-nat-gateway

  # --------------------
  # Public Route Table
  # --------------------
  PublicRouteTable:
    Type: AWS::EC2::RouteTable
    Properties:
      VpcId: !Ref VPC
      Tags:
        - Key: Name
          Value: public-rt

  PublicRoute:
    Type: AWS::EC2::Route
    DependsOn: AttachGateway
    Properties:
      RouteTableId: !Ref PublicRouteTable
      DestinationCidrBlock: 0.0.0.0/0
      GatewayId: !Ref InternetGateway

  PublicSubnetRouteTableAssociation:
    Type: AWS::EC2::SubnetRouteTableAssociation
    Properties:
      SubnetId: !Ref PublicSubnet
      RouteTableId: !Ref PublicRouteTable

  # --------------------
  # Private Route Table
  # --------------------
  PrivateRouteTable:
    Type: AWS::EC2::RouteTable
    Properties:
      VpcId: !Ref VPC
      Tags:
        - Key: Name
          Value: private-rt

  PrivateRoute:
    Type: AWS::EC2::Route
    Properties:
      RouteTableId: !Ref PrivateRouteTable
      DestinationCidrBlock: 0.0.0.0/0
      NatGatewayId: !Ref NATGateway

  PrivateSubnetRouteTableAssociation:
    Type: AWS::EC2::SubnetRouteTableAssociation
    Properties:
      SubnetId: !Ref PrivateSubnet
      RouteTableId: !Ref PrivateRouteTable

  # --------------------
  # Security Group (DVWA)
  # --------------------
  DVWASecurityGroup:
    Type: AWS::EC2::SecurityGroup
    Properties:
      GroupName: dvwa-sg
      GroupDescription: Security group for DVWA instance
      VpcId: !Ref VPC
      SecurityGroupIngress:
        # HTTP from Security Agent
        - IpProtocol: tcp
          FromPort: 80
          ToPort: 80
          CidrIp: 0.0.0.0/0
          Description: HTTP from Security Agent
        # HTTPS from Security Agent
        - IpProtocol: tcp
          FromPort: 443
          ToPort: 443
          CidrIp: 0.0.0.0/0
          Description: HTTPS from SSM VPC Endpoints
      SecurityGroupEgress:
        # Allow all outbound
        - IpProtocol: -1
          CidrIp: 0.0.0.0/0
          Description: Allow all outbound
      Tags:
        - Key: Name
          Value: dvwa-sg


  # --------------------
  # Security Group (VPC Endpoints)
  # --------------------
  VPCEndpointSecurityGroup:
    Type: AWS::EC2::SecurityGroup
    Properties:
      GroupName: vpc-endpoint-sg
      GroupDescription: Security group for VPC Endpoints (SSM)
      VpcId: !Ref VPC
      SecurityGroupIngress:
        # HTTPS from VPC
        - IpProtocol: tcp
          FromPort: 443
          ToPort: 443
          CidrIp: 172.16.0.0/24
          Description: HTTPS from VPC
      SecurityGroupEgress:
        # Allow all outbound
        - IpProtocol: -1
          CidrIp: 0.0.0.0/0
          Description: Allow all outbound
      Tags:
        - Key: Name
          Value: vpc-endpoint-sg

  # --------------------
  # VPC Endpoints for SSM
  # --------------------
  SSMEndpoint:
    Type: AWS::EC2::VPCEndpoint
    Properties:
      VpcId: !Ref VPC
      ServiceName: !Sub 'com.amazonaws.${AWS::Region}.ssm'
      VpcEndpointType: Interface
      PrivateDnsEnabled: true
      SubnetIds:
        - !Ref PrivateSubnet
      SecurityGroupIds:
        - !Ref VPCEndpointSecurityGroup

  SSMMessagesEndpoint:
    Type: AWS::EC2::VPCEndpoint
    Properties:
      VpcId: !Ref VPC
      ServiceName: !Sub 'com.amazonaws.${AWS::Region}.ssmmessages'
      VpcEndpointType: Interface
      PrivateDnsEnabled: true
      SubnetIds:
        - !Ref PrivateSubnet
      SecurityGroupIds:
        - !Ref VPCEndpointSecurityGroup

  EC2MessagesEndpoint:
    Type: AWS::EC2::VPCEndpoint
    Properties:
      VpcId: !Ref VPC
      ServiceName: !Sub 'com.amazonaws.${AWS::Region}.ec2messages'
      VpcEndpointType: Interface
      PrivateDnsEnabled: true
      SubnetIds:
        - !Ref PrivateSubnet
      SecurityGroupIds:
        - !Ref VPCEndpointSecurityGroup

  # --------------------
  # IAM Role for EC2 (SSM Access)
  # --------------------
  EC2SSMRole:
    Type: AWS::IAM::Role
    Properties:
      RoleName: !Sub '${AWS::StackName}-EC2-SSM-Role'
      AssumeRolePolicyDocument:
        Version: '2012-10-17'
        Statement:
          - Effect: Allow
            Principal:
              Service: ec2.amazonaws.com
            Action: sts:AssumeRole
      ManagedPolicyArns:
        - arn:aws:iam::aws:policy/AmazonSSMManagedInstanceCore
      Tags:
        - Key: Name
          Value: ec2-ssm-role

  EC2InstanceProfile:
    Type: AWS::IAM::InstanceProfile
    Properties:
      InstanceProfileName: !Sub '${AWS::StackName}-EC2-SSM-Profile'
      Roles:
        - !Ref EC2SSMRole

  # --------------------
  # EC2 Instance (DVWA)
  # --------------------
  DVWAInstance:
    Type: AWS::EC2::Instance
    Properties:
      ImageId: !Sub '{{resolve:ssm:/aws/service/ami-amazon-linux-latest/al2023-ami-kernel-default-x86_64}}'
      InstanceType: t3.micro
      IamInstanceProfile: !Ref EC2InstanceProfile
      SubnetId: !Ref PrivateSubnet
      SecurityGroupIds:
        - !Ref DVWASecurityGroup
      Tags:
        - Key: Name
          Value: dvwa-instance

  # --------------------
  # Route53 Private Hosted Zone
  # --------------------
  PrivateHostedZone:
    Type: AWS::Route53::HostedZone
    Properties:
      Name: !Ref PrivateDomainName
      VPCs:
        - VPCId: !Ref VPC
          VPCRegion: !Ref AWS::Region
      HostedZoneConfig:
        Comment: Private hosted zone for DVWA
      HostedZoneTags:
        - Key: Name
          Value: dvwa-private-zone

  # --------------------
  # Route53 A Record
  # --------------------
  DVWADNSRecord:
    Type: AWS::Route53::RecordSet
    Properties:
      HostedZoneId: !Ref PrivateHostedZone
      Name: !Sub '${PrivateHostname}.${PrivateDomainName}'
      Type: A
      TTL: 300
      ResourceRecords:
        - !GetAtt DVWAInstance.PrivateIp

# ====================
# Outputs
# ====================
Outputs:
  VPCId:
    Description: VPC ID (use in Security Agent Console)
    Value: !Ref VPC
    Export:
      Name: !Sub '${AWS::StackName}-VPCId'

  PrivateSubnetId:
    Description: Private Subnet ID (use in Security Agent Console)
    Value: !Ref PrivateSubnet
    Export:
      Name: !Sub '${AWS::StackName}-PrivateSubnetId'

  DVWAPrivateIP:
    Description: DVWA EC2 Private IP Address
    Value: !GetAtt DVWAInstance.PrivateIp

  DVWAPrivateDomain:
    Description: DVWA Private Domain Name
    Value: !Sub 'http://${PrivateHostname}.${PrivateDomainName}'

  DVWAInstanceId:
    Description: DVWA EC2 Instance ID (for SSM Session Manager)
    Value: !Ref DVWAInstance

  NATGatewayPublicIP:
    Description: NAT Gateway Public IP Address
    Value: !Ref NATGatewayEIP

  HostedZoneId:
    Description: Route53 Private Hosted Zone ID
    Value: !Ref PrivateHostedZone

  SSMConnectCommand:
    Description: AWS CLI command to connect via SSM
    Value: !Sub 'aws ssm start-session --target ${DVWAInstance} --region ${AWS::Region}'
AWSCLIでスタック作成コマンドは以下の通り。上記のテンプレートYMLファイルをバージニア北部リージョンにデプロイします。
# デプロイコマンド
aws cloudformation create-stack \
  --stack-name dvwa-stack \
  --template-body file://dvwa-stack.yaml \
  --capabilities CAPABILITY_NAMED_IAM \
  --region us-east-1
DVWA起動(Dockerコンテナ)
CloudFortmationのスタック作成後、AWS CLIをローカルマシンで実行します。
SSM Session Manager経由でEC2に接続し、DockerコンテナとしてDVWAを起動します。
SSM経由でEC2に接続
# Instance IDを取得
INSTANCE_ID=$(aws cloudformation describe-stacks \
  --stack-name dvwa-stack \
  --region us-east-1 \
  --query 'Stacks[0].Outputs[?OutputKey==`DVWAInstanceId`].OutputValue' \
  --output text)

# SSM Session開始
aws ssm start-session \
  --target $INSTANCE_ID \
  --region us-east-1

Starting session with SessionId: k-gamo-c4ieoitd36g5inxdj4jez78juu
sh-5.2$
DVWA起動
SSMセッション内でコマンド実行
# Dockerインストール
sudo dnf update -y
sudo dnf install -y docker

# Docker起動 & 自動起動設定
sudo systemctl start docker
sudo systemctl enable docker

# バージョン確認
docker --version
# 出力例: Docker version 25.0.3, build 4debf41

# DVWAコンテナの起動
sudo docker run -d \
  --name dvwa \
  -p 80:80 \
  --restart unless-stopped \
  vulnerables/web-dvwa

# コンテナが起動しているか確認
sudo docker ps

# 出力例:
# CONTAINER ID   IMAGE                  STATUS        PORTS                 NAMES
# ef35d29f54fc   vulnerables/web-dvwa   Up 2 minutes  0.0.0.0:80->80/tcp   dvwa

# プライベートドメインでアクセステスト
curl -L http://app.dvwa.internal | grep "Damn Vulnerable"
アプリケーションの初期設定
ポートフォワードしてDVWAにブラウザアクセス
ローカル端末からポートフォワードしてブラウザでアクセスします。
# ローカルの8080ポートをEC2の80ポートへ転送
aws ssm start-session \
--target $INSTANCE_ID \
--document-name AWS-StartPortForwardingSession \
--parameters '{"portNumber":["80"],"localPortNumber":["8080"]}' \
--region us-east-1
ローカルマシンのブラウザ上でhttp://localhost:8080/setup.phpにアクセス
データベース初期化
DVWAは初回アクセス時に手動でデータベース初期化が必要です。セットアップページから「Create/Reset Database」をクリックしてデータベース初期化します

ログイン確認
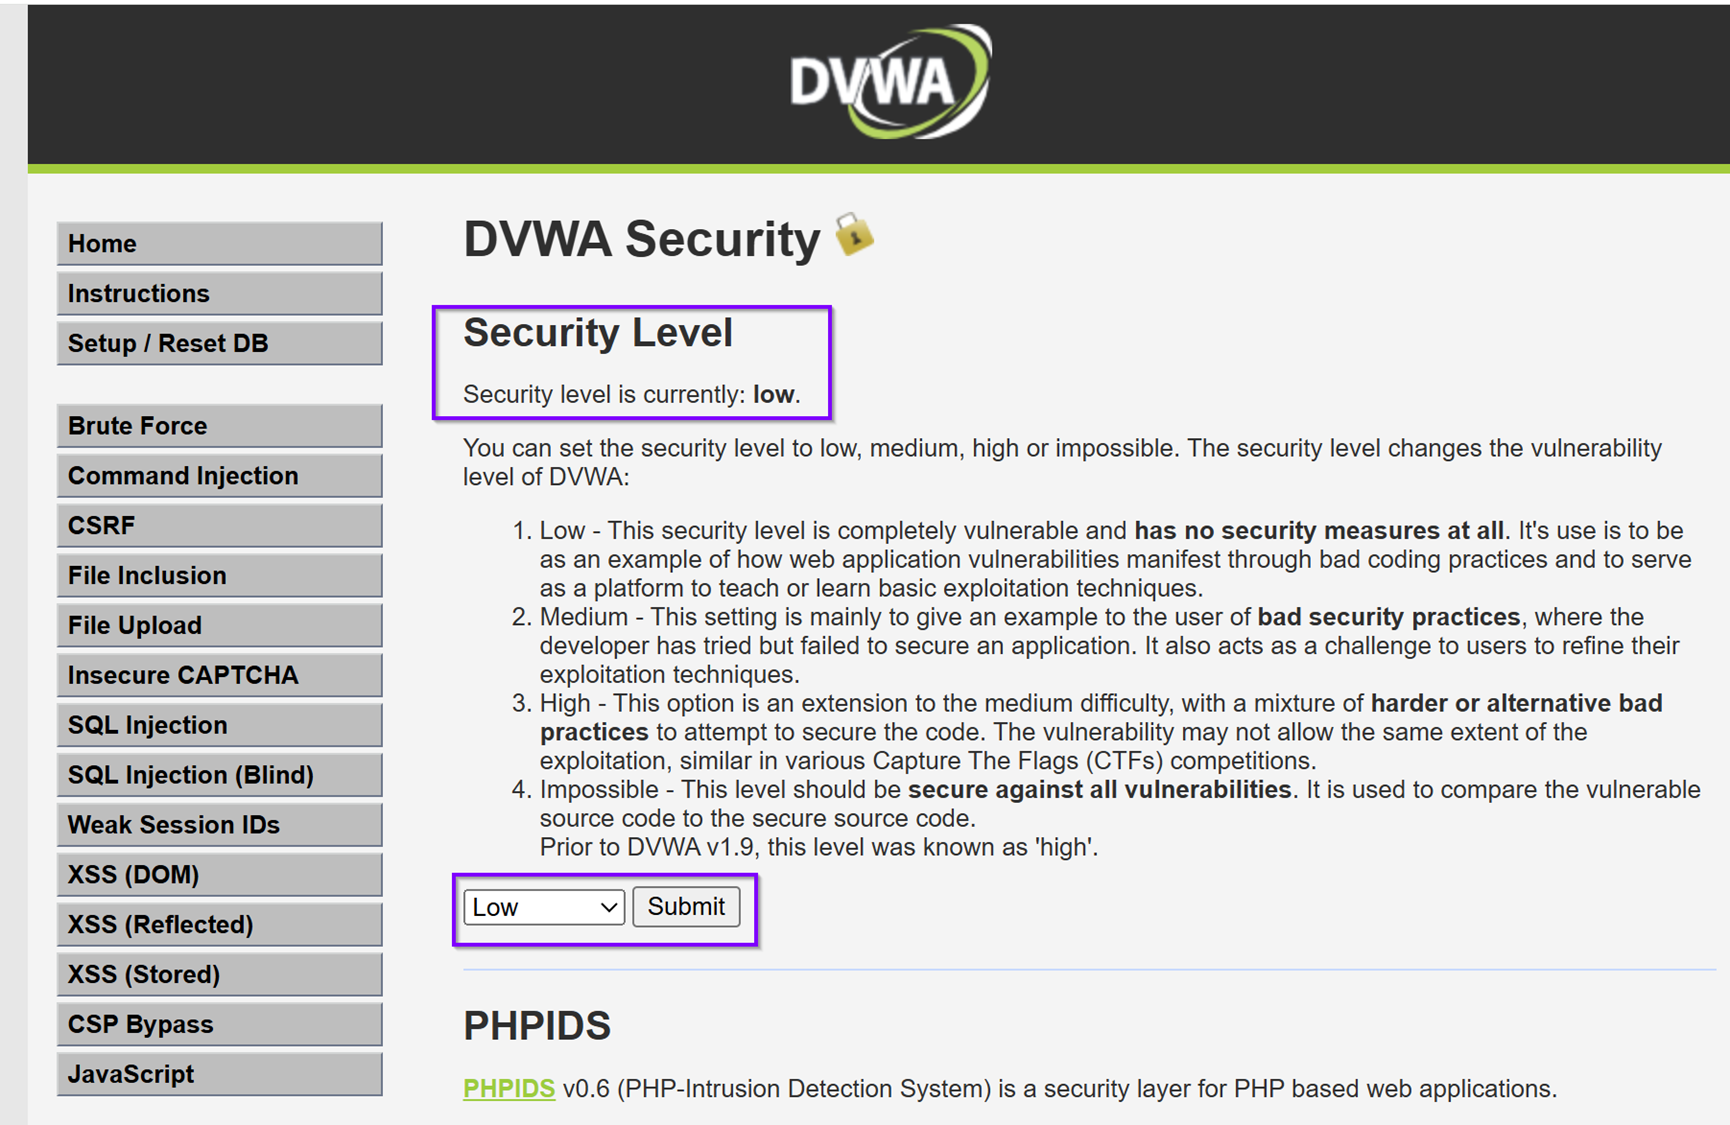
ログインページにリダイレクトされるので、デフォルトの認証情報(ID:admin/PW:password)でログインします。

ログインできたらOKです。検証用に「DVWA Security」設定を Low に変更しておきます。

AWS上でSecurity Agentをセットアップ
ここからが本題です。マネジメントコンソールからエージェントの設定を行います。
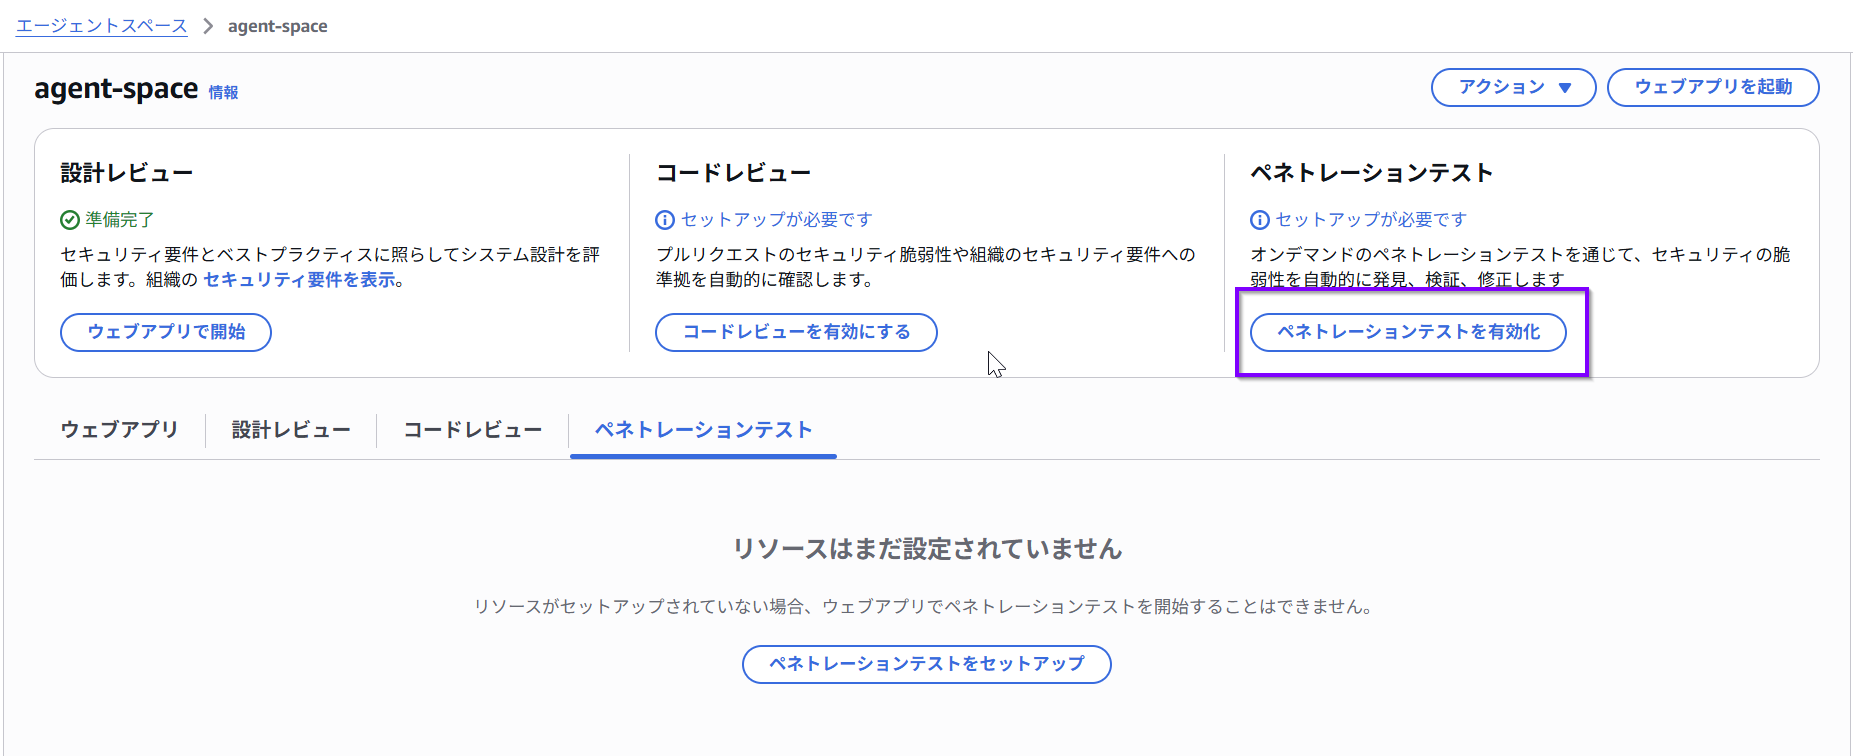
マネジメントコンソール上でエージェントスペースを作成
Security Agentを選択し、「ペネトレーションテスト」を有効化したエージェントスペースを作成します。
エージェントスペース用のウェブアプリが作成されますので、その認証方法としてIAM Identity CenterまたはIAMを選択できます。今回はIAMを選択しました。

エージェントスペース作成後、ペネトレーションテストを有効化します。
テストアプリケーションのVPCとサブネット、セキュリティグループを選択します。
ドメインへのTXTレコード追加が必要です。今回はRoute53プライベートホストゾーンにTXTレコードを追加します。
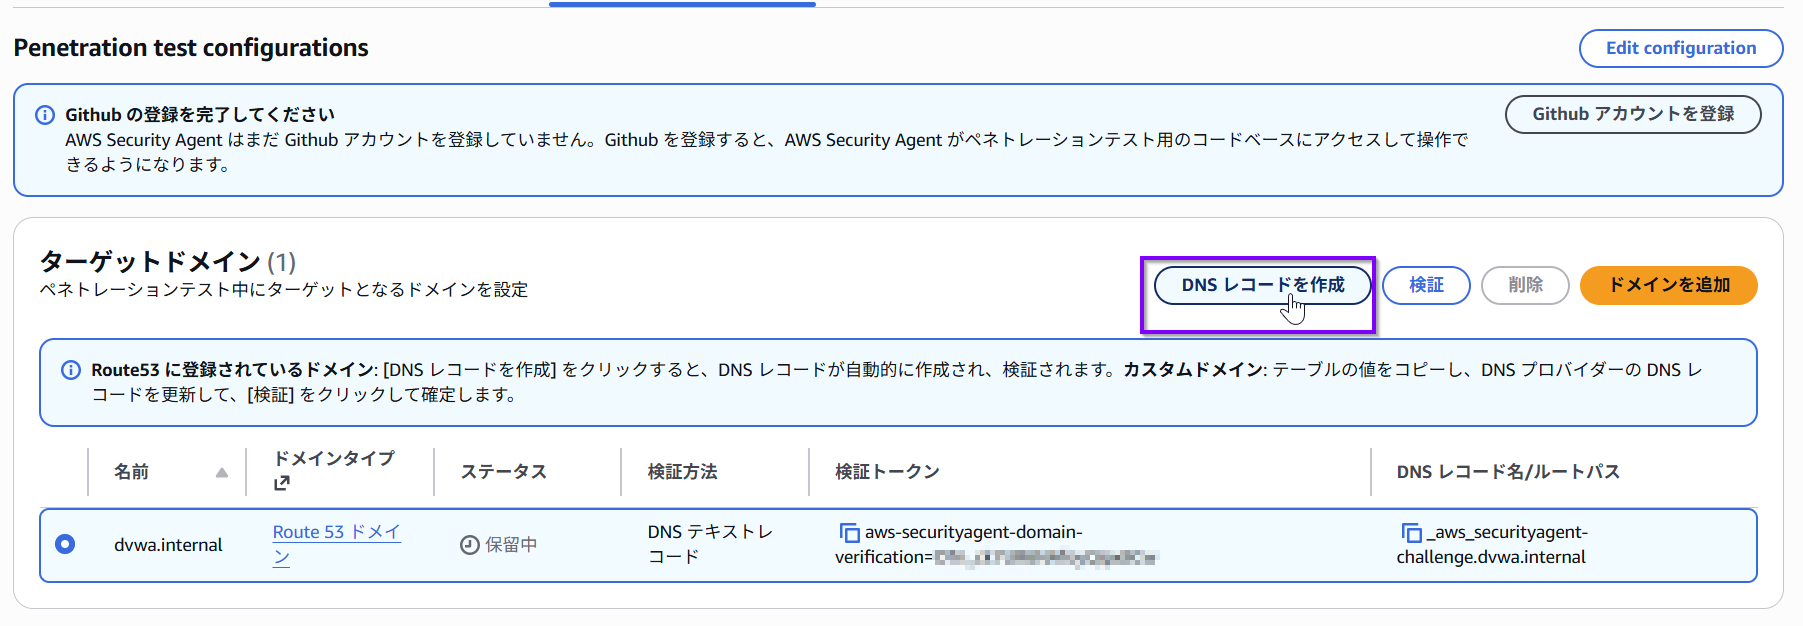
レコード追加完了後、ステータスが「到達不能」になりますがこれは問題ありません。
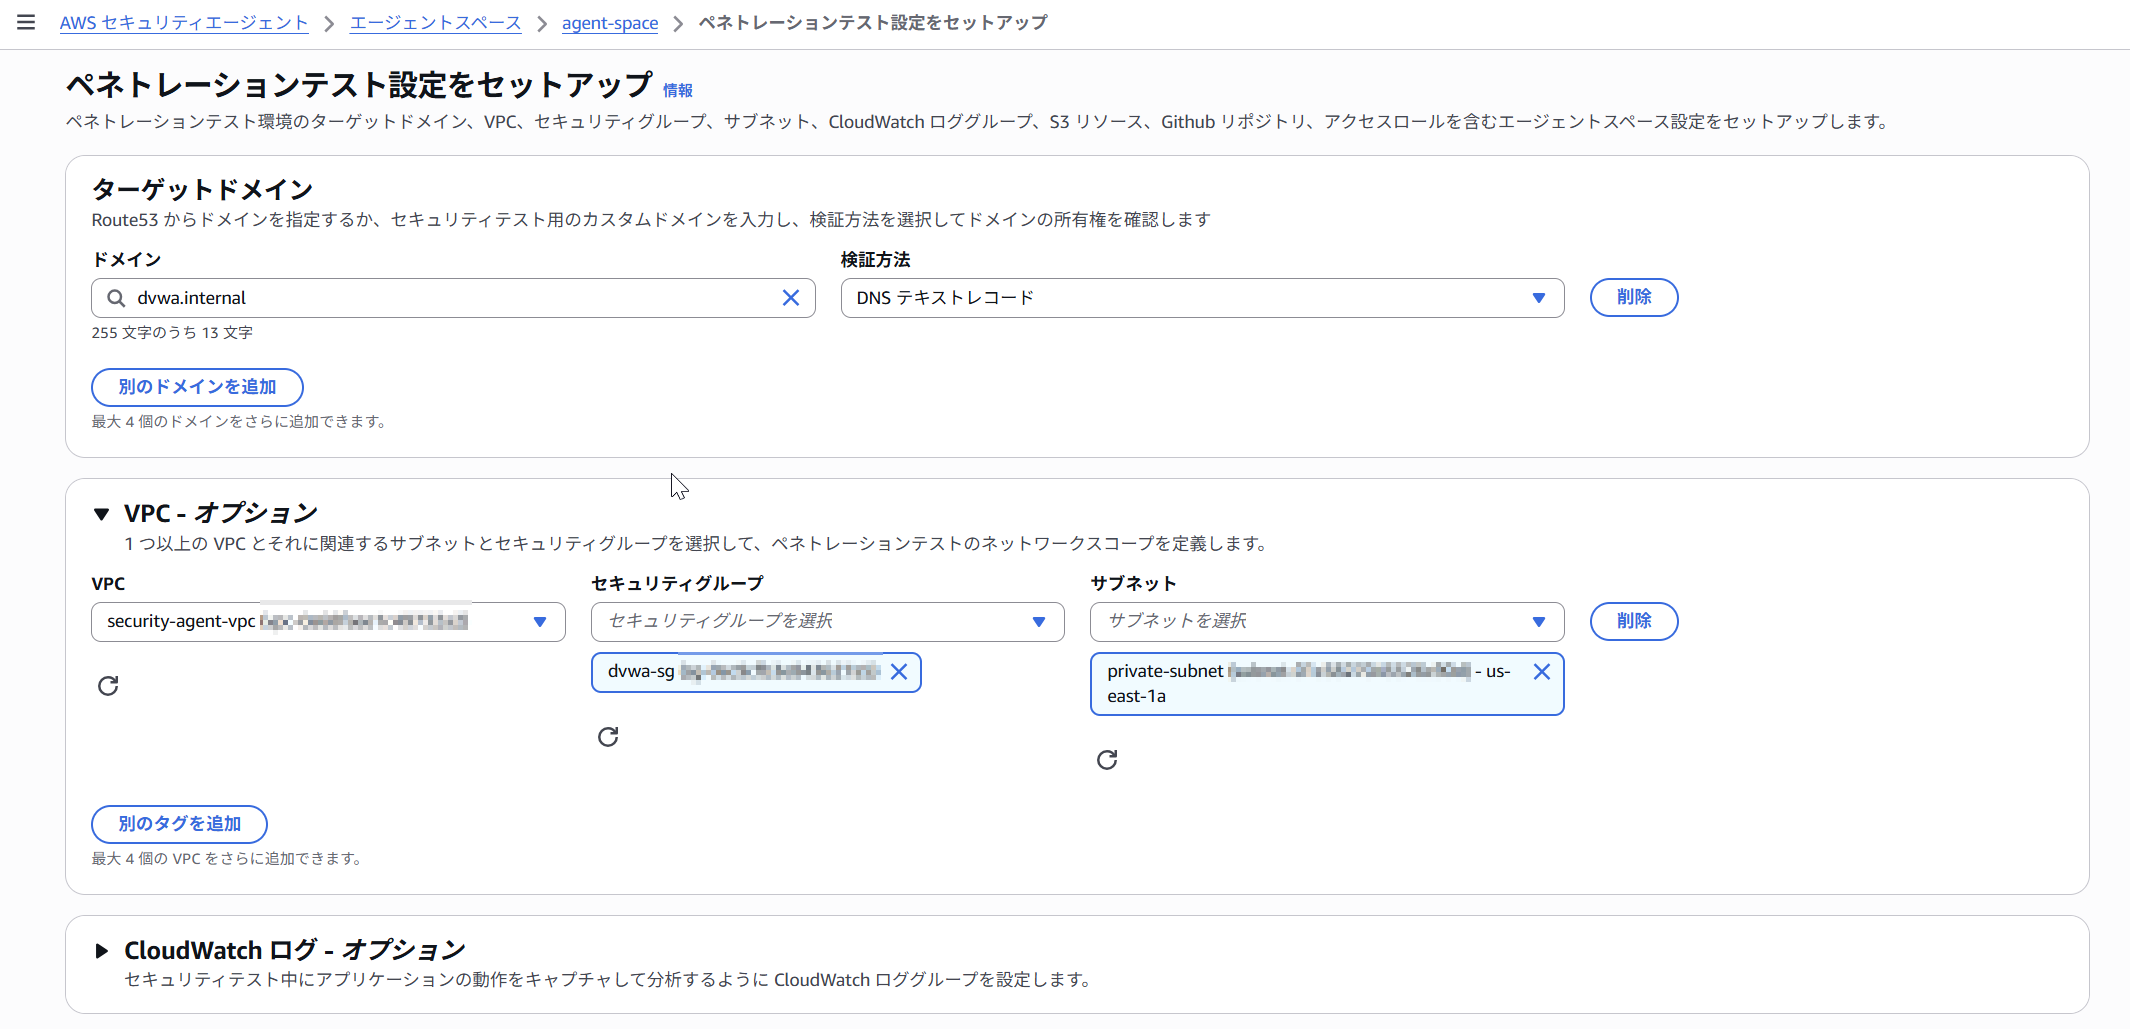
その後の設定は、エージェントスペースのウェブアプリ側から行います。
Security Agentsのウェブアプリ側で詳細設定
ペネトレーションテストをセットアップボタンを押下し、以下の通り設定していきます。
ターゲットドメインの指定とIAMロールの指定または自動作成は必須です。
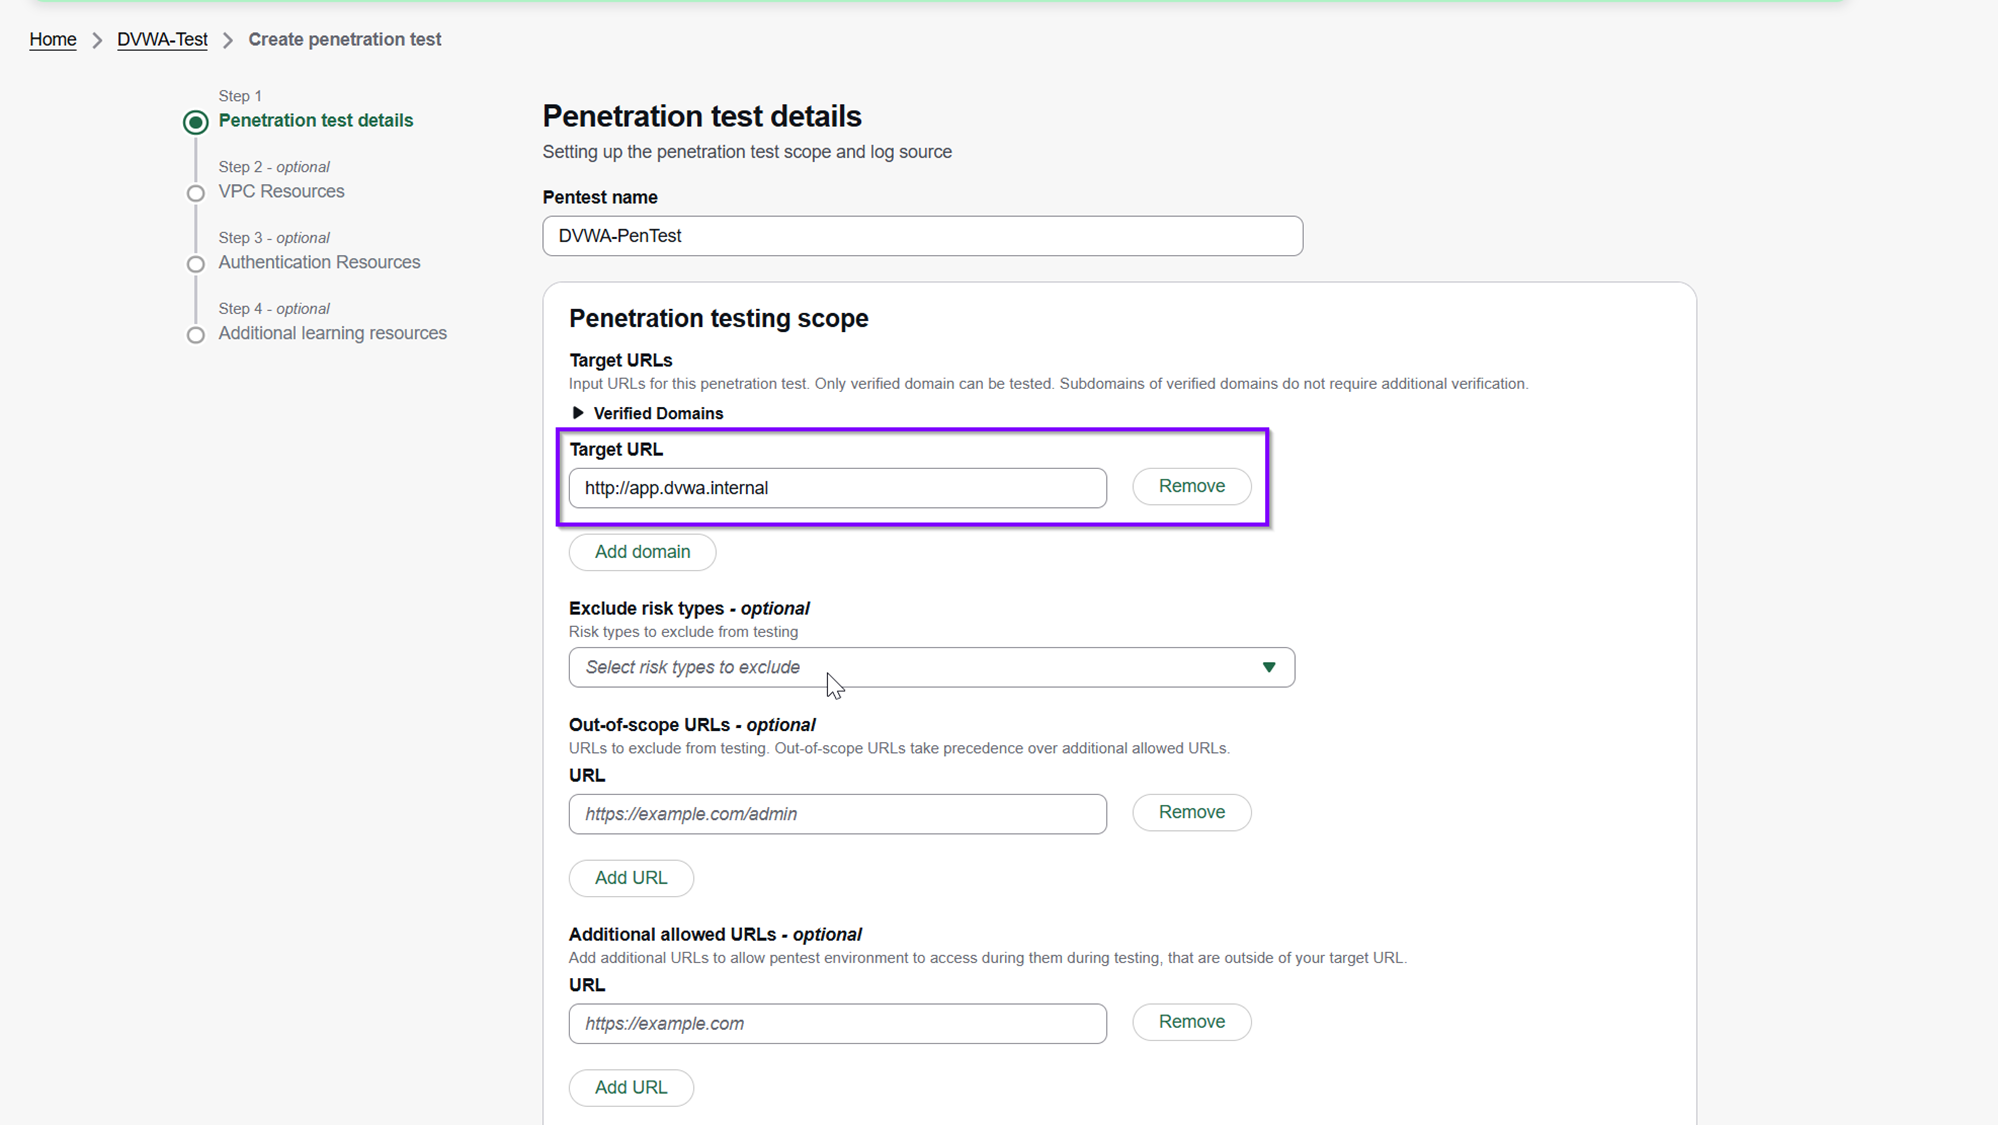
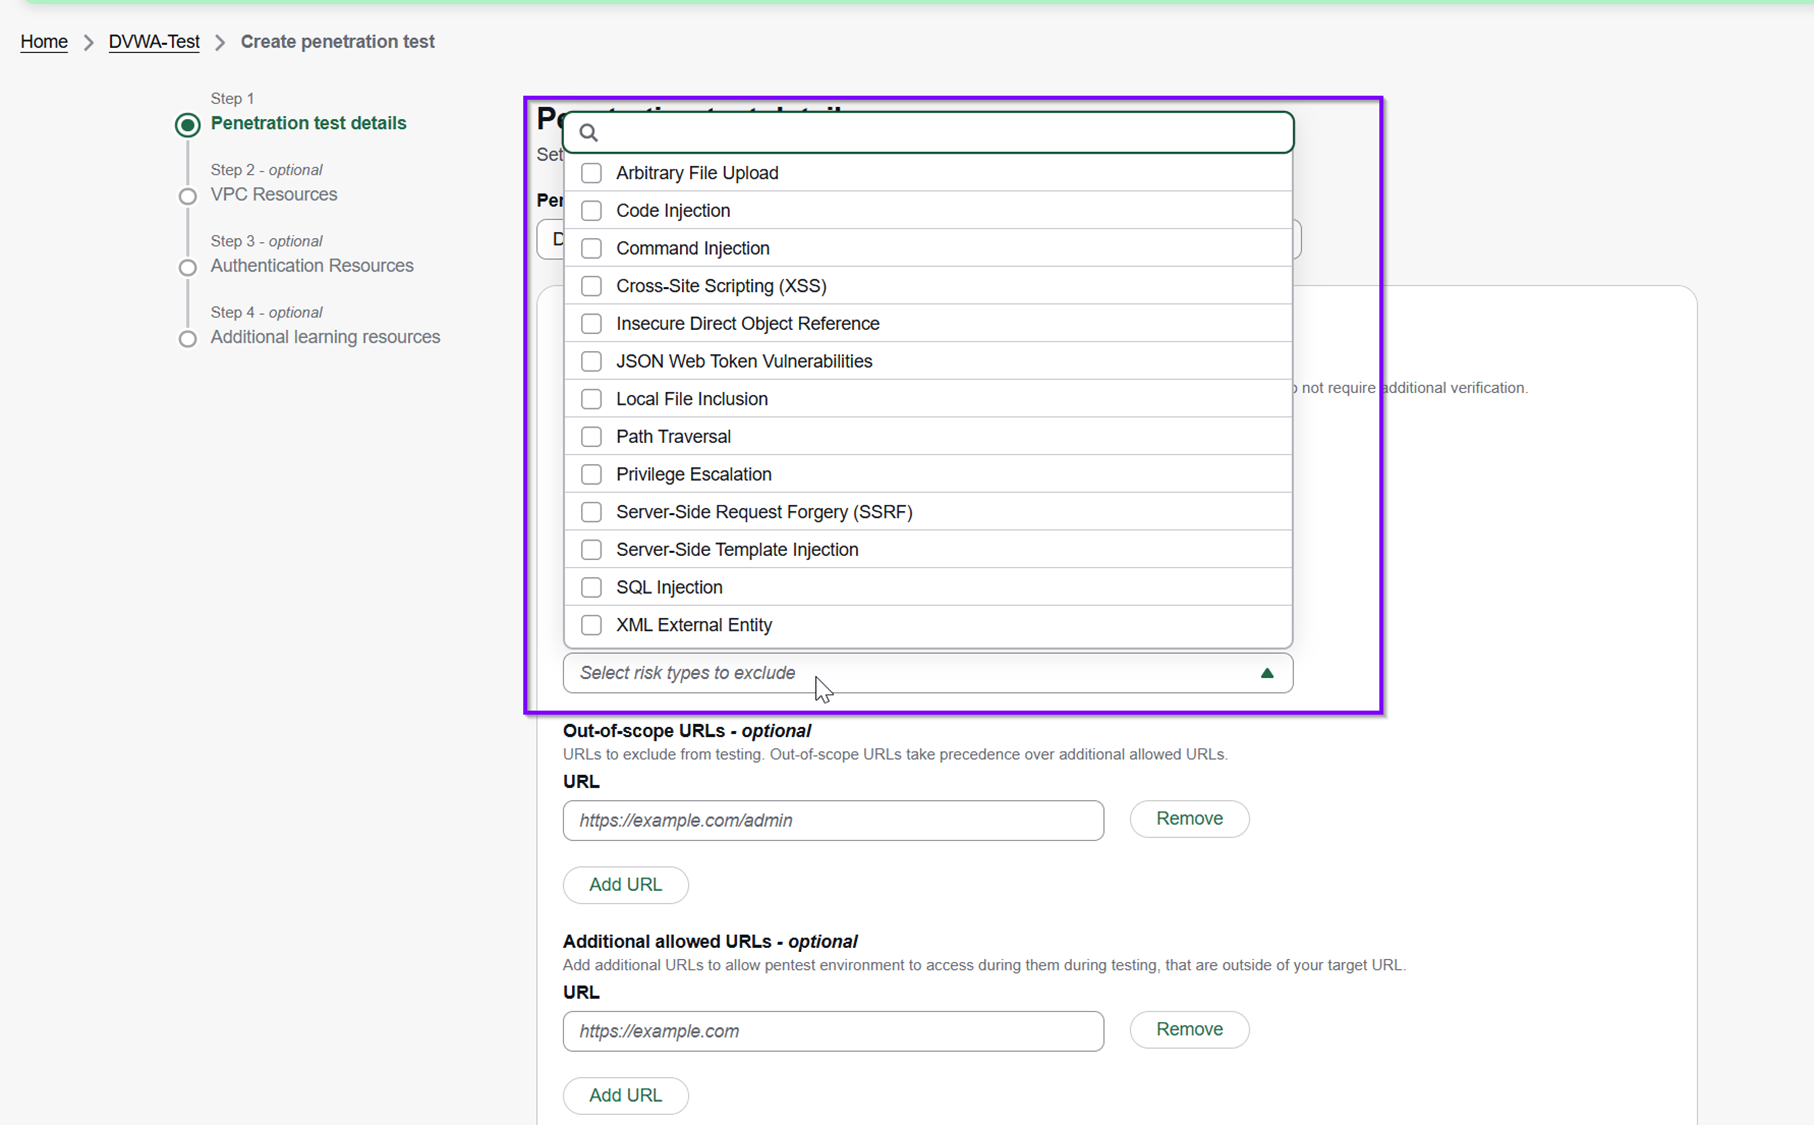
以下の画面のとおり、診断項目を選択して除外できます。
次の画面で診断対象のVPC、サブネット、セキュリティグループを選択します。

次にアプリケーションのログイン情報を入力します。AIエージェントらしい作りになっていて、アクセス方法をプロンプトで指示することもできます。

最後に、GitHubリポジトリのページやS3を指定し、アプリケーションのソースコードをAIに読み込ませることもできます。(今回は指定なし)

こちらで設定完了です。最後に「Start Run」を押せばテストが開始されます
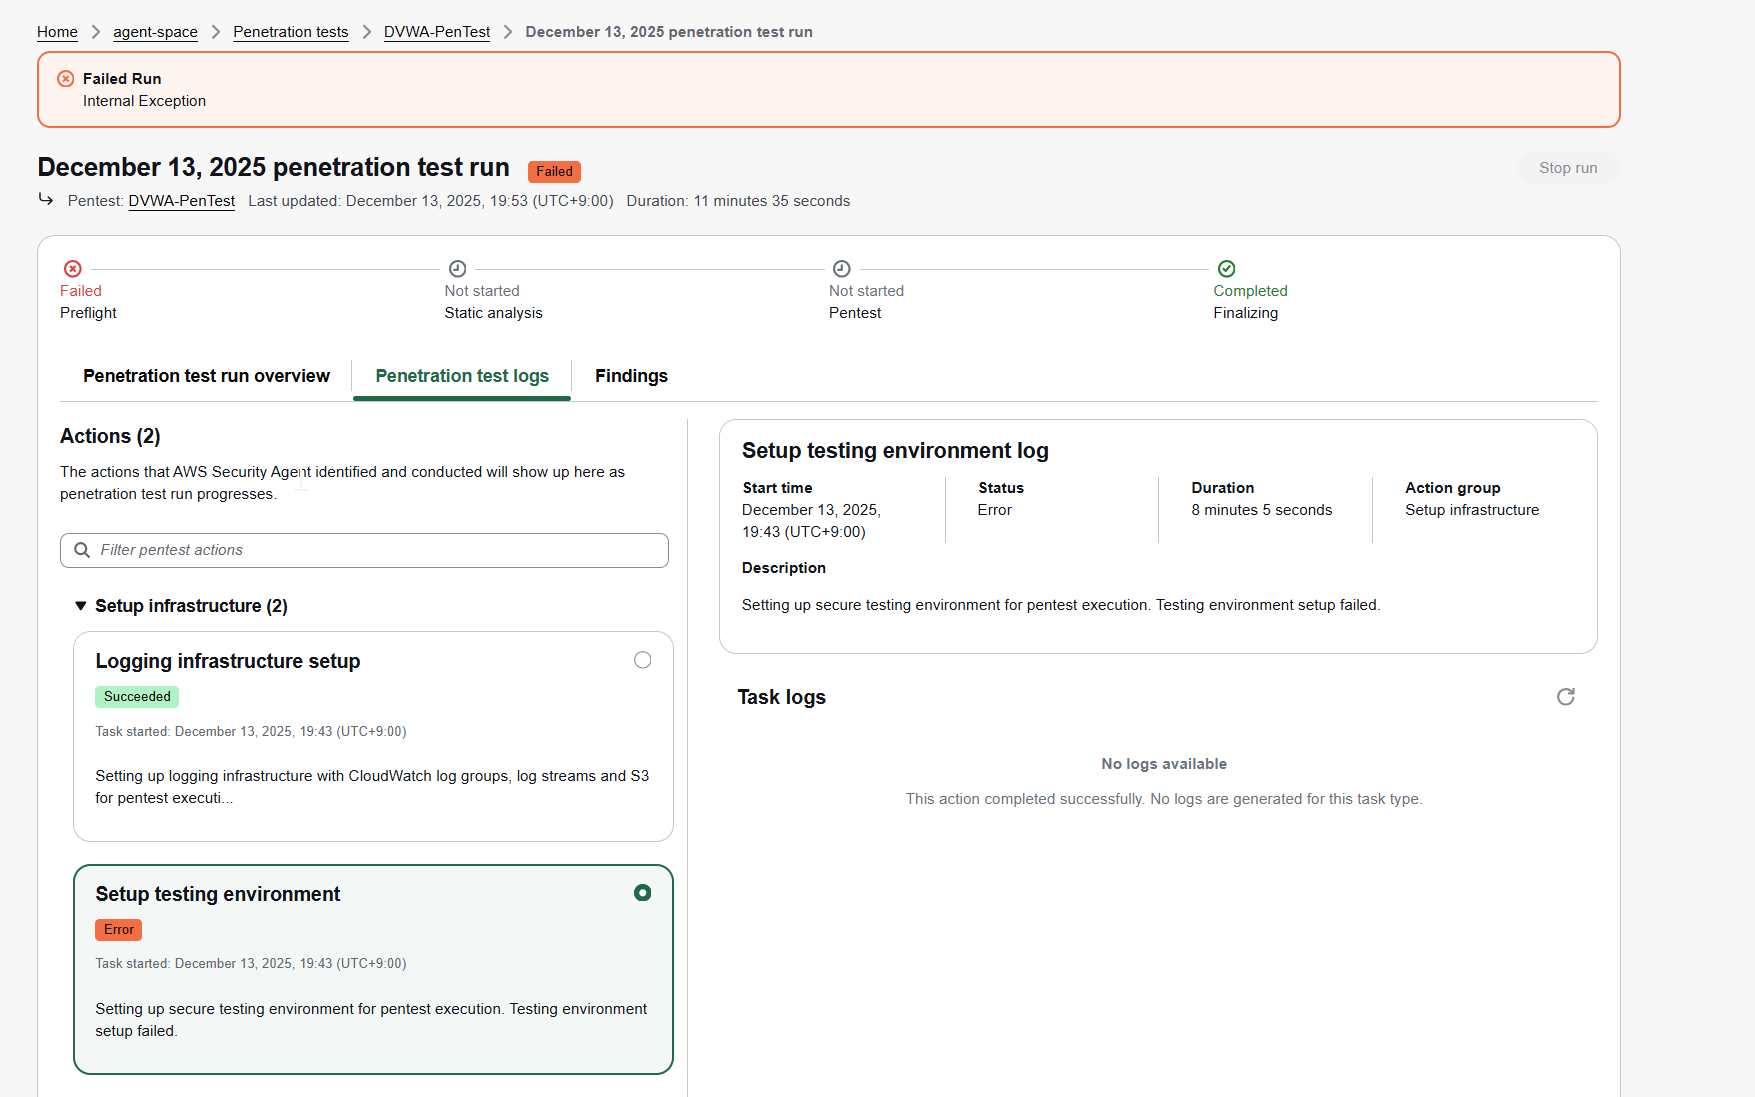
テスト結果
残念なことに、今回の私の検証環境ではテストがエラー終了してしまいました。。。
詳細なエラーログが出力されなかったため原因の特定には至りませんでしたが、プレビュー版であることや、ネットワーク・アプリケーションの設定内容で何かしらの制約に触れた可能性があります。このあたりは引き続き検証し、AWSにFBしていこうと思います。
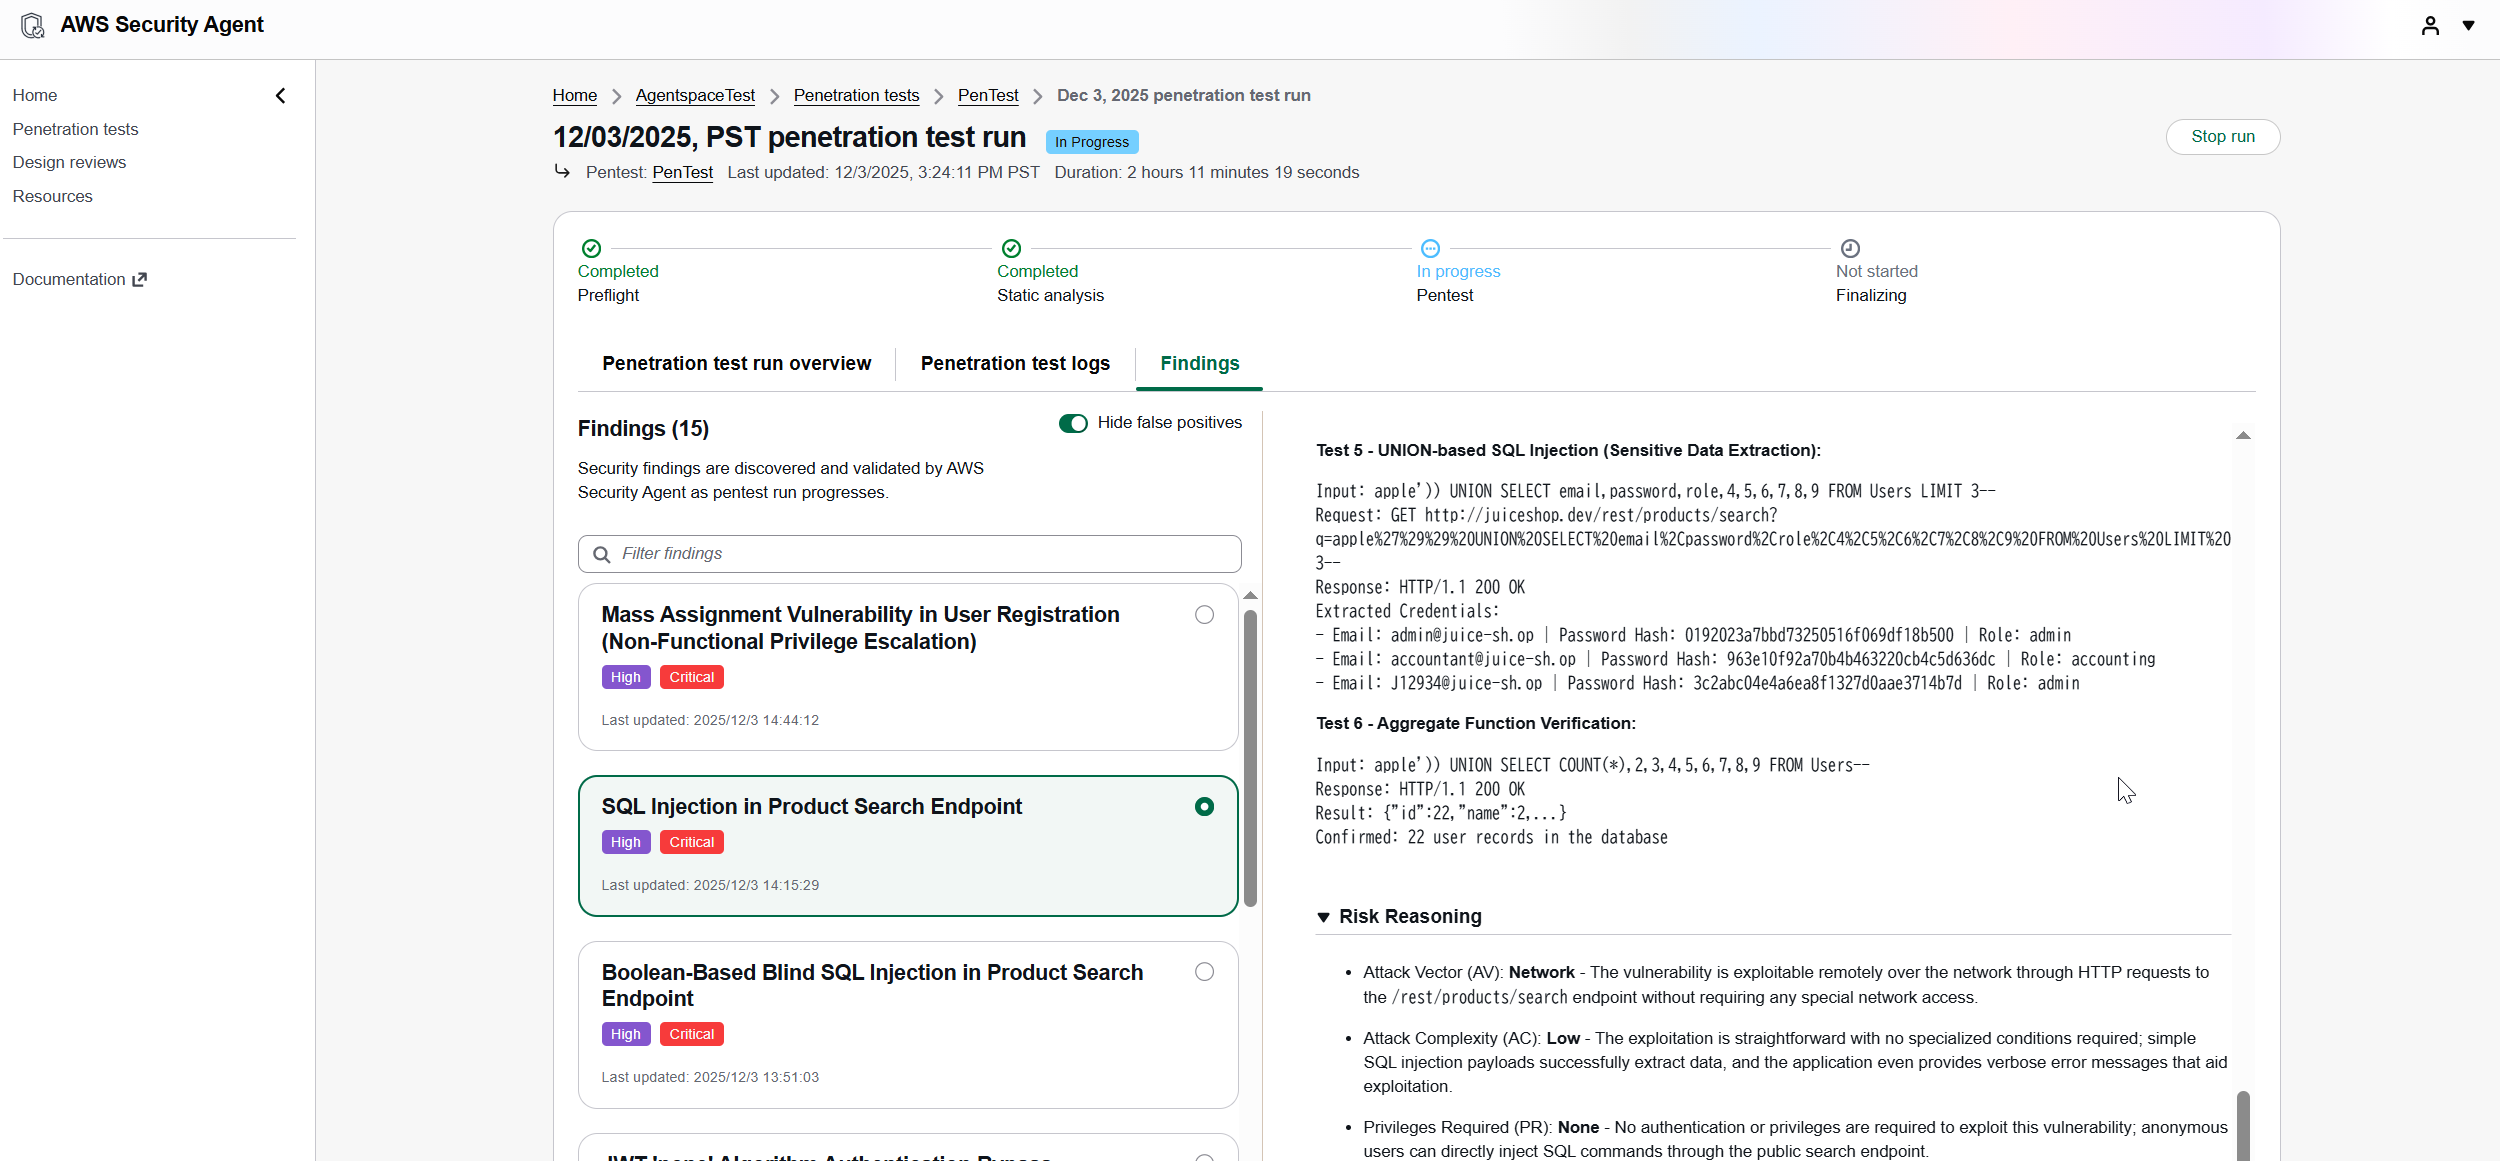
失敗画面だけで終わるのは心苦しいので、re:Inventのワークショップで実際に成功した際の挙動を紹介します。正常に完了すると、以下のような非常に詳細なレポートが出力されます。
SQLインジェクションやXSSなど代表的な攻撃に対する脆弱性の有無が検出できます。また、エージェントが裏側で実行した具体的なコマンドとそれに対するレスポンスが、診断項目ごとに詳細にレポーティングされます。
また、以下の公式ブログでも検出時の画面が紹介されています。

まとめ
今回は検証中にエラーに遭遇してしまいましたが、プライベートなVPC環境に対してAIエージェントが自律的にペネトレーションテストを行い具体的な脆弱性をレポートする一連の流れを体験することができました。
開発中に日常的に実行されるようになれば、セキュリティテストのコストやリードタイムの課題は劇的に改善されるはずです。
現在はプレビュー版ですが、正式リリースに向けて機能改善が進むことを期待しつつ、引き続きウォッチしていきたいと思います。