親から子に情報を与える場合
親の変化を子で何かするときに使用します。
Inputを使用する
公式
子コンポーネントでは親から取得したデータを格納するプロパティに@Input()デコレーションを定義します。親のテンプレートの[]で指定した値をそのまま使用する場合は、引数なしの@Input() プロパティ名 :型で良いですが、変える場合は@Input('ほにゃらら') プロパティ名 :型にします。
(今回の場合親のテンプレートでは[master]と定義していますが、子ではmasterNameとして使用します。)
import { Component, Input } from '@angular/core';

import { Hero } from './hero';
@Component({
  selector: 'hero-child',
  template: `
    <h3>{{hero.name}} says:</h3>
    <p>I, {{hero.name}}, am at your service, {{masterName}}.</p>
  `
})
export class HeroChildComponent {
  @Input() hero: Hero;
  @Input('master') masterName: string;
}
親コンポーネントのテンプレートで値を渡します。
[ほにゃらら]部分に、子のプロパティ名を指定し、右辺に渡すプロパティや、定数を指定します。
(文字列を渡す時は[ほにゃらら]="'hogehoge'"の様に、シングルクォートを忘れない様にしましょう)
import { Component } from '@angular/core';
import { HEROES } from './hero';
@Component({
  selector: 'hero-parent',
  template: `
    <h2>{{master}} controls {{heroes.length}} heroes</h2>
    <hero-child *ngFor="let hero of heroes"
      [hero]="hero"
      [master]="master">
    </hero-child>
  `
})
export class HeroParentComponent {
  heroes = HEROES;
  master: string = 'Master';
}
アクセサを使う
公式
アクセサ(get/set)を使うこともできます。プロパティをprivateにしたかったり、例の様にトリムする場合などに使用します。
(普通のgetter/setterでもいいですが。)
import { Component, Input } from '@angular/core';
@Component({
  selector: 'name-child',
  template: `
    <h3>"{{name}}"</h3>
  `
})
export class NameChildComponent {
  private _name: string = '<no name set>';
  @Input()
  set name(name: string) {
    this._name = (name && name.trim()) || '<no name set>';
  }
  get name() { return this._name; }
}
import { Component } from '@angular/core';
@Component({
  selector: 'name-parent',
  template: `
    <h2>Master controls {{names.length}} names</h2>
    <name-child *ngFor="let name of names"
      [name]="name">
    </name-child>
  `
})
export class NameParentComponent {
  // Displays 'Mr. IQ', '<no name set>', 'Bombasto'
  names = ['Mr. IQ', '   ', '  Bombasto  '];
}
ngOnChangesを使う
公式
ngOnChangesメソッドを使って、変更を取得します。@Input()のデータバインド後に呼び出されるメソッドです。ngOnChangesはライフサイクルフックの一つです。
@Inputで、親から取得したプロパティをキーに、サービスから値を取得したりするときに使用できます。
(ソースは公式を参照ください。)
親が子を監視してバインドする場合
子の変化を親で何かするときに使用します。
子供のイベント監視(@OutputとEventEmitter)
子側でEventEmitterを使います。
EventEmitterは出力プロパティで、普通は@Outputデコレータと一緒に使います。
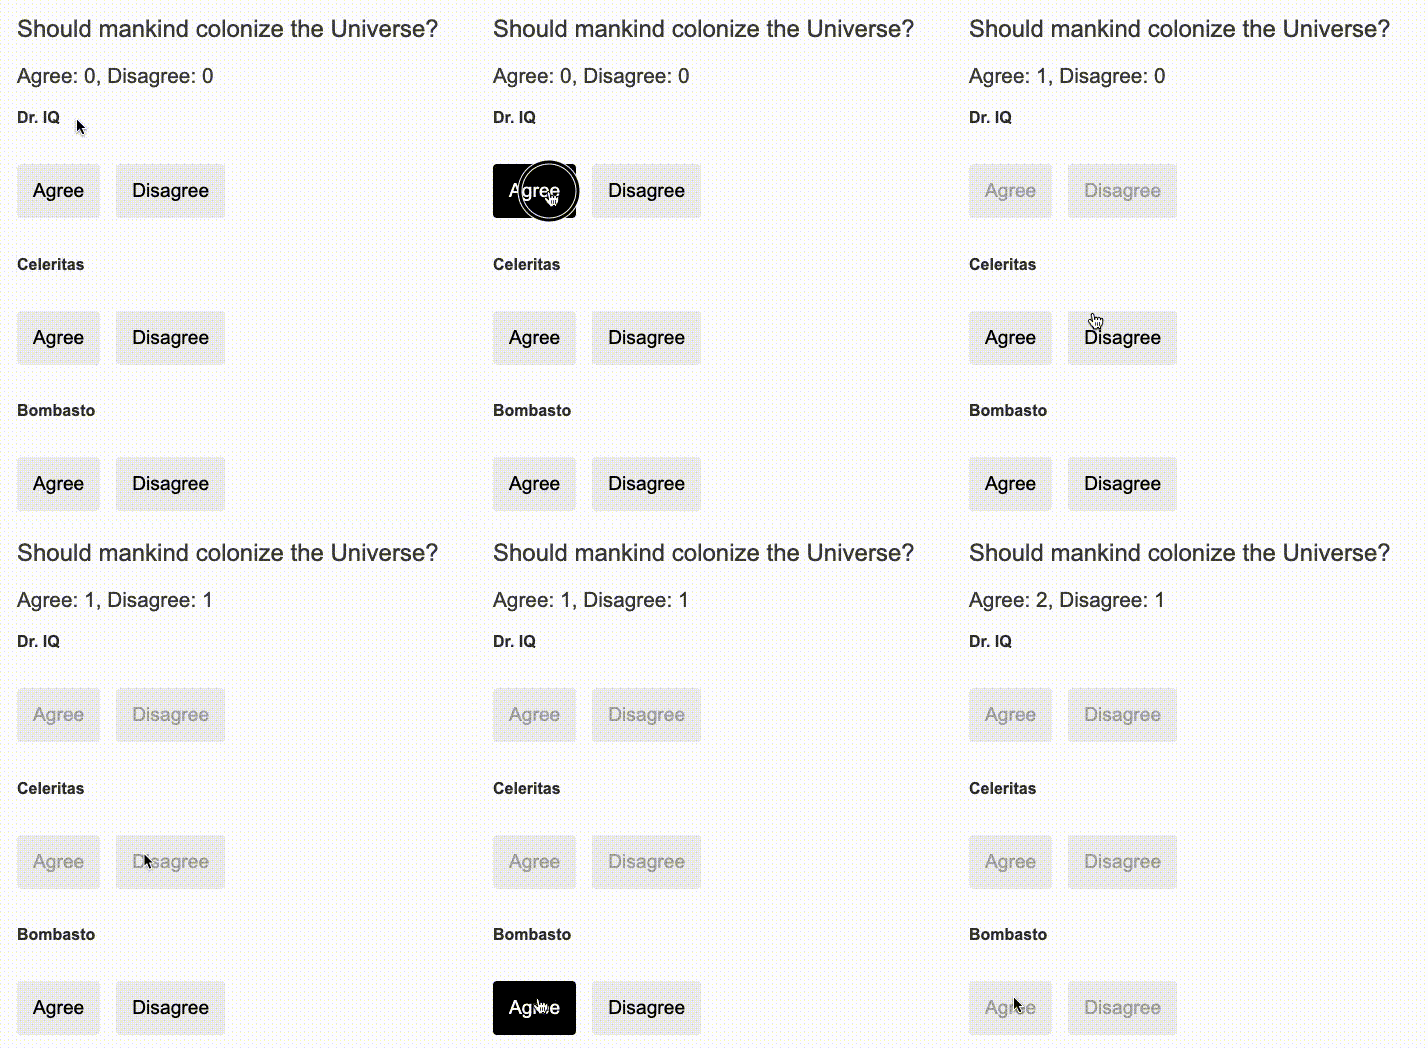
子コンポーネントから親コンポーネントにデータを渡す例(公式より拝借):

Mr. IQなどの名前の定義及び、カウンターは親(VoteTakerComponent)で行い、
ボタン関連は子(VoterComponent)で定義しています。
子のボタンがクリックされると、子のvote()メソッドが呼び出され、メソッド内で親のonVoted()メソッドに伝え(emit)、親がカウントアップします。
(循環参照ぽい気がする動きですが、詳しいことはわかりません。)
import { Component, EventEmitter, Input, Output } from '@angular/core';
@Component({
  selector: 'my-voter',
  template: `
    <h4>{{name}}</h4>
    <button (click)="vote(true)"  [disabled]="voted">Agree</button>
    <button (click)="vote(false)" [disabled]="voted">Disagree</button>
  `
})
export class VoterComponent {
  @Input()  name: string;
  @Output() onVoted = new EventEmitter<boolean>();
  voted = false;
  vote(agreed: boolean) {
    this.onVoted.emit(agreed);
    this.voted = true;
  }
}
import { Component }      from '@angular/core';
@Component({
  selector: 'vote-taker',
  template: `
    <h2>Should mankind colonize the Universe?</h2>
    <h3>Agree: {{agreed}}, Disagree: {{disagreed}}</h3>
    <my-voter *ngFor="let voter of voters"
      [name]="voter"
      (onVoted)="onVoted($event)">
    </my-voter>
  `
})
export class VoteTakerComponent {
  agreed = 0;
  disagreed = 0;
  voters = ['Mr. IQ', 'Ms. Universe', 'Bombasto'];
  onVoted(agreed: boolean) {
    agreed ? this.agreed++ : this.disagreed++;
  }
}
@Inputと@Outputを使用して双方向バインドする
正しいやり方か判りませんが、@Inputと@Outputを使用して双方向バインドします。
子ではinputプロパティで親からの値を取得し、outputプロパティに値を入れ、親に渡します。
import { Component, Input, Output, EventEmitter } from '@angular/core';

@Component({~~省略~~})
export class Child{

  @Input()  input:bool
  @Output() output = new EventEmitter<bool>();

  toFalse(){
    this.input = false;
    this.output.emit(false);
  }
}
import { Component } from '@angular/core';

@Component({
  selector: 'parent',
  template = `<子のセレクタ
    [input]="bool"
    (output)="bool = $event">
  </子のセレクタ>`
})

export class Parent{
  private bool:boolean;
  ~~省略~~
}
親が子供のプロパティやメソッドを使う
親側のテンプレートで、子コンポーネントをローカル変数化します。
import { Component, OnDestroy, OnInit } from '@angular/core';
@Component({
  selector: 'countdown-timer',
  template: '<p>{{message}}</p>'
})
export class CountdownTimerComponent implements OnInit, OnDestroy {
  intervalId = 0;
  message = '';
  seconds = 11;
  clearTimer() { clearInterval(this.intervalId); }
  ngOnInit()    { this.start(); }
  ngOnDestroy() { this.clearTimer(); }
  start() { this.countDown(); }
  stop()  {
    this.clearTimer();
    this.message = `Holding at T-${this.seconds} seconds`;
  }
  private countDown() {
    this.clearTimer();
    this.intervalId = window.setInterval(() => {
      this.seconds -= 1;
      if (this.seconds === 0) {
        this.message = 'Blast off!';
      } else {
        if (this.seconds < 0) { this.seconds = 10; } // reset
        this.message = `T-${this.seconds} seconds and counting`;
      }
    }, 1000);
  }
}
import { Component }                from '@angular/core';
import { CountdownTimerComponent }  from './countdown-timer.component';
@Component({
  selector: 'countdown-parent-lv',
  template: `
  <h3>Countdown to Liftoff (via local variable)</h3>
  <button (click)="timer.start()">Start</button>
  <button (click)="timer.stop()">Stop</button>
  <div class="seconds">{{timer.seconds}}</div>
  <countdown-timer #timer></countdown-timer>
  `,
  styleUrls: ['demo.css']
})
export class CountdownLocalVarParentComponent { }
子のメソッドstart(),stop()及び、子のプロパティsecondsを使用しています。
親コンポーネントから子供のメソッドを使用する
公式
先述のパターンは簡単ですが、テンプレート内だけで、親クラス自体が子クラスにアクセスできるわけではないため、子の変数や関数の参照を親のクラスで使用することはできません。
親側でViewChildを使用すればそれができます。
import { AfterViewInit, ViewChild } from '@angular/core';
import { Component }                from '@angular/core';
import { CountdownTimerComponent }  from './countdown-timer.component';
@Component({
  selector: 'countdown-parent-vc',
  template: `
  <h3>Countdown to Liftoff (via ViewChild)</h3>
  <button (click)="start()">Start</button>
  <button (click)="stop()">Stop</button>
  <div class="seconds">{{ seconds() }}</div>
  <countdown-timer></countdown-timer>
  `,
  styleUrls: ['demo.css']
})
export class CountdownViewChildParentComponent implements AfterViewInit {
  @ViewChild(CountdownTimerComponent)
  private timerComponent: CountdownTimerComponent;
  seconds() { return 0; }
  ngAfterViewInit() {
    // Redefine `seconds()` to get from the `CountdownTimerComponent.seconds` ...
    // but wait a tick first to avoid one-time devMode
    // unidirectional-data-flow-violation error
    setTimeout(() => this.seconds = () => this.timerComponent.seconds, 0);
  }
  start() { this.timerComponent.start(); }
  stop() { this.timerComponent.stop(); }
}
window.setTimeout
指定された遅延の後に、コードの断片または関数を実行します。
要点は@ViewChildデコレータと,ngAfterViewInitライフサイクルフックです。
@ViewChildデコレータを通して、子のCountdownTimerComponentをprivateなtimerComponent にインジェクトしています。
本来親コンポーネントが作成されてから子コンポーネントが作成されるため、this.secondsは取得に失敗しエラーが発生しますが、ngAfterViewInitライフサイクルフックにより、子コンポーネント表示後0ミリ秒遅延させ、取得させることで問題を解決させています。
serviceを使って親子でデータをやり取りする
バインドが必要なコンポーネントでサービスをsubscribeすることにより、データを共有します。
import { Injectable } from '@angular/core';
import { Subject }    from 'rxjs/Subject';
@Injectable()
export class MissionService {
  // Observable string sources
  private missionAnnouncedSource = new Subject<string>();
  private missionConfirmedSource = new Subject<string>();
  // Observable string streams
  missionAnnounced$ = this.missionAnnouncedSource.asObservable();
  missionConfirmed$ = this.missionConfirmedSource.asObservable();
  // Service message commands
  announceMission(mission: string) {
    this.missionAnnouncedSource.next(mission);
  }
  confirmMission(astronaut: string) {
    this.missionConfirmedSource.next(astronaut);
  }
}
import { Component }          from '@angular/core';
import { MissionService }     from './mission.service';
@Component({
  selector: 'mission-control',
  template: `
    <h2>Mission Control</h2>
    <button (click)="announce()">Announce mission</button>
    <my-astronaut *ngFor="let astronaut of astronauts"
      [astronaut]="astronaut">
    </my-astronaut>
    <h3>History</h3>
    <ul>
      <li *ngFor="let event of history">{{event}}</li>
    </ul>
  `,
  providers: [MissionService]
})
export class MissionControlComponent {
  astronauts = ['Lovell', 'Swigert', 'Haise'];
  history: string[] = [];
  missions = ['Fly to the moon!',
              'Fly to mars!',
              'Fly to Vegas!'];
  nextMission = 0;
  constructor(private missionService: MissionService) {
    missionService.missionConfirmed$.subscribe(
      astronaut => {
        this.history.push(`${astronaut} confirmed the mission`);
      });
  }
  announce() {
    let mission = this.missions[this.nextMission++];
    this.missionService.announceMission(mission);
    this.history.push(`Mission "${mission}" announced`);
    if (this.nextMission >= this.missions.length) { this.nextMission = 0; }
  }
}
import { Component, Input, OnDestroy } from '@angular/core';
import { MissionService } from './mission.service';
import { Subscription }   from 'rxjs/Subscription';
@Component({
  selector: 'my-astronaut',
  template: `
    <p>
      {{astronaut}}: <strong>{{mission}}</strong>
      <button
        (click)="confirm()"
        [disabled]="!announced || confirmed">
        Confirm
      </button>
    </p>
  `
})
export class AstronautComponent implements OnDestroy {
  @Input() astronaut: string;
  mission = '<no mission announced>';
  confirmed = false;
  announced = false;
  subscription: Subscription;
  constructor(private missionService: MissionService) {
    this.subscription = missionService.missionAnnounced$.subscribe(
      mission => {
        this.mission = mission;
        this.announced = true;
        this.confirmed = false;
    });
  }
  confirm() {
    this.confirmed = true;
    this.missionService.confirmMission(this.astronaut);
  }
  ngOnDestroy() {
    // prevent memory leak when component destroyed
    this.subscription.unsubscribe();
  }
}