背景
- BLEでSwitchBotの機器からのデータを収集し、MQTTで配信するソフトを作っている
- 前回の記事でRaspberry Piが特定のBLE機器から来るアドバタイズパケットの読み込みが遅い原因を調査したが、結局原因はわからないままだった
- 依然原因は不明であるものの、DBus経由でBluezにアクセスすると何かオーバヘッドがあるかもしれないと考え、直接ソケット通信でHCIにアクセスすることを試した
下準備
- 今まで作っていたプログラムの構成だとBLEを取り扱うクラスがDBusと密結合していたため、抽象クラスを切り出し、BLEの操作と下回りの通信をデカップリングさせた
class BluetoothAbstructLayer
{
public:
    virtual ~BluetoothAbstructLayer() = default;

    virtual bool init() = 0;
    virtual bool start_scan() = 0;
    virtual bool stop_scan() = 0;
    virtual void check_adv_data() = 0;
    virtual void add_sensor_data_handler(std::shared_ptr<SensorDataHandler> sensorDataHandler)  = 0;
};
- さらに、BLE機器のデータをパースするクラスもDBusに依存していたため、これらもデカップリングさせた
BluezSockLayer
- BluetoothAbstructLayerクラスを継承してBluezSockLayerを作った
- このクラスは以下のことをBluezが提供するAPI経由で行う
- init()で初期化
- add_sensor_data_handler()でアドバタイズパケットをモニタリングしたいBLE機器を追加
- start_scan()でスキャン開始
- check_adv_data()でアドバタイズパケットを読み込む
- BluezのAPIはHCIのコマンドをラップしているようで、HCIコマンド自体はBluetoothの規格で定義されている (CoreSpec 6.1だとVolume 4 Part Eの7. HCI commands and event)
- そのため本来であればこの仕様を読み込む必要があるのだが、例によってCopilotにざっくり骨格を作ってもらい不明確な点は仕様に立ち戻って確認する、といったやり方で実装を進めた
init
- hci_get_routeでHCIデバイスを取得し、hci_open_devで対応するソケットのディスクリプタを取得する
// init()
    int device_id = hci_get_route(nullptr);
    if (device_id < 0)
    {
        std::cerr << "Failed to get HCI root: " << device_id << std::endl;
        return false;
    }

    m_sock = hci_open_dev(device_id);
    if (m_sock < 0)
    {
        std::cerr << "Failed to open HCI device: " << device_id << std::endl;
        return false;
    }
start_scan
-
hci_le_set_scan_parametersでスキャンに関する設定を追加できる
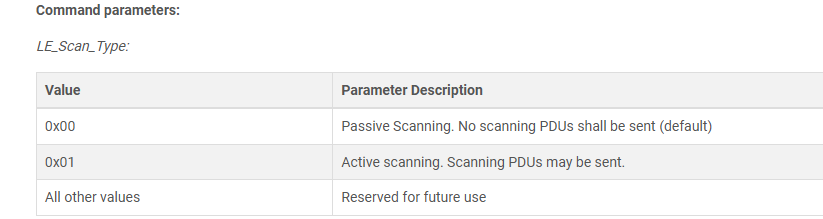
- MotionSensorはSCAN_RESPに情報を入れているので(SCAN_REQを送らないといけないので)アクティブスキャンである必要がある
- 第二引数でパッシブスキャンかアクティブスキャンかを選択できるようだが、ヘッダを見てもどのような値をいれればいいのかがわからない
- そのためCoreSpecを確認したところ0x01がアクティブスキャンだそうなので、0x01を設定した
-
hci_le_set_scan_enableで第二引数を0x01にするとスキャンを開始する
- これもCore Specに書いてあった
// start_scan()

    if (hci_le_set_scan_parameters(m_sock, type, interval, window, own_type, filter, to) < 0)
    {
        std::cerr << "hci_le_set_scan_parameters failed: " << strerror(errno) << std::endl;
        return false;
    }

    if (hci_le_set_scan_enable(m_sock, 0x01, 0x00, 1000) < 0)
    {
        std::cerr << "hci_le_set_scan_enable failed: " << strerror(errno) << std::endl;
        return false;
    }
check_adv_data
- hci_open_dev()で取得したソケットからデータを読み込る
- ソケットから得られるデータは先頭の3バイトにLE Meta eventというメタ情報を格納している部分があり、そこを見ることでアドバタイズパケットであるかどうかがわかる
- アドバタイズパケットであった場合はデータ部分をle_advertising_infoにキャストし、興味のあるMACアドレスからのパケットかどうかの確認と、そうであった場合はデータのパースを行っている
//check_adv_data()
    int len = read(m_sock, buf, sizeof(buf));
    if (len < 0)
    {
        std::cerr << "Failed to read HCI event: " << strerror(errno) << std::endl;
        return;
    }

    evt_le_meta_event* meta = (evt_le_meta_event*)(buf + (1 + HCI_EVENT_HDR_SIZE));
    if (meta->subevent != EVT_LE_ADVERTISING_REPORT)
    {
        std::cerr << "Unexpected event type: " << static_cast<int>(meta->subevent) << std::endl;
        return;
    }

    le_advertising_info* info = (le_advertising_info*)(meta->data + 1);
呼び出し側の実装
- hci_le_set_scan_parametersでscan intervalを10msに設定したので、ソケットへの問い合わせの間隔も10msに統一させた
void IotDeviceHubManager::run()
{
  while(true)
  {
    m_bluetooth->check_adv_data();
    usleep(10000);//10ms
  }
}
実行
- HCIデバイスの起動にioctlを使っているので、バイナリはスーパーユーザで実行する必要がある
$sudo IotDeviceHub
実行結果
Message received on topic iot_device_hub/sensor_data/entrance/pir_utc: Since the last trigger PIR time (s): 4
Message received on topic iot_device_hub/sensor_data/entrance/pir_utc: Since the last trigger PIR time (s): 2
Message received on topic iot_device_hub/sensor_data/entrance/pir_utc: Since the last trigger PIR time (s): 2
DBus経由でPIR(人の動きを感知してからの経過時間)は15秒から40秒くらいあったのだが、今回のアップデートで2から4秒ほどに短縮できた
今後の課題
- スキャン間隔を10msという短い間隔に設定しているので消費電力も上がっているはずである
- そのためRaspberryPi(とできればBLE機器)の消費電力を測定し、最適な値に設定したい