1. はじめに
皆様お疲れ様です。Swift AdventCalendarの2日目を担当させて頂きます、fumiyasac(Fumiya Sakai)と申します。何卒よろしくお願い致します。
結構前にも何度かメディアアプリで活用することができそうな動きを実現するためのサンプル実装をご紹介してきましたが、今回はUICollectionViewとUIPageViewControllerを利用してかつUIライブラリを使わない方針で、メディアアプリっぽい無限スクロール型のタブからカテゴリーを選択する動きとを自作してみたサンプルを作成しました。以前にも先人のエンジニアの方々が取り組んでいたことをブログ記事等でも拝見していたので、丁度良い機会でしたので改めて取り組んでみることにしました。
Githubでのサンプルコード:
※ 実際に公開しているリポジトリ内のコードでは、現在位置がわかるようにダミーのサンプルデータを表示するようにしています。
サンプルの全体的な動きの動画:
※ こちらのサンプルはPullRequestやIssue等はお気軽にどうぞ!
補足資料に関して:
今回の内容につきましては、ROPPONGI.swift 第6回 望年会にて登壇の際に利用した資料を下記のリンクにて共有しておりますので、こちらも是非ご活用頂けますと幸いです。
2. 今回の参考資料とサンプル概要について
★2-1. このサンプルを実装するにあたっての参考資料:
今回のサンプル実装にあたっては下記に紹介するTIPやの記事での実装を参考に取り入れました。
1.UICollectionViewにおいて画面上に見えているセルのインデックス値を取得する:
下記は現在画面上に表示されているUICollectionViewのセルを表示するためのTIPSは下記になります。今回のサンプルではスクロールが止まったタイミングでUICollectionViewで作成したタブ部分での位置補正とUIPageViewControllerでセットしているUIViewControllerにおいて該当するカテゴリーのインデックスに該当する記事一覧を表示しているUIViewControllerを表示するために利用しています。
var visibleIndexPathList: [IndexPath] = []
for cell in categoryScrollTabCollectionView.visibleCells {
    if let visibleIndexPath = categoryScrollTabCollectionView.indexPath(for: cell) {
        visibleIndexPathList.append(visibleIndexPath)
        print("現在画面内に見えているセルのインデックス値:", visibleIndexPath)
    }
}
2.UICollectionViewLayoutを利用するための参考リンク集:
UICollectionViewLayoutをカスタマイズすることによって、さらに複雑なUIレイアウトを実現するための参考にした記事は下記になります。
- UICollectionViewLayoutを利用するにあたってのはじめの一歩
- UICollectionViewのLayoutで悩んだら
- UICollectionViewFlowLayoutでセルの大きさやセル同士の間隔などを設定する
3.UICollectionViewやUIScrollViewを利用した無限スクロールの実装例:
メディア系のアプリでよくあるような無限スクロールをするUIを作る上で、その他参考になりそうな記事及び実装サンプルはこちらになります。
- UIPageViewControllerをつかって無限スクロールできるタブUIを実装してOSSとして公開しました
- 【Swift4】UICollectionViewを使ってカルーセルを実装してみた。【セルの装飾編】
- 無限スクロールするUICollectionView実装サンプル
- 無限スクロールするUIScrollView実装サンプル
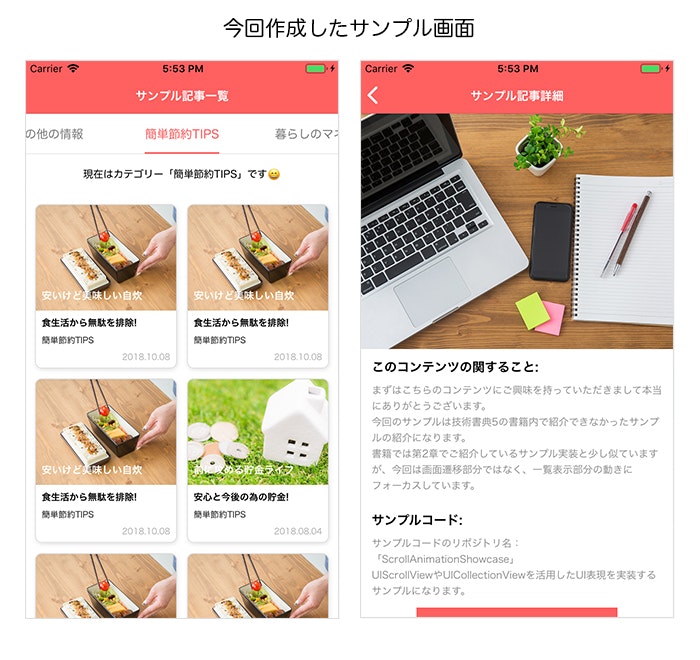
★2-2. 今回のサンプルについて:
サンプルのキャプチャ画像:
環境やバージョンについて:
- Xcode10.1
- Swift4.2
- MacOS Mojave (Ver10.14)
3. 無限スクロールするタブによるカテゴリー選択部分を実装する部分に関する解説
ここからは無限スクロール型のタブをUIColletionViewの性質を利用して実装し、UIPageViewControllerの動きと連携する部分に関する部分に関して実装する上で押さえておくと良さそうなポイントを解説していきます。
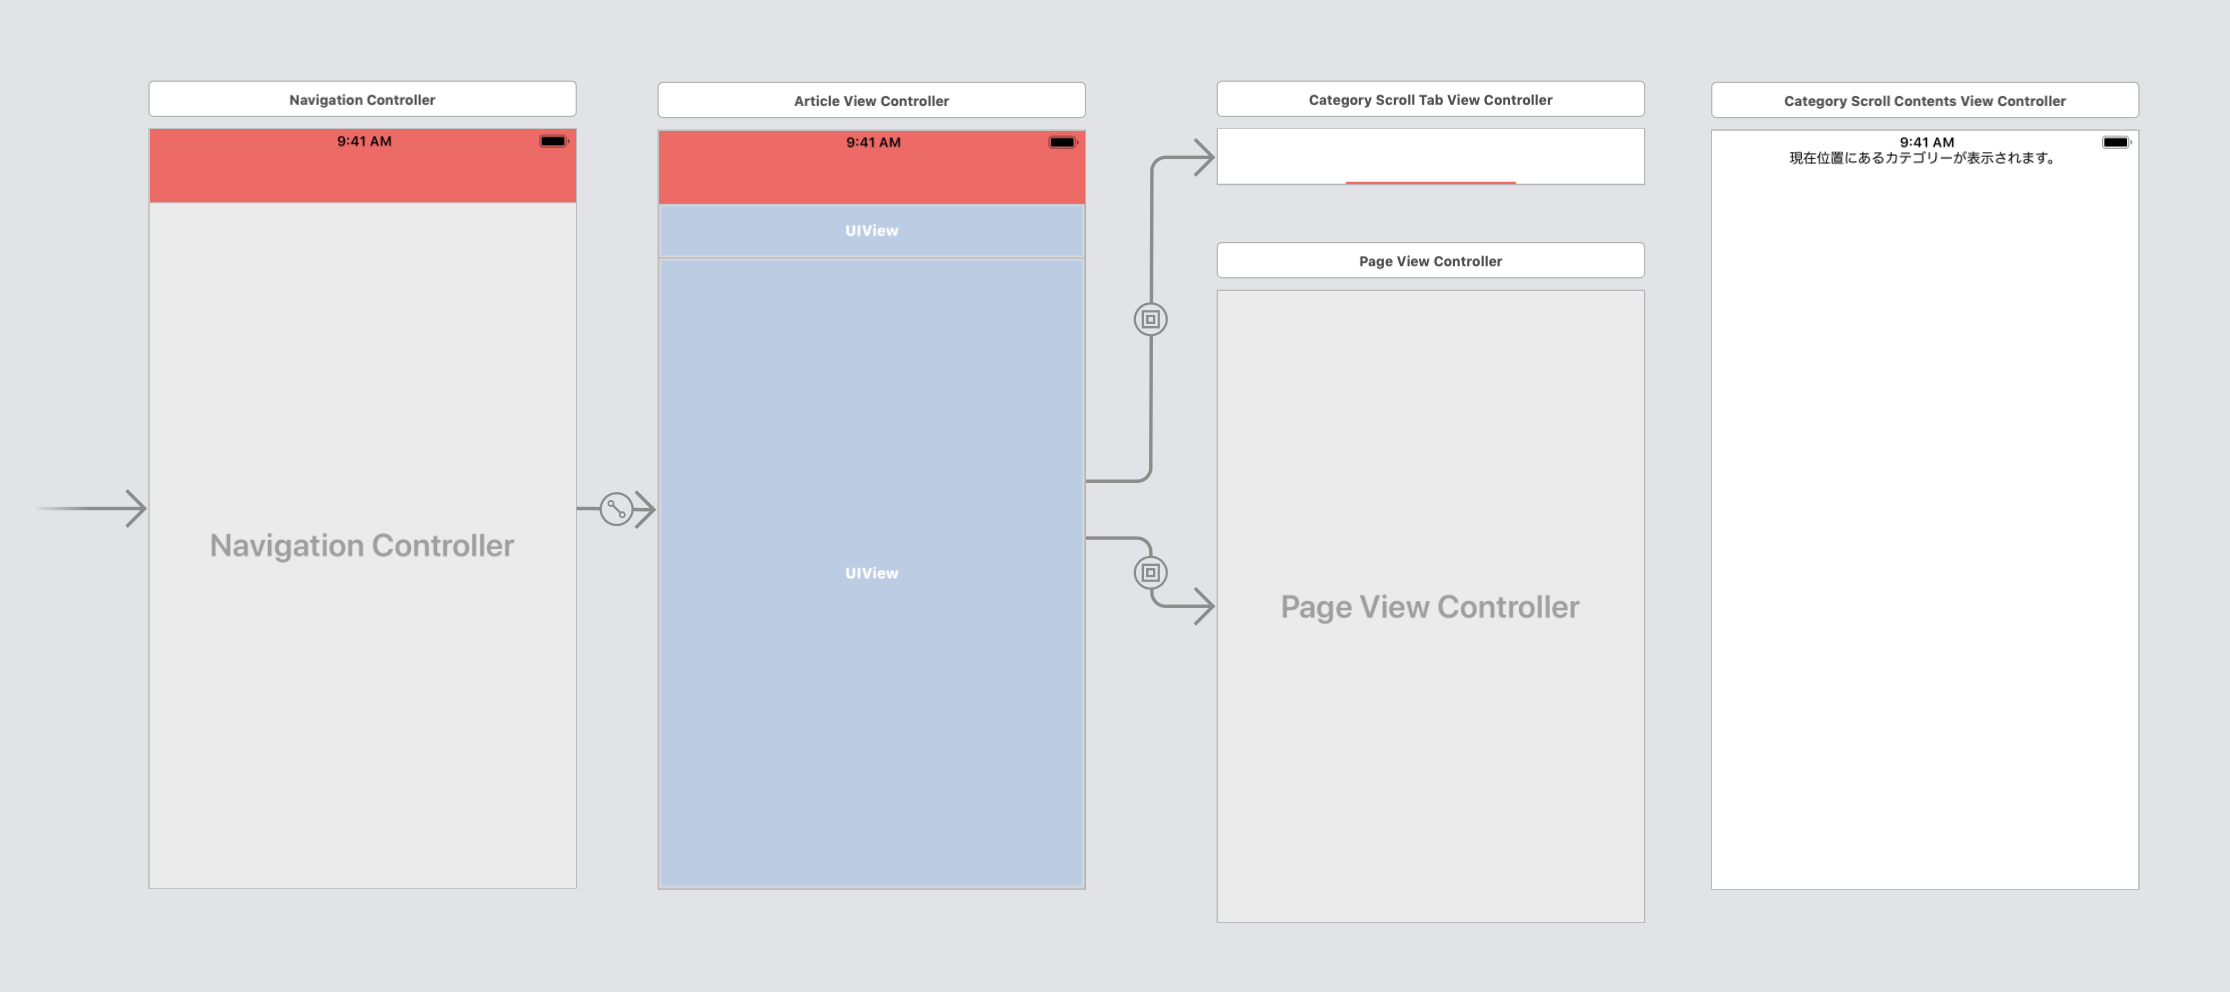
★3-1: Storyboardの構成
Storyboardの構成に関しては下記のような形になります。おおもとの画面となるArticleViewController.swiftの上には2つのContainerViewがあり、
- 無限スクロールするUICollectionViewを配置している
CategoryScrollTabViewController.swiftを接続しているContainerView - カテゴリー別の記事一覧を表示する
CategoryScrollContentsViewController.swiftを表示するためのUIPageViewControllerを接続しているContainerView
という形となっています。
そしてCategoryScrollTabViewController.swiftでは、UICollectionViewで表現しているタブ表示において、ユーザーが選択したカテゴリーに該当するカテゴリー別の記事一覧を表示するための処理を下記のようなProtocolを用意して橋渡しができるような形としておきます。
// カテゴリータブ操作時に実行されるプロトコル
protocol CategoryScrollTabDelegate: NSObjectProtocol {

    // UIPageViewControllerで表示しているインデックスの画面へ遷移する
    func moveToCategoryScrollContents(selectedCollectionViewIndex: Int, targetDirection: UIPageViewController.NavigationDirection, withAnimated: Bool)
}
そして、定義したProtocolと対応する実際の処理をArticleViewController.swiftに下記のような形で実装します。CategoryScrollTabViewController.swiftのUICollectionViewに配置しているセルが押下されたタイミングでCategoryScrollTabDelegateに定義したメソッドを実行させることで、UIPageViewControllerの位置表示を変更するような形となっています。
class ArticleViewController: UIViewController {

    // カテゴリーの一覧データ
    private let categoryList: [String] = ArticleMock.getArticleCategories()

    // 現在表示しているViewControllerのタグ番号
    private var currentCategoryIndex: Int = 0

    // ページングして表示させるViewControllerを保持する配列
    private var targetViewControllerLists: [UIViewController] = []

    // ContainerViewにEmbedしたUIPageViewControllerのインスタンスを保持する
    private var pageViewController: UIPageViewController?

    ・・・(省略)・・・
}

// MARK: - CategoryScrollTabDelegate

extension ArticleViewController: CategoryScrollTabDelegate {

    // タブ側のViewControllerで選択されたインデックス値とスクロール方向を元に表示する位置を調整する
    func moveToCategoryScrollContents(selectedCollectionViewIndex: Int, targetDirection: UIPageViewController.NavigationDirection, withAnimated: Bool) {

        // UIPageViewControllerに設定した画面の表示対象インデックス値を設定する
        // MEMO: タブ表示のUICollectionViewCellのインデックス値をカテゴリーの個数で割った剰余
        currentCategoryIndex = selectedCollectionViewIndex % categoryList.count

        // 表示対象インデックス値に該当する画面を表示する
        pageViewController!.setViewControllers([targetViewControllerLists[currentCategoryIndex]], direction: targetDirection, animated: withAnimated, completion: nil)
    }
}
対応するデータに対応した画面表示のための実装と、無限スクロールするタブに関連するための実装を1つのViewControllerの中に押し込めてしまうと処理が煩雑になってしまいそうだったので、全体のUI構成要素の部品別に分割して処理の接続が必要な部分についてはProtocolを経由して処理の橋渡しができるようにしている点がポイントになるかと思います。
★3-2: 無限スクロールを伴うタブ型UI実装をするために必要なポイント解説①
次に無限スクロールを伴うタブ型UIを実装するにあたって必要な実装に関するポイントについて解説していきます。
今回のサンプルでは、UICollectionViewで作成しているタブについては現在位置に表示されているものが真ん中くるような形にしたかったので、下記のような形でUICollectionViewFlowLayoutクラスを継承したクラスを作成し、layoutAttributeプロパティを調節することで 「各々のセルがスクロールから止まる際に停止位置が中央に来るような調節」 を適用させています。

そして今回のサンプルで利用している無限スクロールを伴うタブ型UIに適用した、スクロールから止まる際に停止位置が中央に来るようにするUI実装をするためのCategoryScrollTabViewFlowLayout.swiftクラスのコードは下記ような形になります。
import UIKit

final class CategoryScrollTabViewFlowLayout: UICollectionViewFlowLayout {

    // 参考1: 下記のリンクで紹介されていたTIPSを元に実装しました
    // https://uruly.xyz/carousel-infinite-scroll-3/

    // 参考2: UICollectionViewのlayoutAttributeの変更タイミングに関する記事
    // https://qiita.com/kazuhiro4949/items/03bc3d17d3826aa197c0

    // 参考3: UICollectionViewFlowLayoutのサブクラスを利用したスクロールの停止位置算出に関する記事
    // https://dev.classmethod.jp/smartphone/iphone/collection-view-layout-cell-snap/

    // 該当のセルのオフセット値を計算するための値(スクリーンの幅 - UICollectionViewに配置しているセルの幅)
    private let horizontalTargetOffsetWidth: CGFloat = UIScreen.main.bounds.width - AppConstant.CATEGORY_CELL_WIDTH

    // UICollectionViewをスクロールした後の停止位置を返すためのメソッド
    // MEMO: UICollectionViewのLayoutAttributeを調整して、中央に表示されるように調整している
    override func targetContentOffset(forProposedContentOffset proposedContentOffset: CGPoint, withScrollingVelocity velocity: CGPoint) -> CGPoint {

        // 配置されているUICollectionViewを取得する
        guard let conllectionView = self.collectionView else {
            assertionFailure("UICollectionViewが配置されていません。")
            return CGPoint.zero
        }
        // UICollectionViewのオフセット値を元に該当のセルの情報を取得する
        var offsetAdjustment: CGFloat = CGFloat(MAXFLOAT)
        let horizontalOffest: CGFloat = proposedContentOffset.x + horizontalTargetOffsetWidth / 2
        let targetRect = CGRect(
            x: proposedContentOffset.x,
            y: 0,
            width: conllectionView.bounds.size.width,
            height: conllectionView.bounds.size.height
        )

        // 配置されているUICollectionViewのlayoutAttributesを元にして停止させたい位置を算出する
        guard let layoutAttributes = super.layoutAttributesForElements(in: targetRect) else {
            assertionFailure("配置したUICollectionViewにおいて該当セルにおけるlayoutAttributesを取得できません。")
            return CGPoint.zero
        }
        for layoutAttribute in layoutAttributes {
            let itemOffset = layoutAttribute.frame.origin.x
            if abs(itemOffset - horizontalOffest) < abs(offsetAdjustment) {
                offsetAdjustment = itemOffset - horizontalOffest
            }
        }

        return CGPoint(
            x: proposedContentOffset.x + offsetAdjustment,
            y: proposedContentOffset.y
        )
    }
}
今回の実装ではUICollectionViewの位置を中央に寄せる処理だけのシンプルなものになりますが、UICollectionViewLayoutやUICollectionViewFlowLayoutを継承したクラスを活用することによって、UICollectionViewのレイアウトをカスタマイズすることによって、より多彩な表現を実現することができるので工夫次第では様々な動きを実現できます。
★3-3: 無限スクロールを伴うタブ型UI実装をするために必要なポイント解説②
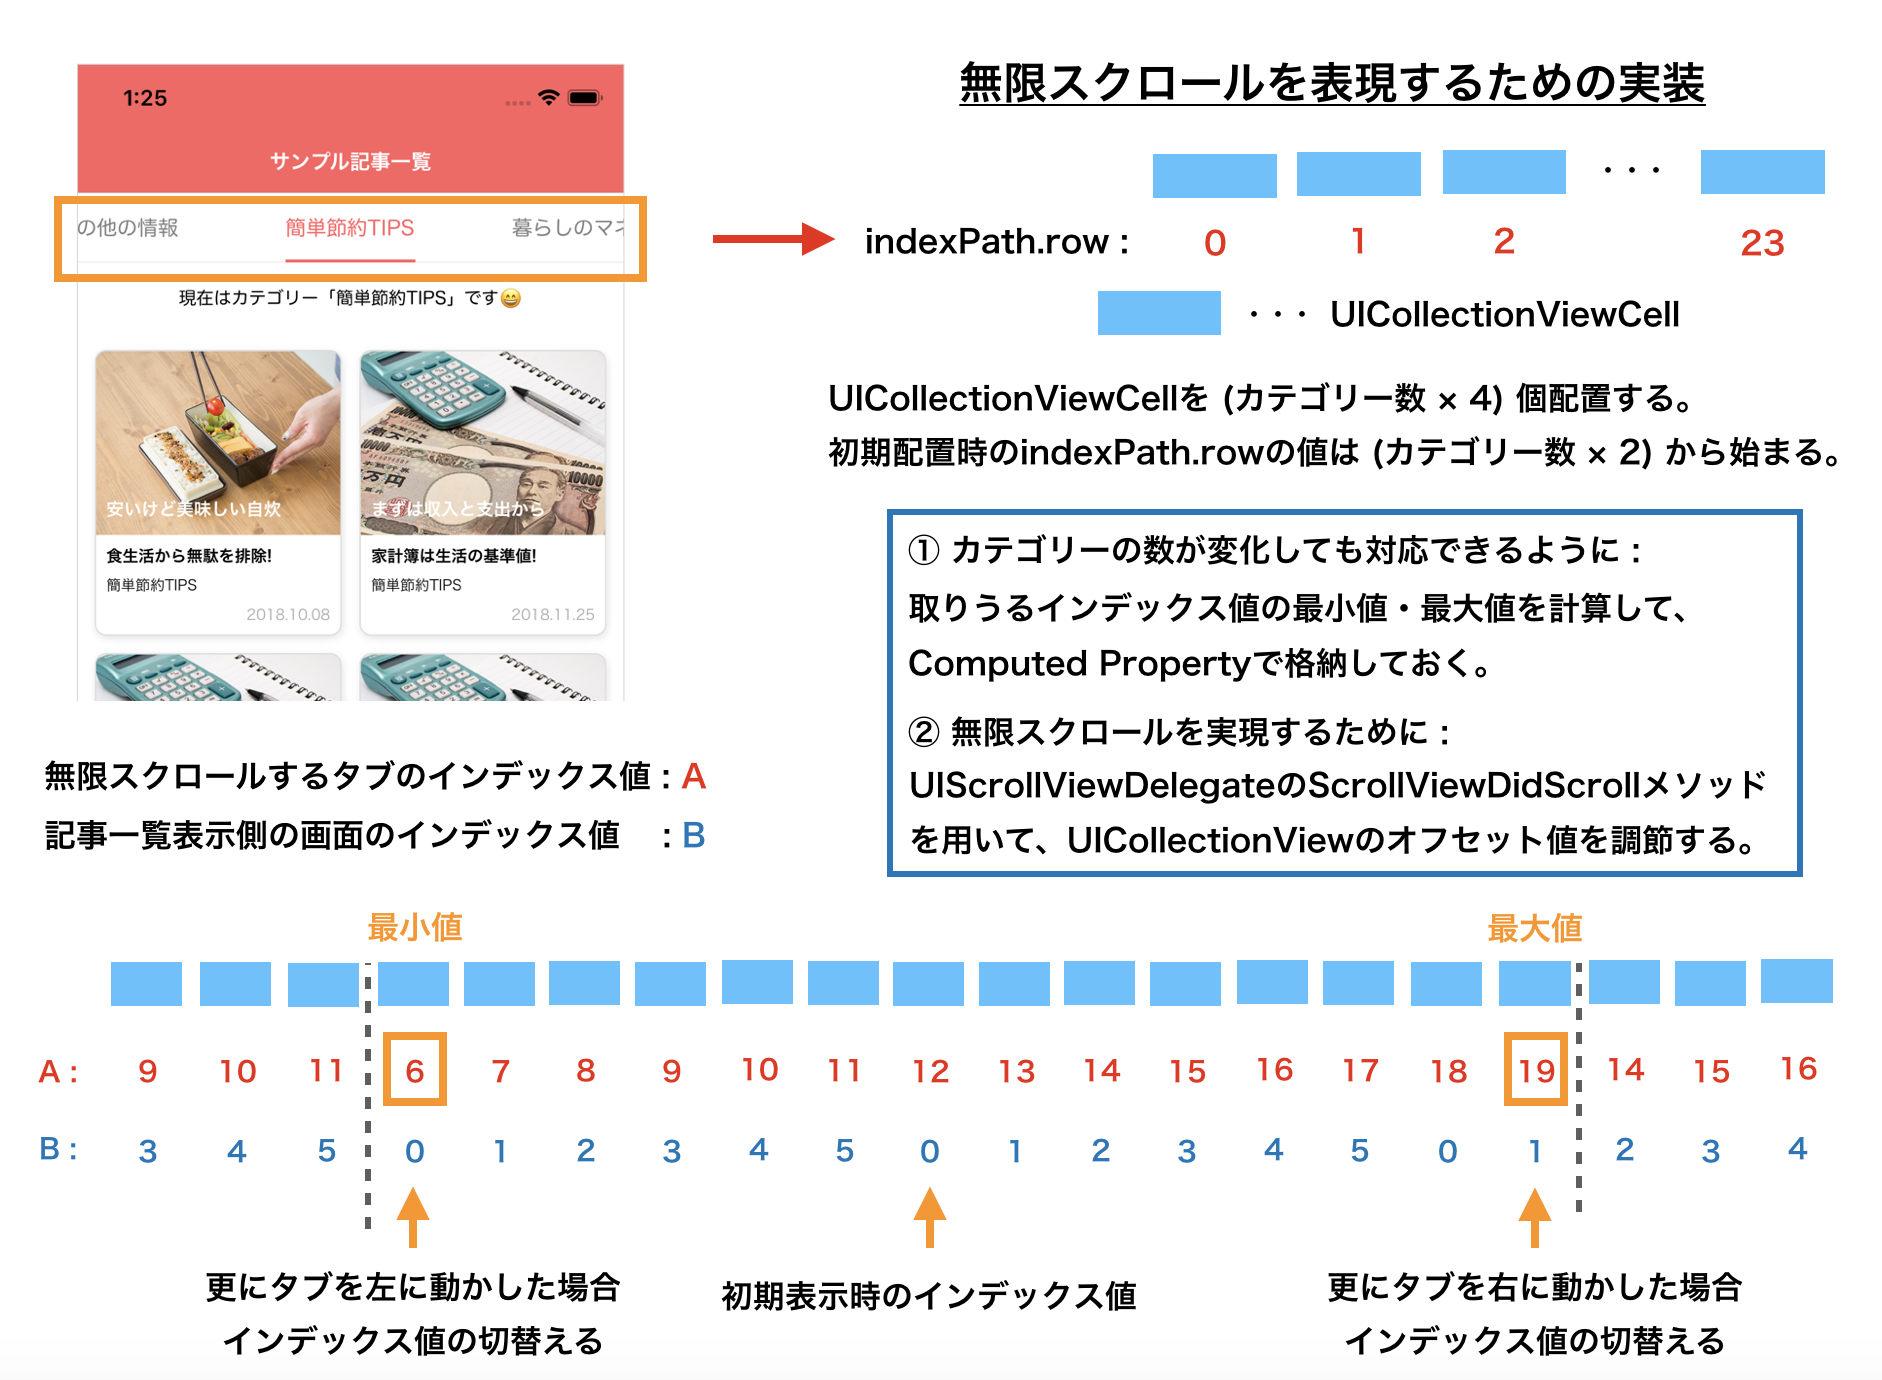
そして無限スクロールを伴うタブ型UIを実装するにあたって、重要な部分となる 「UICollectionViewCellの配置個数やインデックス値と連動したUIScrollViewDelegateとの処理」 について紹介できればと思います。
下図のような形で実際のカテゴリーの数の4倍した個数のセルを配置しておき、UICollectionViewCellの選択されているインデックスの初期値は実際のカテゴリー数の2倍の数に相当するような形にしておきます。スクロールした際に発動するUIScrollViewDelegateのfunc scrollViewDidScroll(_ scrollView: UIScrollView)を利用してスクロールをした際に指定したX軸方向のオフセット値のしきい値を超えた場合には位置を調節し、その際に見えているUICollectionViewCellのインデックス値が指定した範囲内に収まるような形にしています。
そして今回のサンプルで利用している無限スクロールを伴うタブ型UIを実現するための、無限スクロールを実行するためにUIScrollViewDelegateを利用した処理及びUICollectionViewに配置したセルのインデックス値を調整とするための処理をまとめたコードは下記のような形になります。
スクロールが停止した際に加えて、UICollectionViewに配置しているセルがタップされた場合やArticleViewController.swiftに配置したUIPageViewControllerを操作した際には、scrollToItem(at indexPath: IndexPath, at scrollPosition: UICollectionView.ScrollPosition, animated: Bool)メソッドが実行されて現在位置が変更されるので、その際にも該当のインデックス値がしきい値を超えないようにする配慮が必要になる点に注意してください。
class CategoryScrollTabViewController: UIViewController {

    // CategoryScrollTabDelegateプロトコル
    weak var delegate: CategoryScrollTabDelegate?

    // カテゴリーの一覧データ
    private let categoryList: [String] = ArticleMock.getArticleCategories()

    // ボタン押下時の軽微な振動を追加する
    private let buttonFeedbackGenerator: UIImpactFeedbackGenerator = {
        let generator: UIImpactFeedbackGenerator = UIImpactFeedbackGenerator(style: .light)
        generator.prepare()
        return generator
    }()

    // MEMO: UICollectionViewの一番最初のセル表示位置に関する設定
    // 参考: https://www.101010.fun/entry/swift-once-exec
    private lazy var setInitialCategoryScrollTabPosition: (() -> ())? = {

        // 押下した場所のインデックス値を持っておくために、実際のタブ個数の2倍の値を設定する
        currentSelectIndex = self.categoryList.count * 2
        //print("初期表示時の中央インデックス値:", currentSelectIndex)

        // 変数(currentSelectIndex)を基準にして位置情報を更新する
        updateCategoryScrollTabCollectionViewPosition(withAnimated: false)
        return nil
    }()

    // 配置したセル幅の合計値
    private var allTabViewTotalWidth: CGFloat = 0.0

    // 現在選択中のインデックス値を格納する変数(このクラスに配置しているUICollectionViewのIndex番号)
    private var currentSelectIndex = 0

    @IBOutlet weak private var selectedCatogoryUnderlineWidth: NSLayoutConstraint!
    @IBOutlet weak private var categoryScrollTabCollectionView: UICollectionView!

    // MARK: - Computed Properties

    // MEMO:
    // ここでは無限スクロールができるように予め、(実際の個数 × 4)のセルを配置している
    // またscrollViewDidScroll内の処理で所定の位置で調整をかけるので実際のUICollectionViewCellのインデックス値の範囲は下記のようになる
    // Ex. タブを6個設定する場合 → 6 ... 19が取り得る範囲となる

    // 表示するカテゴリーの個数を元にしたインデックスの最大値
    // 例. カテゴリーが6個の場合は5となる
    private var targetContentsMaxIndex: Int {
        return categoryList.count - 1
    }

    // 実際に配置したUICollectionViewCellが取り得るインデックスの最大値
    // 例. カテゴリーが6個の場合は19となる
    private var targetCollectionViewCellMaxIndex: Int {
        return categoryList.count * 4 - targetContentsMaxIndex
    }

    // 実際に配置したUICollectionViewCellが取り得るインデックスの最小値
    // 例. カテゴリーが6個の場合は6となる
    private var targetCollectionViewCellMinIndex: Int {
        return categoryList.count
    }

    // MARK: - Override

    override func viewDidLoad() {
        super.viewDidLoad()

        setupCategoryScrollTabCollectionView()
    }

    override func viewDidAppear(_ animated: Bool) {
        super.viewDidAppear(animated)

        // MEMO: この部分は一番最初に起動した時だけ発火するようにする
        setInitialCategoryScrollTabPosition?()
    }

    // MARK: - Function

    // 親(ArticleViewController)のUIPageViewControllerのスクロール方向を元にUICollectionViewの位置を設定する
    // MEMO: このメソッドはUIPageViewControllerを配置している親(ArticleViewController)から実行される
    func moveToCategoryScrollTab(isIncrement: Bool = true) {

        // UIPageViewControllerのスワイプ方向を元に、更新するインデックスの値を設定する
        var targetIndex = isIncrement ? currentSelectIndex + 1 : currentSelectIndex - 1

        // 取りうるべきインデックスの値が閾値(targetCollectionViewCellMaxIndex)を超えた場合は補正をする
        if targetIndex > targetCollectionViewCellMaxIndex {
            targetIndex = targetCollectionViewCellMaxIndex - targetContentsMaxIndex
            currentSelectIndex = targetCollectionViewCellMaxIndex
        }

        // 取りうるべきインデックスの値が閾値(targetCollectionViewCellMinIndex)を下回った場合は補正をする
        if targetIndex < targetCollectionViewCellMinIndex {
            targetIndex = targetCollectionViewCellMinIndex + targetContentsMaxIndex
            currentSelectIndex = targetCollectionViewCellMinIndex
        }

        // MEMO: タブがスクロールされている状態でUIPageViewControllerがスワイプされた場合の考慮
        // → スクロール中である場合には強制的に慣性スクロールを停止させる
        let isScrolling = (categoryScrollTabCollectionView.isDragging || categoryScrollTabCollectionView.isDecelerating)
        if isScrolling {
            categoryScrollTabCollectionView.setContentOffset(categoryScrollTabCollectionView.contentOffset, animated: true)
        }

        // 押下した場所のインデックス値を持っておく
        currentSelectIndex = targetIndex
        //print("コンテンツ表示側のインデックスを元にした現在のインデックス値:", currentSelectIndex)

        // 変数(currentSelectIndex)を基準にして位置情報を更新する
        updateCategoryScrollTabCollectionViewPosition(withAnimated: true)

        // 「コツッ」とした感じの端末フィードバックを発火する
        buttonFeedbackGenerator.impactOccurred()
    }

    // MARK: - Private Function

    // UICollectionViewに関する設定
    private func setupCategoryScrollTabCollectionView() {
        categoryScrollTabCollectionView.delegate = self
        categoryScrollTabCollectionView.dataSource = self
        categoryScrollTabCollectionView.registerCustomCell(CategoryScrollTabViewCell.self)
        categoryScrollTabCollectionView.showsHorizontalScrollIndicator = false

        // MEMO: タブ内のスクロール移動を許可する場合はtrueにし、許可しない場合はfalseとする
        categoryScrollTabCollectionView.isScrollEnabled = true
    }

    // 選択もしくはスクロールが止まるであろう位置にあるセルのインデックス値を元にUICollectionViewの位置を更新する
    private func updateCategoryScrollTabCollectionViewPosition(withAnimated: Bool = false) {

        // インデックス値に相当するタブを真ん中に表示させる
        let targetIndexPath = IndexPath(row: currentSelectIndex, section: 0)
        categoryScrollTabCollectionView.scrollToItem(at: targetIndexPath, at: .centeredHorizontally, animated: withAnimated)

        // UICollectionViewの下線の長さを設定する
        let categoryListIndex = currentSelectIndex % categoryList.count
        setUnderlineWidthFrom(categoryTitle: categoryList[categoryListIndex])

        // 現在選択されている位置に色を付けるためにCollectionViewをリロードする
        categoryScrollTabCollectionView.reloadData()
    }

    // スクロールするタブの下にある下線の幅を文字の長さに合わせて設定する
    private func setUnderlineWidthFrom(categoryTitle: String) {

        // 下線用のViewに付与したAutoLayoutの幅に関する制約値を更新する
        let targetWidth = CategoryScrollTabViewCell.calculateCategoryUnderBarWidthBy(title: categoryTitle)
        selectedCatogoryUnderlineWidth.constant = targetWidth
        UIView.animate(withDuration: 0.36, animations: {
            self.view.layoutIfNeeded()
        })
    }

    // UIPageViewControllerを動かす方向を受け取ったインデックス値(indexPath.row)と現在のインデックス値(currentSelectIndex)を元に算出する
    // MEMO: 親(ArticleViewController)のUIPageViewCotrollerの更新はCategoryScrollTabDelegateのメソッドを経由して実行する
    private func getCategoryScrollContentsDirection(selectedIndex: Int) -> UIPageViewController.NavigationDirection {

        // 下記の条件を満たす場合は例外的に進む方向とする
        // 1. 引数で渡されたインデックス値:
        //   - selectedIndex が (targetCollectionViewCellMaxIndex - targetContentsMaxIndex) と等しい
        // 2. 現在のインデックス値:
        //   - currentSelectIndex が targetCollectionViewCellMaxIndex と等しい
        if selectedIndex == targetCollectionViewCellMaxIndex - targetContentsMaxIndex && currentSelectIndex == targetCollectionViewCellMaxIndex {
            return UIPageViewController.NavigationDirection.forward
        }

        // 下記の条件を満たす場合は例外的に戻す方向とする
        // 1. 引数で渡されたインデックス値:
        //   - selectedIndex が (targetCollectionViewCellMinIndex + targetContentsMaxIndex) と等しい
        // 2. 現在のインデックス値:
        //   - currentSelectIndex が targetCollectionViewCellMinIndex と等しい
        if selectedIndex == targetCollectionViewCellMinIndex + targetContentsMaxIndex && currentSelectIndex == targetCollectionViewCellMinIndex {
            return UIPageViewController.NavigationDirection.reverse
        }

        // (現在のインデックス値 - 引数で渡されたインデックス値)を元に方向を算出する
        if currentSelectIndex - selectedIndex > 0 {
            return UIPageViewController.NavigationDirection.reverse
        } else {
            return UIPageViewController.NavigationDirection.forward
        }
    }
}

// MARK: - UICollectionViewDelegate

extension CategoryScrollTabViewController: UICollectionViewDelegate {}

// MARK: - UICollectionViewDataSource

extension CategoryScrollTabViewController: UICollectionViewDataSource {

    // 配置するセルの個数を設定する
    func collectionView(_ collectionView: UICollectionView, numberOfItemsInSection section: Int) -> Int {

        // MEMO: 無限スクロールの対象とする場合はタブ表示要素の4倍余分に要素を表示する
        return categoryList.count * 4
    }

    // 配置するセルの表示内容を設定する
    func collectionView(_ collectionView: UICollectionView, cellForItemAt indexPath: IndexPath) -> UICollectionViewCell {
        let cell = collectionView.dequeueReusableCustomCell(with: CategoryScrollTabViewCell.self, indexPath: indexPath)
        let targetIndex = indexPath.row % categoryList.count
        let isSelectedTab = (indexPath.row % categoryList.count == currentSelectIndex % categoryList.count)
        cell.setCategory(name: categoryList[targetIndex], isSelected: isSelectedTab)
        return cell
    }

    // セル押下時の処理内容を記載する
    func collectionView(_ collectionView: UICollectionView, didSelectItemAt indexPath: IndexPath) {

        // UIPageViewControllerを動かす方向を選択したインデックス値(indexPath.row)と現在のインデックス値(currentSelectIndex)を元に算出する
        let targetDirection = getCategoryScrollContentsDirection(selectedIndex: indexPath.row)

        // 押下した場所のインデックス値を現在のインデックス値を格納している変数(currentSelectIndex)にセットする
        currentSelectIndex = indexPath.row
        //print("タブ押下時の中央インデックス値:", currentSelectIndex)

        // 変数(currentSelectIndex)を基準にして位置情報を更新する
        updateCategoryScrollTabCollectionViewPosition(withAnimated: true)

        // 算出した現在のインデックス値・動かす方向の値を元に、UIPageViewControllerで表示しているインデックスの画面へ遷移する
        self.delegate?.moveToCategoryScrollContents(
            selectedCollectionViewIndex: currentSelectIndex,
            targetDirection: targetDirection,
            withAnimated: true
        )

        // 「コツッ」とした感じの端末フィードバックを発火する
        buttonFeedbackGenerator.impactOccurred()
    }
}

// MARK: - UICollectionViewDelegateFlowLayout

extension CategoryScrollTabViewController: UICollectionViewDelegateFlowLayout {

    // タブ用のセルにおける矩形サイズを設定する
    func collectionView(_ collectionView: UICollectionView, layout collectionViewLayout: UICollectionViewLayout, sizeForItemAt indexPath: IndexPath) -> CGSize {
        return CategoryScrollTabViewCell.cellSize
    }
}

// MARK: - UIScrollViewDelegate

extension CategoryScrollTabViewController: UIScrollViewDelegate {

    // 配置したUICollectionViewをスクロールしている際に実行される処理
    func scrollViewDidScroll(_ scrollView: UIScrollView) {

        // 表示したいセル要素のWidthを計算する
        // MEMO: 実際の幅の値が欲しいのでUIScrollView内の幅を1/4したものになる
        if allTabViewTotalWidth == 0.0 {
            allTabViewTotalWidth = floor(scrollView.contentSize.width / 4.0)
        }

        // スクロールした位置が閾値を超えたら中央に戻す
        if (scrollView.contentOffset.x <= allTabViewTotalWidth) || (scrollView.contentOffset.x > allTabViewTotalWidth * 3.0) {
            scrollView.contentOffset.x = allTabViewTotalWidth * 2.0
        }
    }

    // 配置したUICollectionViewをスクロールが止まった際に実行される処理
    func scrollViewDidEndDecelerating(_ scrollView: UIScrollView) {

        // スクロールが停止した際に見えているセルのインデックス値を格納して、真ん中にあるものを取得する
        // 参考: https://stackoverflow.com/questions/18649920/uicollectionview-current-visible-cell-index

        var visibleIndexPathList: [IndexPath] = []
        for cell in categoryScrollTabCollectionView.visibleCells {
            if let visibleIndexPath = categoryScrollTabCollectionView.indexPath(for: cell) {
                visibleIndexPathList.append(visibleIndexPath)
                //print("現在画面内に見えているセルのインデックス値:", visibleIndexPath)
            }
        }
        let targetIndexPath = visibleIndexPathList[1]

        // ※この部分は厳密には不要ではあるがdelegeteで引き渡す必要があるので設定している
        let targetDirection = getCategoryScrollContentsDirection(selectedIndex: targetIndexPath.row)

        // 押下した場所のインデックス値を現在のインデックス値を格納している変数(currentSelectIndex)にセットする
        currentSelectIndex = targetIndexPath.row
        //print("スクロールが慣性で停止した時の中央インデックス値:", currentSelectIndex)

        // 変数(currentSelectIndex)を基準にして位置情報を更新する
        updateCategoryScrollTabCollectionViewPosition(withAnimated: true)

        // 算出した現在のインデックス値・動かす方向の値を元に、UIPageViewControllerで表示しているインデックスの画面へ遷移する
        self.delegate?.moveToCategoryScrollContents(
            selectedCollectionViewIndex: currentSelectIndex,
            targetDirection: targetDirection,
            withAnimated: false
        )

        // 「コツッ」とした感じの端末フィードバックを発火する
        buttonFeedbackGenerator.impactOccurred()
    }
}
タブの動きを表現するためのCategoryScrollTabViewController.swiftに関しては後述するUIPageViewControllerDelegate及びUIPageViewControllerDataSourceと連動する必要があるので全体的なコードは多くなってしまいますが、全体のコードの中でも特に内部で利用しているUICollectionViewCellのインデックス値・配置位置等に関する調整に関する実装ポイントを下記にまとめました。
(実装ポイント1)インデックス値を調整するための実装:

(実装ポイント2)配置したUICollectionViewのoffset値を調整するための実装:

(実装ポイント3)UICollectionViewCellのインデックス値の変更の前後状態を元にUIPageViewControllerの動き方を決定するための実装:

(実装ポイント4)配置したUICollectionViewのスクロールが停止した際の表示位置を調整するための実装:

★3-4: メイン部分に配置したUIPageViewControllerと連携するために必要な実装
最後に記事一覧表示をするためのUIPageViewControllerを配置しているArticleViewController.swiftに関する部分をまとめておこうと思います。基本的にはカテゴリーに紐づくデータを表示するための画面(CategoryScrollContentsViewController.swift)のインスタンスの一覧をまずはスワイプで無限スクロールできるような状態にしておき、ページが動いたタイミング(この場合はスワイプアニメーションに該当)に発動する処理func pageViewController(_ pageViewController: UIPageViewController, didFinishAnimating finished: Bool, previousViewControllers: [UIViewController], transitionCompleted completed: Bool)でにおいて完了したタイミングで、前述した無限スクロールするタブUIの位置変更を実行するupdateCategoryScrollTabPosition(isIncrement: true)を実行するような形にしています。
これらの点を元に処理をまとめたコードは下記のような形になります。
class ArticleViewController: UIViewController {

    // カテゴリーの一覧データ
    private let categoryList: [String] = ArticleMock.getArticleCategories()

    // 現在表示しているViewControllerのタグ番号
    private var currentCategoryIndex: Int = 0

    // ページングして表示させるViewControllerを保持する配列
    private var targetViewControllerLists: [UIViewController] = []

    // ContainerViewにEmbedしたUIPageViewControllerのインスタンスを保持する
    private var pageViewController: UIPageViewController?

    // MARK: - Override

    override func viewDidLoad() {
        super.viewDidLoad()

        // MEMO: InterfaceBuilderでNavigationBarの背景色を#ff6060 / Trunslucentをfalseとする
        setupNavigationBarTitle("サンプル記事一覧")
        removeBackButtonText()
        setupPageViewController()
    }

    // Segueに設定したIdentifierから接続されたViewControllerを取得する
    override func prepare(for segue: UIStoryboardSegue, sender: Any?) {

        switch segue.identifier {

        // ContainerViewで接続されたViewController側に定義したプロトコルを適用する
        case "CategoryScrollTabViewContainer":
            let vc = segue.destination as! CategoryScrollTabViewController
            vc.delegate = self

        default:
            break
        }
    }

    // MARK: - Private Function

    private func setupPageViewController() {

        // UIPageViewControllerで表示させるViewControllerの一覧を配列へ格納する
        let _ = categoryList.enumerated().map{ (index, categoryName) in
            let sb = UIStoryboard(name: "Article", bundle: nil)
            let vc = sb.instantiateViewController(withIdentifier: "CategoryScrollContents") as! CategoryScrollContentsViewController
            vc.view.tag = index
            vc.setDescription(text: categoryName)
            vc.setArticlesByCategoryId(articles: ArticleMock.getArticlesBy(categoryId: index))
            targetViewControllerLists.append(vc)
        }

        // ContainerViewにEmbedしたUIPageViewControllerを取得する
        for childVC in children {
            if let targetVC = childVC as? UIPageViewController {
                pageViewController = targetVC
            }
        }

        // UIPageViewControllerDelegate & UIPageViewControllerDataSourceの宣言
        pageViewController!.delegate = self
        pageViewController!.dataSource = self

        // 最初に表示する画面として配列の先頭のViewControllerを設定する
        pageViewController!.setViewControllers([targetViewControllerLists[0]], direction: .forward, animated: false, completion: nil)
    }

    // 配置されているタブ表示のUICollectionViewの位置を更新する
    // MEMO: ContainerViewで配置しているViewControllerの親子関係を利用する
    private func updateCategoryScrollTabPosition(isIncrement: Bool) {
        for childVC in children {
            if let targetVC = childVC as? CategoryScrollTabViewController {
                targetVC.moveToCategoryScrollTab(isIncrement: isIncrement)
            }
        }
    }
}

// MARK: - UIPageViewControllerDelegate

extension ArticleViewController: UIPageViewControllerDelegate {

    // ページが動いたタイミング(この場合はスワイプアニメーションに該当)に発動する処理を記載するメソッド
    // (実装例)http://c-geru.com/as_blind_side/2014/09/uipageviewcontroller.html
    // (実装例に関する解説)http://chaoruko-tech.hatenablog.com/entry/2014/05/15/103811
    // (公式ドキュメント)https://developer.apple.com/reference/uikit/uipageviewcontrollerdelegate
    func pageViewController(_ pageViewController: UIPageViewController, didFinishAnimating finished: Bool, previousViewControllers: [UIViewController], transitionCompleted completed: Bool) {

        // スワイプアニメーションが完了していない時には処理をさせなくする
        if !completed { return }

        // ここから先はUIPageViewControllerのスワイプアニメーション完了時に発動する
        if let targetViewControllers = pageViewController.viewControllers {
            if let targetViewController = targetViewControllers.last {

                // Case1: UIPageViewControllerで表示する画面のインデックス値が左スワイプで 0 → 最大インデックス値
                if targetViewController.view.tag - currentCategoryIndex == -categoryList.count + 1 {
                    updateCategoryScrollTabPosition(isIncrement: true)

                // Case2: UIPageViewControllerで表示する画面のインデックス値が右スワイプで 最大インデックス値 → 0
                } else if targetViewController.view.tag - currentCategoryIndex == categoryList.count - 1 {
                    updateCategoryScrollTabPosition(isIncrement: false)

                // Case3: UIPageViewControllerで表示する画面のインデックス値が +1
                } else if targetViewController.view.tag - currentCategoryIndex > 0 {
                    updateCategoryScrollTabPosition(isIncrement: true)

                // Case4: UIPageViewControllerで表示する画面のインデックス値が -1
                } else if targetViewController.view.tag - currentCategoryIndex < 0 {
                    updateCategoryScrollTabPosition(isIncrement: false)
                }

                // 受け取ったインデックス値を元にコンテンツ表示を更新する
                currentCategoryIndex = targetViewController.view.tag
            }
        }
    }
}

// MARK: - UIPageViewControllerDataSource

extension ArticleViewController: UIPageViewControllerDataSource {

    // 逆方向にページ送りした時に呼ばれるメソッド
    func pageViewController(_ pageViewController: UIPageViewController, viewControllerBefore viewController: UIViewController) -> UIViewController? {

        // インデックスを取得する
        guard let index = targetViewControllerLists.index(of: viewController) else {
            return nil
        }

        // インデックスの値に応じてコンテンツを動かす
        if index <= 0 {
            return targetViewControllerLists.last
        } else {
            return targetViewControllerLists[index - 1]
        }
    }

    // 順方向にページ送りした時に呼ばれるメソッド
    func pageViewController(_ pageViewController: UIPageViewController, viewControllerAfter viewController: UIViewController) -> UIViewController? {

        // インデックスを取得する
        guard let index = targetViewControllerLists.index(of: viewController) else {
            return nil
        }

        // インデックスの値に応じてコンテンツを動かす
        if index >= targetViewControllerLists.count - 1 {
            return targetViewControllerLists.first
        } else {
            return targetViewControllerLists[index + 1]
        }
    }
}

// MARK: - CategoryScrollTabDelegate

extension ArticleViewController: CategoryScrollTabDelegate {

    // タブ側のViewControllerで選択されたインデックス値とスクロール方向を元に表示する位置を調整する
    func moveToCategoryScrollContents(selectedCollectionViewIndex: Int, targetDirection: UIPageViewController.NavigationDirection, withAnimated: Bool) {

        // UIPageViewControllerに設定した画面の表示対象インデックス値を設定する
        // MEMO: タブ表示のUICollectionViewCellのインデックス値をカテゴリーの個数で割った剰余
        currentCategoryIndex = selectedCollectionViewIndex % categoryList.count

        // 表示対象インデックス値に該当する画面を表示する
        // MEMO: メインスレッドで実行するようにしてクラッシュを防止する対策を施している
        DispatchQueue.main.async {
            if let targetPageViewController = self.pageViewController {
                targetPageViewController.setViewControllers([self.targetViewControllerLists[self.currentCategoryIndex]], direction: targetDirection, animated: withAnimated, completion: nil)
            }
        }
    }
}
タブ型のUICollectionViewを実装しているCategoryScrollTabViewController.swiftとコンテンツを表示するためのUIPageViewControllerがあるArticleViewController.swiftにおけるお互いの関係性と処理のキーポイントとなりそうな部分についてまとめたものが下図になります。
該当箇所の全体的なポイントをまとめた概略図:

4. その他今回の実装の中で取り入れた細かなTIPSに関する解説
このような形のUI実装については昨今のアプリにおいてはよく見かける形のものかと思いますが、より細かな部分を見ていくと様々な工夫やデザインが施されているものも数多くあります。今回はスクロールが停止したことをよりユーザーが検知しやすくなるような小さな工夫を加えてみましたので、その実装部分における簡単な解説になります。
★4-1: スクロール停止時に現在位置を示す下線部分が表示文字と同じ長さになるアニメーションを加える
無限スクロールするタブ型UI部分にはUICollectionViewの他にも、現在選択されているセルの文字の長さに応じて下線部分の長さが変化するようなアニメーションを加えています。まずは下図のような形でInterfaceBuilderに下線となるUIViewを配置した後にAutoLayoutの幅の制約をOutlet接続をしておきます。

次に下記のような形のコードで引数で渡された文字列とフォントから配置するラベルの幅を取得できるようにしておきます。
final class CategoryScrollTabViewCell: UICollectionViewCell {

    ・・・(省略)・・・

    // MARK: - Class Function

    // カテゴリー表示用の下線の幅を算出する
    class func calculateCategoryUnderBarWidthBy(title: String) -> CGFloat {

        // テキストの属性を設定する
        var categoryTitleAttributes = [NSAttributedString.Key : Any]()
        categoryTitleAttributes[NSAttributedString.Key.font] = UIFont(
            name: AppConstant.CATEGORY_FONT_NAME,
            size: AppConstant.CATEGORY_FONT_SIZE
        )

        // 引数で渡された文字列とフォントから配置するラベルの幅を取得する
        let categoryTitleLabelSize = CGSize(
            width: .greatestFiniteMagnitude,
            height: AppConstant.CATEGORY_FONT_HEIGHT
        )
        let categoryTitleLabelRect = title.boundingRect(
            with: categoryTitleLabelSize,
            options: .usesLineFragmentOrigin,
            attributes: categoryTitleAttributes,
            context: nil)

        return ceil(categoryTitleLabelRect.width)
    }

    ・・・(省略)・・・
}
そして前述のラベルの幅を取得する処理とアニメーション処理を組み合わせた下記のようなメソッドを然るべきタイミングで実行するようにしています。
// selectedCatogoryUnderlineWidth: 下線表示となるUIViewに付与している幅の制約

// スクロールするタブの下にある下線の幅を文字の長さに合わせて設定する
private func setUnderlineWidthFrom(categoryTitle: String) {

    // 下線用のViewに付与したAutoLayoutの幅に関する制約値を更新する
    let targetWidth = CategoryScrollTabViewCell.calculateCategoryUnderBarWidthBy(title: categoryTitle)
    selectedCatogoryUnderlineWidth.constant = targetWidth
    UIView.animate(withDuration: 0.36, animations: {
        self.view.layoutIfNeeded()
    })
}
実行するタイミング:
- UIPageViewControllerのスワイプ移動が完了したタイミング
- 無限スクロールするタブ型UIのスクロールが停止したタイミング
- 無限スクロールするタブ型UIのセルをタップしたタイミング
※ 具体的な処理部分についてはCategoryScrollTabViewController.swiftの処理をご参考下さい。
★4-2: スクロール停止時に止まった事をユーザーに伝える「コツッ」となる端末フィードバックを加える
ユーザーによる移動処理が完了したことを視覚と合わせて、端末が微妙に震える(Haptic Feedback)の処理を触覚でも伝えるようにするために下記のようなコードを然るべきタイミングで実行するようにしています。
// ボタン押下時の軽微な振動を追加する
private let buttonFeedbackGenerator: UIImpactFeedbackGenerator = {
    let generator: UIImpactFeedbackGenerator = UIImpactFeedbackGenerator(style: .light)
    generator.prepare()
    return generator
}()

// impactOccurred()メソッドを実行することで「コツッ」とした感じの端末フィードバックを発火する
buttonFeedbackGenerator.impactOccurred()
実行するタイミング:
- UIPageViewControllerのスワイプ移動が完了したタイミング
- 無限スクロールするタブ型UIのスクロールが停止したタイミング
- 無限スクロールするタブ型UIのセルをタップしたタイミング
※ 具体的な処理部分についてはCategoryScrollTabViewController.swiftの処理をご参考下さい。
参考:
5. あとがき
今回のトピックに関しては特に目新しいものではないかもしれませんが、改めて自分でも実装してみる事で、実装を実現するために必要な技術や知識はもとよりカスタマイズする上での勘所を自分の中でも掴むことができたのは、とても良い体験になったと思います。また今回の実装については参考資料で書かれている記事における実装と異なる部分がありますが、実装方法については決して1通りとは限らないと思いますので今回の実装以外でより効率的または汎用性のある実装があるよ!という方はご教授頂けますと幸いに思いますm(_ _)m
見た目にも目を惹くようなワンポイントを含めたアニメーションやインタラクションを伴うUI実装の部分は、しばしば求められるものではないかもしれないが、実装の手段や道筋を知っておけば「アプリUIをさらにより良いものにする」ためのヒントやアイデアとして取り入れる事ができますし、同様の機能であっても差が生まれる部分にもなり得る場所だと思うので、同じトピックであっても探求は忘れないでいきたい所存です。
追記.
2019.11.13: 上タブのスクロール中にコンテンツ表示部分をスワイプした場合の対処用の処理をコードに追記しました。(Githubのコードについても同様です)