初めに
Railsでグループ機能を実装したのでその実装方法を記事にしてみました。
初学者ですので間違いもあるかと思いますが、その際はご指摘いただけると幸いです。
今回の記事でできるようになる事
グループの作成機能
グループの一覧画面作成
自分がグループオーナーの場合はEditリンクを出す
グループ編集機能
グループ詳細画面の作成
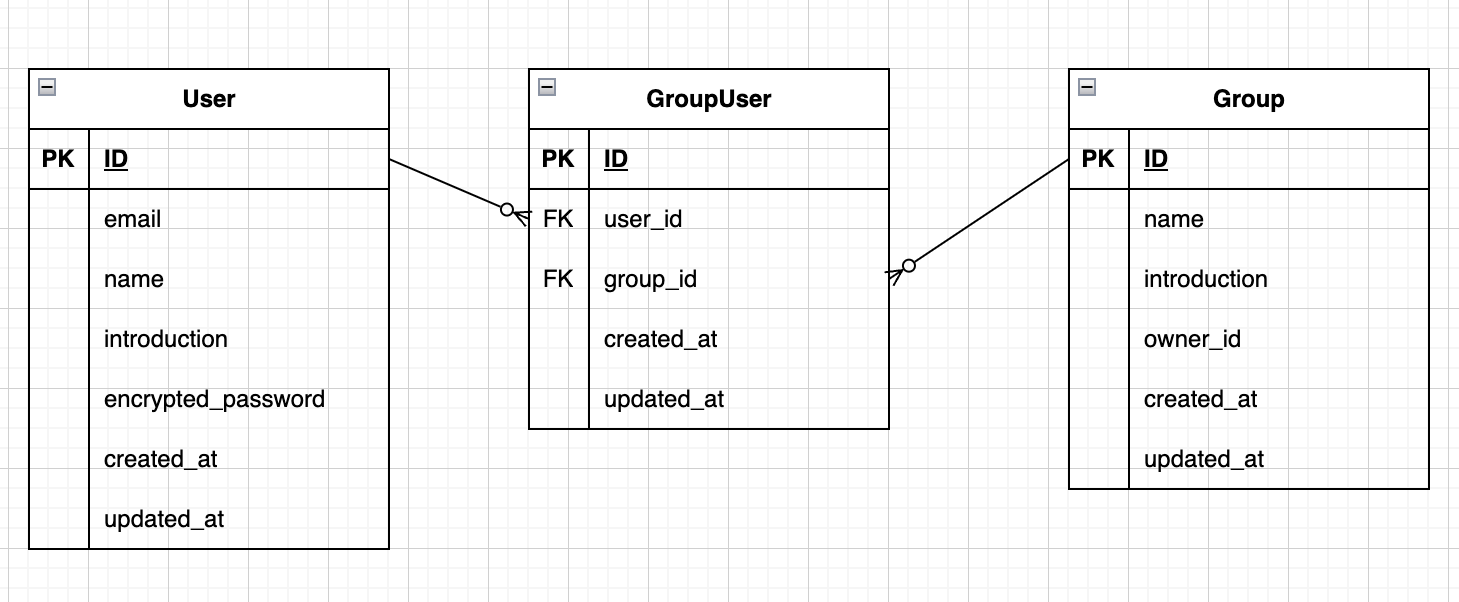
アソシエーションの考え方
ユーザー:Group= 1:N(複数)
Group:ユーザー=1:N(複数)
ユーザーとグループが多対多の関係になるので中間テーブルが必要となります。
そこで中間テーブル(GroupUser)を用意し、外部キーとしてuser_idとgroup_idを持たせます。
モデルの作成
$rails g model Group
$rails g model GroupUser
作成したマイグレーションファイルを編集します。
class CreateGroups < ActiveRecord::Migration[6.1]
  def change
    create_table :groups do |t|
      t.string :name
      t.text :introduction
      t.integer :owner_id

      t.timestamps
    end
  end
end
class CreateGroupUsers < ActiveRecord::Migration[6.1]
  def change
    create_table :group_users do |t|
      t.references :user, index: true, foreign_key: true
      t.references :group, index: true, foreign_key: true

      t.timestamps
    end
  end
end
group_userですがt.references :user, index: true, foreign_key: trueのように記述することで
自動的に外部キーとしてuserを持たせることができます。groupも同様です。
記述が済んだら下記を忘れずに行いましょう。
$rails db:migrate
モデル内にアソシエーション等を記述する
class Group < ApplicationRecord
  has_many :group_users, dependent: :destroy
  has_many :users, through: :group_users

  validates :name, presence: true
  validates :introduction, presence: true
  has_one_attached :image

  # imageを呼び出した時に中身が空だったら、assets/images/no_image.jpgを呼び出す
  def get_image
    (image.attached?) ? image : 'no_image.jpg'
  end

end
class GroupUser < ApplicationRecord
  belongs_to :user
  belongs_to :group
end
class GroupUser < ApplicationRecord
  has_many :group_users, dependent: :destroy
  has_many :groups, through: :group_users
end
ルーティングを記述
# except destroyアクション以外のルーティングを生成
  resources :groups, except: [:destroy]
今回の記事では削除機能は実装していないのでdestroyははずしております。
groupsコントローラーを作成と記述
まずはgroupsコントローラーを作成しましょう!
$rails g controller groups
次にコントローラーを編集していきます。
  before_action :authenticate_user!
  before_action :ensure_correct_user, only: [:edit, :update]

  def index
    @book = Book.new #アプリの都合上定義しておりますご自身のアプリに合わせて変更して下さい。
    @groups = Group.all
  end

  def show
    @book = Book.new #アプリの都合上定義しておりますご自身のアプリに合わせて変更して下さい。
    @group = Group.find(params[:id])
  end

  def new
    @group = Group.new
  end

  def create
    @group = Group.new
    # 誰が作ったグループかを判断する為に必要。
    @group.owner_id = current_user.id
    if @group.save
      redirect_to groups_path
    else
      render 'new'
    end
  end

  def edit
    @group = Group.find(params[:id])
  end

  def update
    if @group.update(group_params)
      redirect_to groups_path
    else
      render "edit"
    end
  end

  private

  def group_params
    params.require(:group).permit(:name, :introduction, :image)
  end

  # params[:id]を持つ@groupのowner_idカラムのデータと自分のユーザーIDが一緒かどうかを確かめる。
  # 違う場合、処理をする。グループ一覧ページへ遷移させる。before_actionで使用する。
  def ensure_correct_user
    @group = Group.find(params[:id])
    unless @group.owner_id == current_user.id
      redirect_to groups_path
    end
  end

end
解説
create時の@group.owner_id = current_user.idは
グループの作成者が誰かを判断する為に必要な処理となります。
ensure_correct_userはグループオーナーかどうかを確かめるメソッドになります。
このメソッドを毎回、edit、updateアクション時にbefore actionとして使用しているので
グループオーナーでないとグループ一覧ページに遷移する形になります。
viewページの作成
まずはグループ作成ページとグループ一覧ページのリンクを作成していきます。
今回はuserの一覧ページにリンクを作成しております。
<div>
  <%= link_to 'グループを作成する', new_group_path %>
  |
  <%= link_to 'グループ一覧', groups_path %>
</div>
次にグループ作成のformを作成します。
formは部分テンプレーにて。
<%= form_with model: group, local: true do |f| %>
  <div class="form-group">
    <%= f.label :グループ名 %>
    <%= f.text_field :name, class: 'form-control' %>
  </div>

  <div class="form-group">
    <%= f.label :紹介文 %>
    <%= f.text_area :introduction, class: 'form-control' %>
  </div>

  <div class="form-group">
    <%= f.label :グループ画像 %>
    <%= f.file_field :image, class: "form-control-file", accept: 'image/*' %>
  </div>

  <div class="form-group">
    <%= f.submit class: 'btn btn-info' %>
  </div>
<% end %>
formを呼び出すグループ作成ページを作っていきます。
<div class='container'>
  <div class='row'>
    <div class="col-sm-12 col-md-8 col-lg-5 px-5 px-sm-0 mx-auto">
      <h3>Create Group</h3>
        <%= render 'layouts/errors', obj: @group %>
        <%= render 'form', group: @group %>
    </div>
  </div>
</div>
次にグループの一覧ページを作成していきます。
まず、グループ一覧の部分テンプレートを作成します。
<table class="table table-hover table-inverse">
    <thead>
      <tr>
        <th></th>
        <th>グループ名</th>
        <th>紹介文</th>
        <th></th>
      </tr>
    </thead>
    <tbody>
      <% groups.each do |group| %>
        <tr>
          <td><%= image_tag group.get_image, size:"50x50" %></td>
          <td><%= link_to group.name, group_path(group) %></td>
          <td><%= group.introduction %></td>
          <% if group.owner_id == current_user.id %>
            <td>
              <%= link_to 'Edit', edit_group_path(group), class: "btn btn-sm btn-success" %>
            </td>
          <% end %>
        </tr>
      <% end %>
    </tbody>
  </table>
作成した一覧ページを呼び出していきます。
<div class='container px-5 px-sm-0'>
  <div class='row'>
    <div class='col-md-3'>
      <h2>User info</h2>
      <%= render 'users/info', user: current_user %>
      <h2 class="mt-3">New book</h2>
      <%= render 'books/form', book: @book %>
    </div>

    <div class='col-md-8 offset-md-1'>
      <h2>Groups</h2>
      <%= render 'index', groups: @groups %>
    </div>
  </div>
</div>
ここまできたらもう少しです。
グループ詳細ページを作成していきます。
<div class='container px-5 px-sm-0'>
  <div class='row'>
    <div class='col-md-3'>
      <h2>User info</h2>
      <%= render 'users/info', user: current_user %>

      <h2 class="mt-3">New book</h2>
      <%= render 'books/form', book: @book %>
    </div>

    <div class='col-md-8 offset-md-1'>
      <h2>Group Detail</h2>
      <table class="table table-hover table-inverse">
        <thead>
          <tr>
            <th></th>
            <th>グループ名</th>
            <th>紹介文</th>
            <th></th>
          </tr>
        </thead>
        <tbody>
            <tr>
              <td><%= image_tag @group.get_image, size:"100x100" %></td>
              <td><%= @group.name %></td>
              <td><%= @group.introduction %></td>
              <% if @group.owner_id == current_user.id %>
                <td>
                  <%= link_to 'Edit', edit_group_path(@group), class: "btn btn-sm btn-success" %>
                </td>
              <% end %>
            </tr>
        </tbody>
      </table>
    </div>
  </div>
</div>
最後に編集ページを作成します。
<div class='container'>
  <div class='row'>
    <div class="col-sm-12 col-md-8 col-lg-5 px-5 px-sm-0 mx-auto">
      <h3>Editing Group</h3>
      <%= render 'layouts/errors', obj: @group %>
        <%= render 'form', group: @group %>
    </div>
  </div>
</div>
以上で完成になります。
viewページに関しましては今回作成しているアプリの都合上、
グループ機能とは関係ない記述もございますので、
その辺りはご自身のアプリーションに合わせて変更お願い致します。
最後に
最後までご覧いただきありがとうございます。
初学者なので、間違っていることや、分かりづらい箇所もあるかと思います。
何かお気づきがあれば遠慮なくご指摘頂けると幸いです。
ここまで長くなりましたが
最後までお付き合いいただきましてありがとうございました!!