はじめに
こんにちは、Wano株式会社でエンジニアをやっているnariと申します。
こちらはterraform Advent Calendar 2019 15日目の記事として書いています。
今回は、一つの現行アカウントで全てのリソース管理していたものを、ステージング/開発環境のリソースだけ新アカウントへ移す際にやったことを、既存リソースのIaC話を中心にまとめていきたいと思います。
対象読者
- 現状本番環境とステージング/開発環境を単一アカウントで管理しており、アカウント分離を検討している方
- 既存リソースのIaC/ステートフルなリソースのアカウント移行プロセスに興味がある方
何をやったか
現行のアカウントの既存のステージング/開発環境のリソースのみTerraformでIaCし、新アカウントへ移植した。

なぜやるか
現状、弊チームのメインプロダクトは、大部分がGUIによってAWS上にインフラが構築され、管理されています。また、まだまだプロダクトとしてアーリーな時期(リリースから1年くらい)であり、信頼性や基盤に対して専門のチームを付けたり、大きなリソースを割くことができない状態です。(ビジネスモデルとして確立するまで、どんどんと新規機能をリリースする必要がある)
しかし、現在プロダクトとして海外展開するプロジェクトが進行中で、今までCDNなど以外は東京リージョンに閉じて展開していたインフラリソースを、各リージョンに複製/展開し管理する必要が出てきたため、このままのGUI管理では限界を感じインフラをコード化(IaC)して管理していく方向に転換しようとしています。
今回そのファーストステップのstage/devリソースのIaCの話を -> 本番環境リソース以外をTerraformでIaCして別アカウントに移す方法 - Qiita
「アーリーなプロダクトのチームに対して、どうIaCの文化を導入していっているか」といったカルチャー的は切り口のお話は、SRE Advent Calendar 2019の22日目に書かせていただこうと思っておりますので、この記事ではテクニカル寄りな話をしていこうかなと思います。
どうやったか
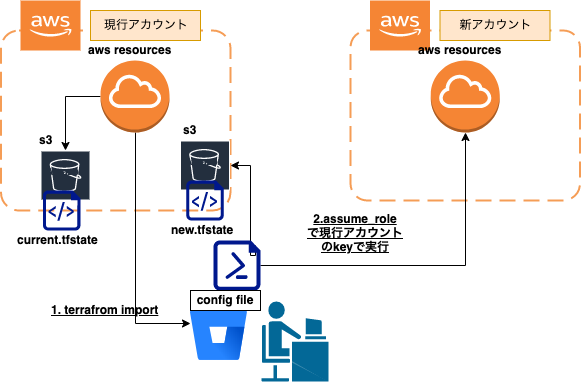
1.ステートレスなリソースは現行アカウントのステージング/開発環境のリソースをIaCして新アカウントにapply
1.1 リソースの断捨離
今回はいい機会だったので、歴史的経緯でALBの前に立ててたCloudFront(Wordpressの名残)や、今は全く使われていない各種リソース(S3、Route53周り特に)を断捨離したり命名にルールを設けて変更したりしました。
歴史的経緯によりリリースから1年くらいのサービスでもよくわからないリソースまみれになるので、そういう意味でも早めにリソース管理徹底したい!と決意を新たにしました。
1.2 コンポーネント(tfstate)を分けてリソースをimportしてIaCしていく
- 以前全てIaCでインフラの構築をさせていただいたプロジェクトでもコンポーネントは分割して構築し、その結果非常に運用においてメリットを感じているので、こちらもその方向で設計して構築(import)していっています。
- その際の分割粒度検討記事がTerraformのコンポーネント分割について検討する - Qiita
- module化に関しては、一旦行わずにまずはプレーンなtfファイルで管理していく(のちにそもそもmodule化する必要があるのか検討し、普遍的で共有化できる部分はmoduleに抜き出す)
- terraform-jpコミュニティでここは相談させていただきました。Thanks to @chaspy
1.2.1 コンポーネントの分割粒度について
- 上記の記事で検討した基準に準拠して分割しています

1.2.2 terraforming対応リソースの場合
-
terraformingを使用してリソースをimportする
- 詳しいterraformingの説明は次の記事を参照 -> Terraforming で既存のインフラを Terraform 管理下におく - Qiita
-
terraformerに関しては、serviceごとにtfstateが別れてしまい、mergeの手段がないので使用していない
- 詳しい問題点は、次の記事がよくまとまっている -> 期待のツール Terrafomer の基本動作方法と問題点 ジェダイさんのブログ
- 諸々の課題が改善されれば、上手く使っていきたいのでwatchしていきたい
-
terraformingコマンドで対応リソース一覧とコマンド一覧が出力されるのでそちら参照 - アカウント内の指定サービスの全リソースをimportしてしまうので、本番リソースの記述は削除する必要があります
Commands:
  terraforming alb             # ALB
  terraforming asg             # AutoScaling Group
  terraforming cwa             # CloudWatch Alarm
  terraforming dbpg            # Database Parameter Group
  terraforming dbsg            # Database Security Group
  terraforming dbsn            # Database Subnet Group
  terraforming ddb             # DynamoDB
  terraforming ec2             # EC2
  terraforming ecc             # ElastiCache Cluster
  terraforming ecsn            # ElastiCache Subnet Group
  terraforming efs             # EFS File System
  terraforming eip             # EIP
  terraforming elb             # ELB
  terraforming help [COMMAND]  # Describe available commands or one specific command
  terraforming iamg            # IAM Group
  terraforming iamgm           # IAM Group Membership
  terraforming iamgp           # IAM Group Policy
  terraforming iamip           # IAM Instance Profile
  terraforming iamp            # IAM Policy
  terraforming iampa           # IAM Policy Attachment
  terraforming iamr            # IAM Role
  terraforming iamrp           # IAM Role Policy
  terraforming iamu            # IAM User
  terraforming iamup           # IAM User Policy
  terraforming igw             # Internet Gateway
  terraforming kmsa            # KMS Key Alias
  terraforming kmsk            # KMS Key
  terraforming lc              # Launch Configuration
  terraforming nacl            # Network ACL
  terraforming nat             # NAT Gateway
  terraforming nif             # Network Interface
  terraforming r53r            # Route53 Record
  terraforming r53z            # Route53 Hosted Zone
  terraforming rds             # RDS
  terraforming rs              # Redshift
  terraforming rt              # Route Table
  terraforming rta             # Route Table Association
  terraforming s3              # S3
  terraforming sg              # Security Group
  terraforming sn              # Subnet
  terraforming snss            # SNS Subscription
  terraforming snst            # SNS Topic
  terraforming sqs             # SQS
  terraforming vgw             # VPN Gateway
  terraforming vpc             # VPC

Options:
  [--merge=MERGE]                                # tfstate file to merge
  [--overwrite], [--no-overwrite]                # Overwrite existing tfstate
  [--tfstate], [--no-tfstate]                    # Generate tfstate
  [--profile=PROFILE]                            # AWS credentials profile
  [--region=REGION]                              # AWS region
  [--assume=ASSUME]                              # Role ARN to assume
  [--use-bundled-cert], [--no-use-bundled-cert]  # Use the bundled CA certificate from AWS SDK
1.2.2.1 tfstateのimport
- terraforming [service_name] [--tfstate] で出力
- 以下のようにterraforming [service_name] [--tfstate][--merge="mergeしたいtfstateファイル"] でどんどんmergeしていってtfstateファイルを作っていく(現状一回のコマンドで複数serviceを指定できないっぽい。。)
-> % terraforming vpc --tfstate >> t1.tfstate
-> % terraforming sn  --tfstate --merge=t1.tfstate >> t2.tfstate
-> % terraforming rt  --tfstate --merge=t2.tfstate >> t3.tfstate
-> % terraforming rta  --tfstate --merge=t3.tfstate >> t4.tfstate
-> % terraforming igw --tfstate --merge=t4.tfstate >> terraform.tfstate
- 本番リソース部分をtfstateファイルから削除し、最終tfstateをremoteにpush
terraform state push terraform.tfstate
1.2.2.2 Configure file(tfファイル)のimport
-
terraforming [service_name]>> main.tfで集約する - 本番リソースの記述は削除する
- ハードコード部分は適宜リソース参照や、remote stateで参照させてください
1.2.2.3 tfstateもconfigファイルもimport終わったら
-
terraform planをうって差分が出ないように調整
1.2.3 terraforming未対応リソースかつterraform importコマンド対応リソースの場合
-
terraform importコマンドを使用して、リソースをimportする -
terraform importはtfstateのみimport可能 - config file(tf file)は、自前で書く必要がある
1.2.3.1 tfstateのimport
- terrafrom import [resource_type].[resource_name] [resource_id]
-> % terraform import aws_security_group.xxxxxxxxxxx sg-xxxxxxxxxxx
aws_security_group.xxxxxxxxxxxx: Importing from ID "sg-xxxxxxxxxx"...
aws_security_group.xxxxxxxxxxxx: Import prepared!
  Prepared aws_security_group for import
  Prepared aws_security_group_rule for import
  Prepared aws_security_group_rule for import
aws_security_group.xxxxxxxxxxxxx: Refreshing state... [id=sg-xxxxxxxx]
aws_security_group_rule.xxxxxxxxxxxxxx: Refreshing state... [id=sgrule-xxxxxxxxxxxx]
aws_security_group_rule.xxxxxxxxxxxxxx: Refreshing state... [id=sgrule-xxxxxxxxxxx]

Import successful!

The resources that were imported are shown above. These resources are now in
your Terraform state and will henceforth be managed by Terraform.
1.2.3.2 以下のようにconfigure file側で枠を作る(公式documentのsampleコピペが良い)
resource "aws_iam_role" "test_hoge_xxxxx" {
  # (resource arguments)
}
1.2.3.3 terraform planで変更が出なくなるまでconfigure file(tfファイル)をいじる
- コンソールに出力される差分をコピペして、hcl形式に変更させればOK
1.2.4 terraform importコマンド未対応リソースの場合
- importコマンドが対応してないリソースに関しては少し煩雑な以下のプロセスを実行する必要があります
- dummyのリソースを作成し、そちらを参考に自前でtfstateとconfig file(tfファイル)を作成します
1.2.4.1 該当リソースのTerraformのドキュメントのサンプルをコピーして、dummyのリソースを作成
resource "aws_volume_attachment" "dummy" {
  device_name = "/dev/sdh"
  volume_id   = aws_ebs_volume.dummy.id
  instance_id = aws_instance.dummy.id
}

resource "aws_ebs_volume" "dummy" {
  availability_zone = "ap-northeast-1c"
  size              = 20
  tags = {
    Name    = "dummy"
    Service = "dummy"
  }
}
1.2.4.2 dummyリソース部分のtfstateをコピーして、ターゲットとなるリソースのtfstateの枠を作る
-
terraform state pullして、tfstateの以下のdummy部分をコピペして追加および修正し、ターゲットリソースの枠を作る
       {
      "mode": "managed",
      "type": "aws_volume_attachment",
      "name": "dummy",
      "provider": "provider.aws",
      "instances": [
        {
          "schema_version": 0,
          "attributes": {
            "device_name": "/dev/sdh",
            "force_detach": null,
            "id": "vai-xxxxxxxxxx",
            "instance_id": "i-xxxxxxxxxxxxxxxxxx",
            "skip_destroy": null,
            "volume_id": "vol-xxxxxxxxxxxxxxxx"
          },
          "private": "bnVsbA==",
          "depends_on": [
            "aws_ebs_volume.dummy",
            "aws_instance.xxxxxxxxxxxxxxx"
          ]
        }
      ]
    }
- serialをインクリメントして、
terraform state push terraform.tfstate
1.2.4.3 terraform refresh してtfstateを既存リソースの状態に合わせる
1.2.4.4 tfstateに合わせた形で、ターゲットリソースのconfig fileを作成する
1.2.4.5 dummyリソースを削除して、terraform plan で差分がなくなるまで修正する
1.3 新アカウントにapply(assume_roleの活用)
- 環境ごとにアカウントを分けたりする場合、それぞれを別のaws credentials keyで操作するのはとても煩わしくなりがちです(CDプロセスをbuild serverに委譲している場合はより一層)
- ですので、現行アカウントのkeyのみで、新アカウントのリソースを操作させるためにassume_roleを活用しています(以下のように、provider blockで設定できて非常に便利)
- 新アカウントで、現行アカウントをidentiferとして指定してroleを作成して、role_arnに設定
provider "aws" {
  version = "xxxxxx"
  region  = "YOUR_REGION"

  assume_role {
    //この指定によって、現行アカウントのkeyで新アカウントのリソースを操作できる
    role_arn = "arn:aws:iam::${YOUR_NEW_ACCOUNT_ID}:role/${YOUR_ASSUME_ROLE_NAME}"
  }
}
2.ステートフルなものはスナップショットの共有/syncコマンドなどで別途対応
RDS、Elasticacheはコスト削減のためstage環境では使用していなかったので説明は省略していますが、以下の記事が参考になりそうです
2.1 EC2周り(AMI,ebs)の移行
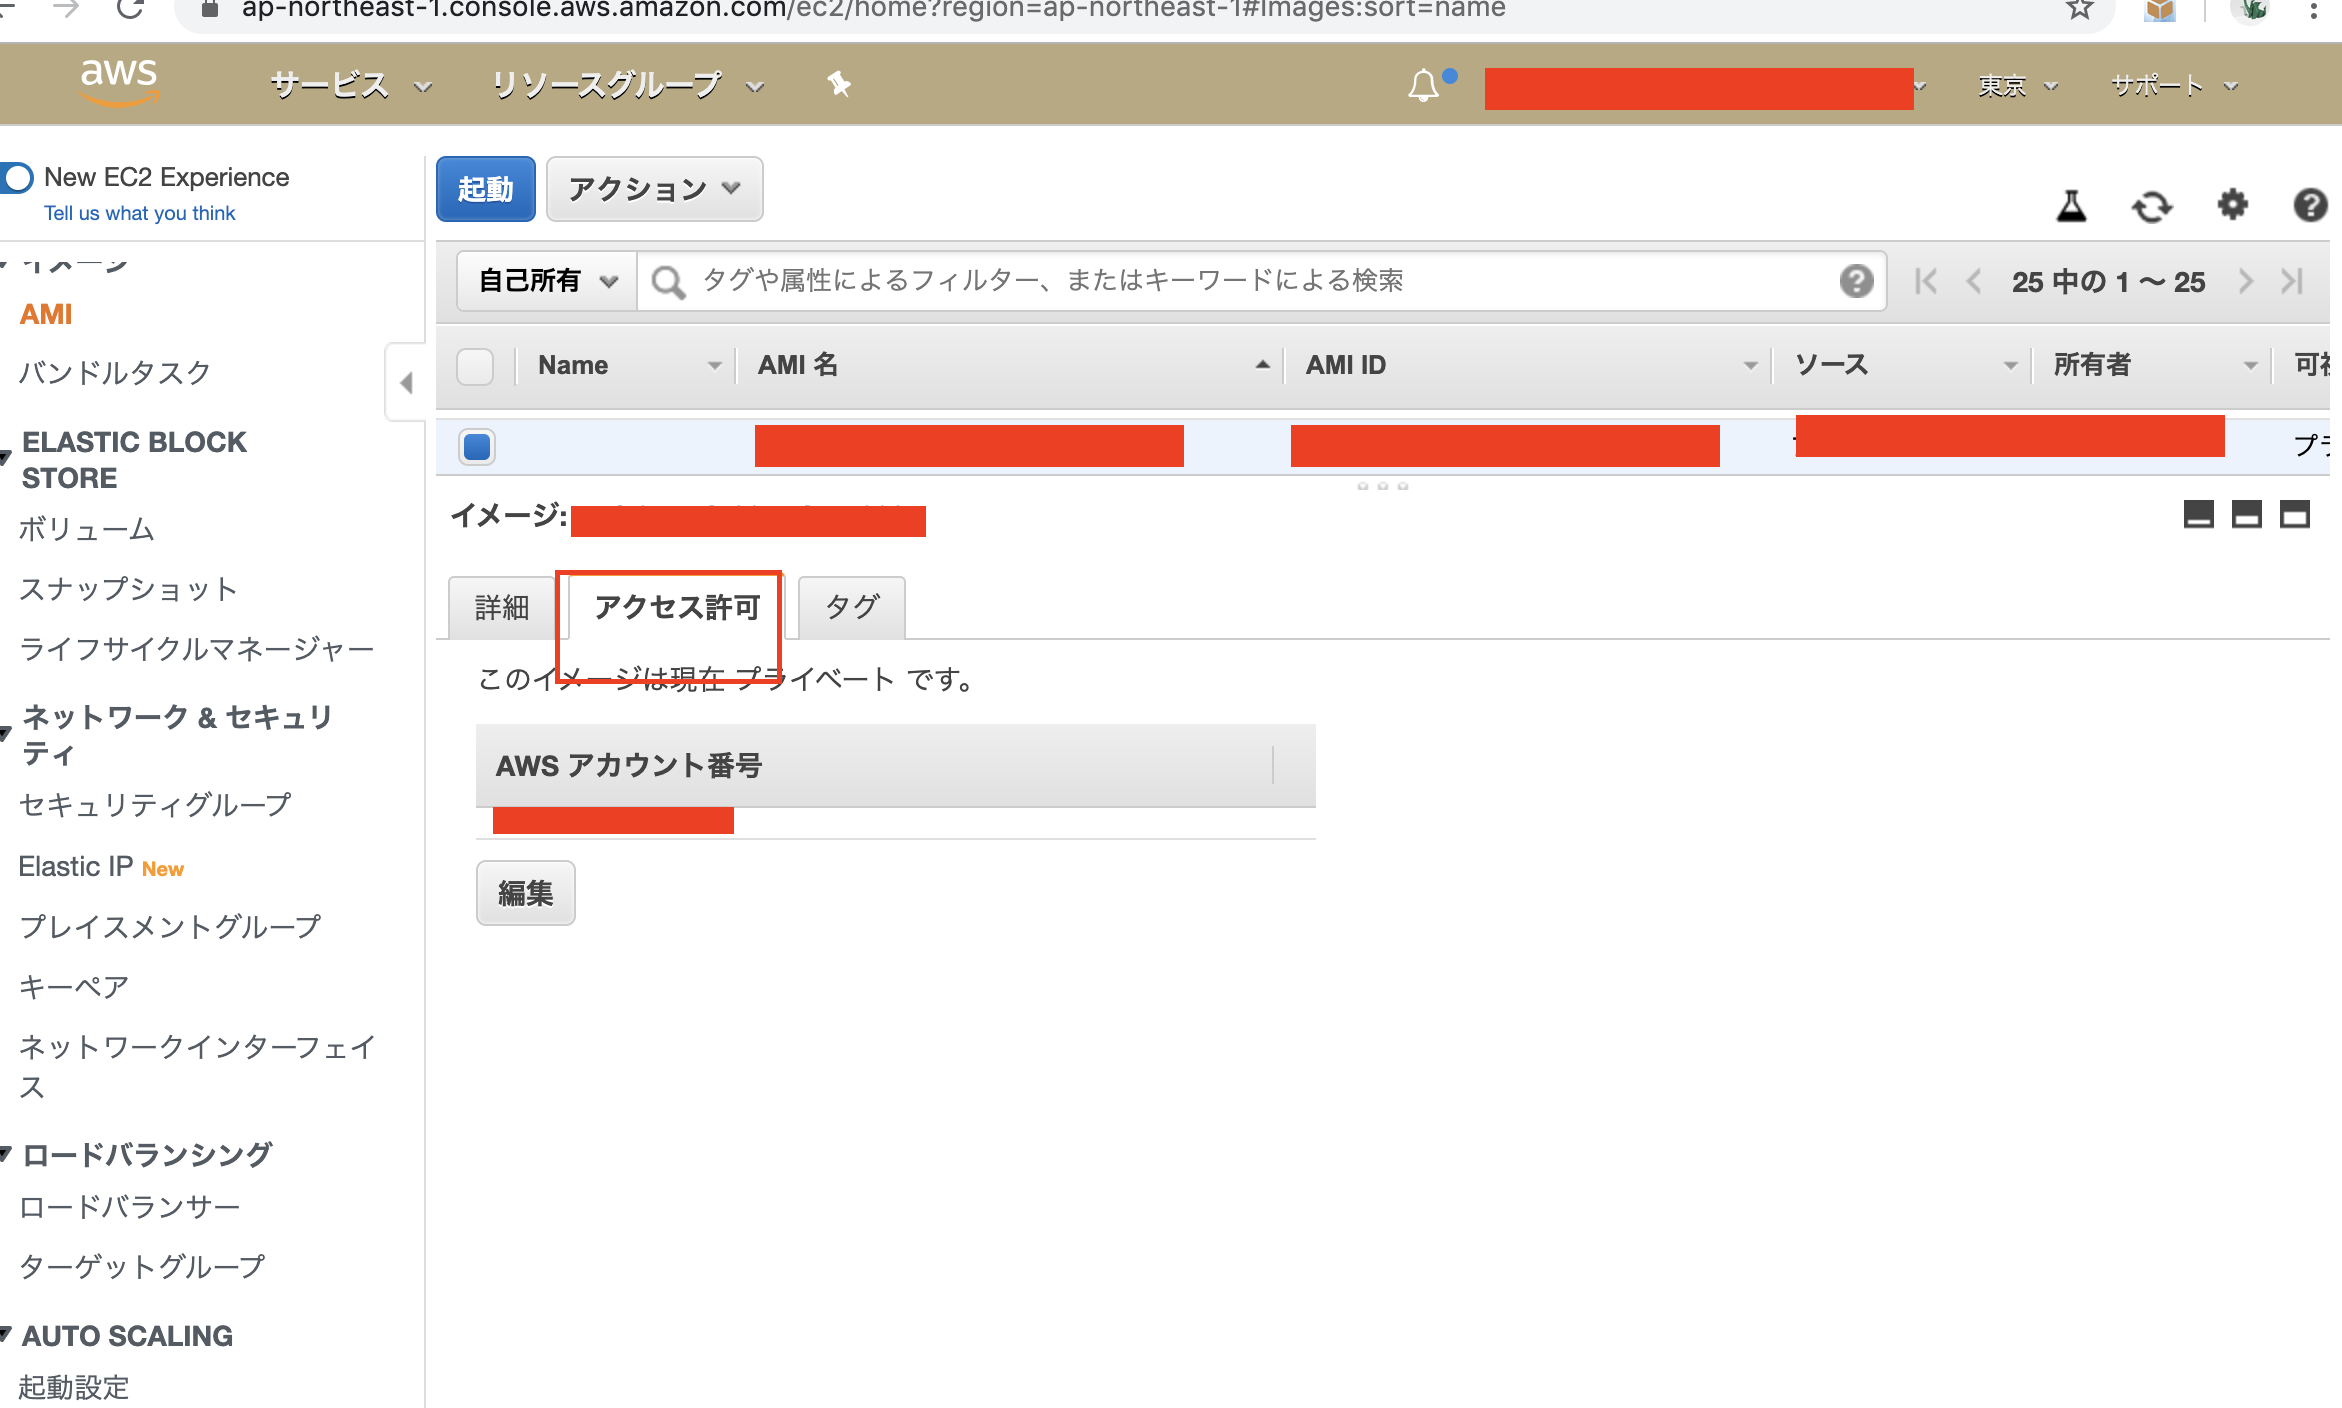
- 現行のアカウントの対象ec2 instanceのAMI/ebs snapshotを取得し、新アカウントにアクセス許可を与え、data sourceで参照させて新アカウントの方にapplyします
- terraformのamiリソースで、access permissionの設定のparameterが見つからずこちらは一時的に手動対応しています(ami自体も新アカウントの方でとりなおすため、ここは手動対応でも問題ない)
-
特定の AWS アカウントと AMI を共有する - Amazon Elastic Compute Cloudを参考に

/* ami */
data "aws_ami" "vk-stage-pertrigo-01-ami" {
  owners = ["YOUR_NEW_ACCOUNT_ID"]

  filter {
    name   = "name"
    values = ["YOUR_AMI_NAME"]
  }
}

/* ebs snapshot */
data "aws_ebs_snapshot" "vk-stage-pertrigo-01-ebs-volume-snapshot" {
  owners = ["YOUR_NEW_ACCOUNT_ID"]

  filter {
    name   = "tag:Name"
    values = ["YOUR_EBS_SNAPSHOT_NAME"]
  }
}
2.2 S3 bucketの移行
S3のbucket_nameは、グローバルに一意に設定されているため、bucket_nameを変えずに新アカウントに移動させるには少し複雑な以下プロセスを行う必要があります。
2.2.1.まず現行アカウント側に新アカウントからの操作許可するバケットポリシーを対象bucketにそれぞれ付加する
data "aws_iam_policy_document" "hoge" {
  statement {
    actions = ["s3:*"]

    resources = [
      aws_s3_bucket.stage_xxx_xxx.arn,
      "${aws_s3_bucket.stage_xxx_xxx.arn}/*",
    ]

    principals {
      type        = "AWS"
      identifiers = ["YOUR_NEW_ACCOUNT_ID"]
    }
  }
}

resource "aws_s3_bucket_policy" "hoge" {
  bucket = aws_s3_bucket.stage_xxx_xxx.id
  policy = data.aws_iam_policy_document.hoge.json
}
2.2.2. 新しいアカウントに空のバケットを移行用にように作る (bucket_nameのprefixにcopy-をつけて、global uniqueに)
resource "aws_s3_bucket" "stage_xxx_xxx" {
  bucket = "copy-stage-xxx-xxx"
  acl    = "private"
  versioning {
    enabled    = false
    mfa_delete = false
  }
}
2.2.3. aws s3 syncコマンドで現行アカウントから新アカウントへ移す
aws s3 sync s3://stage-xxx-xxx s3://copy-stage-xxx-xxx
2.2.4. 現行アカウント側のバケットを削除(元のbucket_nameを開ける)
2.2.5. 新アカウントに現行アカウントと同じ名前で空のbucketを用意して、copy-xxxからそれぞれsyncする(元の名前に戻す)
resource "aws_s3_bucket" "stage_xxx_xxx" {
  bucket = "stage-xxx-xxx"
  acl    = "private"
  versioning {
    enabled    = false
    mfa_delete = false
  }
}
aws s3 sync s3://copy-stage-xxx-xxx s3://stage-xxx-xxx
これからの展望
ここで移行しているリソースは全てではないので、残りのリソースの移行(動画のpreencodeサービス、AWS LightSailで行なっているdeliveryサービス、metrics alert etc)を早急にやっていき、その後本番環境のリソースもコード化していきます。
ここまでは、私一人でやってきたので、本番環境リソースのIaCに関しては他のdeveloperも巻き込みながら経験をシェアしていければと思っています。(勉強会や、諸々のtipsの共有は適宜行なっていますが、やはりタスクとして自分の手を動かすのが一番身に付く)