はじめに
Visual Studio Code(VSCode)+textlintで文章校正をするための導入手順です。
環境
- Windows11 64bit
- Visual Studio Code version 1.63
- Node.js v16.13.2
- npm 8.1.2
- textlint v12.1.0
textlintとは
文章を書く時に表記揺れや誤字脱字、読みにくい表現などを校正してくれるツールです。
公式サイト
textlint · The pluggable linting tool for text and markdown
Qiitaの記事の下書きを、VSCodeを使ってMarkdownで書くことが多いのですが、textlintを使用すれば自動で文章校正ができます。

導入手順
導入手順について説明していきます。
以下の記事も参考にしてみてください。
作者のazuさんによる導入方法についての記事です。
textlintで日本語の文章をチェックする - Web Scratch
ドットインストールでも導入方法について動画で紹介されています。
textlint入門 (全11回) - プログラミングならドットインストール
Node.jsのインストール
textlintを導入するためにはNode.jsが必要となります。
既にインストールされている人は次に進んでください。
-
Node.js公式サイトからNode.js(推奨版)をダウンロードする

-
ダウンロードしたファイルを実行し、画面の指示に従って進んでいき、Node.jsをインストールする
-
PowerShellを立ち上げて、以下のコマンドを実行し、Node.jsがインストールされたことを確認する
node -v -
Node.jpと一緒にnpm(Node Package Manager)もインストールされているはずなので確認する
npm -v
textlintのインストール
VSCode上でtextlintの環境を作っていきます。
-
VSCodeを開き、任意のフォルダ、もしくはWorkspeaceを開く
今回は「D:\Workbooks」というフォルダを作成し、VSCodeで開きました。
VSCodeからは必ずフォルダかWorkspeaceを開いてください。ファイルそのものを開いてしまうとtextlintが正しく作業しません。 -
VSCodeでターミナルを開き、「D:\Workbooks」へ移動する
Workspeaceで開いた場合は、「Workbooks.code-workspace」ファイルがあるディレクトリへ移動してください。
-
ターミナルで以下のコマンドを実行し、プロジェクト管理用ファイルを作成する(「package.json」が作成される)
npm init -y -
textlintをインストールする(「node_modules」と「package-lock.json」が作成される)
npm install --save-dev textlint -
textlintのバージョンを表示し、インストールできたことを確認する
./node_modules/.bin/textlint -v -
Textlintの校正ルールをインストールする
npm install --save-dev textlint-rule-preset-ja-technical-writing
npm install --save-dev textlint-rule-preset-jtf-style
ルールはいろいろあるのですが、自分はこの2つのルールを使用しています。
-
textlint-rule-preset-ja-technical-writing
技術文書を書くためのルールのプリセット(「1文の長さは100文字以下とする」や「ら抜き言葉」など) -
textlint-rule-preset-JTF-style
JTF日本語標準スタイルガイド(翻訳用)に準拠しているプリセット
-
textlint-rule-preset-ja-technical-writing
-
ルールを有効にする設定ファイルを作成する(「.textlintrc」が作成される)
npx textlint --init.textlintrcの中身は以下のようになっており、これを編集することで適用したいルールを変更できます。
{
"filters": {},
"rules": {
	"preset-ja-technical-writing": true,
	"preset-jtf-style": true
}
}
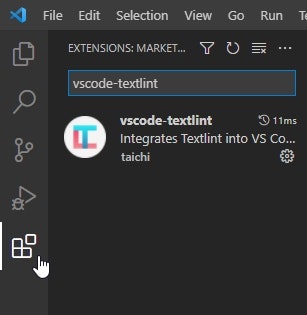
拡張機能「vscode-textlint」のインストール
textlintをVSCode上で動かすための拡張機能をインストールします。
-
VSCodeを再起動する
-
もしtextlintがうまく起動しない場合は、以下の設定をする
これで、VSCode上でtextlintを使用して文章が自動校正されるようになりました。

参考にしたサイト
- textlintで日本語の文章をチェックする - Web Scratch(最終アクセス2022年1月25日)
- textlint入門 (全11回) - プログラミングならドットインストール(最終アクセス2022年1月25日)
- textlint と VS Code で始める文章校正 - Qiita(最終アクセス2022年1月25日)


