やりたいこと
Science DirectのあるJournalに掲載されているすべての論文の書誌情報+アブストラクトを収集したい。
まずはスクレイピングの基礎を学ぶ
(参考:https://codezine.jp/article/detail/12230)
requestsパッケージとBeautifulSoup4パッケージを使ってやるのが基本らしい。
ということで、まずはこいつらをインストール
pip install requests, beautifulsoup4
んで、こんなことをしてみた。
import request
from bs4 import BeautifulSoup

# スクレイピング対象の URL にリクエストを送り HTML を取得する
res = requests.get('https://www.ymori.com/books/python2nen/test1.html')

# レスポンスの HTML から BeautifulSoup オブジェクトを作る
soup = BeautifulSoup(res.text, 'html.parser')
print(soup)
とりあえず、htmlをテキストで取得はできたわけだが、例えばチェックボックスをOnにしたり、ボタンをクリックしたりとかってどうやってやるんだ??
SeleniumとChromedriver
調べていくと、Javascriptを駆使して動的に色々と表示内容を変えるようなページはBeautifulSoupではできないらしい。
どうしようと調べていくとSeleniumというパッケージにたどり着いた。
(参考:https://qiita.com/Fujimon_fn/items/16adbd86fad609d993e8)
どうやら、RPAのようなことをやれるらしい。つまり、Webブラウザを人に見えるような形で順に操作していく。
ただ、これだけだとダメで使っているブラウザに合わせたドライバが必要。
(参考:https://kurozumi.github.io/selenium-python/installation.html#drivers)
インストール
Seleniumとchromedriverをインストールする。
インストールするにあたり、ChromeDriverのページで、自分のChromeとバージョンが一致するドライバのバージョンを確認しておく(確認したら84.0.4147.30だった)。
(参考:https://qiita.com/hanzawak/items/2ab4d2a333d6be6ac760)
pip install selenium, chromedriver-binary==84.0.4147.30
これでインストールすると、パスの設定が要らなくなる(ただし、import chromedriverを入れる必要がある)
ただ、別にChromeDriverから直接、ダウンロードしてきたExeファイルを、例えばc:\workとかにおいて、明示的にパスを渡すというのでもできる。こちらの場合、パッケージのインポートは不要。
とりあえず起動させてみる
以下はimport chromedriverではなく、明示的にパス渡しした例。
import requests
from selenium import webdriver  #  import chromedriver_binary

load_url = "https://www.sciencedirect.com/journal/reliability-engineering-and-system-safety/vol/204/suppl/C"
driver = webdriver.Chrome(executable_path='c:/work/chromedriver.exe')  #  driver = webdriver.Chrome()
driver.get(load_url)
すると、ブラウザが勝手に立ち上がって、指定したアドレスのページにとんだ。
完全にRPAやな。
ページの操作
やりたいのは、Jounralのページにアクセスしたら、
- まずは左上にある「Select All」をクリックして、表示されているPaperのチェックボックスをすべてOnにする
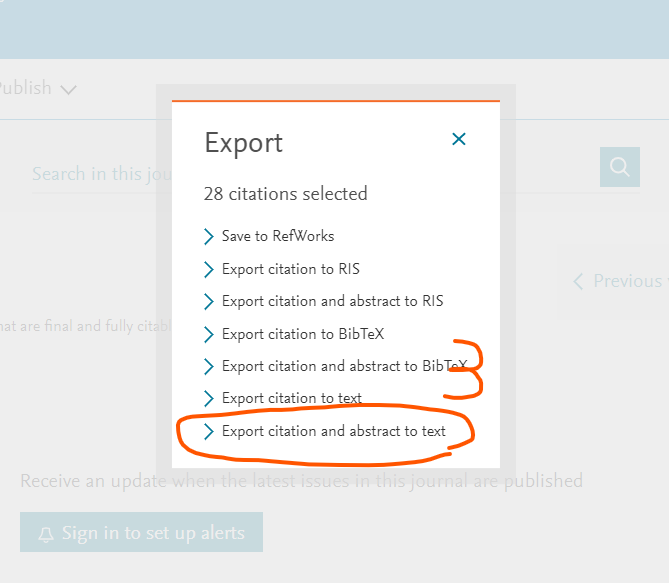
- Export Citations をクリックして文献情報をDLするためのダイアログを表示させる
- 文献情報をDLするためのダイアログで「Export citation and abstract to text」をクリック。→するとテキストファイルだDLされる。
- テキストファイルのDLが済んだら、ページの上のほうにある「Previous Vol/Issue」をクリックして、一つまえの巻号のページに進む。
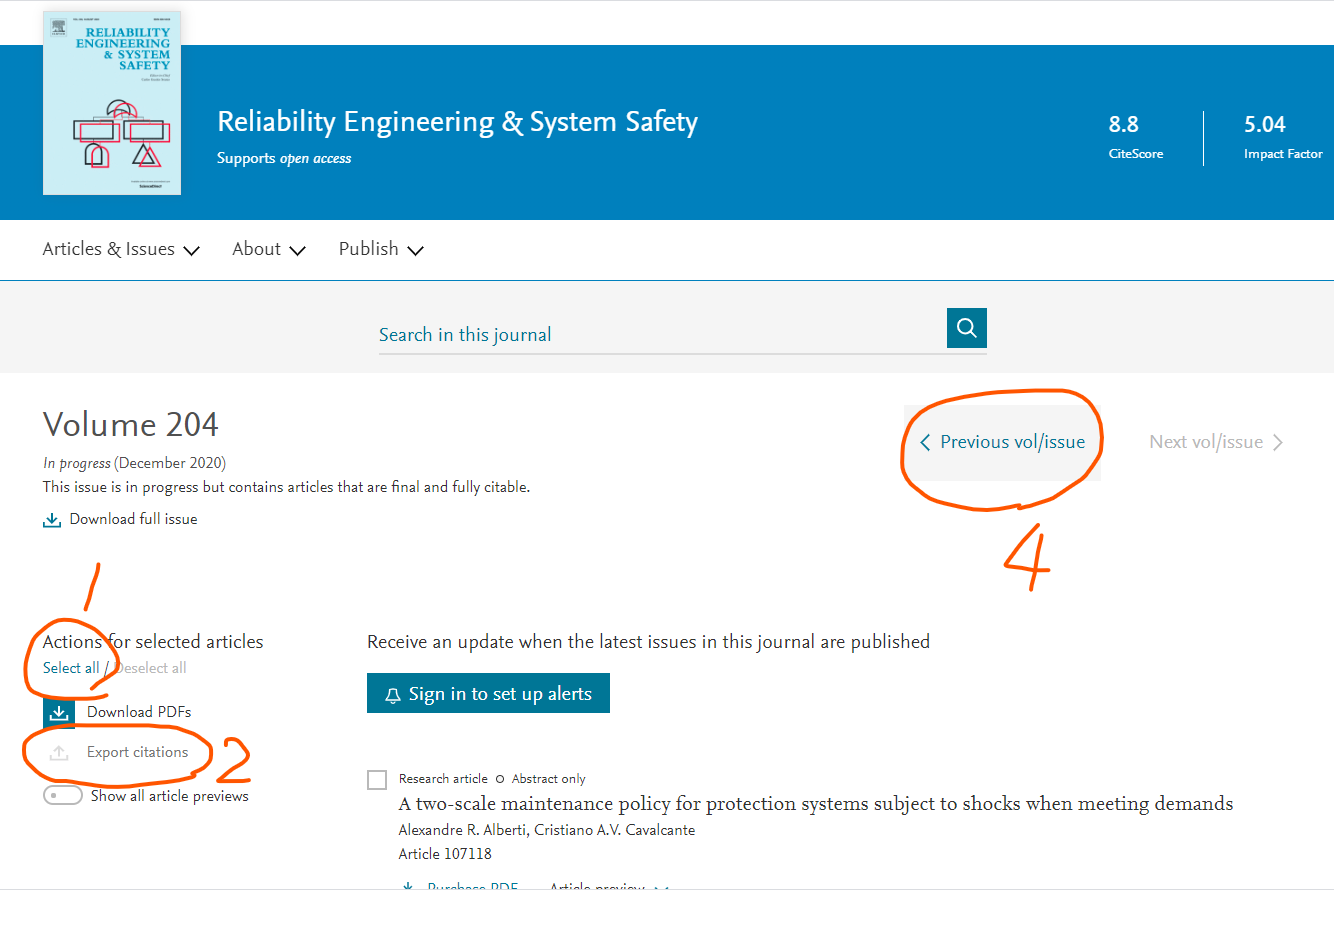
っていう処理。これをループ処理すればすべての文献の情報がGetできる。
ってことで、「Select All」と「Export Citations」と「Export citation and abstract to text」をクリックする方法を調べる。
基本的は、driverが読み込んだページから、操作したい対象をIDやらclass名やらName属性やら見つけ出して、.click()を送ればよい。
ってことで、まずは「Select_All」を探してみる。
クロームで当該ページにいきF12キーでDeveloper画面を出す。
んで、Ctrl+Fで検索ボックスを出して「Select All」と入力して検索。すると、Select Allが記載されているところが見つかる。
実はbuttonタグで作られてたんやね。まあ、そりゃそうか。ただ、ぱっと見はボタンには見えないので、ちょっと意外だった。
とりあえず、このbuttonタグの個所で右クリック⇒Copy⇒ Copy selectorを選択して、CSS Selectorを取得しておく。
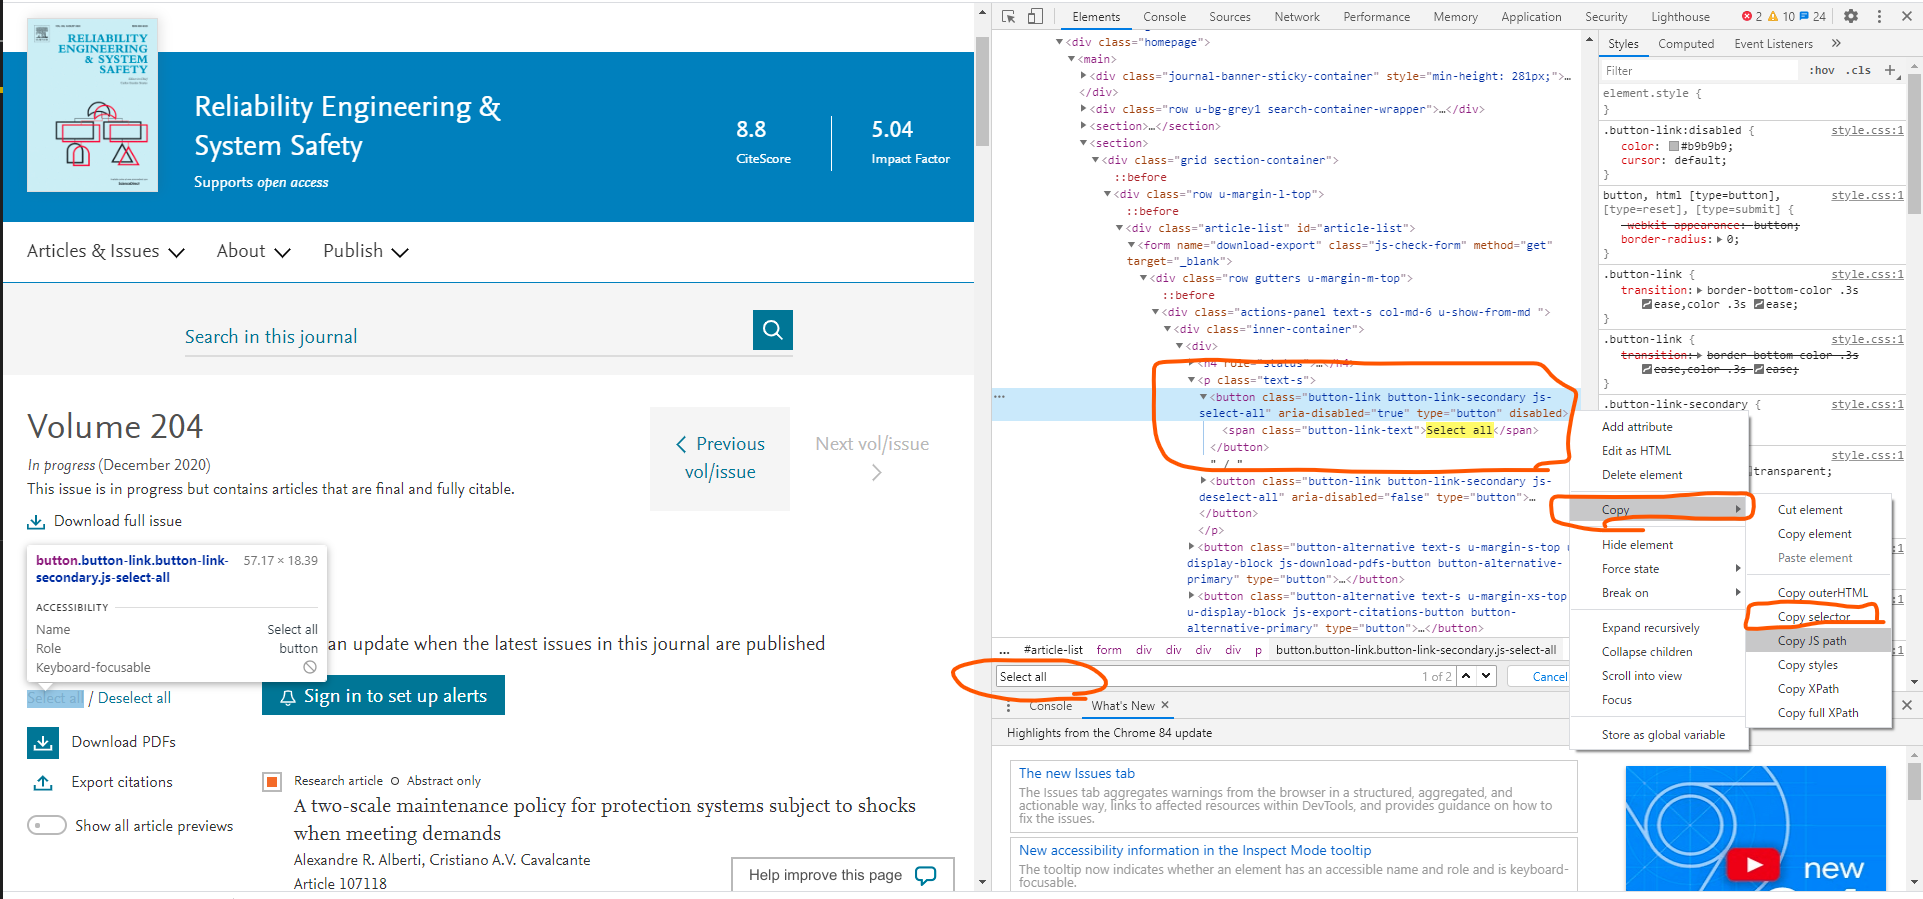
で、ソースコードの方に戻って、
先ほどのcss selectorをペースト。ただ、必要なのは、後ろほうの「button.」以下のみ。ってことで
button = driver.find_element_by_css_selector("button.button-link.button-link-secondary.js-select-all")
button.click()
要素のアクセス可能になるまでの待機処理
なんだけど、いきなりOpenBrowser.pyに上記を書き加えて実行しても失敗する。というのは、ChromeにURLを渡したら、すぐにアクセス可能になるのではなく、実際にURLからHTMLを取ってきて、それをブラウザが解析して、要素にアクセスできるようになるまでの間にタイムラグがあるから。
なので、しばらく待たないといけない。
このページではtimeパッケージからtime.sleep()を取ってきて使ってる。ただ、この方法はこのマニュアルにも書いてある通り、スマートではない。ってことでWebDriverに付属しているWait機能を使う。ってことで以下のようなソース。
(参考:https://qiita.com/uguisuheiankyo/items/cec03891a86dfda12c9a)
(参考:https://www.selenium.dev/selenium/docs/api/py/webdriver_support/selenium.webdriver.support.expected_conditions.html)
なお、マニュアルでは、IDで要素を指定する方法しかのってなかったのだが、css selectorの場合はCSS_SELECTORというのを使う。(参考:https://selenium-python.readthedocs.io/locating-elements.html)
・・・と実際に使って試したんだけど、Waitではうまくいかなかった。どうしてもタイミングのずれが生じてしまうみたいで、エラーになる。
なので、結局time.sleep()も含めることにした。
import requests
from selenium import webdriver  #  import chromedriver_binary
from selenium.webdriver.common.by import By
from selenium.webdriver.support.ui import WebDriverWait
from selenium.webdriver.support import expected_conditions as EC

load_url = "https://www.sciencedirect.com/journal/reliability-engineering-and-system-safety/vol/204/suppl/C"
driver = webdriver.Chrome(executable_path='c:/work/chromedriver.exe')  #  driver = webdriver.Chrome()
driver.get(load_url)
    #WebDriverWait(driver, 10).until(EC.visibility_of_all_elements_located)
time.sleep(5)
    #WebDriverWait(driver, 20).until(
    #    EC.element_to_be_clickable((By.CSS_SELECTOR, "button.button-link.button-link-secondary.js-select-all"))
    #)
button = driver.find_element_by_css_selector("button.button-link.button-link-secondary.js-select-all")
button.click()
他の要素についても同様に・・・
ということで、他の「Export Citations」やら「Export citation and abstract to text」につてもCSS Selectorを取得して、クリックする処理を書き加えていく。
一方、「Previous Vol/Issue」はボタンではなくリンクだった。リンクについても同じようにcss selectorで指定できたりするが、リンクのテキストでも要素にアクセスできる。ってことでテキストでアクセスしてみた。
import time
import requests
# from bs4 import BeautifulSoup
# import chromedriver_binary

from selenium import webdriver
from selenium.webdriver.common.by import By
from selenium.webdriver.support.ui import WebDriverWait
from selenium.webdriver.support import expected_conditions as EC

load_url = "https://www.sciencedirect.com/journal/reliability-engineering-and-system-safety/vol/204/suppl/C"
Last_url = "https://www.sciencedirect.com/journal/reliability-engineering-and-system-safety/vol/20/issue/1"

driver = webdriver.Chrome(executable_path='c:/work/chromedriver.exe')
driver.get(load_url)

while 1:
    time.sleep(5)

    button = driver.find_element_by_css_selector("button.button-link.button-link-secondary.js-select-all")
    button.click()

    time.sleep(2)

    button2 = driver.find_element_by_css_selector("button.button-alternative.text-s.u-margin-xs-top.u-display-block.js-export-citations-button.button-alternative-primary")
    button2.click()

    time.sleep(2)

    button3 = driver.find_element_by_css_selector("button.button-link.button-link-primary.u-margin-xs-bottom.text-s.u-display-block.js-citation-type-textabs")
    button3.click()

    time.sleep(3)

    #現在のURLを取得する
    Purl = driver.current_url
    #PurlとCurlが同じならBreak
    if Purl== Last_url:
        break

    link = driver.find_element_by_link_text('Previous vol/issue')
    link.click()