概要
MyBatisのバージョンが3.4以上であれば、ハンドラクラスを作成せずともInputStreamを渡すだけでファイルをbyte[]に変換してデータベースに登録することができます。
アップロードされたファイルを、MyBatisを利用してデータベースにファイルを保存したいと考えたとき、MybatisのバージョンによってはTypeHandlerが必要になります。
今回はTypeHandlerを利用した方法を、覚え書きとして今回記事を書くことにしました。
この記事のゴール
Spring Initializrを利用して新規作成したプロジェクトに、TypeHandlerを利用したファイルのアップロード機能を実装する。
依存関係
Spring Initializrで依存関係に追加したものは、以下の通りです。

依存関係の一部
<dependencies>
	<dependency>
		<groupId>org.springframework.boot</groupId>
		<artifactId>spring-boot-starter-thymeleaf</artifactId>
	</dependency>
	<dependency>
		<groupId>org.springframework.boot</groupId>
		<artifactId>spring-boot-starter-web</artifactId>
	</dependency>
	<dependency>
		<groupId>org.mybatis.spring.boot</groupId>
		<artifactId>mybatis-spring-boot-starter</artifactId>
		<version>2.1.4</version>
	</dependency>
		<dependency>
		<groupId>org.postgresql</groupId>
		<artifactId>postgresql</artifactId>
		<scope>runtime</scope>
	</dependency>
	<dependency>
		<groupId>org.springframework.boot</groupId>
		<artifactId>spring-boot-starter-test</artifactId>
		<scope>test</scope>
	</dependency>
</dependencies>

<build>
	<plugins>
		<plugin>
			<groupId>org.springframework.boot</groupId>
			<artifactId>spring-boot-maven-plugin</artifactId>
		</plugin>
	</plugins>
</build>
今回作成をするものについて
作成するアプリは、以下の機能を実装していきます。
- HTMLのフォームで送信されたファイルをJavaで受け取り、そのファイルをMyBatisを利用してPostgreSQLに登録をする
- 同HTMLに登録されているファイルを一覧として表示をする
- ファイル名のリンクを押下することで、登録されているファイルをダウンロードすることができる
ファイル階層
FileManagement
├ src/main/java
│ └ com.example.demo
│ ├ controller
│ │ └ FileManagementController.java
│ ├ handler
│ │ ├ AttachmentFileHandler.java
│ │ └ InputStreamTypeHandler.java
│ ├ model
│ │ ├ AttachmentFile.java
│ │ └ FileManagement.java
│ ├ repository
│ │ └ FileManagementRepository.java
│ ├ service
│ │ ├ FileManagementService.java
│ │ └ FileManagementServiceImpl.java
│ └ FileManagementApplication.java
└ src/main/resources
├ com.example.demo.repository
│ └ FileManagementRepository.xml
├ templates
│ └ index.html
└ application.yml
データ登録の実装
まず、HTMLのフォームで送信されたファイルをJavaで受け取り、そのファイルをMyBatisを利用してPostgreSQLに登録をする機能を実装していきます。
Viewの実装
テンプレートはThymeleafを利用しています。
ファイルをアップロードするためのフォームと、登録されたファイルの一覧をリンクで表示するだけのシンプルなものになっています。
<!DOCTYPE html>
<html lang="ja" xmlns:th="http://www.thymeleaf.org">
<head>
	<meta charset="utf-8" />
	<title>ファイル管理画面</title>
</head>
<body>
	<h1>ファイル管理画面</h1>
		<h2>新規ファイル登録フォーム</h2>
		<form action="/" enctype="multipart/form-data" method="POST">
			<p>
				<input type="file" name="file" />
				<input type="submit" value="登録" />
			</p>
		</form>
		<h2>ファイル一覧</h2>
		<th:block th:if="${#lists.isEmpty(files)}">
			<p>登録されているファイルはありません</p>
		</th:block>
		<th:block  th:if="!${#lists.isEmpty(files)}">
			<tr th:each="file : ${files}">
				<td>
					<a th:text="${file.fileName}" th:href="@{'/' + ${file.id}}"></a>
				</td>
			</tr>
		</th:block>
</body>
</html>

PostgreSQLの定義
使用するRDBMSは、PostgreSQLです。
今回はmydbという名前のデータベースを作成し、スキーマは作成せずpublicにテーブルを作成します。
このとき、プロジェクト内のapplication.ymlの定義は以下のとおりです。
spring:
  datasource:
    url: jdbc:postgresql://localhost:5432/mydb
    username: postgres
    password: postgres
    driver-class-name: org.postgresql.Driver
テーブルとして定義した際に実行したSQLは以下のようになります。
CREATE SEQUENCE id_seq;

CREATE TABLE files(
id integer DEFAULT nextval('id_seq'),
file_name text,
file bytea,
CONSTRAINT pk_files PRIMARY KEY(id)
);
ハンドラとモデルの実装
まず、ファイルを登録する際に利用するモデルから定義をしていきます。
ファイルのInputStreamと、ファイルサイズを持ちます。
public class AttachmentFile {
	private long length;
	private InputStream inputStream;

	public AttachmentFile(long length, InputStream inputStream) {
		this.length = length;
		this.inputStream = inputStream;
	}

	public long getLength() {
		return length;
	}
	public InputStream getInputStream() {
		return inputStream;
	}
}
次に上記モデルクラスを使ったTypeHandlerの定義です。
ハンドラクラスは、org.apache.ibatis.type.BaseTypeHandlerを継承する必要があり、パラメータがNULLだった場合などの動作を定義します。
import java.sql.Blob;
import java.sql.CallableStatement;
import java.sql.PreparedStatement;
import java.sql.ResultSet;
import java.sql.SQLException;

import org.apache.ibatis.type.BaseTypeHandler;
import org.apache.ibatis.type.JdbcType;

import com.example.demo.model.AttachmentFile;

public class AttachmentFileTypeHandler extends BaseTypeHandler<AttachmentFile> {

	@Override
	public void setNonNullParameter(PreparedStatement ps, int i, AttachmentFile parameter, JdbcType jdbcType)
			throws SQLException {
		ps.setBinaryStream(i, parameter.getInputStream(), parameter.getLength());
	}

	@Override
	public AttachmentFile getNullableResult(ResultSet rs, String columnName) throws SQLException {
		return toInputStream(rs.getBlob(columnName));
	}

	@Override
	public AttachmentFile getNullableResult(ResultSet rs, int columnIndex) throws SQLException {
		return toInputStream(rs.getBlob(columnIndex));
	}

	@Override
	public AttachmentFile getNullableResult(CallableStatement cs, int columnIndex) throws SQLException {
		return toInputStream(cs.getBlob(columnIndex));
	}

	private AttachmentFile toInputStream(Blob blob) throws SQLException {
		if (blob == null) {
			return null;
		} else {
			return new AttachmentFile(-1, blob.getBinaryStream());
		}
	}
}
次にファイルの受け取りに関するモデルとハンドラクラスを定義します。
これらは、ファイルの一覧としてHTMLにファイル名を列挙するために使用したり、ファイルのダウンロードに使用されます。
public class FileManagement {
	private int id;
	private String fileName;
	private InputStream fileData;

	public int getId() {
		return id;
	}
	public void setId(int id) {
		this.id = id;
	}
	public String getFileName() {
		return fileName;
	}
	public void setFileName(String fileName) {
		this.fileName = fileName;
	}
	public InputStream getFileData() {
		return fileData;
	}
	public void setFileData(InputStream fileData) {
		this.fileData = fileData;
	}
}
受け取りのハンドラクラスも、org.apache.ibatis.type.BaseTypeHandlerを継承します。
受け取りはInputStreamで行うので、ファイル登録と同じようにInputStreamがNULLの場合などの動作を定義します。
import java.io.InputStream;
import java.sql.CallableStatement;
import java.sql.PreparedStatement;
import java.sql.ResultSet;
import java.sql.SQLException;

import org.apache.ibatis.type.BaseTypeHandler;
import org.apache.ibatis.type.JdbcType;

public class InputStreamTypeHandler extends BaseTypeHandler<InputStream> {

	@Override
	public void setNonNullParameter(PreparedStatement ps, int i, InputStream parameter, JdbcType jdbcType)
			throws SQLException {
		ps.setBlob(i, parameter);
	}

	@Override
	public InputStream getNullableResult(ResultSet rs, String columnName) throws SQLException {
		return rs.getBinaryStream(columnName);
	}

	@Override
	public InputStream getNullableResult(ResultSet rs, int columnIndex) throws SQLException {
		return rs.getBinaryStream(columnIndex);
	}

	@Override
	public InputStream getNullableResult(CallableStatement cs, int columnIndex) throws SQLException {
		return cs.getResultSet().getBinaryStream(columnIndex);
	}
}
BLOBについて
import java.sql.Blobとしているように、ファイル管理にはBLOB(Binary Large OBject)を利用します。
BLOBとは、バイナリデータをデータベースに登録する際に使われるデータ型です。
MyBatisは、InputStreamで渡されたデータをバイナリデータとしてデータベースに保存します。
あまり意識せずとも利用ができますが、約1GBまでのファイルサイズしか扱うことが出来ないことには注意しなければなりません。
RepositoryとTypeHandlerの実装
リポジトリと、MybBatisのxml定義は以下のようになります。
@Mapper
public interface FileManagementRepository {
	List<FileManagement> findAll();
	void insertFile(@Param("fileName") String fileName, @Param("attachmentFile") AttachmentFile attachmentFile);
	FileManagement getFileDataById(@Param("id") int id);
}
<?xml version="1.0" encoding="UTF-8"?>
<!DOCTYPE mapper PUBLIC "-//mybatis.org//DTD Mapper 3.0//EN"
    "http://mybatis.org/dtd/mybatis-3-mapper.dtd">

<mapper namespace="com.example.demo.repository.FileManagementRepository">
  <resultMap id="fileManagement" type="com.example.demo.model.FileManagement">
    <result column="id" property="id" />
    <result column="file_name" property="fileName" />
    <result column="file" property="fileData" typeHandler="com.example.demo.handler.InputStreamTypeHandler" />
  </resultMap>

  <select id="findAll" resultMap="fileManagement">
    SELECT
      id, file_name
    FROM
      files
    ORDER BY
      id ASC
  </select>

  <insert id="insertFile">
    INSERT INTO
      files
    (
      file_name,
      file
    )
    VALUES
    (
      #{fileName},
      #{attachmentFile, typeHandler=com.example.demo.handler.AttachmentFileTypeHandler}
    )
  </insert>

  <select id="getFileDataById" parameterType="int" resultMap="fileManagement">
    SELECT
      file_name,
      file
    FROM
      files
    WHERE
      id = #{id}
  </select>
</mapper>
それぞれの動作は
- ファイル名の一覧を取得する
- ファイルを登録する
- ファイルのデータを取得する
となっており、データの取得にはFileManagementクラスを使用しています。
重要なのがAttachmentFileTypeHandlerとInputStreamTypeHandlerを指定している部分で、それぞれ登録と受け取りの際にtypeHandlerで指定をしています。
このようにする事で、PostgreSQLにBLOBとしてデータを登録することと、登録されたデータをInputStreamとして受け取ることが出来ます。
また、テーブルの主キーに設定しているidについては、テーブルの定義の際にid integer default nextval('id_seq')としているので、データの登録時にidを指定をしない事でデフォルト値を使用するようにしています。
Serviceの実装
ここまで実装してきたものを利用するサービスクラスは、以下のようになります。
import java.util.List;
import org.springframework.web.multipart.MultipartFile;
import com.example.demo.model.FileManagement;

public interface FileManagementService {
	public List<FileManagement> findAll();
	public void insertFile(MultipartFile uploadFile);
	public FileManagement getFileData(int id);
}
import java.io.IOException;
import java.io.InputStream;
import java.util.List;

import org.springframework.beans.factory.annotation.Autowired;
import org.springframework.stereotype.Service;
import org.springframework.web.multipart.MultipartFile;

import com.example.demo.model.AttachmentFile;
import com.example.demo.model.FileManagement;
import com.example.demo.repository.FileManagementRepository;

@Service
public class FileManagementServiceImpl implements FileManagementService {
	@Autowired
	FileManagementRepository reposiroty;

	public List<FileManagement> findAll() {
		return reposiroty.findAll();
	}

	public void insertFile(MultipartFile uploadFile) {
		String fileName = uploadFile.getOriginalFilename();
		InputStream inputstream = null;
		AttachmentFile attachmentFile = null;
		try {
			inputstream = uploadFile.getInputStream();
			attachmentFile = new AttachmentFile(uploadFile.getSize(), inputstream);
			reposiroty.insertFile(fileName, attachmentFile);
		} catch (IOException e) {
			e.printStackTrace();
		} finally {
			if (inputstream != null) {
				try {
					inputstream.close();
				} catch (IOException e) {
					e.printStackTrace();
				}
			}
		}
	}

	public FileManagement getFileData(int id) {
		return reposiroty.getFileDataById(id);
	}
}
ここまで実装した機能を利用する為の処理をしています。
アップロードされたファイルは、コントローラクラスでorg.springframework.web.multipart.MultipartFileとして受け取るので、そこからファイル名やファイルサイズ、ファイルの実態を取得しています。
Controllerの実装
最後に、今まで実装してきた機能のコントローラクラスを作成します。
作成したクラスは以下のようになります。
import java.io.IOException;
import java.net.URLEncoder;
import java.util.List;

import javax.servlet.http.HttpServletResponse;

import org.apache.tomcat.util.http.fileupload.IOUtils;
import org.springframework.beans.factory.annotation.Autowired;
import org.springframework.stereotype.Controller;
import org.springframework.ui.Model;
import org.springframework.web.bind.annotation.PathVariable;
import org.springframework.web.bind.annotation.RequestMapping;
import org.springframework.web.bind.annotation.RequestMethod;
import org.springframework.web.bind.annotation.RequestParam;
import org.springframework.web.multipart.MultipartFile;

import com.example.demo.model.FileManagement;
import com.example.demo.service.FileManagementService;

@Controller
public class FileManagementController {

	@Autowired
	FileManagementService service;

	@RequestMapping(value = "/", method = RequestMethod.GET)
	public String showIndexPage(Model model) {
		List<FileManagement> files = service.findAll();
		model.addAttribute("files", files);
		return "index";
	}

	@RequestMapping(value = "/", method = RequestMethod.POST)
	public String postFile(@RequestParam("file") MultipartFile uploadFile, Model model) {
		if (uploadFile.isEmpty()) {
			return showIndexPage(model);
		}
		service.insertFile(uploadFile);
		return showIndexPage(model);
	}

	@RequestMapping(value = "/{id}", method = RequestMethod.GET)
	public void download(@PathVariable("id") int id, HttpServletResponse res) throws IOException {
		FileManagement file = service.getFileData(id);
		if (file.getFileData() != null) {
			res.setContentType("application/octet-stream;charset=UTF-8");
			String fileName = file.getFileName();
			res.setHeader("Content-Disposition", "attachment;filename=\"" + URLEncoder.encode(fileName, "UTF-8") + "\"");
			IOUtils.copy(file.getFileData(), res.getOutputStream());
		} else {
			res.setStatus(404);
		}
	}
}
それぞれ
- フォームとファイルの一覧を表示するリクエスト
- ファイルを登録するリクエスト
- ファイルをダウンロードするリクエスト
をマッピングしています
ファイルをダウンロードするリクエストについて
少し複雑になっているのがファイルをダウンロードするリクエストについてで、まずHTMLからは<a th:text="${file.fileName}" th:href="@{'/' + ${file.id}}"></a>で作成されたリンクでリクエストされます。
指定されたidのファイルデータをテーブルから取得して、HttpServletResponseに情報を詰めていきます。
IOUtils.copy(file.getFileData(), res.getOutputStream())としている部分は
InputStream in = file.getFileData();
OutputStream out = response.getOutputStream();
byte[] buffer = new byte[1024 * 4];
while ((n = in.read(buffer, 0, buffer.length)) != -1) {
    out.write(buffer, 0, n);
}
とする処理を、便利なメソッドで省略をしています。
動作確認
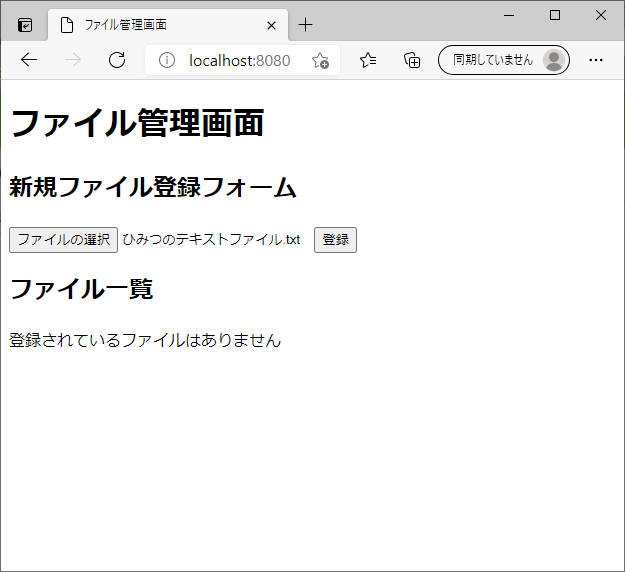
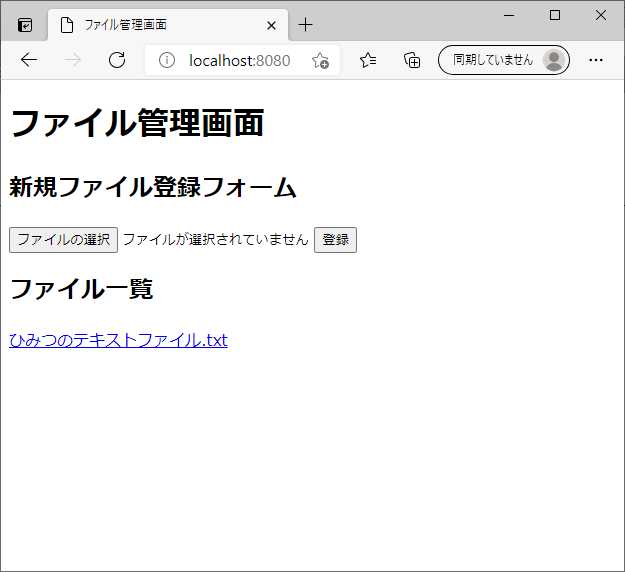
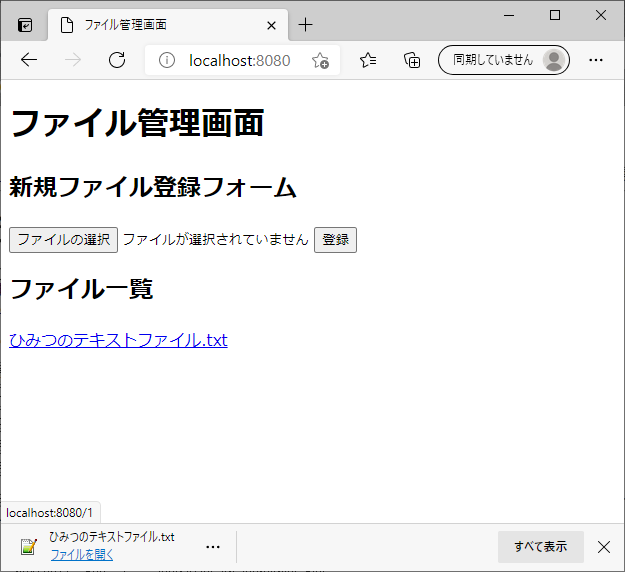
実装したプロジェクトを動作させた際のブラウザの動作確認を、スクリーンショットで掲載します。
それぞれ
- 初めてHTMLを表示して、アップロードするファイルを選択したとき
- ファイルを選択した状態で登録ボタンを押下したとき
- 一覧のファイル名のリンクを押下して、ファイルがダウンロードされたとき
になります。
おわりに
今回関係のないソースコードを減らすために、必要になるであろう例外のチェックを最低限しかしていません。
実際に実装をする際には、例外処理をしっかりとする必要があります。
また、今回の記事はあくまでMyBatisのバージョンが3.4未満の場合に必要になるTypeHandlerの定義になります。
MyBatisのバージョンが古くてTypeHandlerが必要な時には、今回のような定義をする必要があります。