Azure Monitor Application Insights を App Service Web アプリに設定する
こんにちは、@studio_meowtoon です。今回は、WSL の Ubuntu から Azure App Service Web アプリに、Azure Monitor Application Insights を設定する一例を紹介します。

目的
Windows 11 の Linux でクラウド開発します。
こちらから記事の一覧がご覧いただけます。
実現すること
Azure App Service Web アプリに、Azure CLI コマンドで Azure Monitor Application Insights を設定します。
Microsoft Azure は、Web ブラウザから簡単に App Service Web アプリ に Application Insights を設定できる機能があります。これにより、コマンドを入力する必要はありません。この記事では学習のため、Ubuntu で操作する CLI から直接 App Service Web アプリを設定する方法を試みています。ご注意ください。
技術トピック
Azure Monitor Application Insights とは?
こちらを展開してご覧いただけます。
Application Insights
Azure Monitor Application Insights は、Microsoft Azure 上で稼働するアプリケーションの監視・トラブルシューティング・パフォーマンス解析を行うためのクラウドベースのアプリケーションパフォーマンス管理サービスです。
このサービスを使用することで、アプリケーションの稼働状況やエラー発生率、パフォーマンスの低下要因、ユーザーの利用状況などをリアルタイムで可視化し、問題を特定して解決することができます。
開発環境
- Windows 11 Home 22H2 を使用しています。
WSL の Ubuntu を操作していきますので macOS の方も参考にして頂けます。
WSL (Microsoft Store アプリ版) ※ こちらの関連記事からインストール方法をご確認いただけます
> wsl --version
WSL バージョン: 1.0.3.0
カーネル バージョン: 5.15.79.1
WSLg バージョン: 1.0.47
Ubuntu ※ こちらの関連記事からインストール方法をご確認いただけます
$ lsb_release -a
No LSB modules are available.
Distributor ID: Ubuntu
Description:    Ubuntu 22.04.1 LTS
Release:        22.04
Java JDK ※ こちらの関連記事からインストール方法をご確認いただけます
$ java -version
openjdk version "11.0.18" 2023-01-17
OpenJDK Runtime Environment (build 11.0.18+10-post-Ubuntu-0ubuntu122.04)
OpenJDK 64-Bit Server VM (build 11.0.18+10-post-Ubuntu-0ubuntu122.04, mixed mode, sharing)
Maven ※ こちらの関連記事からインストール方法をご確認いただけます
$ mvn -version
Apache Maven 3.6.3
Maven home: /usr/share/maven
Java version: 11.0.18, vendor: Ubuntu, runtime: /usr/lib/jvm/java-11-openjdk-amd64
Azure CLI ※ こちらの関連記事からインストール方法をご確認いただけます
$ az --version
azure-cli                         2.45.0
core                              2.45.0
telemetry                          1.0.8
この記事では基本的に Ubuntu のターミナルで操作を行います。Vim を使用してコピペする方法を初めて学ぶ人のために、以下の記事で手順を紹介しています。ぜひ挑戦してみてください。
Application Insights を設定する手順
ログイン
Azure CLI で Azure にログインします。
$ az login
こちらの関連記事で手順がご確認いただけます。
Azure App Service Web アプリの作成
こちらの関連記事で手順がご確認いただけます。
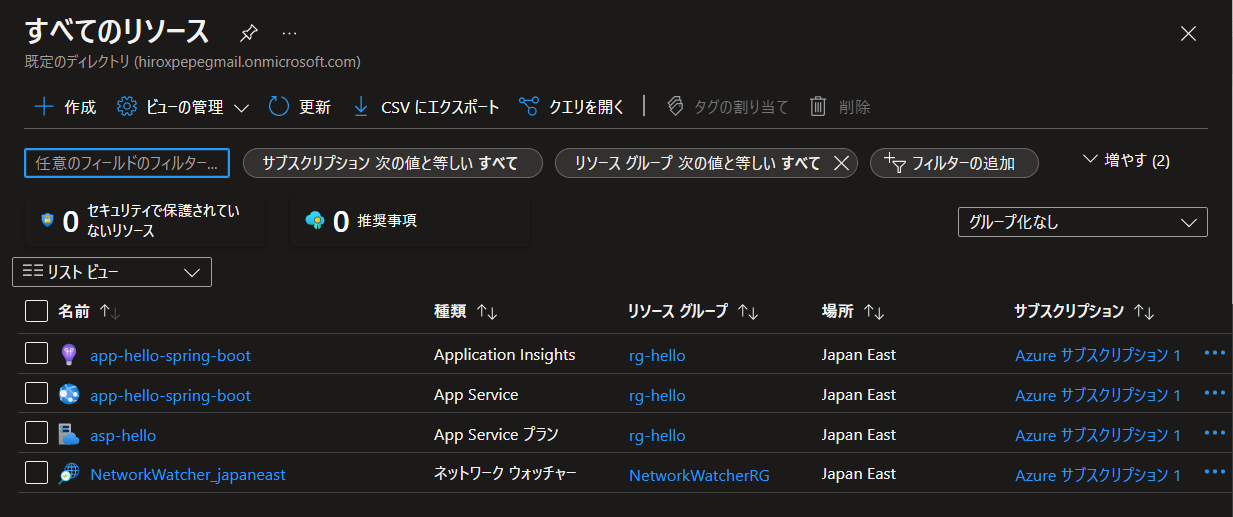
Azure Portal には以下のように表示されます。

ここまでで App Service Web アプリを Azure クラウドにデプロイすることができました。
シェル変数の作成
シェル変数として以下の値を作成します。状況により、Web アプリの名前を変える必要があります。
$ location_name=japaneast
$ resource_group_name=rg-hello
$ appservice_plan_name=asp-hello
$ webapp_name=app-hello-spring-boot
この記事では、Azure のリソース設定において特に使用頻度が高いリージョンとリソースグループ、アプリの名前などについては、シェル変数という機能を使って設定する方法を紹介しています。
Application Insights インスタンスを作成
Application Insights インスタンスを作成します。
※ 初回に拡張機能のインストールが必要となる旨のメッセージが表示されます。
$ az monitor app-insights component create \
    --resource-group $resource_group_name \
    --app $webapp_name \
    --location $location_name
Azure Portal では以下のように表示されます。
Application Insights インスタンスのインストルメンテーションキーをシェル変数 instrumentation_key に取得します。
$ instrumentation_key=$(az monitor app-insights component show \
    --resource-group $resource_group_name \
    --app $webapp_name \
    --query instrumentationKey \
    --output tsv)
シェル変数の値を確認します。
$ set | grep instrumentation_key
instrumentation_key=fxxx3327-36bf-4xxxx-b8e3-759exxxxxxc1
Azure のリソース設定では、他のリソースのキーが必要になることがあります。Azure CLI を使用して設定を進める場合、シェル変数を使う方法があります。シェル変数に馴染みがない人もいるかもしれませんが、手順に従って進めることができます。
ここまでの手順で Application Insights インスタンスを作成して、そのインストルメンテーションキーを取得することができました。
Application Insights Agent for Java のダウンロード
JAR ファイル形式のライブラリを Web アプリのコンテナにダウンロードします。
Web アプリのコンテナに SSH で接続します。
$ az webapp ssh \
    --resource-group $resource_group_name \
    --name $webapp_name
コンテナに接続した後、デプロイした JAR ファイルが格納されたディレクトリに移動しします。
※ コンテナから出るときは ctrl + D を押します。
# cd site/wwwroot
# ls -lah
total 17M
drwxrwxrwx    2 nobody   nobody         0 Mar 16 06:09 .
drwxrwxrwx    2 nobody   nobody         0 Mar 16 06:09 ..
-rwxrwxrwx    1 nobody   nobody     16.9M Mar 16 06:09 app.jar
-rwxrwxrwx    1 nobody   nobody      3.2K Mar 16 06:08 hostingstart.html
curl コマンドをインストールします。
# apk add curl
Application Insights Agent の最新バージョンの情報をシェル変数 agent_version に取得します。
# agent_version=$(curl -s \
    https://api.github.com/repos/microsoft/ApplicationInsights-Java/releases/latest \
    | grep tag_name \
    | cut -d '"' -f 4)
シェル変数を確認します。
# set | grep agent_version
agent_version=3.4.10
Application Insights Agent の最新バージョンをダウンロードします。
# wget https://github.com/microsoft/ApplicationInsights-Java/releases/download/$agent_version/applicationinsights-agent-$agent_version.jar
JAR ライブラリを確認します。
# ls -la | grep *applicationinsights-agent*
-rwxrwxrwx    1 nobody   nobody    37580237 Mar 16 07:28 applicationinsights-agent-3.4.10.jar
ここまでで、GitHub から Application Insights Java ライブラリを Web アプリのコンテナに取得することができました。
Application Insights の設定ファイル作成
シェル変数 instrumentation_key を設定します。
※ 上の手順で取得した instrumentation_key が必要です。
# instrumentation_key=fxxx3327-36bf-4xxxx-b8e3-759exxxxxxc1
この Web アプリのコンテナのシェル変数を以下のコマンドで確認することができます。
# set | more
applicationinsights.json を作成します。
# cat << EOF > applicationinsights.json
{
    "instrumentationKey": "$instrumentation_key",
    "agent": {
        "version": "$agent_version",
        "inlineBytecodeInstrumentation": {
            "enabled": true
        }
    }
}
EOF
instrumentation_key が設定されているか確認します。
# cat applicationinsights.json
applicationinsights-agent.xml を作成します。
# cat << EOF > applicationinsights-agent.xml
<ApplicationInsights xmlns="http://schemas.microsoft.com/ApplicationInsights/2013/Settings">
  <InstrumentationKey>$instrumentation_key</InstrumentationKey>
  <Agent>
      <ClassTransformer>
          <AddTransformer className="com.microsoft.applicationinsights.agent.bootstrap.diagnostics.DiagnosticTelemetryModuleTransformer"/>
      </ClassTransformer>
  </Agent>
</ApplicationInsights>
EOF
instrumentation_key が設定されているか確認します。
# cat applicationinsights-agent.xml
ディレクトリ内のファイルの内容を確認します。
# ls -lah
total 53M
drwxrwxrwx    2 nobody   nobody         0 Mar 16 07:49 .
drwxrwxrwx    2 nobody   nobody         0 Mar 16 06:09 ..
-rwxrwxrwx    1 nobody   nobody     16.9M Mar 16 06:09 app.jar
-rwxrwxrwx    1 nobody   nobody     35.8M Mar 16 07:28 applicationinsights-agent-3.4.10.jar
-rwxrwxrwx    1 nobody   nobody       407 Mar 16 07:49 applicationinsights-agent.xml
-rwxrwxrwx    1 nobody   nobody       195 Mar 16 07:48 applicationinsights.json
-rwxrwxrwx    1 nobody   nobody      3.2K Mar 16 06:08 hostingstart.html
ここまでで、applicationinsights.json と applicationinsights-agent.xml 設定ファイルを Web アプリのコンテナに作成することができました。
ターミナルに ctrl + D を入力して Web アプリのコンテナからローカルの Ubuntu に戻ります。
Web アプリの設定にインストルメンテーションキーを追加
Web アプリの設定にインストルメンテーションキーを追加します。
$ az webapp config appsettings set \
    --resource-group $resource_group_name \
    --name $webapp_name \
    --settings APPINSIGHTS_INSTRUMENTATIONKEY=$instrumentation_key
Application Insights Agent の最新バージョンの情報をシェル変数 agent_version に取得します。
$ agent_version=$(curl -s \
    https://api.github.com/repos/microsoft/ApplicationInsights-Java/releases/latest \
    | grep tag_name \
    | cut -d '"' -f 4)
シェル変数を確認します。
$ set | grep agent_version
agent_version=3.4.10
Web アプリの起動ファイルを修正します。
$ az webapp config set \
    --resource-group $resource_group_name \
    --name $webapp_name \
    --startup-file "java -javaagent:/home/site/wwwroot/applicationinsights-agent-$agent_version.jar -jar /home/site/wwwroot/app.jar --server.port=80"
Web アプリの再起動を行います。
$ az webapp restart \
    --resource-group $resource_group_name \
    --name $webapp_name
Azure Portal を確認します。

こちらの表示はしばらく経った状況ですが、メトリックデータの収集が正常に動作していることが確認できました。
まとめ
検証環境の Azure で、Azure Monitor Application Insights を App Service Web アプリに設定することができました。
実際の業務では、Azure Portal から手動で App Service に Azure Monitor Application Insights を設定することができます。しかし、Ubuntu を使ってこの記事の手順を追うことにより、Linux の知識も身につけることができます。最初は難しく感じるかもしれませんが、少しずつ進めていくことで自信を持って取り組むことができるようになります。
どうでしたか? WSL Ubuntu で、Azure クラウドアプリケーション開発環境を手軽に構築することができます。ぜひお試しください。今後も Azure の開発環境などを紹介していきますので、ぜひお楽しみにしてください。