前の ListView + ArrayAdpter のケース では表示と選択が可能でしたが
RecyclerView を使用して移動(上下)やスワイプの動作が可能なパターン
ライブラリの登録
app の build.gradle に
    dependencies {
        implementation 'com.android.support:recyclerview-v7:27.1.1'
        implementation 'com.android.support:cardview-v7:27.1.1'
    }
バージョンは自分の環境に合わせてください
画面の設定
listView2.xml
<?xml version="1.0" encoding="utf-8"?>
<android.support.constraint.ConstraintLayout
    xmlns:android="http://schemas.android.com/apk/res/android"
    xmlns:app="http://schemas.android.com/apk/res-auto"
    xmlns:tools="http://schemas.android.com/tools"
    android:layout_width="match_parent"
    android:layout_height="match_parent">

    <LinearLayout
        android:layout_width="0dp"
        android:layout_height="0dp"
        android:orientation="vertical"
        app:layout_constraintBottom_toBottomOf="parent"
        app:layout_constraintEnd_toEndOf="parent"
        app:layout_constraintStart_toStartOf="parent"
        app:layout_constraintTop_toTopOf="parent">

        <android.support.v7.widget.RecyclerView
            android:id="@+id/listView2"
            android:layout_width="match_parent"
            android:layout_height="match_parent"
            android:layout_weight="9">
        </android.support.v7.widget.RecyclerView>

        <Button
            android:id="@+id/btnAdd2"
            android:layout_width="match_parent"
            android:layout_height="wrap_content"
            android:layout_weight="1"
            android:text="追加"
            tools:layout_editor_absoluteY="511dp">

        </Button>
    </LinearLayout>
</android.support.constraint.ConstraintLayout>
RecyclerView がリスト表示されるところ
見た目は前と一緒
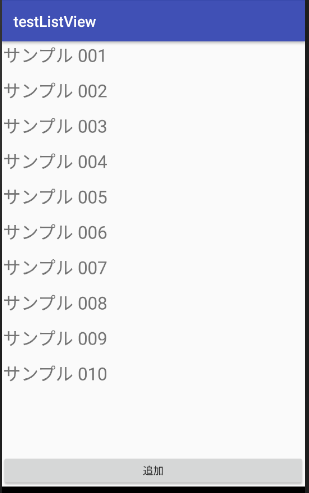
前と同じように追加のボタンあります
1項目分のレイアウト
list_item.xml
<?xml version="1.0" encoding="utf-8"?>
<LinearLayout
        xmlns:android="http://schemas.android.com/apk/res/android"
        android:id="@+id/linear_layout"
        android:layout_width="match_parent"
        android:layout_height="@android:dimen/app_icon_size"
        android:gravity="center"
        android:orientation="horizontal">
        <TextView
            android:id="@+id/itemTextView"
            android:layout_width="match_parent"
            android:layout_height="match_parent"
            android:layout_margin="2dp"
            android:layout_weight="1"
            android:textAlignment="viewStart"
            android:textSize="24sp">
        </TextView>
</LinearLayout>
これはTextView 1つですが 複数でもイメージでも好きに変えれるようです
(一応、イメージとボタンでは動かしてみました)
RecyclerView用のアダプタ(操作)
class RecyclerAdapter(private val context: Context, private val nameList: ClsListData ) : RecyclerView.Adapter<RecyclerAdapter.RecyclerViewHolder>() {
    private var listener: onItemClickListener? = null

    class RecyclerViewHolder(itemView: View) : RecyclerView.ViewHolder(itemView) {
        val linearLayout: LinearLayout
        val textView: TextView
        init {
            linearLayout = itemView.findViewById(R.id.linear_layout) as LinearLayout
            textView = itemView.findViewById(R.id.itemTextView) as TextView
        }
    }
    override fun onCreateViewHolder(parent: ViewGroup, viewType: Int): RecyclerViewHolder {
        val view = LayoutInflater.from(context).inflate(R.layout.list_item, parent, false)
        return RecyclerViewHolder(view)
    }
    override fun onBindViewHolder(holder: RecyclerViewHolder, position: Int) {
        val number = nameList.getItem(position)
        holder.textView.text = number
        holder.linearLayout.setOnClickListener { view ->
            listener!!.onClick(view, nameList.getItem(holder.adapterPosition))
        }
    }
    fun setOnItemClickListener(listener: onItemClickListener) {
        this.listener = listener
    }
    override fun getItemCount(): Int {
        return nameList.size
    }
    fun addItem() {
        nameList.putItem()
    }
    interface onItemClickListener {
        fun onClick(view: View, name: String)
    }
}
表示&操作
class List2Activity : AppCompatActivity() {
    private val mSampleData = ClsListData()
    private lateinit var adapter : RecyclerAdapter
    override fun onCreate(savedInstanceState: Bundle?) {
        super.onCreate(savedInstanceState)
        setContentView(R.layout.activity_list2)
        // データを設定
        adapter = RecyclerAdapter(this, mSampleData)
        listView2.adapter = adapter
        // クリック
        adapter.setOnItemClickListener(object : RecyclerAdapter.onItemClickListener {
            override fun onClick(v: View, name: String) {
                Toast.makeText(this@List2Activity, name, Toast.LENGTH_SHORT).show()
            }
        })
        //
        val mIth = ItemTouchHelper(object : ItemTouchHelper.Callback() {
            override fun getMovementFlags(recyclerView: RecyclerView?, viewHolder: RecyclerView.ViewHolder?): Int {
                // 反応する動作の指定 (クリックがないのか?)
//                val p = viewHolder?.getAdapterPosition() ?:-1
//                Log.d("push",p.toString())
                return makeMovementFlags(ItemTouchHelper.UP or ItemTouchHelper.DOWN, ItemTouchHelper.LEFT or ItemTouchHelper.RIGHT)
            }
            // 上下に動かした場合
            override fun onMove(recyclerView: RecyclerView, viewHolder: RecyclerView.ViewHolder, target: RecyclerView.ViewHolder): Boolean {
                // アイテムの位置を変更
                val fromPos: Int = viewHolder.getAdapterPosition()
                val toPos: Int = target.getAdapterPosition()
                Log.d("from",fromPos.toString())
                Log.d("to",toPos.toString())
                listView2.adapter.notifyItemMoved(fromPos, toPos)
                mSampleData.moveItem(fromPos,toPos)
                return true
            }
            // スワイプされた場合
            override fun onSwiped(viewHolder: RecyclerView.ViewHolder, direction: Int) {
                // 項目を消去
                val fromPos: Int = viewHolder.getAdapterPosition()
                Log.d("Del",fromPos.toString())
                mSampleData.deleteItem(fromPos)
                listView2.adapter.notifyItemRemoved(fromPos);
            }

        })
        mIth.attachToRecyclerView(listView2)
        listView2.layoutManager = LinearLayoutManager(this, LinearLayoutManager.VERTICAL, false)
        // 追加
        btnAdd2.setOnClickListener {
            adapter.addItem()
            listView2.adapter = adapter
        }
    }
}
出来る操作は
・クリックでToastへ選択されたデータを表示
・スワイプで削除(確認ダイアログ出ません)
・長押し後上下で移動
・「追加」ボタンで最後にデータ追加される
コードは git に置いてあります