はじめに
今回はIBM Cloud上にGitlabのリポジトリを作成し、IBM Application Gateway Deployment Asset のファイルを保管、IBM Application Gatewayをデプロイするといった流れを試しました。
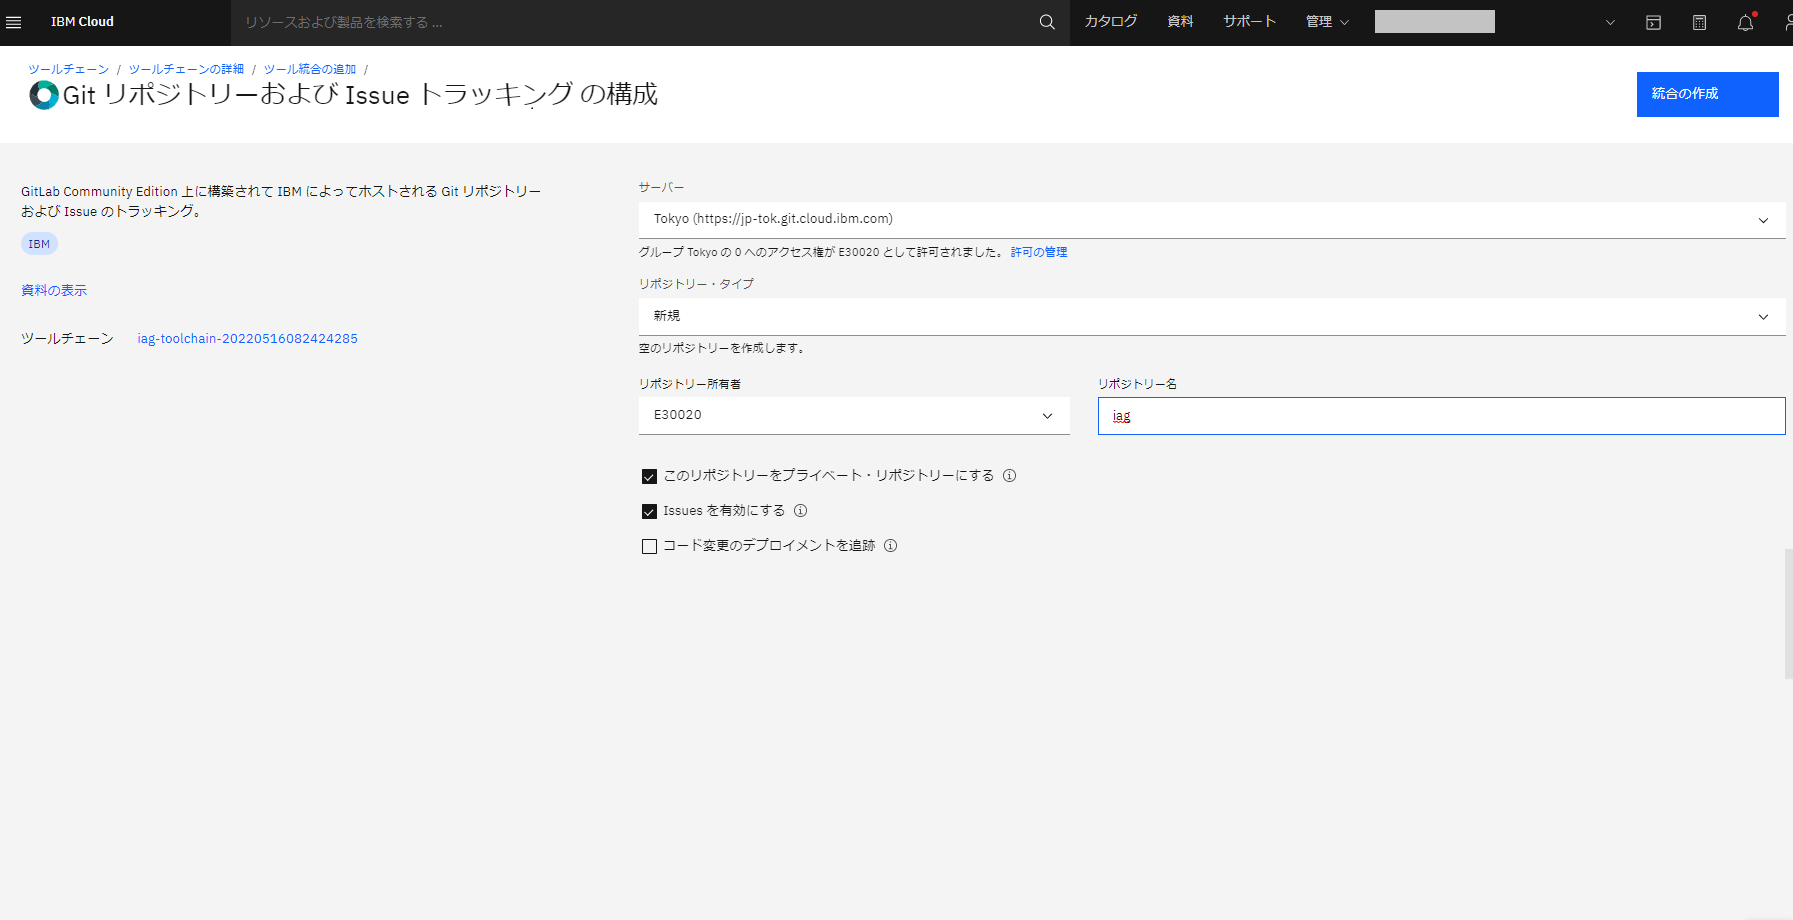
1.Gitlabのリポジトリ作成
以下の記事通りにリポジトリを作成します。iagというプライベートリポジトリを作成しました。
IBM Cloud上のGitLabのレポジトリを作成する
2. IBM Application Gateway Deployment AssetsをGitlabに連携する。
IBM Application Gateway Deployment Assetsのファイルがローカルにあるところから始めました。
README.mdに従ってVerifyの構成や証明書ファイルの発行、 config.propertiesファイルの作成を行ってください。
次に、openshift\iag-build-template.yamlファイルの中にあるGITHUB_REPOの値は、GitLabのURLに書き換えます。
  - displayName: GitHub Repository
    description: GitHub repository where configuration is stored
    name: GITHUB_REPO
    value: https://jp-tok.git.cloud.ibm.com/E30020/iag
Gitlab上に、ローカルにあるデータをアップロードする手順が表示されていました。この手順通りに実施していきます。
Push an existing folder
cd existing_folder
git init --initial-branch=main
git remote add origin https://jp-tok.git.cloud.ibm.com/E30020/iag.git
git add .
git commit -m "Initial commit"
git push -u origin main
ファイルの保管ディレクトリに移動
> cd C:\temp-openshift\iag-gitlab\
Gitのリポジトリを作成。
> git init --initial-branch=main
warning: re-init: ignored --initial-branch=main
Reinitialized existing Git repository in C:/temp-openshift/iag-gitlab/.git/
リモートリポジトリを追加
> git remote add origin https://jp-tok.git.cloud.ibm.com/E30020/iag.git
カレントディレクトリのファイルを追加対象に設定
> git add .
変更をCommit
> git commit -m "Initial commit"
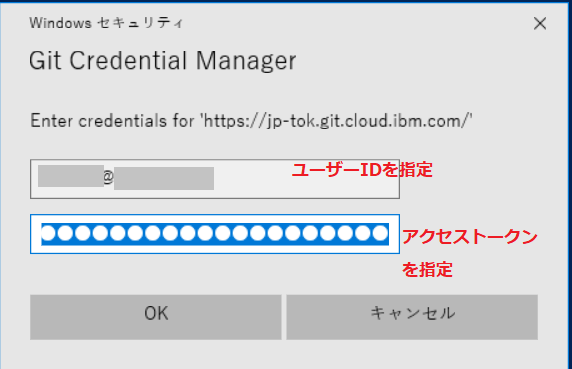
ローカルリポジトリの内容をリモートリポジトリに送信。ダイアログが表示されるため、IBMID/PWDを入力してみる
> git push -u origin main

認証が失敗しました。Personal Access Tokenが必要とあるため作成します。
> git push -u origin main
remote: HTTP Basic: Access denied
remote: You must use a personal access token with 'read_repository' or 'write_repository' scope for Git over HTTP.
remote: You can generate one at https://jp-tok.git.cloud.ibm.com/-/profile/personal_access_tokens
fatal: Authentication failed for 'https://jp-tok.git.cloud.ibm.com/E30020/iag.git/'
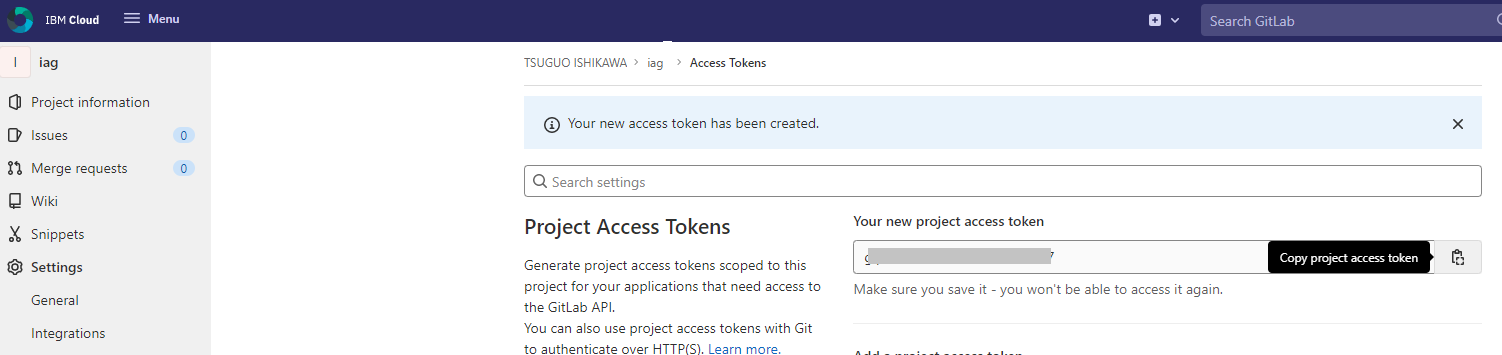
任意の名前、有効期間、および、write_repositoryにチェックをして、アクセストークンを作成します。

作成されたアクセストークンは一度しか表示されないため、コピー/保管します。
ローカルリポジトリの内容をリモートリポジトリに送信します。
表示されたダイアログでパスワード欄にアクセストークンを指定しました。
> git push -u origin main
Enumerating objects: 970, done.
Counting objects: 100% (970/970), done.
Delta compression using up to 8 threads
Compressing objects: 100% (424/424), done.
Writing objects: 100% (970/970), 506.22 KiB | 6.33 MiB/s, done.
Total 970 (delta 588), reused 701 (delta 423), pack-reused 0
remote: Resolving deltas: 100% (588/588), done.
To https://jp-tok.git.cloud.ibm.com/E30020/iag.git
 * [new branch]      main -> main
Branch 'main' set up to track remote branch 'main' from 'origin'.
Gitlab上にファイルがアップロードされたことを確認します。

3. IBM Application Gatewayをデプロイする
プロジェクトを作成します。
> oc new-project <project名>
付属のシェルでSecret/Configmapを登録します。
.\openshift\create-iag-assets.sh
テンプレートを登録します。
> oc create -f .\openshift\iag-build-template.yaml
template.template.openshift.io/ibm-app-gateway-build created
アプリケーションをデプロイします。
oc new-app ibm-app-gateway-build
プライベートリポジトリで作成したため、公開リポジトリと同様にデプロイするとエラーになりました。
> oc logs -f bc/iag
Cloning "https://jp-tok.git.cloud.ibm.com/E30020/iag" ...
error: failed to fetch requested repository "https://jp-tok.git.cloud.ibm.com/E30020/iag" with provided credentials
プライベートリポジトリを利用するためには、SSHキーを利用する方式と、Personal Access Tokenを利用する方式がありました。今回は、Personal Access Tokenの方式を試しました。
https://cloud.redhat.com/blog/private-git-repositories-part-4-hosting-repositories-gitlab?extIdCarryOver=true&sc_cid=701f2000001OH7EAAW
シークレットを登録します。
oc create secret generic user-at-gitlab --from-literal=username=<userid> --from-literal=password=<token>  --type=kubernetes.io/basic-auth
secret/user-at-gitlab created
IBM Application Gateway を ビルドするサービスアカウントにSecretをリンクさせます。
oc secrets link default user-at-gitlab
デプロイしたアプリを削除
> oc delete all -l app=iag
service "iag" deleted
deploymentconfig.apps.openshift.io "iag" deleted
buildconfig.build.openshift.io "iag" deleted
imagestream.image.openshift.io "iag" deleted
route.route.openshift.io "iag" deleted
アプリケーションをデプロイする際に、「--source-secret 」でSecretを指定します。
oc new-app ibm-app-gateway-build --source-secret user-at-gitlab
アプリケーションにアクセスするためのURLを取得します。
2> oc get route
NAME   HOST/PORT                                                                                                   PATH   SERVICES   PORT   TERMINATION            WILDCARD
iag    iag-test.~~~.appdomain.cloud          iag        iag    passthrough/Redirect   None
IBM Security Verifyで認証した後に、IBM Application Gatewayの画面が表示されることを確認します。

最後に
今回は、Gitlabを利用したIBM Application Gatewayのデプロイ方法についてご紹介しました。