この記事は CyberAgent 22 新卒 Advent Calendar 6日目の記事です。
概要
protoファイルのデータ定義を元に様々な言語のコードを生成できるのがすばらしい!
しかも、なにやらprotocプラグインなるものを使えばprotoファイルを元にコードを生成できるらしい!
というわけで、以前protocプラグインを調べたことがありまして、今回はその時のことをまとめてみました。
Go言語でprotoファイルからGoのコードを自動生成するprotocプラグインに入門してみましょう。
Goのコードを自動生成したいなと考えている方などに参考になればと思います。
protocプラグインの仕組み
まずはprotocプラグインの仕組みについて学びましょう。
こちらに関しては、先駆者の方の記事がめちゃくちゃ参考になります。
- https://qiita.com/yugui/items/87d00d77dee159e74886
- https://speakerdeck.com/popon01/godeprotocpuraguinzuo-tutahua-dmm-dot-go-number-3
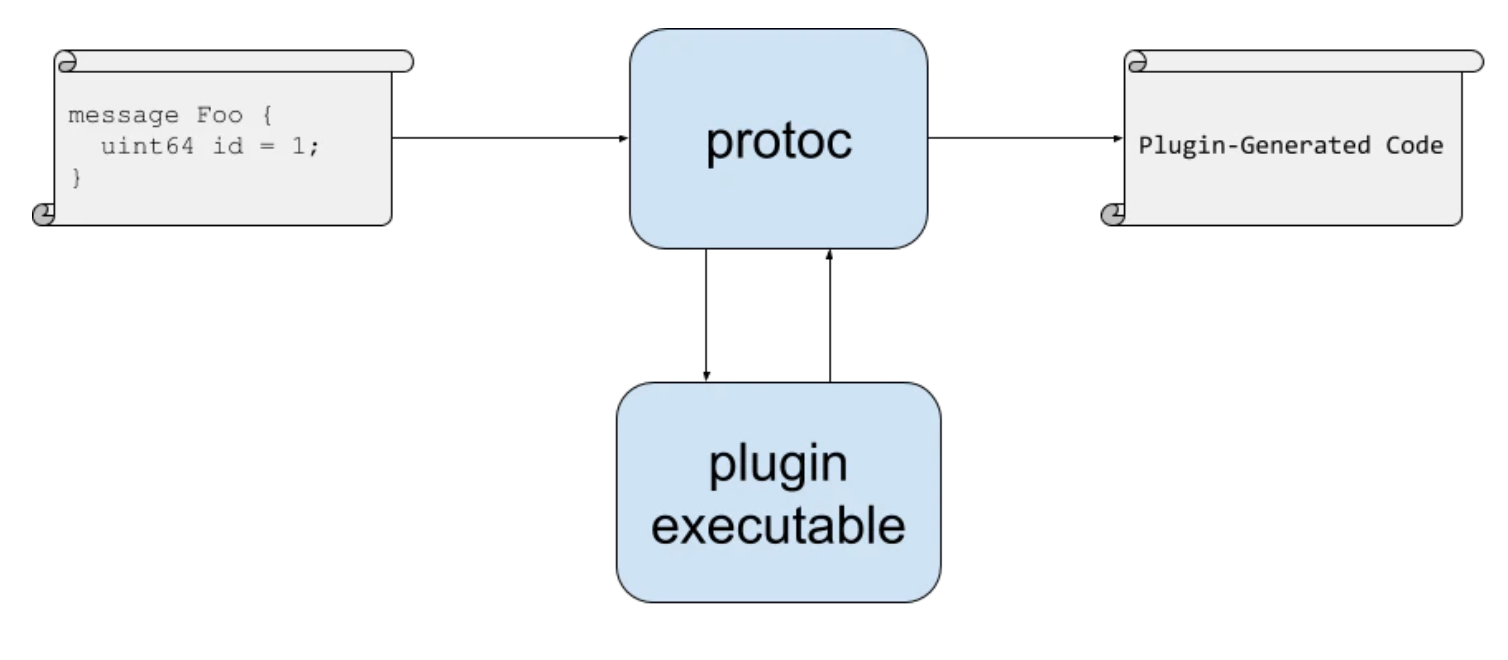
protocプラグインの概要図を以下に示します。
参考:protocプラグインの書き方 より
protoc、protocプラグイン間のデータのやりとりは標準入力と標準出力を使って行われます。
具体的な流れは以下の通りです。
protocが実行されると…
-
protocがprotoファイルの情報を標準入力に出力
-
protocプラグインは標準入力から情報を読み込んで、それを元に出力したいデータを標準出力に出力
-
protocが標準出力からデータを取得し、ファイルを生成
ここで注目したいのが、protocとprotocプラグイン間のデータのやりとりにProtocol Bufferが使われている点です。
https://github.com/protocolbuffers/protobuf/blob/master/src/google/protobuf/compiler/plugin.proto にて定義されたスキーマに基づいたデータがやり取りされるのです。
その上で、改めてprotocプラグインの処理としては
- CodeGeneratorRequestを標準入力から受け取って、
- protoの情報を用いてコードを生成し、
- CodeGeneratorResponseとして標準出力へ出力する
の3ステップになります。
1、3はprotocプラグインを作る上で定型処理になっているので、これらの処理をパッケージとして提供してくれています。
protogen
protogenはprotobuf-goに含まれるパッケージです。
以下ドキュメントからの引用です。
Package protogen provides support for writing protoc plugins.
Plugins for protoc, the Protocol Buffer compiler, are programs which read a CodeGeneratorRequest message from standard input and write a CodeGeneratorResponse message to standard output. This package provides support for writing plugins which generate Go code.
今回はこれを使ってprotocプラグインに入門してみましょう。
お題
protoc-gen-goで生成される構造体に対して、以下のようなメソッドを生やすプラグインを作ってみましょう。
func (x *<struct名>) ThisIs() {
	fmt.Println("This is <struct名>.")
}
コード概要
まず初めに今回のコードがこちらになります。
package main

import (
	"google.golang.org/protobuf/compiler/protogen"
)

func main() {
	protogen.Options{}.Run(func(gen *protogen.Plugin) error {
		for _, protoFile := range gen.Files {
			if !protoFile.Generate {
				continue
			}
			generate(gen, protoFile)
		}
		return nil
	})
}

func generate(gen *protogen.Plugin, protoFile *protogen.File) {
	filename := protoFile.GeneratedFilenamePrefix + "_thisis.pb.go"
	g := gen.NewGeneratedFile(filename, protoFile.GoImportPath)

	g.P("package ", protoFile.GoPackageName)
	g.P("")
	g.P(`import "fmt"`)

	for _, m := range protoFile.Messages {
		g.P("func (x *", m.GoIdent, ")", "ThisIs() {")
		g.P(`fmt.Println("This is `, m.GoIdent, `")`)
		g.P("}")
		g.P("")
	}
}
これだけでprotocプラグインができてしまいます。
まずはmainの中から見ていきます。
protogen.Options{}.Run(func(gen *protogen.Plugin) error {
		for _, f := range gen.Files {
			if !f.Generate {
				continue
			}
			generate(gen, f)
		}
		return nil
})
protogen.Options.Run(func(gen *protogen.Plugin) error)は内部で標準入力からCodeGeneratedRequestを受け取って、最終的に生成したいファイルの情報をCodeGeneratedResponseとして標準出力に流してくれます。
Run executes a function as a protoc plugin.
It reads a CodeGeneratorRequest message from os.Stdin, invokes the > plugin function, and writes a CodeGeneratorResponse message to os.Stdout.
Runに渡すメソッドがプラグインの本体であり、その中でprotoファイルの情報を元に生成したいファイルの内容を作成する処理を実装すればいいわけです。
今回はprotocを実行した時に指定したprotoファイル群に対して、generateメソッドを実行し、protoファイルに対応したファイル群を生成していきます。
では次にファイル生成を行う部分について見ていきます。
func generate(gen *protogen.Plugin, f *protogen.File) {
	filename := f.GeneratedFilenamePrefix + "_thisis.pb.go"
	g := gen.NewGeneratedFile(filename, f.GoImportPath)

	g.P("package ", f.GoPackageName)
	g.P("")
	g.P(`import "fmt"`)

	for _, m := range f.Messages {
		g.P("func (x *", m.GoIdent, ")", "ThisIs() {")
		g.P(`fmt.Println("This is `, m.GoIdent, `")`)
		g.P("}")
		g.P("")
	}
}
ここでやっていることとしては、
- 生成したいファイルを空で新規作成
- protoの情報を元にファイルの中身を追加
の2段階になります。
新規ファイル生成はgen.NewGeneratedFile(filename, f.GoImportPath)で行い、生成ファイル名と、生成後のファイルパスを渡してあげます。
これにより、protocgen.GeneratedFileが新規に作成されます。
あとはファイルの中身を作っていく段階です。
コードにも書いてある通り、ここは愚直にファイルの各行をg.P()で追加していく作業となります。
最後に、上記のコードをコンパイルしましょう。
protocプラグインは、コンパイル後のファイル名にprotoc-gen-*といった命名規則を満たしている必要があります。
今回はprotoc-gen-thisisという名前になるようにコンパイルします。
go build -o protoc-gen-thisis
実行結果
以下のprotoファイルに対して作成したprotocプラグインを実行してみましょう。
syntax = "proto3";

package sample;
option go_package = "pb/sample";

message SampleMessage {
    uint32 id = 1;
    string text = 2;
}
protoc -I. --plugin=/path/to/plugin --thisis_out=. --go_out=. target.proto
--thisis_outオプションで、今回作成したプラグインが生成するファイルの出力先を設定できます。
実行後に、protoc-gen-goで生成されたファイル群と同階層に以下のファイルが生成されると思います。
// 生成されたファイル群
├── target.pb.go
└── target_thisis.pb.go <- 今回のプラグインで生成されたファイル
package sample

import "fmt"

func (x *SampleMessage) ThisIs() {
	fmt.Println("This is SampleMessage")
}
終わりに
今回はprotogenを使って、protocプラグインに入門しました。
プラグイン作成とかかなり敷居が高そうと思ってたんですが、ある程度パッケージが用意されているのでかなり簡単に書くことができました。
みなさんも試しにprotocプラグインを作ってみてはいかがでしょうか。
