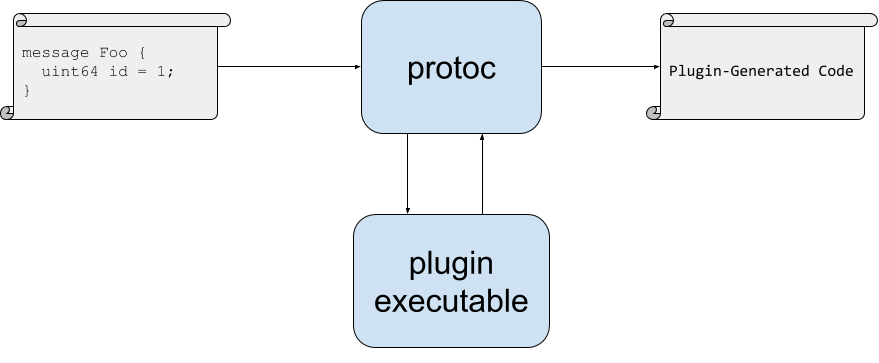
以前の記事では、Protocol Buffers (protobuf)の魅力の1つは周辺ツールを拡張しやすいことだと述べた。そこで本稿では具体的に拡張のためのprotocプラグインの書き方を紹介したい。
ちなみに、protobufの周辺ツールと言うと2種類ある。
- 1つはprotobufでシリアライズされたデータを処理するツール。JSONやCSVにとってのjqやsedやawkに相当する。
- もう1つはprotobufのスキーマを処理するツール。
先の記事にあるようにProtobufはシリアライゼーション機能だけでなくスキーマ言語としても価値が高いので、典型的なweb開発用途では後者のほうが重要だ。
本稿は後者のスキーマ処理の話である。なお前者は、チュートリアルでAPIを覚えたらあとは自分で好きな処理を書きましょうというだけの話なので、別に難しくない。
protoc
初めに、protocについて確認しよう。これはやや前者のprotobufデータを扱う話に被るので、利用例紹介も参考にして欲しい。
簡単に言えばprotocはprotobufスキーマから対応するクラスや構造体を生成するcompilerだ。現在はC++, Java, Python, Objective-C, C#, JavaScript, Ruby, PHPが生成先としてサポートされている。
生成されたクラスを別途提供されているランタイムライブラリと組み合わせると、それらのインスタンスをProtobufのシリアライズ形式やJSONと相互変換できるようになっている。
例えば次のスキーマは下のようなRubyコードになり、Example::Protobuf::SimpleMessageクラスが定義される。 1
syntax = "proto3";
package example.protobuf;

message SimpleMessage {
	uint64 id = 1;
	bytes blob = 4;
}
require 'google/protobuf'

Google::Protobuf::DescriptorPool.generated_pool.build do
  add_message "example.protobuf.SimpleMessage" do
    optional :id, :uint64, 1
    optional :blob, :bytes, 4
  end
end

module Example
  module Protobuf
    SimpleMessage = Google::Protobuf::DescriptorPool.generated_pool.lookup("example.protobuf.SimpleMessage").msgclass
  end
end
この生成を行うには次のようにprotocを使う。
$ protoc -I. --ruby_out=. example.proto
protocプラグイン
さて、先ほど幾つかの言語がprotocの生成先としてサポートされていると言った。それ以外の言語でもprotobufが使えないと困るため、自然な発想としてプラグインによる拡張機構が提供されている。
protocは処理の途中で外部プログラムを呼び出し、その助けを得てGoやSwiftやCやDartやHaskellやいろんな言語をサポートする。
プラグインの仕組みは極めてシンプルで、protocは解析結果を外部プログラムの標準入力に書く。外部プログラムは出力したい内容を標準出力に書く。するとprotocはその指定通りにディレクトリを掘り、ファイルを書き込む。
ところで、プラグインがprotocに書き込み指示するファイルは1入力に対して複数あっても良いし、そもそも出力されるファイルが「未知のプログラミング言語に対してシリアライズ機能を提供するためのコード」である必要なんかどこにもない。だからprotocプラグインは事実上はprotobufスキーマを受け取って任意の処理をするためのシステムとして利用でき、利用されている。
プラグインの書き方
繰り返しになるがプラグインを書くのは簡単なので、まずは例を見てみよう。
プラグインはどの言語で書いても良いが、ここではgoを使うことにする。
package main

import (
	"io"
	"io/ioutil"
	"log"
	"os"

	"github.com/golang/protobuf/proto"
	descriptor "github.com/golang/protobuf/protoc-gen-go/descriptor"
	plugin "github.com/golang/protobuf/protoc-gen-go/plugin"
)

func parseReq(r io.Reader) (*plugin.CodeGeneratorRequest, error) {
	buf, err := ioutil.ReadAll(r)
	if err != nil {
		return nil, err
	}

	var req plugin.CodeGeneratorRequest
	if err = proto.Unmarshal(buf, &req); err != nil {
		return nil, err
	}
	return &req, nil
}

func processReq(req *plugin.CodeGeneratorRequest) *plugin.CodeGeneratorResponse {
	files := make(map[string]*descriptor.FileDescriptorProto)
	for _, f := range req.ProtoFile {
		files[f.GetName()] = f
	}

	var resp plugin.CodeGeneratorResponse
	for _, fname := range req.FileToGenerate {
		f := files[fname]
		out := fname + ".dump"
		resp.File = append(resp.File, &plugin.CodeGeneratorResponse_File{
			Name:    proto.String(out),
			Content: proto.String(proto.MarshalTextString(f)),
		})
	}
	return &resp
}

func emitResp(resp *plugin.CodeGeneratorResponse) error {
	buf, err := proto.Marshal(resp)
	if err != nil {
		return err
	}
	_, err = os.Stdout.Write(buf)
	return err
}

func run() error {
	req, err := parseReq(os.Stdin)
	if err != nil {
		return err
	}

	resp := processReq(req)

	return emitResp(resp)
}

func main() {
	if err := run(); err != nil {
		log.Fatalln(err)
	}
}
若干エラー処理をサボっているが、このプラグインprotoc-gen-reqdumpは入力されたコード生成リクエスト自体をテキスト形式にして出力する。
-
parseReq:- 標準入力からEOFまで読み込む。
- このバイト列はprotobufのシリアライズ形式になった
CodeGeneratorRequestというprotobufメッセージである。なので、proto.Unmarshalでデシリアライズする。
-
processReq:- 読み取った
CodeGeneratorRequestに応じて望む処理を行い、最後にCodeGeneratorResponseを返す。 - 中でも、
CodeGeneratorResponse内のfileフィールドが重要で、ここにCodeGeneratorResponse.Fileメッセージを追加しておくと、あとでprotocがそれに従ってファイルを出力してくれる。
- 読み取った
-
emitResp:- 最後に
CodeGeneratorResponseメッセージをprotobuf形式にシリアライズし、その結果のバイト列を標準出力に書く。
- 最後に
入力メッセージの詳細
この例ではCodeGeneratorRequestメッセージの中身はあまり真面目に見ておらず、単にそれをproto.MarshalTextStringでテキスト形式に変換しているだけである。
しかしこれは特殊な例で、一般的にはCodeGeneratorRequestの中身をもう少し詳しく知らなければ望む処理を行えない。では、中身には何が入っているのか。
「それはスキーマを読めば分かるし、スキーマを公開するチームはより詳細に必要な情報をコメントでスキーマファイルに書いてある」というのがprotobufの考え方だ。なので、まずはスキーマを見てみよう。(コメントは一部割愛した)
message CodeGeneratorRequest {
  // The .proto files that were explicitly listed on the command-line.  The
  // code generator should generate code only for these files.  Each file's
  // descriptor will be included in proto_file, below.
  repeated string file_to_generate = 1;

  // The generator parameter passed on the command-line.
  optional string parameter = 2;

  // FileDescriptorProtos for all files in files_to_generate and everything
  // they import.  The files will appear in topological order, so each file
  // appears before any file that imports it.
  // (引用註: コメント省略)
  repeated FileDescriptorProto proto_file = 15;

  // The version number of protocol compiler.
  optional Version compiler_version = 3;
}
-
files_to_generate: 0個以上のファイルパスが入っている。 -
parameter: 後述のようにprotocプラグインにはコマンドライン引数を渡すことができ、それが文字列型で入っている。 -
proto_file:files_to_generateにリストされたすべてのprotobufスキーマファイルと、それらから直接・間接にimportされたすべてのprotobufスキーマファイルの解析結果がFileDescriptorProtoメッセージとして入っている。 -
compiler_version: いままであまり意識したことがなかったが、protocのバージョンが入ってるらしい。へー。
というわけなので、先ほどの例ではまずproto_fileに入っているファイルのパスからファイルの中身へのmapを構築しておいて、files_to_generateの要素ごとにそのmapを引いて中身を取り出した訳だ。
func processReq(req *plugin.CodeGeneratorRequest) *plugin.CodeGeneratorResponse {
	// map構築
	files := make(map[string]*descriptor.FileDescriptorProto)
	for _, f := range req.ProtoFile {
		files[f.GetName()] = f
	}

	var resp plugin.CodeGeneratorResponse
	for _, fname := range req.FileToGenerate {
		f := files[fname] // ファイルの中身を引く
		out := fname + ".dump"

		// 出力設定にファイルを追加
		resp.File = append(resp.File, &plugin.CodeGeneratorResponse_File{
			Name:    proto.String(out),
			Content: proto.String(proto.MarshalTextString(f)),
		})
	}
	return &resp
}
更に一段潜ってFileDescriptorProtoを見てみても良いが、これはprotobufのスキーマDSLをprotobufメッセージとして表現しただけなので、FileDescriptorProto自身のスキーマとDSLの解説を見れば分かると思う。
出力メッセージの詳細
出力メッセージのほうも一応確認しておく。
message CodeGeneratorResponse {
  // Error message.  If non-empty, code generation failed.  The plugin process
  // should exit with status code zero even if it reports an error in this way.
  // (引用註: 以下略)
  optional string error = 1;

  // Represents a single generated file.
  message File {
    // The file name, relative to the output directory.  The name must not
    // contain "." or ".." components and must be relative, not be absolute (so,
    // the file cannot lie outside the output directory).  "/" must be used as
    // the path separator, not "\".
    // (引用註: 以下略)
    optional string name = 1;

    // (引用註: 略)
    optional string insertion_point = 2;

    // The file contents.
    optional string content = 15;
  }
  repeated File file = 15;
}
もう説明はいらないぐらいだと思うが、要するに出力ファイル名とファイルの中身のペアのリストをfileフィールドに設定すれば良い。insertion_pointはかなり応用的な話なので割愛する。
プラグインの呼び出し
以上のようにして開発したプラグインは、どこか$PATHの通ったところに置いておくか、またはprotoc実行時に明示的に指定する。
最初のケースについて、たとえば下記のようにprotocを実行したとしよう。
$ protoc --foo_out=DIR input.proto
このとき、protocは$PATH上からprotoc-gen-fooという名前の実行ファイルを探し、それをプラグインと見なして呼び出す。protocはプラグインの標準出力からCodeGeneratorResponseをデシリアライズし、その結果指定された通りにファイルを生成する。CodeGeneratorResponse.File.nameフィールドに指定したパスは、--foo_outに指定したディレクトリからの相対で解釈される。
一方、$PATHから探すのではなくプラグインの実行ファイルパスを直接指定することもできる。
$ protoc --plugin=path/to/plugin_executable --foo_out=DIR input.proto
ちなみに、protocがやってくれるのは本当に単純に対象プラグインの実行ファイルを引数なしで実行するだけである。コマンドライン引数は使えないので、例えばもしプラグインをRubyで書いており、bundle exec ruby plugin.rbみたいなものを実行したいとすれば、次のようなラッパースクリプトを書かなければならない。
#!/bin/sh -e
cd /path/to/working/dir
exec bundle exec ruby plugin.rb
プラグインへの引数
さて、だいぶ奇妙に見えるとは思うが、ここでプラグインに実行時引数を指定する方法も紹介する。こうだ。
$ protoc --foo_out=arg1=aaaaaa,arg2,arg3=cccccc:DIR input.proto
出力先ディレクトリ指定の前に何か書いて:で終端すると、protocはその部分をプラグインに渡す引数だと見なす。と言ってもプラグインのプロセス起動時に引数として渡してくれるわけではない。CodeGeneratorRequest.parameterフィールドにこの文字列がそのまま設定されるので、プラグイン側で頑張って解析することになる。
引数文字列を解析する実装はプラグインに委ねられているので、当然どんな形式で引数を受け付けようがプラグインの自由ではある。ただし、ユーザーを驚かせないように下記の一般的な慣習に従った方がよいだろう。
- オプションパラメータ指定はカンマ区切りで繋げる
- ブール値オプションはそのオプション名だけ、それ以外のオプションは
name=value形式で指定する
たとえば、grpc-gatewayの場合、
if req.Parameter != nil {
	for _, p := range strings.Split(req.GetParameter(), ",") {
		spec := strings.SplitN(p, "=", 2)
		if len(spec) == 1 {
			if err := flag.CommandLine.Set(spec[0], ""); err != nil {
				glog.Fatalf("Cannot set flag %s", p)
			}
			continue
		}
		name, value := spec[0], spec[1]
		// (引用註: 一部略)
		if err := flag.CommandLine.Set(name, value); err != nil {
			glog.Fatalf("Cannot set flag %s", p)
		}
	}
}
カスタムオプションとextensions
最後に、プラグインと密接に関係する話題としてカスタムオプションとextensionsを説明したいのだが、割と前提の話が長くなるので次回に回す。
まとめ
-
protocプラグインを書くと、protobufスキーマを読んで任意の処理をするツールを自作できる -
protocは、規約に従ったファイル名の実行ファイルまたは指定された実行ファイルを探して、プラグインとして実行する - プラグインは
CodeGeneratorRequestを標準入力から受け取り、CodeGeneratorResponseを標準出力に書き出す-
CodeGeneratorRequest,CodeGeneratorResponse自身もprotobufメッセージなので、詳しいことはスキーマを読めば分かる。
-
- プラグインへの、普通の意味でのコマンドライン引数を渡すことはできない。このため、プラグインのラッパースクリプトが必要になることもある。
-
protocの出力ディレクトリ指定のところで、プラグインに渡す引数を指定できる。この引数はCodeGeneratorRequest.parameterフィールドに入っているので、自分で頑張って解析する。
-
正直、この公式実装が生成するRubyコードは死ぬほどダサいと思う。公式実装がRubyをサポートする前に作られていたプラグインのほうが格好いいよ。 https://github.com/codekitchen/ruby-protocol-buffers/blob/master/spec/proto_files/simple.pb.rb ↩
