#初めに...
Qiita初心者投稿です。
見にくい...とかこんな内容誰でもできるわ!というのは勘弁してください...
あくまで、機械学習や人工知能の知識ゼロさんが行ったことです。(最初は、エポックって何?Accuracyって何?って状態でしたww)
#RBMとは
RBM(Restricted Boltzmann machine)
Deep Learningにおける 事前学習(Pre Training)法の一種で、良く名前を聞く AutoEncoderと双璧を為すモデルの1種です。統計力学に端を欲し、1984年~1986年にモデルが考案されました。入力を受けて出力が 決定論的(deterministic) に決まるAutoencoderとは違い、議論を確率分布の上で行える 生成モデル であるため、利便性の高いモデルとして知られています。

#よくわかんないなぁ...
###色々調べました!
そうしたら...
scikit learnにBernoulliRBMなるものが存在している!
やるしかねぇ
#実装
とりあえず、MNISTというデータセットで実行!
import numpy as np
import matplotlib.pyplot as plt

from scipy.ndimage import convolve
from sklearn import linear_model, datasets, metrics
from sklearn.model_selection import train_test_split
from sklearn.neural_network import BernoulliRBM
from sklearn.pipeline import Pipeline
from sklearn.base import clone

# 使用したデータセット
from keras.datasets import fashion_mnist
from keras.datasets import mnist

from keras.layers import Input, Dense
from keras.models import Model
from keras import layers, models

import time
import numpy
とりあえずimportは上記のような感じ
次は、例に示されている通りに行う(どうゆう処理しているのかはわからない部分が多い)
def nudge_dataset(X, Y):
    """
    This produces a dataset 5 times bigger than the original one,
    by moving the 8x8 images in X around by 1px to left, right, down, up
    """
    direction_vectors = [
        [[0, 1, 0],
         [0, 0, 0],
         [0, 0, 0]],

        [[0, 0, 0],
         [1, 0, 0],
         [0, 0, 0]],

        [[0, 0, 0],
         [0, 0, 1],
         [0, 0, 0]],

        [[0, 0, 0],
         [0, 0, 0],
         [0, 1, 0]]]

    def shift(x, w):
        return convolve(x.reshape((8, 8)), mode='constant', weights=w).ravel()

    X = np.concatenate([X] +
                       [np.apply_along_axis(shift, 1, X, vector)
                        for vector in direction_vectors])
    Y = np.concatenate([Y for _ in range(5)], axis=0)
    return X, Y


# Load Data
# (x_train, y_train), (x_test, y_test) = mnist.load_data()
# X, y = mnist.load_data()
# X = np.asarray(X, 'float32')
# X, Y = nudge_dataset(X, y)
# X = (X - np.min(X, 0)) / (np.max(X, 0) + 0.0001)  # 0-1 scaling

# X_train, X_test, Y_train, Y_test = train_test_split(
#     X, Y, test_size=0.2, random_state=0)

# (X_train, Y_train), (X_test, Y_test) = fashion_mnist.load_data()
(X_train, Y_train), (X_test, Y_test) = mnist.load_data()

X_train = X_train.astype('float32') / 255.
X_test = X_test.astype('float32') / 255.
X_train = X_train.reshape((len(x_train), np.prod(x_train.shape[1:])))
X_test = X_test.reshape((len(x_test), np.prod(x_test.shape[1:])))

# Models we will use
logistic = linear_model.LogisticRegression(solver='newton-cg', tol=1)
rbm = BernoulliRBM(random_state=0, verbose=True)

rbm_features_classifier = Pipeline(
    steps=[('rbm', rbm), ('logistic', logistic)])

# #############################################################################
# Training

# Hyper-parameters. These were set by cross-validation,
# using a GridSearchCV. Here we are not performing cross-validation to
# save time.
rbm.learning_rate = 0.06
rbm.n_iter = 10
# More components tend to give better prediction performance, but larger
# fitting time
rbm.n_components = 100
logistic.C = 6000

# Training RBM-Logistic Pipeline
rbm_features_classifier.fit(X_train, Y_train)

# Training the Logistic regression classifier directly on the pixel
raw_pixel_classifier = clone(logistic)
raw_pixel_classifier.C = 100.
raw_pixel_classifier.fit(X_train, Y_train)

# #############################################################################
# Evaluation

Y_pred = rbm_features_classifier.predict(X_test)
print("Logistic regression using RBM features:\n%s\n" % (
    metrics.classification_report(Y_test, Y_pred)))

Y_pred = raw_pixel_classifier.predict(X_test)
print("Logistic regression using raw pixel features:\n%s\n" % (
    metrics.classification_report(Y_test, Y_pred)))
ソースコード汚くてすみません...
コメントアウト消さないとな...綺麗なコード書くのって難しい...
sklearnライブラリのBernoulliRBMを使用しています。この例では、BernoulliRBMの特徴抽出器とLogisticRegressionの分類器を使って分類パイプラインを構築しています。比較のために、生の画素値に対するロジスティック回帰を提示しています。
#結果
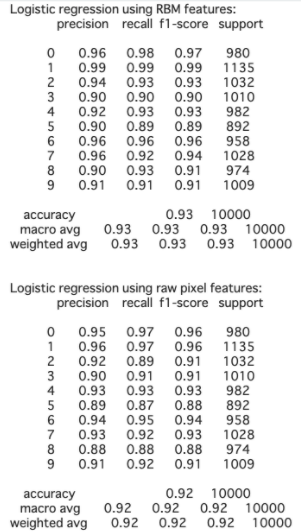
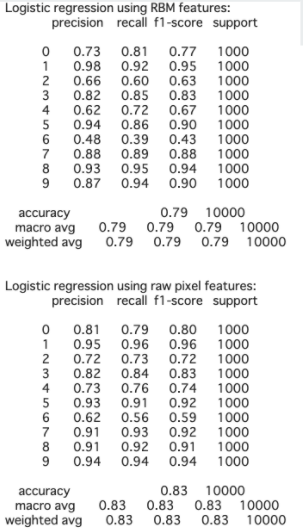
###MNIST...Accuracy: 0.97 Fashion-MNIST...Accuracy: 0.79
エポック数あげたらかなり時間がかかるからエポック数は10に設定(課題提出まで時間ないし...)
#結論
ソースコードコピペして実装してみただけだけど、探し出すのに手間取った...もっと理解しなくては!と思った。
あとは、グラフ?損失関数などを表示できたらよりわかりやすいだろうなと思った。
これから少しずつ投稿していきます。dockerやWeb関係は投稿したいかな...
よろしくお願い致します。