はじめてのSpring Boot
ものすごく出遅れ感がありますがSpring Bootを勉強し始めました。
会社では独自フレームワークやStruts2を使ったシステムがほとんどでしたが昨今騒がれている脆弱性についてやマイクロサービス化していく流れ、春にJJUG CCC 2017 Springに参加させていただいた時にはどこもかしこもSpring Bootの話が多く、ネットに情報も多く書籍も揃っていることからSpring Bootを使ってみることにしました。
使ってみた実感としてはとにかくすぐ始められて簡単に機能追加ができて便利だなと実感しました。本を読みつつ公式ドキュメントをみてさらにはネットで情報を調べればあっという間に簡単なシステムなら出来上がってしまいます。とはいえ、いくつかハマるポイントもあったりしましたが・・・
適当に機能を動かしてみるのもいいけどせっかくなので簡単なサンプルシステムを作って勉強してみることにしました。
作ったソースをgithubにて公開してありますのでこれから新たに始める方の参考になれば幸いです。
https://github.com/ewai/spring-boot-mvc-template
※普段はプロジェクト管理などが主な仕事でコーディングからは随分遠のいているため不備などあるかもしれませんがご容赦ください。もっといいやり方あるなどあれば教えていただけると幸いです。
※デザインいまいちです・・
残TODO
- Unit Test(Junit)
- Integration Test
随時作成して更新する予定です。
こんなサンプルシステム作ってみました
システム概要
書籍情報を管理するシステム
(簡単なマスタ管理を行うようなシステム)
- 検索、検索結果一覧
- 登録
- 更新
- 削除
- ログイン
データを操作するにはログインが必要になる
登録・更新できるのは管理者のみ ←TODO 権限周りがうまくいっていない
画面遷移図
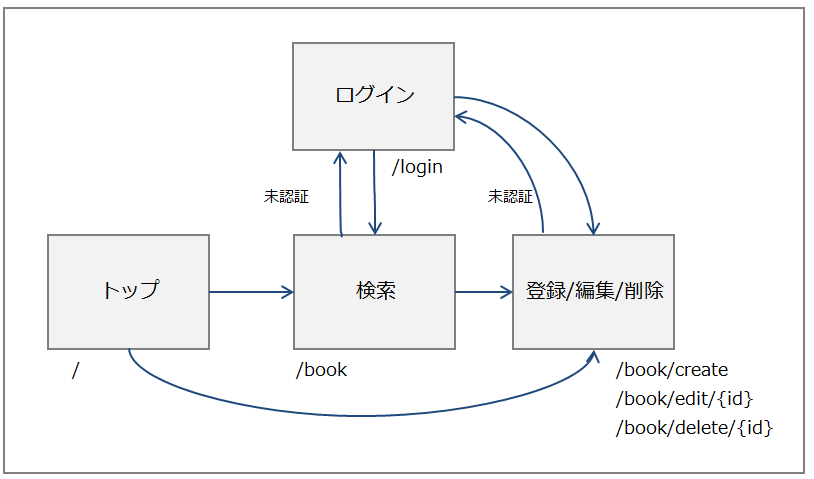
トップ画面以外は認証済みの場合のみ表示できます。
とりあえずデモを見てみる
| ユーザー | パスワード | 権限 |
|---|---|---|
| sbt | sbt | 通常ユーザー権限(参照系のみ) |
| admin | admin | 管理者権限(データ更新が可能) |
ディレクトリ構成
src
  ├─main
  │  ├─java
  │  │  └─info
  │  │      └─ewai
  │  │          └─sbmt
  │  │              ├─config (Security周りの設定など
  │  │              ├─domain (entity, repositoryなど
  │  │              ├─service  (service
  │  │              └─web (controller, validator
  │  │                  └─form (form
  │  └─resources
  │      ├─static
  │      │  ├─css
  │      │  └─img
  │      └─templates (thymleafのテンプレート
  └─test
      └─java
          └─info
              └─ewai
                  └─sbt (TODO Junit
標準のパッケージ構成にしています。
標準に沿わない場合は@ComponentScan("xxx")を指定しないといけないようで、
初め知らずに自由に作ってしまいはまりました。
build.gradleで設定しているライブラリ
~
        springBootVersion = '1.5.6.RELEASE'
~
    compile("org.webjars:jquery:3.2.1")
    compile("org.webjars:bootstrap:3.3.7")

    compile('org.springframework.boot:spring-boot-starter-actuator')
    compile('org.springframework.boot:spring-boot-starter-data-jpa')
    compile('org.springframework.boot:spring-boot-starter-thymeleaf')
    compile('org.springframework.boot:spring-boot-starter-security')
    compile('org.springframework.boot:spring-boot-starter-jetty')
    compile('org.thymeleaf.extras:thymeleaf-extras-springsecurity4:3.0.2.RELEASE')
    runtime('mysql:mysql-connector-java:5.1.43')
    testCompile('org.springframework.boot:spring-boot-starter-test')
    testCompile('org.springframework.security:spring-security-test')
githubのソース build.gradle
デフォルトではtomcatが使われますが会社でJettyを使っている関係もありJettyにしています。
環境
開発環境
- Java8
- Eclipse Oxygen
- windows10
ライブラリ
- Spring Boot 1.5.6
- Spring Framework 4.3.0 (上記を指定すると使われるバージョン)
アプリケーションサーバー
- Jetty
DB
- MySQL 5.7
- Docker
DB環境
※動かしてみる場合に必要ですがソースを見るだけなら不要です。
Docker Hubの公式MySQLを元に自動でDDL、テストデータを登録するDockerfileを作りました。
そちらからdocker buildしてイメージを作るとDDLもテストデータも入っている状態で
MySQLが立ち上がるのでそのまますぐにシステムを稼働できます。
※ローカルにDockerがインストール済みの前提です
以下、かなりざっくりの構築手順です。
初回

# こちらをcloneするなりダウンロードするなりする
https://github.com/ewai/docker-spring-boot-template-mysql

以下、コマンドの実行

# イメージ作成
docker build -t sbtdb .

# コンテナ作成
docker run -d --name sbtdb -p 3306:3306 sbtdb

これで起動されているはずです。
docker ps -a

statusがUPになっていればOK。
※DDLもテストデータも投入済みです
2回目以降

状態の確認
docker ps -a

statusがExitedになっていたらコンテナを起動する
docker start sbtdb
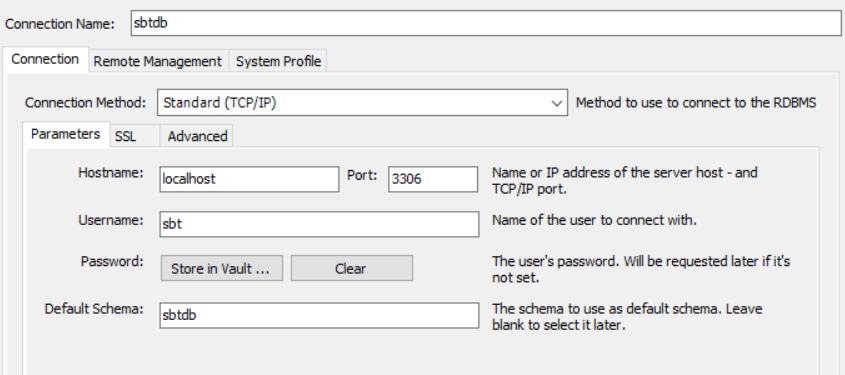
statusがUPになったら接続できる状態ですのでMySQL Workbenchなどで接続してみる。
sbtdb
接続情報
jdbc:mysql://localhost/sbtdb

ユーザー:sbt
パスワード:sbt
例)MySQL Workbench
動かしてみる
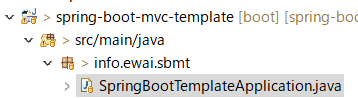
- ローカルに上記のDB構築する
- Eclipseにソースをimportする(github)
- info.ewai.sbmt.SpringBootTemplateApplicationを実行する (gradle buildしてjarを実行してもOK)
- http://localhost:8080/にアクセスする
ソース周りの説明
ログイン認証
関連ソース
+ compile('org.springframework.boot:spring-boot-starter-security')
Spring Securityを使えるようにします。
これを追加するだけで自動的にBasic認証がかかる状態になります。
ログイン認証させたいのでその部分を作りました。
package info.ewai.sbmt.config;

import org.springframework.beans.factory.annotation.Autowired;
import org.springframework.context.annotation.Configuration;
import org.springframework.security.config.annotation.authentication.builders.AuthenticationManagerBuilder;
import org.springframework.security.config.annotation.authentication.configurers.GlobalAuthenticationConfigurerAdapter;
import org.springframework.security.config.annotation.web.builders.HttpSecurity;
import org.springframework.security.config.annotation.web.builders.WebSecurity;
import org.springframework.security.config.annotation.web.configuration.EnableWebSecurity;
import org.springframework.security.config.annotation.web.configuration.WebSecurityConfigurerAdapter;
import org.springframework.security.crypto.bcrypt.BCryptPasswordEncoder;
import org.springframework.security.web.util.matcher.AntPathRequestMatcher;

import info.ewai.sbmt.service.UserService;

@Configuration
@EnableWebSecurity
public class SecurityConfig extends WebSecurityConfigurerAdapter {

    @Override
    public void configure(WebSecurity web) throws Exception {
        web.ignoring().antMatchers("/img/**", "/css/**", "/js/**", "/webjars/**");
    }

    @Override
    protected void configure(HttpSecurity http) throws Exception {
        http.authorizeRequests()
                .antMatchers("/").permitAll()
                .anyRequest().authenticated()
                .and()
            .formLogin()
                .loginPage("/login")
                .usernameParameter("username")
                .passwordParameter("password").permitAll().and()
            .logout()
                .logoutRequestMatcher(new AntPathRequestMatcher("/logout"))
                .logoutSuccessUrl("/")
                .deleteCookies("JSESSIONID")
                .invalidateHttpSession(true).permitAll();
    }

    @Configuration
    protected static class AuthenticationConfiguration extends GlobalAuthenticationConfigurerAdapter {
        @Autowired
        UserService userService;

        @Override
        public void init(AuthenticationManagerBuilder auth) throws Exception {
            auth.userDetailsService(userService).passwordEncoder(new BCryptPasswordEncoder());
        }
    }
}
- 各静的ファイルが認証不要にする
- "/"へのアクセスのみ認証不要とする
- "/"以外へアクセスが来た場合は"/login"へ遷移させる
- "/logout"へアクセスが来た場合はJSESSIONIDを削除して"/"へ遷移させる
- "/login"へpostが来たらパラメータを元にuserServiceでユーザーを取得しパスワードをチェックする
    @RequestMapping(value = "/login", method = RequestMethod.GET)
    public String login() {
        return "login";
    }
ログインページに遷移させるだけのコントローラです。
こういうのが確か設定だけで出来るのを見つけた気がするのですが忘れてしまったので、
そういうのは一旦SimpleController.javaに集めました。
@Component
public class UserService implements UserDetailsService {

    @Autowired
    private UserRepository userRepository;

    @Override
    public UserDetails loadUserByUsername(String username) throws UsernameNotFoundException {
        if (StringUtils.isEmpty(username)) {
            throw new UsernameNotFoundException("Username is empty");
        }
        User user = userRepository.findByUsername(username);
        if (user == null) {
            throw new UsernameNotFoundException("User not found for name: " + username);
        }
        return user;
    }
}
public interface UserRepository extends JpaRepository<User, Long> {
    public User findByUsername(String username);
}
その他
info.ewai.sbmt.domain.User
info.ewai.sbmt.domain.Authorities
login.html
UserDetailsをimplementsしてほぼ標準で作ってしまったが、
社内システムのユーザー情報を変換して同期すれば使えるかもしれません。
サンプルシステム内で使えるユーザー・権限
デフォルトで投入されているデータ
| ユーザー | パスワード | 権限 | 権限内容 |
|---|---|---|---|
| sbt | sbt | ROLE_USER | 通常ユーザー権限(参照系のみ) |
| admin | admin | ROLE_ADMIN | 管理者権限(データ更新が可能) |
| admin | admin | ACTUATOR | Spring Boot Actuatorを使える権限 |
検索画面
    @RequestMapping(value = "/book", method = RequestMethod.GET)
    public String index(Model model) {
        List<Book> list = this.bookservice.findAll();
        model.addAttribute("booklist", list);
        model.addAttribute("bookForm", new BookForm());
        return "book";
    }
    public List<Book> findByBookNameLikeAndTagLike(String bookName, String tag) {
        if (StringUtils.isEmpty(bookName) && (StringUtils.isEmpty(tag))) {
            return this.findAll();
        }
        return this.bookRepository.findByBookNameLikeAndTagLike("%" + bookName + "%", "%" + tag + "%");
    }
public interface BookRepository extends JpaRepository<Book, Long> {

    public List<Book> findByBookNameLikeAndTagLike(String bookName, String tag);
}
メソッドでLikeと指定するとあいまい検索ができるので使ってみました。
パラメータの方には自動で%がつくのかと思いましたがつかなかったので%を付けました。
標準の機能で簡単にページングできそうですがとりあえずしてません。
実際には複雑なSQLを作ることもでてくると思うのでカスタムrepositoryを作ってJPQLやSQLを書くことになるかと思ってます。
@PersistenceContext
EntityManager entityManager;
 ~
Query query = entityManager.createQuery("from Book where id = :id")
編集画面
入力チェック
カスタムVaridatorを作ってチェックしています。
@Component
public class BookValidator implements Validator {

    @Autowired
    BookService bookService;

    @Override
    public boolean supports(Class<?> clazz) {
        return BookForm.class.isAssignableFrom(clazz);
    }

    @Override
    public void validate(Object target, Errors errors) {

        // required check
        ValidationUtils.rejectIfEmptyOrWhitespace(errors, "bookName", "field.required");

        // TODO form check
        // BookForm form = BookForm.class.cast(target);
        // errors.rejectValue("field", "errorCode");

        // global message
        if (errors.hasErrors()) {
            errors.reject("input.error");
        }
    }
}
ほぼBook.javaのEntityと同じ
必須チェックやサイズのチェックなどの簡単なチェックはFormにアノテーションを付ければ
チェック可能ですがFormを使いまわしたいのとFormとValidatorにチェックを分散させたくなかったので
Validatorにチェックを集約しています。
- グローバルに出すエラーメッセージ(画面全体へのメッセージ)
- 各フィールドに出すエラーメッセージ
のエラーメッセージを設定しています。
エラーメッセージはmessages_ja.propertiesに入っています。
    @RequestMapping(value = "/book/save", method = RequestMethod.POST)
    public String save(@Valid @ModelAttribute BookForm bookForm, BindingResult result, Model model) {
        logger.info("save/" + bookForm.getBookId());

        if (result.hasErrors()) {
            return "book-edit";
        }

        try {
            this.bookservice.save(new Book(bookForm));
        } catch (Exception e) {
            result.reject("exception.error");
            result.reject("using defaultMessage", e.toString());
            return "book-edit";
        }

        return "book-complete";
    }
new Book(bookForm)
にてformからentityへ入れ替えをしています。
何かいいやり方ないものですかね。
// グルーバルなメッセージを表示
bindingResult.reject("errorCode")
// 各フィールドへのエラーメッセージを表示
bindingResult.reject("field", "errorCode")
ControllerではBindingResultにrejectを設定して、
ValidatorではErrorsにrejectを設定する。
@Valid @ModelAttribute BookForm bookForm, BindingResult result
引数部分の定義はこの順で書くのがルールのようです。
BindingResultを前に持っていくとエラーが発生します。
ちょいはまりました。
@ValidをつけるとValidatorで事前にチェックされた状態でここが呼ばれます。
ですので、result.hasErrors()でエラーがあるかしかチェックしていません。
更新処理
    @Transactional
    public Book save(Book book) {
        return this.bookRepository.save(book);
    }
実際にはもっと複雑な処理が入ってくるかと思いますが単純にsaveしているだけです。
@Transactionalを付けておくとExceptionが発生した際にrollbackされます。
非検査例外(RuntimeExceptionなど)がrollbackされるそうです。
参考にさせていただきました)
http://qiita.com/NagaokaKenichi/items/a279857cc2d22a35d0dd
Controllerのメソッドに@Transactionalを付けようかと思いましたが、
画面制御の関係でExceptionをcatchして処理しますがそうするとrollbackされなかったので、
ビジネスロジックは基本全てServiceにもっていくことでここにつければいいのかな
と思いこうしました。
複雑な場合はもちろんEntityManagerからTransactionを取り出して制御することになりそうですが、
基本はアノテーションで済むといいかな、済まないのかな・・。
Thymeleafのテンプレート共通化
各画面で共通で使うようなソースで変更があったら全ページ変更しないと・・・
みたいなソースを共通化しました。
以下が共通化したソースです。
<!DOCTYPE html>
<html xmlns:th="http://www.thymeleaf.org"
      xmlns:sec="http://www.springframework.org/schema/security">
<head>
<!-- common head -->
<th:block th:fragment="head"><meta http-equiv="Content-Type" content="text/html; charset=utf-8" />
    <meta http-equiv="X-UA-Compatible" content="IE=edge" />
    <link href="https://maxcdn.bootstrapcdn.com/bootstrap/3.3.7/css/bootstrap.min.css"
          th:href="@{/webjars/bootstrap/3.3.7/css/bootstrap.min.css}" rel="stylesheet" />
    <link href="/css/common.css"
          th:href="@{/css/common.css}" rel="stylesheet" />
    <script src="http://ajax.googleapis.com/ajax/libs/jquery/3.2.1/jquery.min.js"
            th:src="@{/webjars/jquery/3.2.1/jquery.min.js}"></script>
    <script src="https://maxcdn.bootstrapcdn.com/bootstrap/3.3.7/js/bootstrap.min.js"
            th:src="@{/webjars/bootstrap/3.3.7/js/bootstrap.min.js}"></script></th:block>
</head>
<body>
    <div th:fragment="header" class="container" id="header">
        <h1><a href="/">Book</a></h1>
        <p style="text-align:right;" th:if="${#httpServletRequest.remoteUser != null}">Hello
          <span th:text="${#httpServletRequest.remoteUser}" /> |
          <a href="/logout">ログアウト</a>  |
          <a href="https://github.com/ewai/spring-boot-mvc-template" target="_blank" alt="spring-boot-mvc-template"><img src="img/mark-github.svg" /></a>
        </p>
    </div>

    <div th:fragment="footer" class="container" id="footer">
        <ul>
            <li><a href="https://github.com/ewai/spring-boot-mvc-template" target="_blank"><img src="img/mark-github.svg"  alt="spring-boot-mvc-template"/></a> <a href="https://github.com/ewai/spring-boot-mvc-template">spring-boot-mvc-template</a></li>
            <li><a href="https://github.com/ewai/docker-spring-boot-template-mysql">docker-spring-boot-template-mysql</a></li>
        </ul>
    </div>

</body>
</html>
th:fragment のタグ内がテンプレートになります。
3つ作りました。
- headの共通で読み込むJS,CSS
- header
- footer
共通ファイルなので別ディレクトリにしようかと思ったのですが読み込まれなかったのでtemplates直下に置いてあります。
<head>
    <th:block th:include="common::head"></th:block>
    <title>Book Search</title>
</head>
<body>
    <th:block th:replace="common::header"></th:block>
  ~~~コンテンツ~~~
    <th:block th:replace="common::footer"></th:block>
</body>
</html>
各ページをこのように使っています。
デメリットとしてはhtmlとしてデザインを確認できなくなることです。
個人的にはアプリケーションを起動して動かしながら確認しますが、
デザイナーの方がピュアなhtmlで作成して確認するような場合は使わない方がいいかもしれません。
権限まわり
特定のユーザーのみに表示したりする場合
+ compile('org.thymeleaf.extras:thymeleaf-extras-springsecurity4:2.1.3.RELEASE')
はじめは以下を追加していたのですが動かず(sec:authorize="hasRole('ROLE_ADMIN')"がそのままhtmlに表示されていた)バージョンを下げたら動きました。
compile('org.thymeleaf.extras:thymeleaf-extras-springsecurity4:3.0.2.RELEASE')
権限があるユーザーのみ表示する場合
<li class="list-group-item" sec:authorize="hasRole('ROLE_ADMIN')"><a href="/book/create" th:href="@{/book/create}" class="btn btn-link" id="link">書籍登録</a></li>
secが使えるように追加
xmlns:sec="http://www.springframework.org/schema/security">
実行可能なjarにする
springBoot {
    executable = true
}
これを追加してビルドすると実行可能なjarになります。
どういうことかというと、
./spring-boot-mvc-template-0.0.1-SNAPSHOT.jar
というように実行できるようにあります。
OS起動時に自動で起動させておきたい時に使えます。
centos7の場合
[Unit]
Description=sbt
After=syslog.target

[Service]
User=sbtuser
ExecStart=/xxx/xxx/spring-boot-mvc-template-0.0.1-SNAPSHOT.jar
SuccessExitStatus=143

[Install]
WantedBy=multi-user.target
systemctl enable sbt.service
これでOS起動時に自動で起動されるようになりました。
Spring Boot Actuator
+ compile('org.springframework.boot:spring-boot-starter-actuator')
こちらを追加するだけで簡単にサーバー状態を確認できるようになるので追加しました。
User(UserDetails)のgetAuthorities()にて"ACUTIATOR"の権限を持っているユーザーで
ログインしないと参照できないようになっているようです。
今回のはadminユーザーにこの権限を持たせていますのでadmin/adminでログインすると参照できます。
{"status":"UP","diskSpace":{"status":"UP","total":247762329600,"free":125178765312,"threshold":10485760},"db":{"status":"UP","database":"MySQL","hello":1}}
サーバー生きてるし、DBも生きている、ディスク容量もまだ空いているということがわかります。
"ACUTIATOR"権限のないユーザーで参照してみたところ、
{"status":"UP"} が返ってきたのでサーバーが上がっているかどうかは参照できるもよう。
http://localhost:8080/env
さすがに"ACUTIATOR"権限が無い場合は環境変数系は参照できないようです。
エラーになりました。
Access is denied. User must have one of the these roles: ACTUATOR
http://localhost:8080/mappings
設計書が作れそうです。
   "{[/book],methods=[GET]}":{
      "bean":"requestMappingHandlerMapping",
      "method":"public java.lang.String info.ewai.sbmt.web.BookController.index(org.springframework.ui.Model)"
   },
   "{[/book/edit/{bookId}],methods=[GET]}":{
      "bean":"requestMappingHandlerMapping",
      "method":"public java.lang.String info.ewai.sbmt.web.BookController.edit(info.ewai.sbmt.web.form.BookForm,org.springframework.validation.BindingResult,java.lang.Long,org.springframework.ui.Model)"
   },
   "{[/book/save],methods=[POST]}":{
      "bean":"requestMappingHandlerMapping",
      "method":"public java.lang.String info.ewai.sbmt.web.BookController.save(info.ewai.sbmt.web.form.BookForm,org.springframework.validation.BindingResult,org.springframework.ui.Model)"
   },
このほかにもエンドポイントがありそうです。
http://qiita.com/MariMurotani/items/01dafd2978076b5db2f3
カスタマイズができたりURLのポートを変えたりもできるようですが一旦そのままとします。
参考にさせていただいた情報
Spring Framework Reference Documentation 4.3.0.RELEASE
http://docs.spring.io/spring/docs/4.3.0.RELEASE/spring-framework-reference/htmlsingle/
Spring Boot Reference Guide 1.5.6.RELEASE
http://docs.spring.io/spring-boot/docs/1.5.6.RELEASE/reference/htmlsingle/
Spring徹底入門 Spring FrameworkによるJavaアプリケーション開発
Spring全般の機能を網羅的に説明してあり理解するのに助かりました。
Spring bootについても少し書いてあります。
最後に
とっても簡単にすぐ作れるSpring bootですがお決まりのルールを知らないとはまることがちらほらありました。しかしながら公式ドキュメント、書籍、ネットの情報が豊富で比較的解決しやすいと感じました。
今回作ったのは簡単なサンプルシステムの為、実用的なシステムを作っていくとまたいろいろと試行錯誤やはまりどころもあるのかとは思いますが使っていきたいと感じました。
書籍やネットにいろいろ情報を載せていただいている方々有難うございました。