Perceptronパーセプトロン
参考書:
ゼロから作るDeepLearning Pythonで学ぶディープラーニングの理論と実践 斎藤康毅 著
開発環境:
VScode + 拡張機能Python(microsoft) + anaconda(統計処理、参考書の推薦ライブラリ)
この記事は、ゼロから作るDeep Learning 第2章の学習記録と、補足知識の記録になります。

1層パーセプトロンの数学的定義
入力信号を $x_1, x_2$、重みを $w_1, w_2$、バイアスを $b とすると、出力 y$ は以下の式で表されます。
$$
y = h(w_1 x_1 + w_2 x_2 + b)
$$
ここで h(x)$ はステップ関数です。
$$
h(x) = \begin{cases}
0 & (x \le 0) \\
1 & (x > 0)
\end{cases}
$$
※話が進むと、この$h(x)$が入れ替わります。なので、この形式で記述しました。
2層パーセプトロンによるXORの実現
XORゲートは、既存のゲート(AND, NAND, OR)を組み合わせることで実現できます。
第0層の入力 $(x_1, x_2)$ から第1層(NAND, OR)、そして第2層(AND)へと信号を伝達します。
$$
\begin{aligned}
s_1 &= \text{NAND}(x_1, x_2) \\
s_2 &= \text{OR}(x_1, x_2) \\
y &= \text{AND}(s_1, s_2)
\end{aligned}
$$
このように層を重ねることで、単層では不可能だった 「非線形」な領域の分離 が可能になります。
最初に、
基本論理回路AND,NAND,ORを、パーセプトロンで再現できるのか、Pythonで実際に確かめてみます。
パーセプトロンの学習、基本論理回路
まずは、基本論理回路のおさらい。
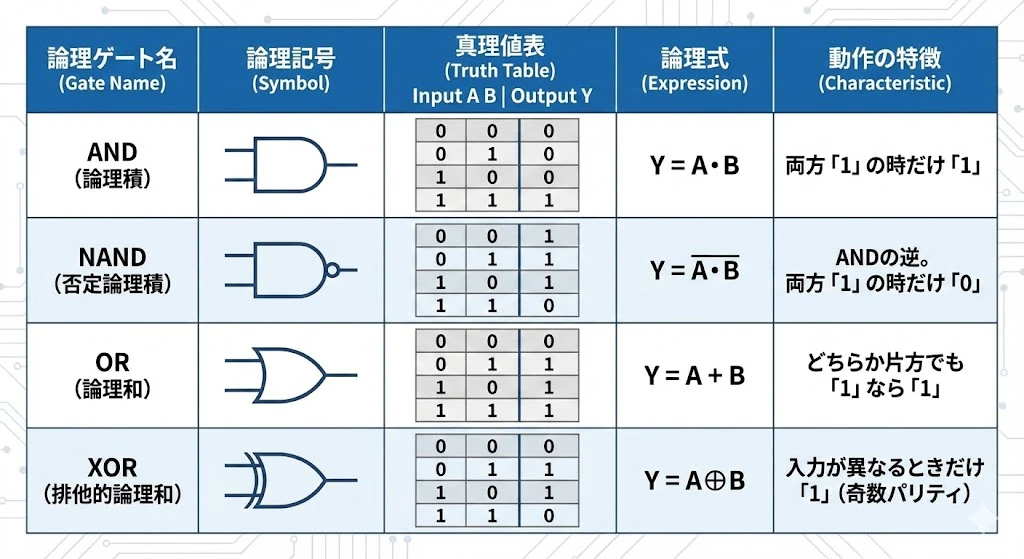
各基本論理回路のパーセプトロンの重みは、人間が適当に、正しい出力になるように設定します。
import numpy as np
def AND(x1,x2):
    x = np.array([x1,x2])
    w = np.array([0.5,0.5])
    d = -0.7
    temp = d+np.sum(x*w)
    if temp > 0:
        return 1
    else:
        return 0

def NAND(x1,x2):
    x = np.array([x1,x2])
    w = np.array([-0.5, -0.5])
    d = 0.7
    temp = d+np.sum(x*w)
    if temp > 0:
        return 1
    else:
        return 0

def OR(x1,x2):
    x = np.array([x1,x2])
    w = np.array([0.5,0.5])
    d = -0.3
    temp = d+np.sum(x*w)
    if temp>0:
        return 1
    else:
        return 0
XOR パーセプトロンの構築
XORは、2層パーセプトロンで正しい結果が得られます。
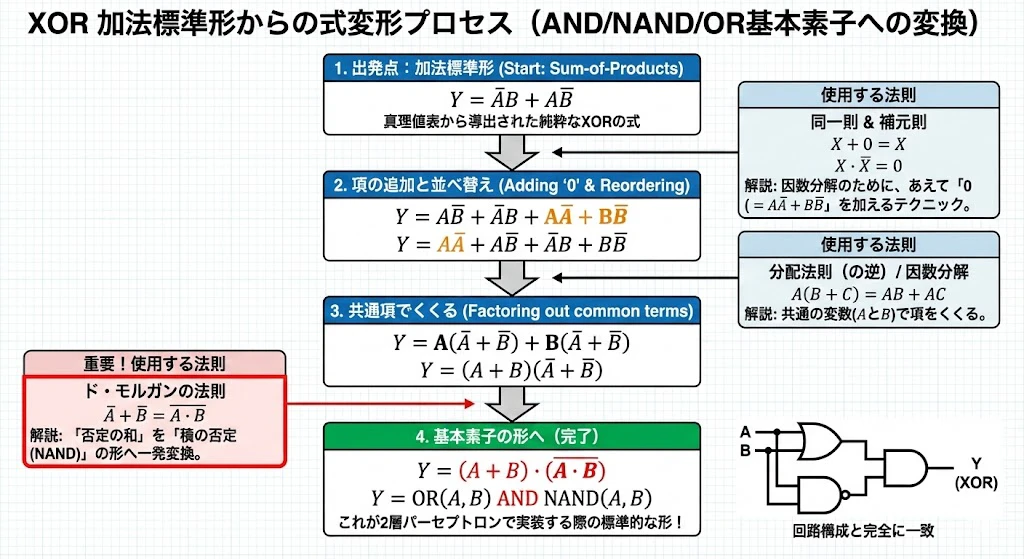
と論理式からも、2層が必要そうだと、わかります。
def XOR(x1, x2):
    s1 = NAND(x1, x2)
    s2 = OR(x1, x2)
    y = AND(s1, s2)
    return y
※あらかじめ AND, NAND, OR 関数が定義されている必要があります。
パーセプトロン 基本論理回路AND、NAND、OR、XOR 出来上がったコード
import numpy as np
def AND(x1,x2):
    x = np.array([x1,x2])
    w = np.array([0.5,0.5])
    d = -0.7
    temp = d+np.sum(x*w)
    if temp > 0:
        return 1
    else:
        return 0

def NAND(x1,x2):
    x = np.array([x1,x2])
    w = np.array([-0.5, -0.5])
    d = 0.7
    temp = d+np.sum(x*w)
    if temp > 0:
        return 1
    else:
        return 0

def OR(x1,x2):
    x = np.array([x1,x2])
    w = np.array([0.5,0.5])
    d = -0.3
    temp = d+np.sum(x*w)
    if temp>0:
        return 1
    else:
        return 0

def XOR(x1,x2):
    s1 = NAND(x1,x2)
    s2 = OR(x1,x2)
    temp = AND(s1,s2)
    if temp >0:
        return 1
    else:
        return 0

#後で解説する3入力XOR
def Input3XOR(x1,x2,x3):
    s1 = XOR(x1,x2)
    s2 = XOR(s1,x3)
    if s2 >0:
        return 1
    else:
        return 0

print("AND")
print(AND(0,0))
print(AND(0,1))
print(AND(1,0))
print(AND(1,1))
print("NAND")
print(NAND(0,0))
print(NAND(0,1))
print(NAND(1,0))
print(NAND(1,1))
print("OR")
print(OR(0,0))
print(OR(0,1))
print(OR(1,0))
print(OR(1,1))
print("XOR")
print(XOR(0,0))
print(XOR(0,1))
print(XOR(1,0))
print(XOR(1,1))
print("3inputXOR")
print(Input3XOR(0,0,0))
print(Input3XOR(0,0,1))
print(Input3XOR(0,1,0))
print(Input3XOR(0,1,1))
print(Input3XOR(1,0,0))
print(Input3XOR(1,0,1))
print(Input3XOR(1,1,0))
print(Input3XOR(1,1,1))
VScode 出力結果

ついでに、3入力、1出力の論理回路をパーセプトロンで置き換えてみます。
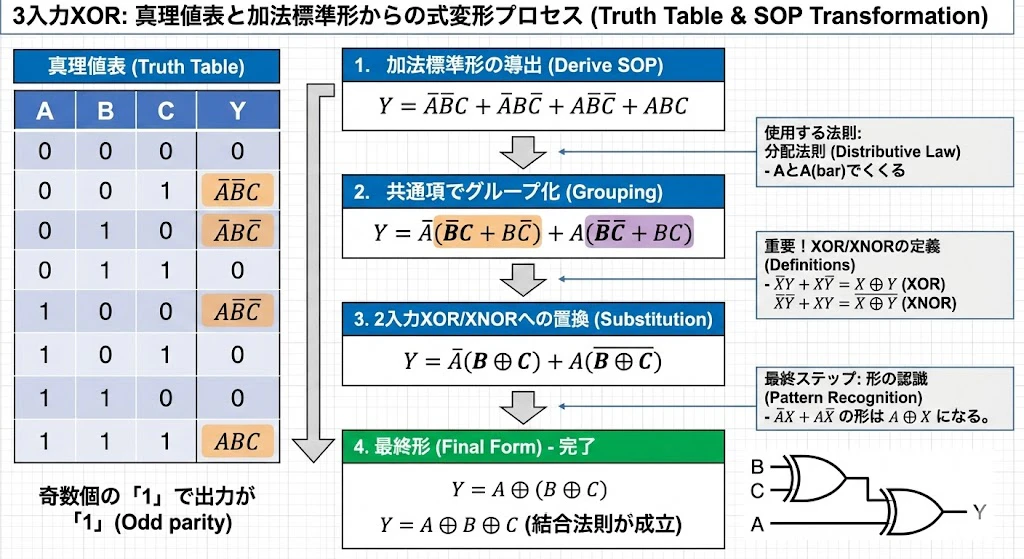
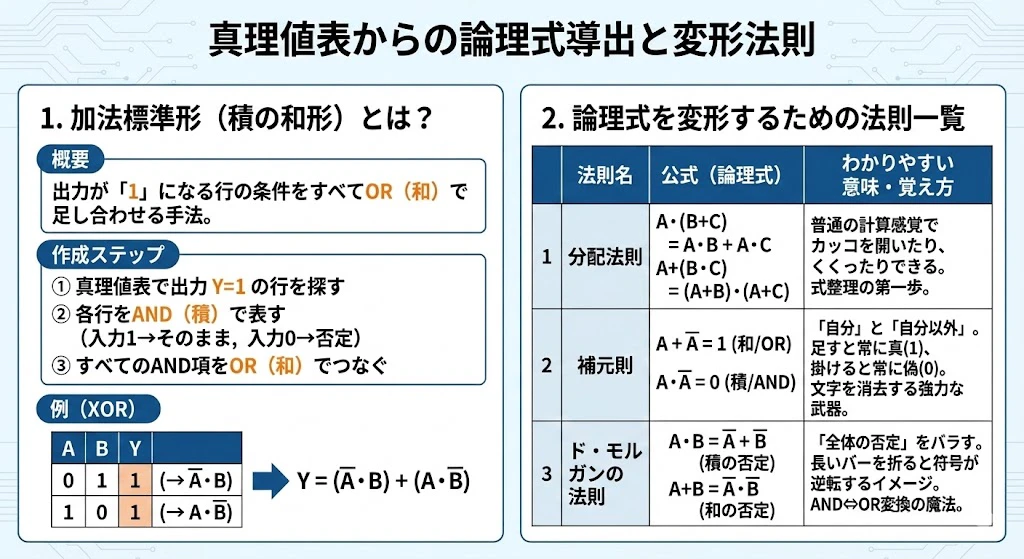
加法標準形からの論理式
出力が1となる行を抽出した加法標準形は以下の通りです。
$$
y = \bar{x}_1 \bar{x}_2 x_3 + \bar{x}_1 x_2 \bar{x}_3 + x_1 \bar{x}_2 \bar{x}_3 + x_1 x_2 x_3
$$
これを排他的論理和の記号($\oplus$)を用いて簡略化すると、以下のようになります。
$$
y = x_1 \oplus x_2 \oplus x_3
$$
コードと出力結果は、上記にあります。