はじめに
PlayはTypesafe社が提供しているWebアプリケーションのためのフレームワークです。
他のフレームワークと同様、PlayもMVCアーキテクチャーを採用しているのですが、面白い点はModelとControllerの実装をJavaとScalaの2つから選べること。
「JavaとScalaの2つを提供しているんだったら何もJavaの作法に縛られることないよね」ということなのか、Playには、JavaでWebアプリケーションとなれば当然出てくるサーブレットやJSPといったJavaEEの概念モデルは一切なく、どちらかというと、Ruby on Railsのような軽量フレームワークとして実装されているようです。
長年Java一筋で、Webアプリケーションは基本サーブレット、次々と新しいフレームワークが出てもJavaEEの範疇で。。。そんな中、Railsの波にも乗ることができず、設定ファイルの煩雑さや開発スピードの差に気付いてはいても、Rubyは動的型付だから。。。と自分を言い聞かせてきた日々。。。
JavaもScalaも静的型付言語、プラスRailsのような軽量フレームワーク。今回Playの実力を確かめるべく、JavaとScalaで単純なWebアプリケーションを作成してみました。
少し見づらいのですが、せっかくですので、JavaとScalaの2つのコードを載せて比較してみたいと思います。
なお、Scalaの実装につきましては、下記の記事の方がスマートな実装になっていますので、そちらをご参照ください。
Play 2.5でのCRUD処理およびメール送信(activatorによる開発環境の構築からketerによるデプロイまで
環境
Play Framework 2.4.3
Java 8
Scala 2.11
Ebean ORM?
Slick 3.0
作成するWebアプリケーションについて
携帯電話のカレンダー機能には、予定を登録すると、その開始日時の○分前にアラームをならす機能があるかと思います。私のガラホ(AQUOS K SHF32)ではアラームは呼出音の設定と連動しているようで、呼出音を切ってバイブのみで使用していると、当然アラームは鳴らず、それだけならまだしも、バイブすらしてくれないという使い勝手の悪さ。
ということで、その機能をWebアプリケーションとして作成することにしてみました。
概要は、サイトにアクセスし、件名、開始時刻、通知時間(○分前)、説明文を登録すると、サーバ側でその通知時刻になった時点で、メールを配信してくれるというWebアプリケーションです。

ModelとDAOの作成(Java編)
まずModelの作成から始めていきます。
まずは慣れ親しんだJavaから。Javaでは「Ebean ORM」というORMを使います。Ebeanを使用するため、Play2.4のオフィシャルドキュメントを参考に下記の3点を設定します。
1.project/plugins.sbtに下記を追記
addSbtPlugin("com.typesafe.sbt" % "sbt-play-ebean" % "1.0.0")
2.build.sbtに下記を追記
lazy val myProject = (project in file(".")).enablePlugins(PlayJava, PlayEbean)
3.conf/application.confに下記を追記
db.default.driver=org.h2.Driver
db.default.url="jdbc:h2:mem:play"
ebean.default = ["models.*"]
データベースはH2のメモリストレージで行います。
そして、app/models/Notification.javaに下記の実装を。
package models;

import java.util.*;

import javax.persistence.*;

import com.avaje.ebean.Model;
import com.avaje.ebean.annotation.*;

import play.data.validation.Constraints.*;
import play.data.format.*;

@Entity
public class Notification extends Model {
	@Id
	public Long id;

	@Required(message = "必須項目です。")
	public String subject;

	@Required(message = "必須項目です。")
	@Formats.DateTime(pattern = "yyyy-MM-dd'T'HH:mm")
	public Date actionDate;

	public Integer notificationPeriod;

	public String summary;

	@Formats.DateTime(pattern = "yyyy-MM-dd'T'HH:mm")
	public Date notificationDate;

	public boolean isSent;

	@CreatedTimestamp
	@Formats.DateTime(pattern = "yyyy-MM-dd'T'HH:mm")
	public Date createdDate;

	@UpdatedTimestamp
	@Formats.DateTime(pattern = "yyyy-MM-dd'T'HH:mm")
	public Date updatedDate;

	@Override
	public void save() {
		notificationDate = calcNotificationDate(actionDate, notificationPeriod);
		super.save();
	}

	@Override
	public void update() {
		notificationDate = calcNotificationDate(actionDate, notificationPeriod);
		super.update();
	}

	private Date calcNotificationDate(Date actionDate, Integer notificationPeriod) {
		Calendar cl = Calendar.getInstance();
		cl.setTime(actionDate);
		cl.add(Calendar.MINUTE, -notificationPeriod);
		return cl.getTime();
	}
}
EbeanはModelクラスに対して、直接save()やupdate()をコールすることにより自動的にデータベースへINSERTやUPDATEしてくれる優れもの。また、@CreatedTimestampのアノテーションはINSERT時にタイムスタンプを、@UpdatedTimestampのアノテーションはUPDATE毎に自動的にタイムスタンプを登録してくれます。
private Date calcNotificationDate(Date, Integer)は開始時刻と○分前で指定された通知時間から通知時刻を計算します。DAO側に実装する処理のような気もしますが、スーパークラスのcom.avaje.ebean.Model側にsave()やupdate()が内包されてしまっているので、@Overrideしてこちらから呼び出すことに。
後、Ebeanの場合、データベース自体はEbean側が自動的にSQLスクリプトを生成し、Play側がconf/evolutions/default/1.sqlに記述されたSQLを実行しテーブルを自動作成してくれるのも便利なところ。
続いてCRUD処理を行うDAOをapp/dao/NotificationDAO.javaに。
package dao;

import models.Notification;

import java.util.Calendar;
import java.util.Date;
import java.util.List;

import javax.inject.Singleton;

import com.avaje.ebean.Model.Finder;

@Singleton
public class NotificationDAO {

	private static Finder<Long, Notification> find = new Finder<Long, Notification>(Notification.class);

	public void create(Notification notification) {
		notification.save();
	}

	public void update(Notification notification) {
		notification.update();
	}

	public void delete(Notification notification) {
		notification.delete();
	}

	public List<Notification> all() {
		return find.all();
	}

	public Notification byId(long id) {
		return find.byId(id);
	}

	public List<Notification> getNotificationList() {
		return find.where().eq("isSent", false).le("notificationDate", new Date()).findList();
	}
}
Ebeanの場合、更新系はあらかじめNotificationのスーパークラスであるcom.avaje.ebean.Modelに実装されているsave()、update()、delete()をコールするだけ。参照系はcom.avaje.ebean.Model.Finderのオブジェクトを使って行います。
all()はすべて取得、byId(long)はプライマリキーのIDで取得、getNotificationList()は検索して取得しています。
本アプリは通知時刻にメール送信を行うため、「メール送信していない」且つ「通知時刻<=現在時刻」という条件のgetNotificationList()を定義しています。
ModelとDAOの作成(Scala編)
次にScalaでのModelとDAOの作成を見てみます。
Scalaでは「Slick」というORMFRMを使います。Slickは「Scala Language-Integrated Connection Kit」の略でPlayと同じTypesafe社が提供しているORMならぬFRM「Functional Relational Mapping」だそうです。(修正:2015/10/30)
Slickを使用するため、Play2.4のオフィシャルドキュメントを参考に下記の2点を設定します。
1.build.sbtに下記を追記
libraryDependencies += "com.typesafe.play" %% "play-slick" % "1.0.1"
libraryDependencies += "com.typesafe.play" %% "play-slick-evolutions" % "1.0.1"
libraryDependencies += "com.h2database" % "h2" % "1.3.176"
※build.sbtから「jdbc」の依存の記述をコメントアウト(起動時にbindingのエラーが出るため)
2.conf/application.confに下記を追記
slick.dbs.default.driver="slick.driver.H2Driver$"
slick.dbs.default.db.driver="org.h2.Driver"
slick.dbs.default.db.url="jdbc:h2:mem:play"
こちらもデータベースはH2のメモリストレージで行います。
そして、app/models/Notification.scalaに下記の実装を。
package models

import java.util.Date

case class Notification (
    id: Option[Long],
    subject: String,
    actionDate: Date,
    notificationPeriod: Int,
    summary: String,
    notificationDate: Date,
    isSent: Boolean,
    createdDate: Date,
    updatedDate: Date
)
ScalaはCaseクラスを使用するため、Modelの定義自体は簡単です。
ただ、Slickの場合、Ebeanと違ってSQLスクリプトの自動生成は行ってくれませんので、conf/evolutions/default/1.sqlは自分で用意する必要があります。
# Notification

# --- !Ups

CREATE TABLE "notification" (
    "id" bigint(20) NOT NULL AUTO_INCREMENT,
    "subject" varchar(255),
    "action_date" timestamp,
    "notification_period" integer,
    "summary" varchar(255),
    "notification_date" timestamp,
    "is_sent" boolean,
    "created_date" timestamp,
    "updated_date" timestamp,
    PRIMARY KEY ("id")
);

# --- !Downs

DROP TABLE "notification";
続いてCRUD処理を行うDAOをapp/dao/NotificationDAO.scalaに。
package dao

import scala.concurrent.Future
import java.util.Date
import java.util.Calendar
import java.sql.Timestamp
import javax.inject.Inject
import javax.inject.Singleton
import models.Notification
import play.api.db.slick.DatabaseConfigProvider
import play.api.libs.concurrent.Execution.Implicits.defaultContext
import slick.driver.JdbcProfile

@Singleton
class NotificationDAO @Inject()(val dbConfigProvider: DatabaseConfigProvider) {

  val dbConfig = dbConfigProvider.get[JdbcProfile]

  import dbConfig.driver.api._

  implicit def javaDateMapper = MappedColumnType.base[Date, Timestamp](
      dt => new Timestamp(dt.getTime),
      ts => new Date(ts.getTime)
  )

  private class NotificationTable(tag: Tag) extends Table[Notification](tag, "notification") {

    def id = column[Long]("id", O.PrimaryKey, O.AutoInc)
    def subject = column[String]("subject")
    def actionDate = column[Date]("action_date")
    def notificationPeriod = column[Int]("notification_period")
    def summary = column[String]("summary")
    def notificationDate = column[Date]("notification_date")
    def isSent = column[Boolean]("is_sent", O.Default(false))
    def createdDate = column[Date]("created_date")
    def updatedDate = column[Date]("updated_date")

    def * = (id.?, subject, actionDate, notificationPeriod, summary, notificationDate, isSent, createdDate, updatedDate) <> ((Notification.apply _).tupled, Notification.unapply)
  }

  private val notifications = TableQuery[NotificationTable]

  def all(): Future[List[Notification]] = dbConfig.db.run(notifications.result).map(_.toList)

  def byId(id: Long): Future[Option[Notification]] = dbConfig.db.run(notifications.filter(_.id === id).result.headOption)

  def getNotificationList(): Future[List[Notification]] =
    dbConfig.db.run(notifications.filter(n => (n.isSent === false) && (n.notificationDate < new Date)).result).map(_.toList)

  def create(notification: Notification): Future[Int] = {
    val n = notification.copy(
        notificationDate = calcNotificationDate(notification.actionDate, notification.notificationPeriod),
        isSent = false,
        createdDate = new Date,
        updatedDate = new Date
    )
    dbConfig.db.run(notifications += n)
  }

  def update(notification: Notification): Future[Int] = {
    dbConfig.db.run(notifications.filter(_.id === notification.id).map(
        n => (
            n.subject,
            n.actionDate,
            n.notificationPeriod,
            n.summary,
            n.notificationDate,
            n.updatedDate
            )
      ).update(
        notification.subject,
        notification.actionDate,
        notification.notificationPeriod,
        notification.summary,
        calcNotificationDate(notification.actionDate, notification.notificationPeriod),
        new Date
      )
    )
  }

  def sent(id: Long): Future[Int] = {
    dbConfig.db.run(notifications.filter(_.id === id).map(
        n => (n.isSent, n.updatedDate)
      ).update(
        true, new Date
      )
    )
  }

  def delete(id: Long): Future[Int] = dbConfig.db.run(notifications.filter(_.id === id).delete)

  private def calcNotificationDate(actionDate: Date, notificationPeriod: Int): Date = {
    val cl = Calendar.getInstance
    cl.setTime(actionDate)
    cl.add(Calendar.MINUTE, -notificationPeriod)
    cl.getTime
  }

}
こちらはEbeanと異なり、かなりのボリュームに。。。
概要としては、
- Modelである
Notificationを型に持ったTableをスーパークラスにしてNotificationTableを作成。 - それを元にJava側の
Finderに相当するTableQueryを作成。 - Slickが
java.util.Dateに対応していなため、対応しているjava.sql.Timestampとの相互変換のためのimplicit def javaDateMapperを作成。 - 後はCRUDの実装
といった流れになります。
Ebeanとのバランスをとるためには、NotificationTableをModel側に実装するといいのでしょうが、Slick3.0とインジェクションの絡みでなんだか少し難しそう。。
Slick3.0は結果をFutureで返すところが少しわかりづらいですね。
Slickでは、FRMの思想として、TableQueryをScalaのコレクション感覚で操作することになるため、queryといった変数名ではなくnotificationsのようにリストっぽい変数名にすることがポイントのようです。(追記:2015年10月30日)
ModelとDAOについてのJavaとScalaの比較
ORMとFRMでそれぞれ異なるため、JavaとScalaの言語的な比較というよりは、EbeanとSlickの比較になってしまいますが、実感としては圧倒的にEbeanが簡単でした。Slickはデータのマッピング部分がややこしく、Ebeanはその点、自動でやってくれますので。
PlayもAkkaもJavaとScalaに対応しているのだから、ORMについても何か共通したものがあればいいのですが。できればEbeanよりで。(削除:2015年10月30日)
以前はScala実装のEbeanもあったようですが、Playと同じTypesafe社がScalaの関数型言語の側面を押し出しSlickというFRMを採用していることから、JavaではORM、ScalaではFRMという選択になるのだと思います。(追記:2015年10月30日)
Akkaによるスケジューリング(Java編)
Controller部分に行く前に、先にAkkaによるスケジューリング機能を実装します。
本アプリでは、1分毎にサーバがデータベースに登録されている通知スケジュールをチェックし、該当するものがあればメール送信を行います。
当初このアプリケーションをイメージしたときは、サーバ側のCRONを利用して、チェック用の別アプリかURLを叩くような方式を考えていましたが、Play自体に組み込まれているTypesafe社のAkkaで同様の機能が実現できると知り、当然そちらの方式で。
AkkaはActorモデルを実装した並行処理プログラミングのためのモジュールになります。今回は、Actorに1分毎にメッセージを送り、Actorがデータベースをチェックし、メールの送信、送信フラグの更新を行うことになります。
メール送信はPlayのプラグインで提供されているplay-mailerを使用するので下記設定を追加します。
1.build.sbtに下記を追記
libraryDependencies += "com.typesafe.play" %% "play-mailer" % "3.0.1"
2.conf/application.confに下記を追記
play.mailer {
	host=メールサーバのホスト名
	port=ポート番号
}
notify.mail {
	from = "送信者名 <送信元メールアドレス>"
	to = "送信先メールアドレス"
}
で、app/actors/NotifyActor.javaに下記の実装を。
package actors;

import models.Notification;
import dao.NotificationDAO;

import java.util.List;
import java.util.Date;

import play.libs.mailer.MailerClient;
import play.libs.mailer.Email;
import akka.actor.UntypedActor;
import akka.actor.Props;
import akka.japi.Creator;
import play.Logger;

import com.typesafe.config.Config;
import com.typesafe.config.ConfigFactory;

public class NotifyActor extends UntypedActor {

	public static Props props(final NotificationDAO dao, final MailerClient mc) {
		return Props.create(new Creator<NotifyActor>() {
			private static final long serialVersionUID = 1L;
			@Override
			public NotifyActor create() throws Exception {
				return new NotifyActor(dao, mc);
			}
		});
	}

	private final NotificationDAO dao;
	private final MailerClient mc;
	private final String mailFrom;
	private final String mailTo;

	public NotifyActor(NotificationDAO dao, MailerClient mc) {
		this.dao = dao;
		this.mc = mc;
		Config config = ConfigFactory.load();
		mailFrom = config.getString("notify.mail.from");
		mailTo = config.getString("notify.mail.to");
	}

	@Override
	public void onReceive(Object message) throws Exception {
		if (message.equals("NOTIFY")) {
			Logger.info((new Date()).toString());
			Logger.info("Message(NOTIFY) received");
			List<Notification> notifications = dao.getNotificationList();
			Logger.info("notifications.size() -> " + notifications.size());
			for (Notification notification : notifications) {
				Logger.info("notification.id() -> " + notification.id);
				Email email = new Email();
				email.setSubject(notification.subject);
				email.setFrom(mailFrom);
				email.addTo(mailTo);
				email.setBodyText(notification.actionDate + "\n" + notification.summary);
				mc.send(email);
				Logger.info("Mail sent");
				notification.isSent = true;
				dao.update(notification);
				Logger.info("Model(notification) updated");
			}
		}
	}

}
コンストラクタでは、DAOとメール送信のためのモジュールであるMailerClientを受け取り、Playのコンフィグレーションファイルから、送信元と送信先のメールアドレスを読み込みます。
@Overrideされたpublic void onReceive(Object)で実際にメッセージを受信した際の処理を記述します。処理の流れとしては、データベースのチェック、メール送信、データベースの更新となります。
Actorは実際に利用する際はActorRefという参照に対してスケジュールの開始を指示しますので、コンストラクタに引数を持たせるため、public static Props props(NotificationDAO, MailerClient)を実装しています。
Akkaによるスケジューリング(Scala編)
こちらもメール送信はPlayのプラグインで提供されているplay-mailerを使用するので下記設定を追加します。
1.build.sbtに下記を追記
libraryDependencies += "com.typesafe.play" %% "play-mailer" % "3.0.1"
2.conf/application.confに下記を追記
play.mailer {
	host=メールサーバのホスト名
	port=ポート番号
}
notify.mail {
	from = "送信者名 <送信元メールアドレス>"
	to = "送信先メールアドレス"
}
ActorをScalaで実装すると、下記app/actors/NotifyActor.scalaのようになります。
package actors

import dao.NotificationDAO
import akka.actor._
import javax.inject.Inject
import play.api.libs.concurrent.Execution.Implicits.defaultContext
import play.api.libs.mailer.{MailerClient, Email}
import com.typesafe.config.ConfigFactory

import play.Logger

object NotifyActor {
  def props(dao: NotificationDAO, mc: MailerClient) = Props(classOf[NotifyActor], dao, mc)
}

class NotifyActor(dao: NotificationDAO, mc: MailerClient) extends Actor {

  val config = ConfigFactory.load()
  val mailFrom = config.getString("notify.mail.from")
  val mailTo = config.getString("notify.mail.to")

  def receive = {
    case "NOTIFY" =>
      Logger.info((new java.util.Date).toString)
      Logger.info("Message(NOTIFY) received")
      dao.getNotificationList().map { notifications =>
        Logger.info("notifications.size -> " + notifications.size)
        for (notification <- notifications) {
          Logger.info("notification.id -> " + notification.id)
          val email = Email(
            notification.subject,
            mailFrom,
            Seq(mailTo),
            bodyText = Some(notification.actionDate + "\n" + notification.summary),
            bodyHtml = Some("")
          )
          mc.send(email)
          Logger.info("Mail sent")
          dao.sent(notification.id.getOrElse(0))
          Logger.info("Model(notification) updated")
        }
      }
  }
}
やっていることはほぼ同じですが、記法の差で、かなりコンパクトに仕上がっています。クラス定義にコンストラクタメソッドが記述でき、初期処理をメンバ定義のところに記述できるのが大きいのかもしれません。
AkkaについてのJavaとScalaの比較
こちらはそれほど違いがないようですが、やはりScalaの方がコンパクトに記述できる気が。強力な型推論のおかげで、Javaのように全てを記述する必要がないですし。
Controllerの作成(Java編)
次にController部分を作成します。まずはJavaから。
app/controllers/Application.javaに下記の実装を。
package controllers;

import dao.NotificationDAO;
import models.Notification;
import actors.NotifyActor;

import java.util.Calendar;
import java.util.List;
import java.util.concurrent.TimeUnit;

import javax.inject.Inject;
import javax.inject.Singleton;

import akka.actor.ActorRef;
import akka.actor.ActorSystem;

import scala.concurrent.duration.Duration;

import play.libs.mailer.MailerClient;
import play.mvc.Controller;
import play.mvc.Result;
import play.data.Form;
import play.libs.Json;
import views.html.*;
import play.Logger;

@Singleton
public class Application extends Controller {

	@Inject NotificationDAO dao;
	@Inject MailerClient mc;
	private boolean isInit = false;

	synchronized public Result init() {
		if (!isInit) {
			Logger.info("IN init()");
			Logger.info("start Actaor");
			ActorSystem system = ActorSystem.create("myActor");
			ActorRef notifyActor = system.actorOf(NotifyActor.props(dao, mc));
			Calendar cl = Calendar.getInstance();
			cl.set(Calendar.SECOND, 0);
			cl.set(Calendar.MILLISECOND, 0);
			cl.add(Calendar.MINUTE, 1);
			system.scheduler().schedule(
				Duration.create(cl.getTimeInMillis() - System.currentTimeMillis(), TimeUnit.MILLISECONDS),
				Duration.create(1, TimeUnit.MINUTES),
				notifyActor,
				"NOTIFY",
				system.dispatcher(),
				null
			);
			Logger.info("Actor has started");
			Logger.info("OUT init()");
			isInit = true;
		}
		return ok(index.render(""));
	}

	public Result index() {
		return ok(index.render(""));
	}

	public Result add() {
		Form<Notification> form = Form.form(Notification.class);
		return ok(register.render("", form));
	}

	public Result create() {
		Form<Notification> form = Form.form(Notification.class).bindFromRequest();
		if (!form.hasErrors()) {
			Notification notification = form.get();
			dao.create(notification);
			return ok(index.render("登録しました"));
		} else {
			return badRequest(register.render("ERROR", form));
		}
	}

	public Result getNotifications() {
		List<Notification> notifications = dao.all();
		return ok(list.render("", notifications));
	}

	public Result read(Long id) {
		Notification notification = dao.byId(id);
		if (notification != null) {
			Form form = Form.form(Notification.class).fill(notification);
			return ok(edit.render("", form));
		} else {
			List<Notification> notifications = dao.all();
			return badRequest(list.render("ERROR", notifications));
		}
	}

	public Result update() {
		Form<Notification> form = Form.form(Notification.class).bindFromRequest();
		if (!form.hasErrors()) {
			Notification notification = form.get();
			dao.update(notification);
			List<Notification> notifications = dao.all();
			return ok(list.render("更新しました", notifications));
		} else {
			return badRequest(edit.render("ERROR", form));
		}
	}

	public Result delete(Long id) {
		Notification notification = dao.byId(id);
		if (notification != null) {
			dao.delete(notification);
			List<Notification> notifications = dao.all();
			return ok(list.render("削除しました", notifications));
		} else {
			List<Notification> notifications = dao.all();
			return badRequest(list.render("ERROR", notifications));
		}
	}
}
やっていることは各画面遷移とDAOを介したCRUD処理です。初期処理として先ほど実装したActorを1分単位で起動しています。
Play2.3までは初期処理をGlobalSettingsを継承したクラスで行っていたのですが、Play2.4からは推奨されておらず、代替手段もわからなかったため、init()を外部から叩くような少し苦しい実装になっています。
それぞれのメソッドの概要は下記の通りとなります。
-
index()トップページ(メニューページ)の表示 -
add()登録画面の表示 -
create()登録画面からの入力内容を受け登録処理 -
getNotifications()一覧画面の表示 -
read(Long)編集画面の表示 -
update()編集画面からの入力内容を受け更新処理 -
delete(Long)削除処理
bindFromRequest()はフォームの入力内容をModelにマッピングしてくれる処理で、Ebeanの場合、特に何も考えなくても、それなりに適切にマッピングしてくれるようです。
Controllerの作成(Scala編)
続いてScalaのControllerの作成です。
app/controllers/Application.scalaに下記の実装を。
package controllers

import scala.concurrent.Future

import dao.NotificationDAO
import actors.NotifyActor
import models.Notification

import java.util.concurrent.TimeUnit
import java.util.Calendar
import java.util.Date

import javax.inject.Inject
import javax.inject.Singleton

import akka.actor._
import scala.concurrent.duration._
import scala.concurrent.ExecutionContext.Implicits.global

import play.api.data.Form
import play.api.data.Forms.mapping
import play.api.data.Forms.{longNumber,text,date,number,nonEmptyText,optional}
import play.api.libs.concurrent.Execution.Implicits.defaultContext
import play.api.mvc.Action
import play.api.mvc.Controller

import play.api.libs.mailer._

import play.api.i18n.MessagesApi
import play.api.i18n.I18nSupport

import play.api.libs.json.Json

import play.Logger;

@Singleton
class Application @Inject() (val messagesApi: MessagesApi, dao: NotificationDAO, system: ActorSystem, mc: MailerClient) extends Controller with I18nSupport {

  val notificationForm = Form(
    mapping(
      "id" -> optional(longNumber),
      "subject" -> nonEmptyText,
      "actionDate" -> date("yyyy-MM-dd'T'HH:mm"),
      "notificationPeriod" -> number,
      "summary" -> text
    )(formapply)(formunapply)
  )
  private def formapply(id: Option[Long], subject: String, actionDate: Date, notificationPeriod: Int, summary: String) =
    new Notification(id, subject, actionDate, notificationPeriod, summary, new Date, false, new Date, new Date)
  private def formunapply(n: Notification) = Some((n.id, n.subject, n.actionDate, n.notificationPeriod, n.summary))

  Logger.info("start Actaor")
  val notifyActor = system.actorOf(NotifyActor.props(dao, mc), "notify-actor")
  var cl = Calendar.getInstance
  cl.set(Calendar.SECOND, 0)
  cl.set(Calendar.MILLISECOND, 0)
  cl.add(Calendar.MINUTE, 1)
  system.scheduler.schedule(
      (cl.getTimeInMillis - System.currentTimeMillis).milliseconds,
      1.minutes,
      notifyActor,
      "NOTIFY"
  )
  Logger.info("Actor has started")

  def index = Action {
    Ok(views.html.index(""))
  }

  def add = Action {
    Ok(views.html.register("", notificationForm))
  }

  def create = Action.async { implicit request =>
    notificationForm.bindFromRequest.fold(
        formWithErrors => {
          Future(BadRequest(views.html.register("ERROR", formWithErrors)))
        },
        notification => {
          dao.create(notification).map(cnt => Ok(views.html.index("登録しました")))
        }
    )
  }

  def getNotifications = Action.async {
    dao.all().map(notifications => Ok(views.html.list("", notifications)))
  }

  def read(id: Long) = Action.async {
    dao.byId(id).flatMap(option =>
      option match {
        case Some(notification) => Future(Ok(views.html.edit("", notificationForm.fill(notification))))
        case None => dao.all().map(notifications => BadRequest(views.html.list("ERROR", notifications)))
      }
    )
  }

  def update = Action.async { implicit request =>
    notificationForm.bindFromRequest.fold(
        formWithErrors => {
          Future(BadRequest(views.html.edit("ERROR", formWithErrors)))
        },
        notification => {
          dao.update(notification).flatMap(cnt =>
            if (cnt != 0) dao.all().map(notifications => Ok(views.html.list("更新しました", notifications)))
            else dao.all().map(notifications => BadRequest(views.html.edit("ERROR", notificationForm.fill(notification))))
          )
        }
    )
  }

  def delete(id: Long) = Action.async {
    dao.delete(id).flatMap(cnt =>
      if (cnt != 0) dao.all().map(notifications => Ok(views.html.list("削除しました", notifications)))
      else dao.all().map(notifications => BadRequest(views.html.list("ERROR", notifications)))
    )
  }
}
Scalaの場合、Slickがそこまで頑張ってくれないので、フォームとModelのマッピングについて多少の実装が必要となります。
中でも、applyメソッドとunapplyメソッドの箇所が少々難しく、フォームの項目とデータベース(Model)の項目が同じであれば、Caseクラスのデフォルトのapplyメソッドとunapplyメソッドをそのまま使えるのですが、項目が異なる場合には、恐らく今回のように自力で実装する必要があるものと思われます。
他の箇所は、各画面遷移とDAOを介したCRUD処理です。初期処理として先ほど実装したActorを1分単位で起動しています。
Scalaは初期処理をメンバ定義のところに記述できるので、Javaのように別途init()を外部から叩くような実装は不要となります。(ただ、初期処理はアプリケーション起動時ではなく、いずれかのページがアクセスされたタイミングでの起動となります。)
それぞれのメソッドの概要は下記の通りとなります。
-
indexトップページ(メニューページ)の表示 -
add登録画面の表示 -
create登録画面からの入力内容を受け登録処理 -
getNotifications一覧画面の表示 -
read(Long)編集画面の表示 -
update編集画面からの入力内容を受け更新処理 -
delete(Long)削除処理
bindFromRequestはフォームの入力内容をModelにマッピングしてくれる処理で、Ebeanと異なり、先ほどのapplyメソッドとunapplyメソッドの実装に従ってマッピングを行います。
ControllerについてのJavaとScalaの比較
こちらもModelと同様、EbeanとSlickの差のように感じますが、Scala的には、フォームのマッピングの記述はScalaらしい記述のようですので、文化の差のということなのかもしれません。
Play2.4からGlobalSettingsが推奨されなくなったため、初期処理を行うに際し、Javaでは代替手段が見つからず、そのあたりはScalaの方が対応しやすかったです。
Viewの作成(Java、Scala共通)
ViewはScalaのテンプレートのため、JavaとScalaで同じ実装になります。
唯一register.scala.htmlとedit.scala.htmlの1行目の(implicit messages: Messages)は、Javaの場合、削除しなければいけません。
@(title: String)(content: Html)

<!DOCTYPE html>

<html lang="jp">
	<head>
		<title>@title</title>
		<link rel="stylesheet" media="screen" href="@routes.Assets.versioned("stylesheets/main.css")">
		<link rel="shortcut icon" type="image/png" href="@routes.Assets.versioned("images/favicon.png")">
		<meta name="viewport" content="width=device-width">
	</head>
	<body>
		@content
	</body>
</html>
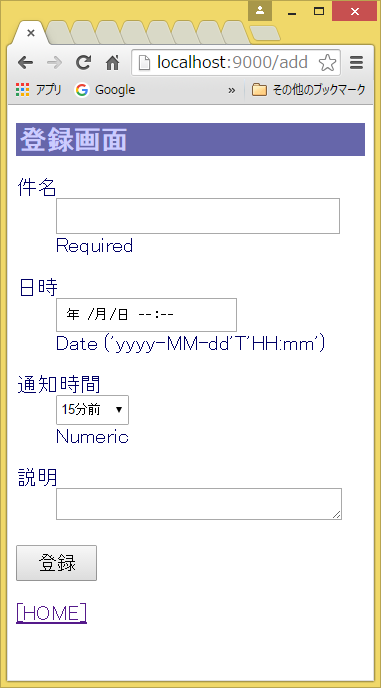
@(message: String)

@main("メニュー画面") {

	<h1>メニュー画面</h1>
	<p>@message</p>

	<p><a href="/add">[登録]</a></p>
	<p><a href="/list">[一覧]</a></p>

}
@(message: String, form1: Form[models.Notification])(implicit messages: Messages)

@main("登録画面") {

	<h1>登録画面</h1>
	<p>@message</p>

	@helper.form(action=routes.Application.create) {
		@(helper.inputText (
			field = form1("subject"),
			'_label -> "件名"
		))
		@helper.input(form1("actionDate"), '_label -> "日時") { (id, name, value, args) =>
		    <input type="datetime-local" name="@name" id="@id" value="@value" @toHtmlArgs(args)>
		}
		@(helper.select (
			field = form1("notificationPeriod"),
			options = Seq("1" -> "1分前", "10" -> "10分前", "15" -> "15分前", "20" -> "20分前", "25" -> "25分前"
						, "30" -> "30分前", "45" -> "45分前", "60" -> "1時間前"),
			args = 'size -> 1,
			'_label -> "通知時間"
		))
		@(helper.textarea (
			field = form1("summary"),
			'_label -> "説明"
		))
	    <button>登録</button>
	}

	<p><a href="/">[HOME]</a></p>
}
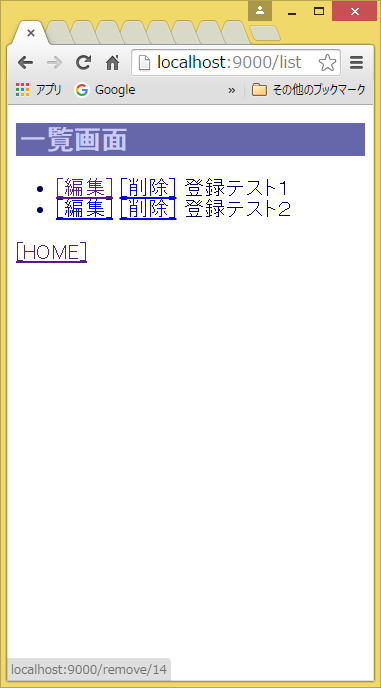
@(message: String, notifications: List[models.Notification])

@main("一覧画面") {

	<h1>一覧画面</h1>
	<p>@message</p>

	<ul id="notifyItems">
	@for(notification <- notifications) {
		<li>
		<a href="/item/@notification.id">[編集]</a>
		<a href="/remove/@notification.id">[削除]</a>
		@notification.subject
		</li>
	}
	</ul>

	<p><a href="/">[HOME]</a></p>
}
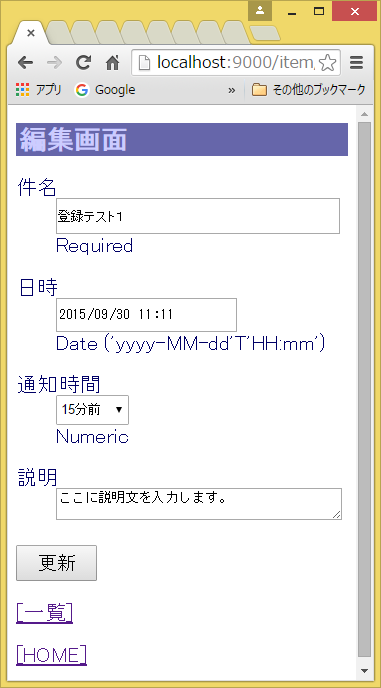
@(message: String, form1: Form[models.Notification])(implicit messages: Messages)

@main("編集画面") {

	<h1>編集画面</h1>
	<p>@message</p>

	@helper.form(action=routes.Application.update) {
		<input type="hidden" name="id" value="@form1("id").value">
		@(helper.inputText (
			field = form1("subject"),
			'_label -> "件名"
		))
		@helper.input(form1("actionDate"), '_label -> "日時") { (id, name, value, args) =>
		    <input type="datetime-local" name="@name" id="@id" value="@value" @toHtmlArgs(args)>
		}
		@(helper.select (
			field = form1("notificationPeriod"),
			options = Seq("1" -> "1分前", "10" -> "10分前", "15" -> "15分前", "20" -> "20分前", "25" -> "25分前"
						, "30" -> "30分前", "45" -> "45分前", "60" -> "1時間前"),
			args = 'size -> 1,
			'_label -> "通知時間"
		))
		@(helper.textarea (
			field = form1("summary"),
			'_label -> "説明"
		))
	    <button>更新</button>
	}

	<p><a href="/list">[一覧]</a></p>
	<p><a href="/">[HOME]</a></p>
}
Routesの作成(Java、Scala共通)
最後にViewとControllerのルートマッピングを行います。
# Routes
# This file defines all application routes (Higher priority routes first)
# ~~~~

# Home page
# GET     /init                       controllers.Application.init
GET     /                           controllers.Application.index
GET     /add                        controllers.Application.add
POST    /create                     controllers.Application.create
GET     /item/:id                   controllers.Application.read(id: Long)
POST    /update                     controllers.Application.update
GET     /remove/:id                 controllers.Application.delete(id: Long)
GET     /list                       controllers.Application.getNotifications

# Map static resources from the /public folder to the /assets URL path
GET     /assets/*file               controllers.Assets.versioned(path="/public", file: Asset)
Javaの場合は、アクター起動のために、コメントアウトしているinit処理を呼び出す必要があります。
一応パーソナルユースなので、GETで削除処理を行っている部分には目をつむってください。。
後、本アプリはガラホからの利用を想定しているので、下記のようなCSSを設定しています。
body {
	font-size: 16pt;
	color: #000066;
}
button {
	font-size: 14pt;
	padding: 5px 20px;
}
h1 {
	font-size: 20pt;
	font-weight: bold;
	background-color: #6666aa;
	color: #ccccff;
	padding: 3px;
}
input#subject {
	width: 280px;
	height: 30px;
}
input#actionDate {
	height: 30px;
}
select#notificationPeriod {
	height: 30px;
}
textarea#summary {
	width: 280px;
}
さいごに
JavaとScalaの両方のソースを掲載したため、かなりの行数となってしまいましたが、Play2.4での簡単なCRUD処理(+Akka)についての実装でした。
今回のWebアプリケーションの作成を通じ、最もPlayが優れていると感じた点は、ViewだけでなくModelやController、はたまたRoutesに至るまですべてが動的コンパイルの対象となっていることです。
静的なコンパイルと動的なコンパイルが混在すると、開発コストの差から、開発のバランスが崩れてしまい、精神的にあまり宜しくない状態となるのですが、Playはすべてを平等に扱っている感があるので、MVCを徹底的に意識したストレスのない実装が可能になると思います。
Playはバージョンアップの度に、かなり大胆に仕様を変更しているらしく、将来的により良いフレームワークに成長するという期待感が高まる一方、今回の実装ではかなりの確率でネットの情報にミスリードさせられてしまいました。Play2.3の情報が参考にならないことも数多くありますので、ご注意を。
その中でもオフィシャルドキュメントはバージョン毎にきちんと作成されていて、かなりの情報量となっています。まずはオフィシャルドキュメントにどっぷりと軸足を置いていただき、外部サイトを参考にする際には、バージョンの確認を徹底することが大切だと思います。