はじめに
CRUD処理およびメール送信を行うWebアプリケーションをPlay 2.5(Scala)で作成してみます。
Kona Linux UEも新しいバージョンになったことですし、今回はノートPCにKona Linux UE 2.0(Ubuntu 16.04 LTS)をインストールしただけの真っ新の状態からスタートし、最終的にAmazon EC2(Ubuntu 14.04 LTS)にデプロイするところまでやってみたいと思います。
なお、今回のコードは下記で公開しています。
https://github.com/imahiro-t/play-app.git
他の関数型言語のWebフレームワークでの実装はこちら
Yesod 1.4でのCRUD処理およびメール送信(stackによる開発環境の構築からketerによるデプロイまで)
PhoenixでのCRUD処理およびメール送信(mixによる開発環境の構築からExrmによるデプロイまで)
環境
Kona Linux UE 2.0(Ubuntu 16.04 LTS)(開発環境)
Amazon EC2(Ubuntu 14.04 LTS)(実行環境)
作成するWebアプリケーションについて
携帯電話のカレンダー機能には、予定を登録すると、その開始日時の○分前にアラームをならす機能があるかと思います。私のガラホ(AQUOS K SHF32)ではアラームは呼出音の設定と連動しているようで、普段呼出音を切ってバイブのみで使用しているので、当然アラームは鳴らず、それだけならまだしも、バイブすらしてくれないという使い勝手の悪さ。
概要は、サイトにアクセスし、件名、日付、時間、通知(○分前)、説明を登録すると、サーバ側でその通知時刻になった時点で、メールを配信してくれるというWebアプリケーションです。
JDK、activatorのインストール
まずは開発環境にJDKをインストールします。Play 2.5はJava 1.8が必要なのでご注意を。
$ sudo apt install openjdk-8-jdk
次にPlayの開発環境を構築するためにactivatorをインストールします。
公式サイトを参考にインストールしてください。
プロジェクトの作成
$ activator new notify play-scala
$ cd notify
activator new [プロジェクト名] [テンプレート]はテンプレートを作成するコマンドで、今回は「notify」というプロジェクト名で、Scalaを使ったPlayアプリケーションのテンプレートを作成します。
notifyディレクトリ内にテンプレートが作成されるので、後はnotifyディレクトリ内でファイルの追加、編集を行っていくことになります。
ModelとDAOの作成
データベースとのやり取りは「Slick」というFRMを使います。Slickは「Scala Language-Integrated Connection Kit」の略でPlayと同じLightbend社が提供しているORMならぬFRM「Functional Relational Mapping」です。
Slickを使用するため、Play2.5のオフィシャルドキュメントを参考に下記の2点を設定します。
1.build.sbtに下記を追記
libraryDependencies += "com.typesafe.play" %% "play-slick" % "2.0.0"
libraryDependencies += "com.typesafe.play" %% "play-slick-evolutions" % "2.0.0"
libraryDependencies += "com.h2database" % "h2" % "1.4.191"
※起動時にbindingのエラーが出るので「jdbc」の依存の記述はコメントアウトしてください。
2.conf/application.confに下記を追記
slick.dbs {
  default.driver = "slick.driver.H2Driver$"
  default.db.driver = "org.h2.Driver"
  default.db.url = "jdbc:h2:./notify"
  default.db.url = ${?H2_DATABASE}
}
そして、app/models/Notification.scalaに下記の実装を。
package models

case class Notification (
  id: Option[Long],
  subject: String,
  actionDate: java.sql.Date,
  actionTime: java.sql.Time,
  notifyBefore: Int,
  summary: String,
  notificationDate: java.util.Date,
  sent: Boolean
)
初回起動時にテーブルを自動生成してもらうため、conf/evolutions/default/1.sqlを用意します。
# Notification

# --- !Ups

CREATE TABLE "notification" (
    "id" bigint(20) NOT NULL AUTO_INCREMENT,
    "subject" varchar(255),
    "action_date" date,
    "action_time" time,
    "notify_before" integer,
    "summary" varchar(255),
    "notification_date" timestamp,
    "sent" boolean,
    PRIMARY KEY ("id")
);

# --- !Downs

DROP TABLE "notification";
続いてCRUD処理を行うDAOをapp/dao/NotificationDAO.scalaに。
package dao

import scala.concurrent.Future
import java.util.Date
import java.util.Calendar
import java.sql.Time
import java.sql.Timestamp
import javax.inject.Inject
import javax.inject.Singleton
import models.Notification
import play.api.db.slick.DatabaseConfigProvider
import play.api.libs.concurrent.Execution.Implicits.defaultContext
import slick.driver.JdbcProfile

@Singleton
class NotificationDAO @Inject()(dbConfigProvider: DatabaseConfigProvider) {

  val dbConfig = dbConfigProvider.get[JdbcProfile]

  import dbConfig.driver.api._

  implicit def javaDateTimestampMapper = MappedColumnType.base[Date, Timestamp](
    dt => new Timestamp(dt.getTime),
    ts => new Date(ts.getTime)
  )

  private class NotificationTable(tag: Tag) extends Table[Notification](tag, "notification") {
    def id = column[Long]("id", O.PrimaryKey, O.AutoInc)
    def subject = column[String]("subject")
    def actionDate = column[java.sql.Date]("action_date")
    def actionTime = column[java.sql.Time]("action_time")
    def notifyBefore = column[Int]("notify_before")
    def summary = column[String]("summary")
    def notificationDate = column[Date]("notification_date")
    def sent = column[Boolean]("sent", O.Default(false))
    def * = (id.?, subject, actionDate, actionTime, notifyBefore, summary, notificationDate, sent) <> ((Notification.apply _).tupled, Notification.unapply)
  }

  private val notifications = TableQuery[NotificationTable]

  def getNotificationsSent(): Future[List[Notification]] =
    dbConfig.db.run(notifications.filter(n => (n.sent === true)).result).map(_.toList)

  def getNotificationsSentNotYet(): Future[List[Notification]] =
    dbConfig.db.run(notifications.filter(n => (n.sent === false)).result).map(_.toList)

  def byId(id: Long): Future[Option[Notification]] = dbConfig.db.run(notifications.filter(_.id === id).result.headOption)

  def create(notification: Notification): Future[Int] = {
    val n = notification.copy(
      notificationDate = calcNotificationDate(notification.actionDate, notification.actionTime, notification.notifyBefore),
      sent = false
    )
    dbConfig.db.run(notifications += n)
  }

  def update(notification: Notification): Future[Int] = {
    dbConfig.db.run(notifications.filter(_.id === notification.id).map(
      n => (
        n.subject,
        n.actionDate,
        n.actionTime,
        n.notifyBefore,
        n.summary,
        n.notificationDate,
        n.sent
        )
    ).update(
      notification.subject,
      notification.actionDate,
      notification.actionTime,
      notification.notifyBefore,
      notification.summary,
      calcNotificationDate(notification.actionDate, notification.actionTime, notification.notifyBefore),
      false
     )
    )
  }

  def getSendList(): Future[List[Notification]] =
    dbConfig.db.run(notifications.filter(n => (n.sent === false) && (n.notificationDate < new Date)).result).map(_.toList)

  def sent(id: Long): Future[Int] =
    dbConfig.db.run(notifications.filter(_.id === id).map(n => (n.sent)).update(true))

  def delete(id: Long): Future[Int] =
    dbConfig.db.run(notifications.filter(_.id === id).delete)

  private def calcNotificationDate(actionDate: java.sql.Date, actionTime: Time, notifyBefore: Int): Date = {
    val cl = Calendar.getInstance
    val clTmp = Calendar.getInstance
    cl.setTimeInMillis(actionDate.getTime())
    clTmp.setTimeInMillis(actionTime.getTime())
    cl.set(Calendar.HOUR_OF_DAY, clTmp.get(Calendar.HOUR_OF_DAY))
    cl.set(Calendar.MINUTE, clTmp.get(Calendar.MINUTE))
    cl.add(Calendar.MINUTE, -notifyBefore)
    cl.getTime
  }

}
概要としては、
- Modelである
Notificationを型に持ったTableをスーパークラスにしてNotificationTableを作成。 - それを元に
TableQueryを作成。 - Slickが
java.util.Dateに対応していなため、対応しているjava.sql.Timestampとの相互変換のためのimplicit def javaDateTimestampMapperを作成。 - 後はCRUDの実装
といった流れになります。
Slickでは、FRMの思想として、TableQueryをScalaのコレクション感覚で操作することになるため、queryといった変数名ではなくnotificationsのようにリストっぽい変数名にすることがポイントです。
Controller(ハンドラー)の作成
Playでは後述するルーティングの設定により、URLパターンから該当するハンドラーが呼び出されることになります。今回は2つのハンドラーを作成します。
まずはハンドラーで共通して利用するフォームとModelとのマッピングを行うオブジェクトを作成します。
app/controllers/Forms.scalaに下記の実装を。
package controllers

import models.Notification

import java.sql.Time
import java.util.Date

import play.api.data.Form
import play.api.data.Forms._

case class NotificationForm(command: Option[String], notification: Notification)

object Forms {
  def notificationForm = Form(
    mapping(
      "command" -> optional(text),
      "db" ->
        mapping(
          "id" -> optional(longNumber),
          "subject" -> nonEmptyText,
          "actionDate" -> sqlDate("yyyy-MM-dd"),
          "actionTime" -> date("HH:mm"),
          "notifyBefore" -> number,
          "summary" -> text
        )
        ((id, subject, actionDate, actionTime, notifyBefore, summary)
        => new Notification(id, subject, actionDate, actionTime.convert, notifyBefore, summary, new Date, false))
        ((n: Notification) => Some((n.id, n.subject, n.actionDate, n.actionTime.convert, n.notifyBefore, n.summary)))
    )(NotificationForm.apply)(NotificationForm.unapply)
  )

  implicit class DateToTimeConversion(date: Date) {
    def convert: Time = {
      if (date != null) new Time(date.getTime())
      else new Time(System.currentTimeMillis())
    }
  }

  implicit class TimeToDateConversion(time: Time) {
    def convert: Date = {
      if (time != null) new Date(time.getTime())
      else new Date(System.currentTimeMillis())
    }
  }

}
今回、フォームに「command」というModelとは直接関係のない隠しフィールドを設けてハンドラー内の処理を振り分けるため、ネストしたマッピングを使用しています。また、「notificationDate」や「sent」のようにModelには存在するけどフォームには存在しない項目があるため、Model側のapplyメソッドとunapplyメソッドを使用せずに別途用意しています。
次にそれぞれのハンドラーを記述します。
1つ目は(一覧表示付きの)登録画面がGETとPOSTで呼び出されたときのハンドラーです。
app/controllers/NotifyC.scalaに下記の実装を。
package controllers

import javax.inject.{Inject, Singleton}

import dao.NotificationDAO
import play.api.i18n.{I18nSupport, MessagesApi}
import play.api.mvc.{Action, Controller}
import play.api.libs.concurrent.Execution.Implicits.defaultContext

@Singleton
class NotifyC @Inject() (val messagesApi: MessagesApi, dao: NotificationDAO) extends Controller with I18nSupport {

  def getNotify = Action.async { implicit request =>
    dao.getNotificationsSent().flatMap(notificationsSent =>
      dao.getNotificationsSentNotYet().map(notificationsSentNotYet =>
        Ok(views.html.notifications(request.flash.get("message").getOrElse(""), notificationsSent, notificationsSentNotYet, Forms.notificationForm))
      )
    )
  }

  def postNotify = Action.async { implicit request =>
    Forms.notificationForm.bindFromRequest.fold(
      formWithErrors => {
        dao.getNotificationsSent().flatMap(notificationsSent =>
          dao.getNotificationsSentNotYet().map(notificationsSentNotYet =>
            BadRequest(views.html.notifications("", notificationsSent, notificationsSentNotYet, formWithErrors))
          )
        )
      },
      formValue => {
        dao.create(formValue.notification).map(_ =>
          Redirect("/notify").flashing("message" -> ("[" + formValue.notification.subject + "]" + "を作成しました。"))
        )
      }
    )
  }

}
GETで呼び出されたときは、getNotifyが呼ばれ、データベースから通知予定のレコードと、通知済みのレコードを取得し、登録画面を表示しています。
POSTで呼び出されたときは、postNotifyが呼ばれ、フォームの入力内容を元にデータベースにレコードを追加しています。その後、登録画面にリダイレクトしています。
2つ目は編集画面がGETとPOSTで呼び出されたときのハンドラーです。
app/controllers/NotificationC.scalaに下記の実装を。
package controllers

import javax.inject.{Inject, Singleton}

import dao.NotificationDAO
import play.api.i18n.{I18nSupport, MessagesApi}
import play.api.mvc.{Action, Controller}
import play.api.libs.concurrent.Execution.Implicits.defaultContext

import scala.concurrent.Future

@Singleton
class NotificationC @Inject() (val messagesApi: MessagesApi, dao: NotificationDAO) extends Controller with I18nSupport {

  def getNotification(id: Long) = Action.async {
    dao.byId(id).map(
      option => option match {
        case Some(notification) => Ok(views.html.notification("", Forms.notificationForm.fill(NotificationForm(None, notification))))
        case None => Redirect("/notify")
      }
    )
  }

  def postNotification(id: Long) = Action.async { implicit request =>
    Forms.notificationForm.bindFromRequest.fold(
      formWithErrors => {
        Future(BadRequest(views.html.notification("ERROR", formWithErrors)))
      },
      formValue => {
        formValue.command match {
          case Some("update") => dao.update(formValue.notification).map(_ =>
            Redirect("/notify").flashing("message" -> ("[" + formValue.notification.subject + "]" + "を更新しました。"))
          )
          case Some("delete") => dao.delete(formValue.notification.id.getOrElse(0)).map(_ =>
            Redirect("/notify").flashing("message" -> ("[" + formValue.notification.subject + "]" + "を削除しました。"))
          )
          case _ => Future(Redirect("/notify"))
        }
      }
    )
  }

}
GETで呼び出されたときは、getNotificationが呼ばれ、データベースからidに該当するレコードを取得し、編集画面を表示しています。
POSTで呼び出されたときは、postNotificationが呼ばれ、フォームからの"command"パラメータにより、更新処理か削除処理を行い、登録画面にリダイレクトしています。
CRUDの思想に従って、GETは表示のみを、POSTで作成、更新、削除を行っています。編集画面からのPOSTは更新と削除があるため、「command」を隠しフィールドとして持ち、処理を振り分けています。
Viewの作成
まずは共通画面をapp/views/main.scala.htmlに。(bootstrapの記述を入れただけです。)
@(title: String)(content: Html)

<!DOCTYPE html>

<html lang="jp">
<head>
    <title>@title</title>

    <!-- Latest compiled and minified CSS -->
    <link rel="stylesheet" href="https://maxcdn.bootstrapcdn.com/bootstrap/3.3.6/css/bootstrap.min.css" integrity="sha384-1q8mTJOASx8j1Au+a5WDVnPi2lkFfwwEAa8hDDdjZlpLegxhjVME1fgjWPGmkzs7" crossorigin="anonymous">
    <!-- Optional theme -->
    <link rel="stylesheet" href="https://maxcdn.bootstrapcdn.com/bootstrap/3.3.6/css/bootstrap-theme.min.css" integrity="sha384-fLW2N01lMqjakBkx3l/M9EahuwpSfeNvV63J5ezn3uZzapT0u7EYsXMjQV+0En5r" crossorigin="anonymous">
    <!-- Latest compiled and minified JavaScript -->
    <script src="https://maxcdn.bootstrapcdn.com/bootstrap/3.3.6/js/bootstrap.min.js" integrity="sha384-0mSbJDEHialfmuBBQP6A4Qrprq5OVfW37PRR3j5ELqxss1yVqOtnepnHVP9aJ7xS" crossorigin="anonymous"></script>

    <link rel="stylesheet" media="screen" href="@routes.Assets.versioned("stylesheets/main.css")">
    <link rel="shortcut icon" type="image/png" href="@routes.Assets.versioned("images/favicon.png")">
    <meta name="viewport" content="width=device-width">
</head>
<body>
@content
</body>
</html>
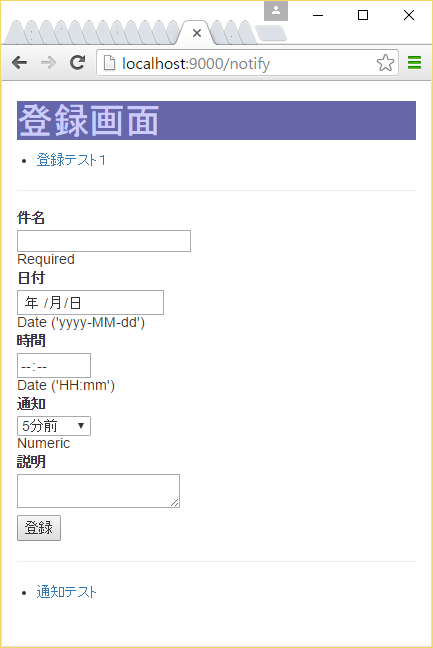
次に登録画面をapp/views/notifications.scala.htmlに。
@(message: String, notificationsSent: List[models.Notification], notificationsSentNotYet: List[models.Notification]
  , myForm: Form[NotificationForm])(implicit messages: Messages)

@main("登録画面") {
<div class="container">
<h1>登録画面</h1>
<p>@message</p>
<ul>
    @for(notification <- notificationsSentNotYet) {
    <li>
        <a href="/notify/@notification.id"> @notification.subject </a>
    </li>
    }
</ul>
<hr>
<p>
@helper.form(action=routes.NotifyC.postNotify) {
    @(helper.inputText (
        field = myForm("db.subject"),
        '_label -> "件名"
    ))
    @(helper.inputDate(
        field = myForm("db.actionDate"),
        '_label -> "日付"
    ))
    @helper.input(myForm("db.actionTime"), '_label -> "時間") { (id, name, value, args) =>
        <input type="time" name="@name" id="@id" value="@value" @toHtmlArgs(args)>
    }
    @(helper.select (
        field = myForm("db.notifyBefore"),
        options = Seq("5" -> "5分前", "10" -> "10分前", "15" -> "15分前", "20" -> "20分前"
        , "30" -> "30分前", "45" -> "45分前", "60" -> "1時間前"),
        args = 'size -> 1,
        '_label -> "通知"
    ))
    @(helper.textarea (
        field = myForm("db.summary"),
        '_label -> "説明"
    ))
    <button>登録</button>
}
</p>
<hr>
<ul>
    @for(notification <- notificationsSent) {
    <li>
        <a href="/notify/@notification.id"> @notification.subject </a>
    </li>
    }
</ul>
</div>
}
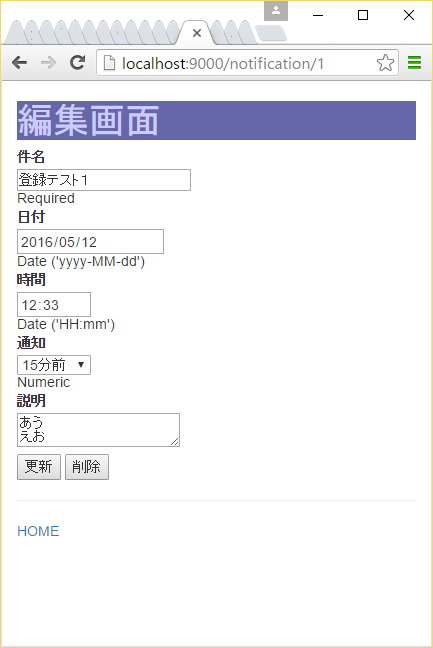
そして編集画面をapp/views/notification.scala.htmlに。
@(message: String, myForm: Form[NotificationForm])(implicit messages: Messages)

@main("編集画面") {
<div class="container">
<h1>編集画面</h1>
<p>@message</p>
<p>
@helper.form(action=routes.NotificationC.postNotification(myForm("db.id").value.getOrElse("0").toLong)) {
    <input type="hidden" name="command" value="update">
    <input type="hidden" name="db.id" value="@myForm("db.id").value">
    @(helper.inputText (
        field = myForm("db.subject"),
        '_label -> "件名"
    ))
    @(helper.inputDate(
        field = myForm("db.actionDate"),
        '_label -> "日付"
    ))
    @helper.input(myForm("db.actionTime"), '_label -> "時間") { (id, name, value, args) =>
        <input type="time" name="@name" id="@id" value="@value" @toHtmlArgs(args)>
    }
    @(helper.select (
        field = myForm("db.notifyBefore"),
        options = Seq("5" -> "5分前", "10" -> "10分前", "15" -> "15分前", "20" -> "20分前"
        , "30" -> "30分前", "45" -> "45分前", "60" -> "1時間前"),
        args = 'size -> 1,
        '_label -> "通知"
    ))
    @(helper.textarea (
        field = myForm("db.summary"),
        '_label -> "説明"
    ))
    <div>
        <input type="submit" value="更新">
        <input type="button" value="削除" onclick="if (confirm('削除しますか?')) {this.form.command.value = 'delete';this.form.submit();}">
    </div>
}
</p>
<hr>
<p><a href="/notify">HOME</a></p>
</div>
}
削除ボタンが押された際に、隠しフィールドの"comannd"を"delete"にしてPOSTしています。
最後にCSSです。
h1 {
    background-color: #6666aa;
    color: #ccccff;
}
input#subject {
    width: 280px;
}
textarea#summary {
    width: 280px;
}
dl {
  margin-bottom: 5px !important;
}
dt,dd {
  line-height: 1 !important;
}
ul {
  padding-left: 20px !important;
}
タイマーの作成
通知時刻にメール送信を行うため、1分間隔でデータベースを検索し、該当するレコードがある場合に、データベースの更新、メールの送信を行います。今回、メールの送信はActorが担当することになります。
メール送信はPlayのプラグインで提供されているplay-mailerを使用するので、まずは下記設定を追加します。
1.build.sbtに下記を追記
libraryDependencies += "com.typesafe.play" %% "play-mailer" % "5.0.0-M1"
2.conf/application.confに下記を追記
play.mailer {
  host = "localhost"
  host = ${?MAIL_HOST}
  port = 25
  port = ${?MAIL_PORT}
}
notify.mail {
  from = "NOTIFY SENDER <from@xxxx.xx>"
  from = ${?MAIL_FROM}
  to = "to@xxxx.xx"
  to = ${?MAIL_TO}
}
メール送信を行うActorは下記のようになります。
package actors

import dao.NotificationDAO
import akka.actor._
import play.api.libs.concurrent.Execution.Implicits.defaultContext
import play.api.libs.mailer.{MailerClient, Email}
import com.typesafe.config.ConfigFactory

import play.api.Logger

object NotifyActor {
  def props(dao: NotificationDAO, mc: MailerClient) = Props(classOf[NotifyActor], dao, mc)
}

class NotifyActor(dao: NotificationDAO, mc: MailerClient) extends Actor {

  val config = ConfigFactory.load()
  val mailFrom = config.getString("notify.mail.from")
  val mailTo = config.getString("notify.mail.to")

  def receive = {
    case "NOTIFY" =>
      Logger.debug((new java.util.Date).toString)
      Logger.debug("Message(NOTIFY) received")
      dao.getSendList().map { notifications =>
        Logger.debug("notifications.size -> " + notifications.size)
        for (notification <- notifications) {
          Logger.debug("notification.id -> " + notification.id)
          val email = Email(
            notification.subject,
            mailFrom,
            Seq(mailTo),
            bodyText = Some("[件名]" +
              "\n" +
              notification.subject +
              "\n" +
              "[日付]" +
              "\n" +
              notification.actionDate +
              "\n" +
              "[時間]" +
              "\n" +
              notification.actionTime +
              "\n" +
              "[通知]" +
              "\n" +
              notification.notificationDate +
              "\n" +
              "[説明]" +
              "\n" +
              notification.summary)
          )
          mc.send(email)
          Logger.debug("Mail sent")
          dao.sent(notification.id.getOrElse(0))
          Logger.debug("Model(notification) updated")
        }
      }
  }
}
Actorにメッセージを送るタイマーは下記のようになります。
package services

import dao.NotificationDAO
import actors.NotifyActor

import javax.inject.Inject
import javax.inject.Singleton

import java.util.Calendar

import akka.actor._
import scala.concurrent.duration._
import scala.concurrent.ExecutionContext.Implicits.global

import play.api.libs.mailer._

import play.api.Logger

@Singleton
class NotifyTimer @Inject() (dao: NotificationDAO, system: ActorSystem, mc: MailerClient) {

  Logger.info("start Actaor")
  val notifyActor = system.actorOf(NotifyActor.props(dao, mc), "notify-actor")
  var cl = Calendar.getInstance
  cl.set(Calendar.SECOND, 0)
  cl.set(Calendar.MILLISECOND, 0)
  cl.add(Calendar.MINUTE, 1)
  system.scheduler.schedule(
    (cl.getTimeInMillis - System.currentTimeMillis).milliseconds,
    1.minutes,
    notifyActor,
    "NOTIFY"
  )
  Logger.info("Actor has started")

}
アプリケーション起動時にタイマーをスタートするためDIの登録を行います。
import com.google.inject.AbstractModule

import services.NotifyTimer

class Module extends AbstractModule {

  override def configure() = {
    bind(classOf[NotifyTimer]).asEagerSingleton()
  }

}
ルーティング
ルーティング(URLパターンからハンドラーへの対応付け)を設定します。
# Routes
# This file defines all application routes (Higher priority routes first)
# ~~~~

# Home page
GET     /notify                     controllers.NotifyC.getNotify
POST    /notify                     controllers.NotifyC.postNotify
GET     /notify/:id                 controllers.NotificationC.getNotification(id: Long)
POST    /notify/:id                 controllers.NotificationC.postNotification(id: Long)

# Map static resources from the /public folder to the /assets URL path
GET     /assets/*file               controllers.Assets.versioned(path="/public", file: Asset)
動作確認
$ activator run
http://localhost:9000/notifyにアクセスして動作確認してみてください。
keterによるデプロイ
今回は、HaskellのYesodというWebフレームワークを使ったWebアプリをデプロイする際にお世話になったKeterを使ってデプロイしてみます。
Keterは、もともとはYesodのデプロイツールとして開発されているのですが、起動するポート番号を環境変数で指定できるWebアプリであれば、特に言語を問わず利用できるようです。
Keterは、ホスト名によるアクセスに対して、特定のWebアプリにフォワードするリバースプロキシの機能を持っているので、例えば、同一サーバ上で、http://play.hostname.xxx/notifyへのアクセスをPlayに、http://yesod.hostname.xxx/notifyへのアクセスをYesodに振り分けるといった使い方もできます。
また、他の機能としては、Webアプリの自動起動、プロセス監視、リビルドによる再起動などの機能もついています。
keterの実行ファイルの作成
keterはHaskellで作成されていますので、まずはHaskellの開発環境を構築するためにstackをインストールします。
公式サイトを参考に使用するOSに合わせてインストールしてください。
次に、HaskellのGHCのインストールとともにketerの実行ファイルを作成します。
$ stack install keter --install-ghc
作成された実行ファイルketerをKona LinuxやAmazon EC2の/usr/bin/等に放り込み、実行権限を与えます。
プロジェクトのビルドファイルの作成
まずはactivatorでプロジェクトのビルドファイルを作成します。
$ activator dist
target/universal/に作成されたnotify-1.0-SNAPSHOT.zipを解凍して作業フォルダに移動します。
作業フォルダ内にconfigフォルダを作成し、プロジェクトのketerファイルを作成するためのコンフィグレーションをketer.ymlに設定します。
stanzas:
  - type: webapp
    exec: ../notify-1.0-SNAPSHOT/bin/notify
    args: []
    hosts:
      - localhost
      - aws.hostname.xxx
    requires-secure: false
notify-1.0-SNAPSHOT/conf/application.confの設定を変更します。
play.crypto.secret = "mypassword"

play.evolutions {
  # You can disable evolutions for a specific datasource if necessary
  db.default.enabled = false
}
keter側ではフォワードするポートを環境変数「PORT」で指定してくるので、notify-1.0-SNAPSHOT/bin/notifyの下部にある「Main script」内で起動時のパラメータを追加します。
addJava "-Dhttp.port=$PORT"
addJava "-Dplay.crypto.secret=mypassword"
作業フォルダ内は下記の構成となります。
[作業フォルダ]
- config
- keter.yml
- notify-1.0-SNAPSHOT
- bin
- conf
- lib
- share
作業フォルダ内で、プロジェクトのketerファイルを作成します。
$ tar czf ../notify.keter *
keterの設定
Kona LinuxやAmazon EC2に下記のディレクトリ構成を作ります。
$ sudo mkdir -p /opt/keter/etc
$ sudo mkdir -p /opt/keter/incoming
$ sudo mkdir -p /opt/keter/db
$ sudo chown $USER.$USER /opt/keter/etc
$ sudo chown $USER.$USER /opt/keter/incoming
$ sudo chown $USER.$USER /opt/keter/db
作成したnotify.keterをKona LinuxやAmazon EC2の/opt/keter/incomingにコピーします。
動作確認時に自動で作成されたnotify.mv.dbをKona LinuxやAmazon EC2の/opt/keter/dbにコピーします。
次にketerを実行するためのコンフィグレーションを設定します。
root: /opt/keter

listeners:
  - host: "*4"
    port: 3000

setuid: ubuntu

env:
  H2_DATABASE: jdbc:h2:/opt/keter/db/notify
  MAIL_HOST: localhost
  MAIL_PORT: "25"
  MAIL_FROM: NOTIFY SENDER <from@xxxx.xx>
  MAIL_TO: to@mydomain.xxx
デーモンとして起動するためのコンフィグレーションを設定します。
※Ubuntu 16.04の場合
[Unit]
Description=Keter Deployment Handler
After=local-fs.target network.target

[Service]
ExecStart=/usr/bin/keter /opt/keter/etc/keter-config.yaml

[Install]
WantedBy=multi-user.target
※Ubuntu 14.04の場合
description "Keter Deployment Handler"

start on (net-device-up and local-filesystems and runlevel [2345])
stop on runlevel [016]
respawn

console output

exec keter /opt/keter/etc/keter-config.yaml
起動して確認します。
※Ubuntu 16.04の場合
sudo systemctl start keter
※Ubuntu 14.04の場合
sudo start keter
http://aws.hostname.xxx:3000/notifyにアクセスして動作確認してみてください。
さいごに
駆け足でactivatorによる開発環境の構築からketerによるデプロイまで見てきました。
Yesodでの実装を挟んだことで、Play2.4で作成した時よりも、それぞれの責務が分かりやすい実装になったように思います。
DIでタイマーを起動するようにしたことで、ControllerとActorの依存もなくなり、また、Yesodのテンプレートを参考にハンドラーを分けることで、メタボ気味だったControllerがすっきりとしました。
Playだけでは決して接点のないketerとの組み合わせもなかなか面白かったです。
keterにはリビルドによる再起動の機能があるので、プロジェクトを修正した場合でも、再度notify.keterを作成して/opt/keter/incomingに放り込むだけで、自動的にデプロイして再起動してくれるので便利だと思いました。