はじめに
HaskellのYesod、ScalaのPlay2に続く第三弾として、今回はElixirのPhoenixにてCRUD処理およびメール送信を行うWebアプリケーションを作成してみます。
なお、今回のコードは下記で公開しています。
https://github.com/imahiro-t/phoenix-app.git
他の関数型言語のWebフレームワークでの実装はこちら
Yesod 1.4でのCRUD処理およびメール送信(stackによる開発環境の構築からketerによるデプロイまで)
Play 2.5でのCRUD処理およびメール送信(activatorによる開発環境の構築からketerによるデプロイまで)
環境
Kona Linux UE 2.0(Ubuntu 16.04 LTS)(開発環境)
Amazon EC2(Ubuntu 14.04 LTS)(実行環境)
MySQL 5.7.15
作成するWebアプリケーションについて
携帯電話のカレンダー機能には、予定を登録すると、その開始日時の○分前にアラームをならす機能があるかと思います。私のガラホ(AQUOS K SHF32)ではアラームは呼出音の設定と連動しているようで、普段呼出音を切ってバイブのみで使用しているので、当然アラームは鳴らず、それだけならまだしも、バイブすらしてくれないという使い勝手の悪さ。
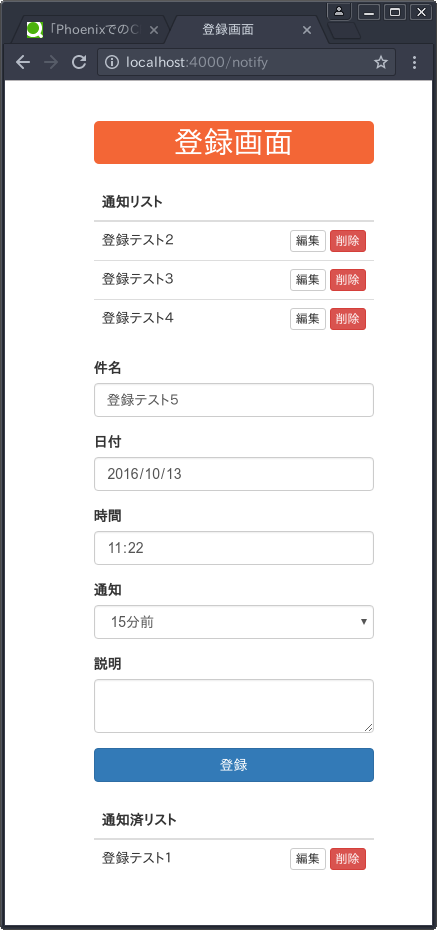
概要は、サイトにアクセスし、件名、日付、時間、通知(○分前)、説明を登録すると、サーバ側でその通知時刻になった時点で、メールを配信してくれるというWebアプリケーションです。
Elixir、Phoenixのインストール
まずは公式サイトを参考に開発環境にElixirをインストールします。
$ wget https://packages.erlang-solutions.com/erlang-solutions_1.0_all.deb && sudo dpkg -i erlang-solutions_1.0_all.deb
$ sudo apt-get update
$ sudo apt-get install esl-erlang
$ sudo apt-get install elixir
次に公式サイトを参考に開発環境にPhoenixをインストールします。
$ mix archive.install https://github.com/phoenixframework/archives/raw/master/phoenix_new.ez
Elixirの「mix」は、Scalaの「activator」やHaskellの「stack」に相当します。
オプションで「Node.js (>= 5.0.0)」「Brunch」、さらにLinux環境では「inotify-tools」が必要とのことですので、それぞれの公式サイトを参考にインストールします。
Node.jsの公式サイト
Brunchの公式サイト
inotify-toolsの公式サイト
プロジェクトの作成
$ mix phoenix.new notify --database mysql
$ cd notify
mix phoenix.new [プロジェクト名]はPheonix用のテンプレートを作成するコマンドで、今回は「notify」というプロジェクト名で、データベースにMySQLを使ったPheonixアプリケーションのテンプレートを作成します。(Brunchをインストールしていない場合は、--no-brunchオプションをつけてプロジェクトを作成します。)
notifyディレクトリ内にテンプレートが作成されるので、後はnotifyディレクトリ内でファイルの追加、編集を行っていくことになります。
Modelの作成
データベースとのやり取りはEctoというORMのようなモデルとデータベースを紐付けを行うマッパーモジュールを使います。
プロジェクト作成時にconfig/dev.exsにデータベースとの接続のための設定が自動的に作られていますので、ユーザ名やパスワード等、設定内容を適宜変更してModelを作成します。
          ・
          ・
config :notify, Notify.Repo,
  adapter: Ecto.Adapters.MySQL,
  username: "root",
  password: "",
  database: "notify_phoenix",
  pool_size: 20
$ mix ecto.create
$ mix phoenix.gen.model Notification notifications subject:string action_date:date action_time:time notify_before:integer summary:text notify_date_time:datetime sent:boolean
$ mix ecto.migrate
上記を実行することで、データベースにテーブルが作成されるだけでなく、web/models/notification.exにフォームとのマッピングやバリデーションのスケルトンが実装されたデータモデルが作成されます。
今回のWebアプリでは、「notify_date_time」や「sent」はフォーム内で使用しないカラムとなり、「summary」は入力が任意のカラムとなりますのでweb/models/notification.ex内のchangesetを一部修正します。
defmodule Notify.Notification do
          ・
          ・
  def changeset(struct, params \\ %{}) do
    struct
    |> cast(params, [:subject, :action_date, :action_time, :notify_before, :summary])
    |> validate_required([:subject, :action_date, :action_time, :notify_before])
  end
end
なお、mix phoenix.gen.model ・・・をmix phoenix.gen.html ・・・にすると、後述するControllerやView(テンプレート含む)に至るまで、すべてを自動生成してくれます。
ルーティング
ルーティング(URLパターンからハンドラーへの対応付け)を設定します。
defmodule Notify.Router do
          ・
          ・
  scope "/", Notify do
          ・
          ・
    resources "/notify", NotifyController, except: [:show]
  end
end
ルーティングの設定はget "/notify", NotifyController, :indexやpost "/notify", NotifyController, :createのように個別に設定していくことも可能ですが、今回は基本的なCRUD処理のみのためresources "/notify", NotifyController, except: [:show]で一括して設定しています。(今回のWebアプリでは使用しないのでexcept: [:show]でNotify.NotifyController.show関数へのルーティングを外しています。)
Controller(ハンドラー)の作成
Phoenixではルーティングの設定により、URLパターンから該当するハンドラーが呼び出されることになります。
web/controllers/notify_controller.exに下記の実装を。
defmodule Notify.NotifyController do
  use Notify.Web, :controller

  alias Notify.Notification

  def index(conn, _params) do
    changeset = Notification.changeset(%Notification{})
    conn
    |> assign(:notifications_sent_not_yet, notifications_sent_not_yet)
    |> assign(:notifications_sent, notifications_sent)
    |> assign(:changeset, changeset)
    |> assign(:title, "登録画面")
    |> render("index.html")
  end

  def create(conn, %{"notification" => notification_params}) do
    changeset = Notification.changeset(%Notification{}, notification_params |> modify_action_time)

    case Repo.insert(changeset) do
      {:ok, notification} ->
        notify_date_time = calc_notify_date_time(notification)
        notification
        |> Ecto.Changeset.change(%{notify_date_time: notify_date_time})
        |> Repo.update!
        conn
        |> put_flash(:info, "[#{notification.subject}]を作成しました")
        |> redirect(to: notify_path(conn, :index))
      {:error, changeset} ->
        conn
        |> assign(:notifications_sent_not_yet, notifications_sent_not_yet)
        |> assign(:notifications_sent, notifications_sent)
        |> assign(:changeset, changeset)
        |> assign(:title, "登録画面")
        |> render("index.html")
    end
  end

  def edit(conn, %{"id" => id}) do
    notification = Repo.get!(Notification, id)
    changeset = Notification.changeset(notification)
    conn
    |> assign(:notification, notification)
    |> assign(:changeset, changeset)
    |> assign(:title, "編集画面")
    |> render("edit.html")
  end

  def update(conn, %{"id" => id, "notification" => notification_params}) do
    notification = Repo.get!(Notification, id)
    changeset = Notification.changeset(notification, notification_params |> modify_action_time)

    case Repo.update(changeset) do
      {:ok, notification} ->
        notify_date_time = calc_notify_date_time(notification)
        notification
        |> Ecto.Changeset.change(%{notify_date_time: notify_date_time, sent: false})
        |> Repo.update!
        conn
        |> put_flash(:info, "[#{notification.subject}]を更新しました")
        |> redirect(to: notify_path(conn, :index))
      {:error, changeset} ->
        conn
        |> assign(:notification, notification)
        |> assign(:changeset, changeset)
        |> assign(:title, "編集画面")
        |> render("edit.html")
    end
  end

  def delete(conn, %{"id" => id}) do
    notification = Repo.get!(Notification, id)

    Repo.delete!(notification)
    conn
    |> put_flash(:info, "[#{notification.subject}]を削除しました")
    |> redirect(to: notify_path(conn, :index))
  end

  defp modify_action_time(params) do
    r = ~r/^\d{2}:\d{2}$/
    %{params | "action_time" => Regex.replace(r, params["action_time"], "\\0" <> ":00")}
  end

  defp notifications_sent_not_yet do
    Notification
    |> where([u], u.sent == false)
    |> Repo.all
  end

  defp notifications_sent do
    Notification
    |> where([u], u.sent == true)
    |> Repo.all
  end

  defp calc_notify_date_time(notification) do
    Ecto.DateTime.from_date_and_time(notification.action_date, notification.action_time)
    |> add_minutes(-(notification.notify_before))
  end

  defp add_minutes(date_time, minutes) do
    date_time
    |> Ecto.DateTime.to_erl
    |> :calendar.datetime_to_gregorian_seconds
    |> Kernel.+(60 * minutes)
    |> :calendar.gregorian_seconds_to_datetime
    |> :calendar.local_time_to_universal_time_dst
    |> hd
    |> Ecto.DateTime.from_erl
  end
end
GETで/notifyが呼び出されたときはindexが呼ばれ、データベースから通知予定のレコードリストと通知済みのレコードリストを取得し、登録画面を表示しています。
POSTで/notifyが呼び出されたときはcreateが呼ばれ、入力内容をデータベースに登録し、その後通知日時を計算してから再度レコードを更新し、登録画面にリダイレクトしています。
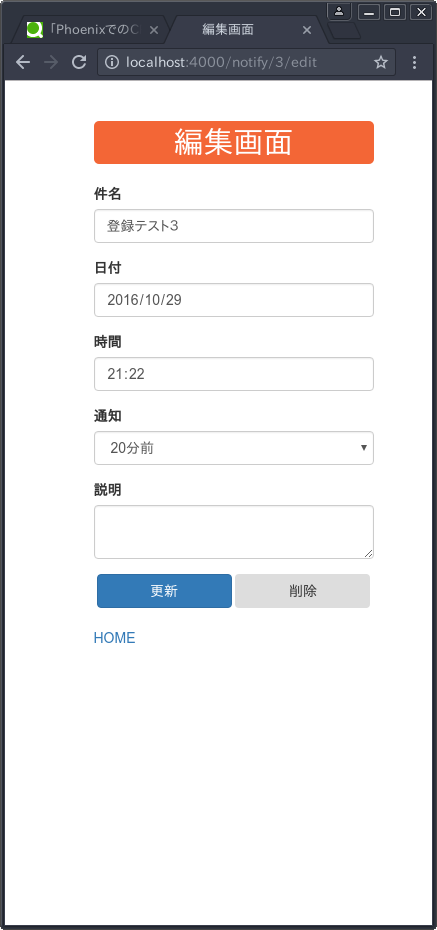
GETで/notify/:id/editが呼び出されたときはeditが呼ばれ、データベースからidに該当するレコードを取得し、編集画面を表示しています。
PUTで/notify/:idが呼び出されたときは、updateが呼ばれ、入力内容でデータベースを更新し、その後通知日時を計算してから再度レコードを更新し、登録画面にリダイレクトしています。
DELETEで/notify/:idが呼び出されたときは、deleteが呼ばれ、データベースからidに該当するレコードを削除し、登録画面にリダイレクトしています。
「PUT」や「DELETE」はHTMLのFORMではサポートされていませんが、フォーム内のHIDDENフィールドに"_method"属性をもたせることで内部的に実現しているようです。
レコードの登録、更新はEcto.Changesetを介して行うことになり、フォームからの入力内容もまずはEcto.Changesetに変換されることになります。
Ecto.Changesetは差分アップデートを行うため、Notify.Notification.changeset内でわざわざselect文を発行してフォームの入力内容とデータベースのレコードとの差分データを作成しているようです。そのため、action_date、action_time、notify_beforeからnotify_date_timeを計算する場合、先に登録・更新処理を行い、その後、登録・更新が完了したレコードに対して通知日時の計算を行って再度レコードの更新処理を行っています。
Viewの作成
まずはデフォルトで用意されている共通点プレートを修正します。(jQueryを読みこんだり、タイトルロゴを消したり。)
<!DOCTYPE html>
<html lang="en">
  <head>
    <meta charset="utf-8">
    <meta http-equiv="X-UA-Compatible" content="IE=edge">
    <meta name="viewport" content="width=device-width, initial-scale=1">
    <meta name="description" content="">
    <meta name="author" content="">

    <title><%= @title %></title>
    <link rel="stylesheet" href="<%= static_path(@conn, "/css/app.css") %>">
    <script type="text/javascript" src="https://cdnjs.cloudflare.com/ajax/libs/jquery/2.1.4/jquery.js"></script>
  </head>

  <body>
    <div class="container">
      <h2><%= @title %></h2>

      <p class="alert alert-info" role="alert"><%= get_flash(@conn, :info) %></p>
      <p class="alert alert-danger" role="alert"><%= get_flash(@conn, :error) %></p>

      <main role="main">
        <%= render @view_module, @view_template, assigns %>
      </main>

    </div> <!-- /container -->
    <script src="<%= static_path(@conn, "/js/app.js") %>"></script>
  </body>
</html>
次に登録画面と編集画面のテンプレートを読み込むViewをweb/views/notify_view.exに。
defmodule Notify.NotifyView do
  use Notify.Web, :view
end
PhoenixではPnoenix.HTMLを利用してテンプレートの記述を行うのですが、Pnoenix.HTMLで用意されているフォームに使用する日付型と日時型のコンポーネントが独自のコンポーネント(年・月・日がそれぞれコンボボックスになっているコンポーネント)になっているので、<input type="date">や<input type="time">が使用できるように別途ヘルパーモジュールを作成します。
defmodule Notify.FormHelpers do
  use Phoenix.HTML

  def date_input(form, field, opts) do
    input(:date, form, field, opts)
  end

  def time_input(form, field, opts) do
    input(:time, form, field, opts)
  end

  defp input(type, form, field, opts) do
    opts =
      opts
      |> Keyword.put_new(:type, type)
      |> Keyword.put_new(:id, field_id(form, field))
      |> Keyword.put_new(:name, field_name(form, field))
      |> Keyword.put_new(:value, field_value(form, field))
    tag(:input, opts)
  end
end
defmodule Notify.Web do
          ・
          ・
  def view do
    quote do
          ・
          ・
      import Notify.FormHelpers
    end
  end
          ・
          ・
end
登録画面と編集画面の共通フォームをweb/templates/notify/form.html.eexに。
<%
    notify_before_options =
        [{"5分前","5"},{"10分前","10"},{"15分前","15"},{"20分前","20"}] ++
        [{"30分前","30"},{"45分前","45"},{"1時間前","60"},{"2時間前","120"}]
%>
<div class="form-group">
    <%= label @form, :subject, "件名", class: "control-label" %>
    <%= text_input @form, :subject, class: "form-control", required: "" %>
    <%= error_tag @form, :subject %>
</div>

<div class="form-group">
    <%= label @form, :action_date, "日付", class: "control-label" %>
    <%= date_input @form, :action_date, class: "form-control", required: "" %>
    <%= error_tag @form, :action_date %>
</div>

<div class="form-group">
    <%= label @form, :action_time, "時間", class: "control-label" %>
    <%= time_input @form, :action_time, class: "form-control", required: "" %>
    <%= error_tag @form, :action_time %>
</div>

<div class="form-group">
    <%= label @form, :notify_before, "通知", class: "control-label" %>
    <%= select @form, :notify_before, notify_before_options, class: "form-control", required: "" %>
    <%= error_tag @form, :notify_before %>
</div>

<div class="form-group">
    <%= label @form, :summary, "説明", class: "control-label" %>
    <%= textarea @form, :summary, class: "form-control" %>
    <%= error_tag @form, :summary %>
</div>
「日付」と「時間」フィールドについては、先ほど作成したヘルパーモジュールの関数を呼び出しています。
登録画面をweb/templates/notify/index.html.eexに。
<table class="table">
    <thead>
    <tr>
        <th>通知リスト</th>
        <th></th>
    </tr>
    </thead>
    <tbody>
    <%= for notification <- @notifications_sent_not_yet do %>
    <tr>
        <td><%= notification.subject %></td>
        <td class="text-right">
            <%= link "編集", to: notify_path(@conn, :edit, notification), class: "btn btn-default btn-xs" %>
            <%= link "削除", to: notify_path(@conn, :delete, notification), method: :delete, data: [confirm: "削除してもいいですか?"], class: "btn btn-danger btn-xs" %>
        </td>
    </tr>
    <% end %>
    </tbody>
</table>

<%= form_for @changeset, notify_path(@conn, :create), fn form -> %>
<%= if @changeset.action do %>
<div class="alert alert-danger">
    <p>入力に誤りがあります</p>
</div>
<% end %>

<%= render "form.html", changeset: @changeset, form: form %>

<div class="button-group">
    <%= submit "登録", class: "btn btn-primary create" %>
</div>

<% end %>

<table class="table">
    <thead>
    <tr>
        <th>通知済リスト</th>
        <th></th>
    </tr>
    </thead>
    <tbody>
    <%= for notification <- @notifications_sent do %>
    <tr>
        <td><%= notification.subject %></td>
        <td class="text-right">
            <%= link "編集", to: notify_path(@conn, :edit, notification), class: "btn btn-default btn-xs" %>
            <%= link "削除", to: notify_path(@conn, :delete, notification), method: :delete, data: [confirm: "削除してもいいですか?"], class: "btn btn-danger btn-xs" %>
        </td>
    </tr>
    <% end %>
    </tbody>
</table>
編集画面をweb/templates/notify/edit.html.eexに。
<%= form_for @changeset, notify_path(@conn, :update, @notification), fn form -> %>
<%= if @changeset.action do %>
<div class="alert alert-danger">
    <p>入力に誤りがあります</p>
</div>
<% end %>

<%= render "form.html", changeset: @changeset, form: form %>

<div class="button-group">
    <%= submit "更新", class: "btn btn-primary update", id: "update_btn" %>
    <%= submit "削除", class: "btn delete", id: "delete_btn" %>
</div>

<% end %>

<%= link "HOME", to: notify_path(@conn, :index) %>
更新ボタン・削除ボタンが押された際に、隠しフィールドの"_method"の値を"put"と"delete"に切り替えるJavaScriptをweb/static/js/app.jsに。
          ・
          ・
$(function(){
    $('#update_btn').click(function(){
        $('input[name="_method"]').val('put');
    });
    $('#delete_btn').click(function(e){
        if (window.confirm('削除してもいいですか?')) {
            $('input[name="_method"]').val('delete');
        } else {
            e.preventDefault();
        }
    });
});
最後にCSSをweb/static/css/app.cssに。
h2 {
    background-color: #F36636;
    color: #FFFFFF;
    border-radius: 5px;
    padding: 5px;
    text-align: center;
    width: 280px;
}
.container, .alert, main {
    width: 280px;
}
.button-group {
    text-align: center;
}
button.create {
    width: 280px;
}
button.update, button.delete {
    width: 135px;
}
※Brunchをインストールしていない場合は、上記2つはpriv/static/js/app.jsとpriv/static/css/app.cssの下部に設定します。
タイマーの作成
通知時刻にメール送信を行うため、1分間隔でデータベースを検索し、該当するレコードがある場合に、データベースの更新、メールの送信を行います。
まずはメール送信のためのモジュールをmix.exに追加します。
defmodule Notify.Mixfile do
          ・
          ・
  def application do
    [mod: {Notify, []},
     applications: [:phoenix, :phoenix_pubsub, :phoenix_html, :cowboy, :logger, :gettext,
                    :phoenix_ecto, :mariaex, :bamboo, :bamboo_smtp]]
  end
          ・
          ・
  defp deps do
    [{:phoenix, "~> 1.2.1"},
     {:phoenix_pubsub, "~> 1.0"},
     {:phoenix_ecto, "~> 3.0"},
     {:mariaex, ">= 0.0.0"},
     {:phoenix_html, "~> 2.6"},
     {:phoenix_live_reload, "~> 1.0", only: :dev},
     {:gettext, "~> 0.11"},
     {:cowboy, "~> 1.0"},
     {:bamboo, "~> 0.7"},
     {:bamboo_smtp, "~> 1.2.1"}]
  end
          ・
          ・
end
メールモジュールをNotify.Mailerとして登録します。
defmodule Notify.Mailer do
  use Bamboo.Mailer, otp_app: :notify
end
メール送信用のコンフィグレーションをconfig/dev.exsとconfig/config.exsに。
          ・
          ・
config :notify, Notify.Mailer,
  adapter: Bamboo.SMTPAdapter,
  server: "localhost",
  port: 25,
  username: "",
  password: "",
  tls: :never, # can be `:always` or `:never`
  ssl: false, # can be `true`
  retries: 1
          ・
          ・
# General application configuration
config :notify,
  ecto_repos: [Notify.Repo],
  mail_from: "NOTIFY SENDER <from@xxxxxx.xxx>",
  mail_to: "to@xxxxxx.xxx"
          ・
          ・
未通知かつ通知時刻のレコードを検索し、メール送信を行うモジュールをweb/controllers/notify_checker.exに。
defmodule Notify.NotifyChecker do
  import Ecto.Query

  alias Notify.Repo
  alias Notify.Notification
  alias Notify.Mailer
  alias Notify.Email

  def check_notify do
    for n <- notifications_to_send do
      send_mail n
      update_table n
    end
  end

  defp notifications_to_send do
    Notification
    |> where([u], u.sent == false and u.notify_date_time <= from_now(0, "microsecond"))
    |> Repo.all
  end

  defp send_mail(notification) do
    notification
    |> Email.notify_mail
    |> Mailer.deliver_now
  end

  defp update_table(notification) do
    notification
    |> Ecto.Changeset.change(%{sent: true})
    |> Repo.update!
  end
end

defmodule Notify.Email do
  import Bamboo.Email

  def notify_mail(notification) do
    new_email
    |> to(Application.get_env(:notify, :mail_to))
    |> from(Application.get_env(:notify, :mail_from))
    |> subject("【通知】 #{notification.subject}")
    |> text_body(notification |> notify_body)
  end

  defp notify_body(notification) do
    """
    [件名]
    #{notification.subject}
    [日付]
    #{notification.action_date}
    [時間]
    #{notification.action_time}
    [通知]
    #{Ecto.DateTime.utc |> to_local_date_time}
    [説明]
    #{notification.summary}
    """
  end

  defp to_local_date_time(utc_date_time) do
    utc_date_time
    |> Ecto.DateTime.to_erl
    |> :calendar.universal_time_to_local_time
    |> Ecto.DateTime.from_erl
  end
end
タイマーはGenServerにしてSupervisorが管理するようにします。
defmodule Notify.Timer do
  use GenServer

  def start_link(name) do
    GenServer.start_link(__MODULE__, :ok, name: name)
  end

  def init(:ok) do
    check_forever
    {:ok, %{}}
  end

  def handle_info(:check_notify, _) do
    spawn(fn -> Notify.NotifyChecker.check_notify end)
    check_forever
    {:noreply, ""}
  end

  defp check_forever do
    {_, _, sec} = Ecto.Time.utc |> Ecto.Time.to_erl
    Process.send_after(self, :check_notify, (60-sec)*1000)
  end

end
defmodule Notify do
  use Application
  def start(_type, _args) do
    children = [
          ・
          ・
      worker(Notify.Timer, [Notify.Timer]),
    ]
          ・
          ・
  end
          ・
          ・
end
動作確認
$ mix deps.get
$ mix phoenix.server
http://localhost:4000/notifyにアクセスして動作確認してみてください。
Exrmによるデプロイ
最後にElixir Release Manager(Exrm)を使ってAmazon EC2にデプロイしてみます。
まずはモジュールをmix.exに追加します。
defmodule Notify.Mixfile do
          ・
          ・
  defp deps do
    [{:phoenix, "~> 1.2.1"},
     {:phoenix_pubsub, "~> 1.0"},
     {:phoenix_ecto, "~> 3.0"},
     {:mariaex, ">= 0.0.0"},
     {:phoenix_html, "~> 2.6"},
     {:phoenix_live_reload, "~> 1.0", only: :dev},
     {:gettext, "~> 0.11"},
     {:cowboy, "~> 1.0"},
     {:bamboo, "~> 0.7"},
     {:bamboo_smtp, "~> 1.2.1"},
     {:exrm, "~> 1.0"}]
  end
          ・
          ・
end
ホスト名の設定を行います。
          ・
          ・
config :notify, Notify.Endpoint,
  http: [port: {:system, "PORT"}],
  url: [host: "host.xxxx.xx"],
  cache_static_manifest: "priv/static/manifest.json",
  root: ".",
  server: true,
  version: Mix.Project.config[:version]
          ・
          ・
データベースアクセスとメール送信用のコンフィグレーションはconfig/prod.secret.exsに行います。
          ・
          ・
config :notify, Notify.Repo,
  adapter: Ecto.Adapters.MySQL,
  username: "root",
  password: "",
  database: "notify_phoenix",
  pool_size: 20

config :notify, Notify.Mailer,
  adapter: Bamboo.SMTPAdapter,
  server: "localhost",
  port: 25,
  username: "",
  password: "",
  tls: :never, # can be `:always` or `:never`
  ssl: false, # can be `true`
  retries: 1
デプロイ用のモジュールを作成します。
$ mix deps.get
$ MIX_ENV=prod mix phoenix.digest
$ MIX_ENV=prod mix compile
$ MIX_ENV=prod mix release
作成されたrel/notify/releases/0.0.1/notify.tar.gzをサーバにアップロードし、予め作成しておいた/opt/notify_phoenix/内に放り込んで解凍します。
次に起動用のスクリプトを/etc/init/notify_phoenix.confに。
description "notify_phoenix"

setuid ubuntu
setgid ubuntu

start on runlevel [2345]
stop on runlevel [016]

expect stop
respawn

env MIX_ENV=prod
export MIX_ENV

## Uncomment the following two lines if we configured
## our port with an environment variable.
env PORT=4444
export PORT

## Add app HOME directory.
env HOME=/opt/notify_phoenix
export HOME

pre-start exec /bin/sh $HOME/bin/notify start

post-stop exec /bin/sh $HOME/bin/notify stop
起動します。
$ sudo start notify_phoenix
http://host.xxxx.xx:4444/notifyにアクセスして動作確認してみてください。
さいごに
関数型言語のWebフレームワークとして、今回はElixirのPhoenixを試してみました。
Elixirのパイプラインでの記述方法がとても楽しく、できるだけパイプラインを使うよう心がけていたら、自然と宣言的な記述を持つ小さな関数がたくさん出来ました。
パイプラインはデータを変換していく過程がよく分かり、主軸でないものを外部関数として放り出すことで、関数の責務を限定的するという良い習慣が身につきそうです。
Phoenixも洗練されたWebフレームワークで、ElixirとWebアプリケーションの相性の良さを感じることができました。
異なる言語・異なるWebフレームワークでも、毎度似た思想を持つフレームワークで同じWebアプリを作っているので、実装の流れはだいたい同じようになりますが、今回のElixir+Phoenixの開発効率は群を抜いていると感じました。
Elixirではそれぞれのモジュールが独立していて、相互がメッセージのやり取りで動いているらしいのですが、表面上の実装ではそれを感じることはできず、通常の関数呼び出しのように見えます。(関数が呼ばれると関数内部でメッセージパッシングを行っている感じだと思います。)
今回のWebアプリでも、EctoやMailer、Timerなどがそれぞれ独立したコンフィグレーションを持って動いているので、相互に依存関係が発生せず、例えば別プロセスで動いているTimerがデータベースにアクセスしたりメールを送信したりする際にも、関数型言語でありながら引数でデータベースの情報やコンフィグレーションの情報を渡す必要がなく、とてもすっきりとしたコードになっています。(かと言ってグローバルに値を持っているということでもなく、どちらかと言えばDIのような感じでしょうか。)
他の言語でもメッセージパッシングによる同様の実装は可能なのでしょうが、Elixirではデフォルトが「これ」というのが開発効率の面で大きいのだと思いました。