はじめに
CRUD処理およびメール送信を行うWebアプリケーションをYesod 1.4で作成してみます。
HaskellのWebフレームワークはいくつかあるのですが、Play2と同様にフルスタックな点や、ルーティングやコンフィグレーションがコンパイルの対象となっている点など、思想的によく似ている感じがしたので今回Yesodを採用しました。
ノートPCにKona Linux UE 1.0(Ubuntu 14.04 LTS)をインストールしただけの真っ新の状態からスタートし、最終的にAmazon EC2(Ubuntu 14.04 LTS)にデプロイするところまでやってみたいと思います。
なお、今回のコードは下記で公開しています。
https://github.com/imahiro-t/yesod-app.git
他の関数型言語のWebフレームワークでの実装はこちら
Play 2.5でのCRUD処理およびメール送信(activatorによる開発環境の構築からketerによるデプロイまで
PhoenixでのCRUD処理およびメール送信(mixによる開発環境の構築からExrmによるデプロイまで)
環境
Kona Linux UE 1.0(Ubuntu 14.04 LTS)(開発環境)
Amazon EC2(Ubuntu 14.04 LTS)(実行環境)
作成するWebアプリケーションについて
携帯電話のカレンダー機能には、予定を登録すると、その開始日時の○分前にアラームをならす機能があるかと思います。私のガラホ(AQUOS K SHF32)ではアラームは呼出音の設定と連動しているようで、普段呼出音を切ってバイブのみで使用しているので、当然アラームは鳴らず、それだけならまだしも、バイブすらしてくれないという使い勝手の悪さ。
概要は、サイトにアクセスし、件名、日付、時間、通知(○分前)、説明を登録すると、サーバ側でその通知時刻になった時点で、メールを配信してくれるというWebアプリケーションです。
stackのインストール
まずはHaskellの開発環境を構築するためにstackをインストールします。
公式サイトを参考に使用するOSに合わせてインストールしてください。
今回は、最終的にketerを使って実行ファイルのみをAmazon EC2(Ubuntu 14.04 LTS)の環境にデプロイするので、開発用にKona Linux UE 1.0(Ubuntu 14.04 LTS)の環境を用意しKona Linuxのみにstackをインストールしました。
GHC、Cabal、Yesodのインストール
$ stack install yesod-bin cabal-install --install-ghc
以前はそれぞれ個別にインストールする必要があったようですが、stackの登場で、これだけで、GHCからYesodまで必要な環境をインストールしてくれます。
プロジェクトの作成
$ stack new notify yesod-sqlite
$ cd notify
stack newはテンプレートを作成するコマンドで、今回は「notify」というプロジェクト名で、データベースはSQLITEを使用したYesodアプリケーションのテンプレートを作成します。
notifyディレクトリ内にテンプレートが作成されるので、後はnotifyディレクトリ内でファイルの追加、編集を行っていくことになります。(日本語が記述されるファイルはUTF-8で保存する必要があります。)
YesodはMVCのすべてを一つのファイルに記述してしまうことも可能ですが、作成したテンプレート(scaffolded site)では、あらかじめMVCをディレクトリ、ファイルに分割したスケルトンが提供されているので、そちらに従って実装します。
Modelの作成
ModelはModel.hsとconfig/modelsで設定することになります。
      ・
      ・
import Data.Time.LocalTime
      ・
      ・
      ・
      ・
Notification
  subject Text
  actionDate Day
  actionTime TimeOfDay
  notifyBefore Int
  summary Textarea Maybe
  notifyDateTime UTCTime
  sent Bool
Model.hsでconfig/modelsを読み込んでいて、config/modelsの設定はコンパイル時にデータベースの定義とYesod側でのコンテナとして展開されます。
デフォルトではTimeOfDayの型が見つからないため、Model.hsでインポートしておきます。
summary Textarea MaybeのようにMaybeをつけることで、データベース側でのフィールドの値の設定を任意とすることができ、ブラウザ側からのフォーム入力のバリデーションも任意扱いとすることができます。(Maybeがついていない場合は、いずれも自動的に必須チェックが入ります。)
フォームの作成
今回は登録画面と編集画面の2つで同様のフォームを使用するため、フォーム自体を一つのモジュールとして別ファイルに定義します。
本来は別ディレクトリに作成するのが正解なのでしょうが、小規模開発ということで今回はHandlerディレクトリ内に作成しています。
module Handler.Forms
  ( notifyMForm
  , notifyAForm
  ) where

import Import

type FormM x = MForm (HandlerT App IO) (FormResult x, Widget)

commandFieldSettings :: FieldSettings master
commandFieldSettings = FieldSettings
    { fsLabel = "コマンド"
    , fsTooltip = Nothing
    , fsId = Just "command"
    , fsName = Just "command"
    , fsAttrs = []
    }

subjectFieldSettings :: FieldSettings master
subjectFieldSettings = FieldSettings
    { fsLabel = "件名"
    , fsTooltip = Nothing
    , fsId = Just "subject"
    , fsName = Just "subject"
    , fsAttrs = []
    }

actionDateFieldSettings :: FieldSettings master
actionDateFieldSettings = FieldSettings
    { fsLabel = "日付"
    , fsTooltip = Nothing
    , fsId = Just "actionDate"
    , fsName = Just "actionDate"
    , fsAttrs = []
    }

actionTimeFieldSettings :: FieldSettings master
actionTimeFieldSettings = FieldSettings
    { fsLabel = "時間"
    , fsTooltip = Nothing
    , fsId = Just "actionTime"
    , fsName = Just "actionTime"
    , fsAttrs = []
    }

notifyBeforeFieldSettings :: FieldSettings master
notifyBeforeFieldSettings = FieldSettings
    { fsLabel = "通知"
    , fsTooltip = Nothing
    , fsId = Just "notifyBefore"
    , fsName = Just "notifyBefore"
    , fsAttrs = []
    }

summaryFieldSettings :: FieldSettings master
summaryFieldSettings = FieldSettings
    { fsLabel = "説明"
    , fsTooltip = Nothing
    , fsId = Just "summary"
    , fsName = Just "summary"
    , fsAttrs = []
    }

notifyBefores :: [(Text,Int)]
notifyBefores =
  [ ("5分前",5)
  , ("10分前",10)
  , ("15分前",15)
  , ("20分前",20)
  , ("30分前",30)
  , ("45分前",45)
  , ("1時間前",60)
  ]

notifyMForm :: Text -> Maybe Notification -> Html -> FormM (Text, Notification)
notifyMForm command mnotification html = do
  (commandRes, commandView) <- mreq hiddenField commandFieldSettings (Just command)
  (subjectRes, subjectView) <- mreq textField subjectFieldSettings (notificationSubject <$> mnotification)
  (actionDateRes, actionDateView) <- mreq dayField actionDateFieldSettings (notificationActionDate <$> mnotification)
  (actionTimeRes, actionTimeView) <- mreq timeFieldTypeTime actionTimeFieldSettings (notificationActionTime <$> mnotification)
  (notifyBeforeRes, notifyBeforeView) <- mreq (selectFieldList notifyBefores) notifyBeforeFieldSettings (notificationNotifyBefore <$> mnotification)
  (summaryRes, summaryView) <- mopt textareaField summaryFieldSettings (notificationSummary <$> mnotification)
  notifyDateTime <- lift (liftIO getCurrentTime)
  let notifyDateTimeRes = FormSuccess notifyDateTime
  sent <- pure False
  let sentRes = FormSuccess sent
  let notificationRes = (,) <$> commandRes
        <*> (Notification
              <$> subjectRes
              <*> actionDateRes
              <*> actionTimeRes
              <*> notifyBeforeRes
              <*> summaryRes
              <*> notifyDateTimeRes
              <*> sentRes
            )
  let widget = $(widgetFile "notify-form")
  return (notificationRes, widget)

notifyAForm :: Text -> Maybe Notification -> Form (Text, Notification)
notifyAForm command mnotification = renderDivs $ (,)
  <$> areq hiddenField commandFieldSettings (Just command)
  <*> (Notification
        <$> areq textField subjectFieldSettings (notificationSubject <$> mnotification)
        <*> areq dayField actionDateFieldSettings (notificationActionDate <$> mnotification)
        <*> areq timeFieldTypeTime actionTimeFieldSettings (notificationActionTime <$> mnotification)
        <*> areq (selectFieldList notifyBefores) notifyBeforeFieldSettings (notificationNotifyBefore <$> mnotification)
        <*> aopt textareaField summaryFieldSettings (notificationSummary <$> mnotification)
        <*> lift (liftIO getCurrentTime)
        <*> pure False
      )
# {html}
^{fvInput commandView}
<dl class="required">
  <dt>
    <label for="subject">件名
  <dd>
    ^{fvInput subjectView}
<dl class="required">
  <dt>
    <label for="actionDate">日付
  <dd>
    ^{fvInput actionDateView}
<dl class="required">
  <dt>
    <label for="actionTime">時間
  <dd>
    ^{fvInput actionTimeView}
<dl class="required">
  <dt>
    <label for="notifyBefore">通知
  <dd>
    ^{fvInput notifyBeforeView}
<dl class="required">
  <dt>
    <label for="summary">説明
  <dd>
    ^{fvInput summaryView}
Yesodでは、レイアウトの自由度に応じてApplicativeフォームとMonadicフォームから選択できます。レイアウトの自由度が高いのはMonadicフォームですが、多少内部に踏み込んでいくため、設定が少し複雑になります。
Applicativeフォームを使用する場合は、notifyAFormの実装だけで済みますが、Monadicフォームの場合は、notifyMFormとtemplates/notify-form.hamletの実装が必要となります。
subjectFieldSettings等のFieldSettingsは”件名”のようにラベル属性を設定することも可能ですが、CSSでフィールドをレイアウトしたり、JavaScriptでフィールドを操作する場合などには、ラベル属性以外の属性の設定が必要となるため、FieldSettingsを定義する必要があります。
今回は同一URLへのPOSTに対して更新処理か削除処理かを判別するために、データベースと関係ない"command"という隠しフィールドを持たせています。
フルスタックなWebフレームワークではフォームとモデル(データベース)には強い結びつきがありますが、Yesodでは"command"のような「フォームでは必要だけどモデルでは必要ない項目」"notifyDateTime"や"sent"のような「モデルでは必要だけどフォームでは必要ない項目」を上手に切り出して記述できます。
Controller(ハンドラー)の作成
Yesodでは後述するルーティングの設定により、URLパターンから該当するハンドラーが呼び出されることになります。今回は2つのハンドラーを作成します。
1つ目は(一覧表示付きの)登録画面がGETとPOSTで呼び出されたときのハンドラーです。
module Handler.Notify
  ( getNotifyR
  , postNotifyR
  ) where

import Import

import Data.Time.Clock
import Data.Time.LocalTime

import Handler.Forms

getNotifyR :: Handler Html
getNotifyR = do
  notificationsSentNotYet <- runDB $ selectList [NotificationSent ==. False] [Desc NotificationNotifyDateTime]
  notificationsSent <- runDB $ selectList [NotificationSent ==. True] [Desc NotificationNotifyDateTime]
  (widget, enctype) <- generateFormPost $ notifyMForm "create" Nothing
  defaultLayout $ do
    setTitle "登録画面"
    $(widgetFile "notifications")

postNotifyR :: Handler Html
postNotifyR = do
  ((res,widget),enctype) <- runFormPost $ notifyMForm "" Nothing
  case res of
    FormSuccess (_, notification) -> do
      timeZone <- liftIO getCurrentTimeZone
      let localTime = LocalTime (notificationActionDate notification) (notificationActionTime notification)
      let actionDateTime =  localTimeToUTC timeZone localTime
      let notifyDateTime =  addUTCTime (-realToFrac (60*notificationNotifyBefore notification)) actionDateTime
      let notification' = notification {notificationNotifyDateTime = notifyDateTime}
      _ <- runDB $ insert notification'
      setMessage $ toHtml $ "[" ++ (notificationSubject notification) ++ "]" ++ "を作成しました"
      redirect $ NotifyR
    _ -> do
      setMessage $ toHtml $ ("入力に誤りがあります"::Text)
      notificationsSentNotYet <- runDB $ selectList [NotificationSent ==. False] [Desc NotificationNotifyDateTime]
      notificationsSent <- runDB $ selectList [NotificationSent ==. True] [Desc NotificationNotifyDateTime]
      defaultLayout $ do
        setTitle "登録画面"
        $(widgetFile "notifications")
GETで呼び出されたときは、getNotifyRが呼ばれ、データベースから通知予定のレコードと、通知済みのレコードを取得し、登録画面を表示しています。
selectListは検索条件と並び順を指定していて、その際のNotificationSentなどはconfig/modelsの設定内容が対応することになります。(NotificationのsentだからNotificationSentみたいな感じです。)
POSTで呼び出されたときは、postNotifyRが呼ばれ、フォームの入力内容を元にデータベースにレコードを追加しています。その後、日付、時間、通知から通知時刻をUTCTimeで計算してレコードを更新し、登録画面にリダイレクトしています。
2つ目は編集画面がGETとPOSTで呼び出されたときのハンドラーです。
module Handler.Notification
  ( getNotificationR
  , postNotificationR
  ) where

import Import

import Data.Time.Clock
import Data.Time.LocalTime

import Handler.Forms

getNotificationR :: NotificationId -> Handler Html
getNotificationR notificationId = do
  notification <- runDB $ get404 notificationId
  ((_,widget), enctype) <- runFormPost $ notifyMForm "update" $ Just notification
  defaultLayout $ do
    setTitle "編集画面"
    $(widgetFile "notification")

postNotificationR :: NotificationId -> Handler Html
postNotificationR notificationId = do
  ((res,widget),enctype) <- runFormPost $ notifyMForm "" $ Nothing
  case res of
    FormSuccess (command, notification) -> do
      case command of
        "update" -> do
          timeZone <- liftIO getCurrentTimeZone
          let localTime = LocalTime (notificationActionDate notification) (notificationActionTime notification)
          let actionDateTime =  localTimeToUTC timeZone localTime
          let notifyDateTime =  addUTCTime (-realToFrac (60*notificationNotifyBefore notification)) actionDateTime
          let notification' = notification {notificationNotifyDateTime = notifyDateTime, notificationSent = False}
          runDB $ replace notificationId notification'
          setMessage $ toHtml $ "[" ++ (notificationSubject notification) ++ "]" ++ "を更新しました"
        "delete" -> do
          runDB $ delete notificationId
          setMessage $ toHtml $ "[" ++ (notificationSubject notification) ++ "]" ++ "を削除しました"
        _ -> notFound
      redirect $ NotifyR
    _ -> do
      setMessage $ toHtml $ ("入力に誤りがあります"::Text)
      defaultLayout $ do
        setTitle "編集画面"
        $(widgetFile "notification")
GETで呼び出されたときは、getNotificationRが呼ばれ、データベースからNotificationIdに該当するレコードを取得し、編集画面を表示しています。
POSTで呼び出されたときは、postNotificationRが呼ばれ、フォームからの"command"パラメータにより、更新処理か削除処理を行い、登録画面にリダイレクトしています。
Viewの作成
YesodではShakespearean TemplatesというHTML、CSS、JavaScriptを記述できるテンプレート言語を使用して、Viewを作成することになります。(HTMLがHamlet、CSSがLucius、JavaScriptがJulius)
最初に作成したテンプレート(scaffolded site)には既にある程度のデフォルト設定が行われているため、差分を記述します。
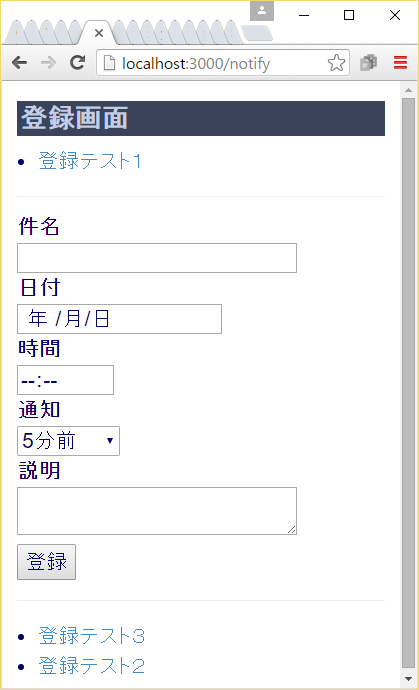
まずは登録画面のHamletです。
<h1>登録画面
<ul>
  $forall Entity notificationId notification <- notificationsSentNotYet
    <li>
      <a href=@{NotificationR notificationId}> #{notificationSubject notification}
<hr>
<p>
  <form method=post enctype=#{enctype}>
    ^{widget}
    <div>
      <input type=submit value="登録">
<hr>
<ul>
  $forall Entity notificationId notification <- notificationsSent
    <li>
      <a href=@{NotificationR notificationId}> #{notificationSubject notification}
このテンプレートはハンドラー内のdefaultLayout $(widgetFile "notifications")で読み込まれることになるので、テンプレート内で使用するnotificationsSentNotYet等はあらかじめハンドラー側でバインドしている必要があります。
^{widget}はハンドラー内の(widget, enctype) <- generateFormPost $ notifyMForm "" Nothing等で作成されたフォームを表示します。(ちなみにnotifyMFormをnotifyAFormにするとMonadicフォームからApplicativeフォームに切り替えることができます。)
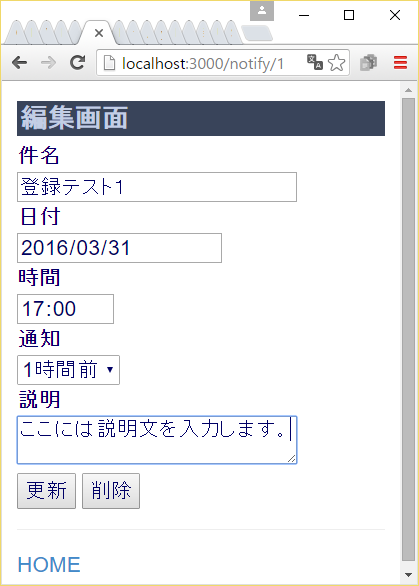
次に編集画面のHamletです。
<h1>編集画面
<p>
  <form method=post enctype=#{enctype}>
    ^{widget}
    <div>
      <input type=submit value="更新">
      <input type=button value=削除 onclick="if (confirm('削除しますか?')) {this.form.command.value = 'delete';this.form.submit();}">
<hr>
<p>
  <a href=@{NotifyR}>HOME
削除ボタンが押された際に、隠しフィールドの"comannd"を"delete"にしてPOSTしています。
今回CSSは共通の静的な情報となるため、Luciusではなく通常のCSSファイルとしてstaticフォルダに格納しています。
h1 {
    background-color: #556677 !important;
    color: #ccddee !important;
}
input#subject {
    width: 280px;
}
textarea#summary {
    width: 280px;
}
dl {
  margin-bottom: 5px !important;
}
dt,dd {
  line-height: 1 !important;
}
ul {
  padding-left: 20px !important;
}
CSSファイルの読み込みはtemplates/default-layout-wrapper.hamletで行います。
     ・
     ・
    <link rel="stylesheet" href="/static/css/notify.css">
     ・
     ・
コンフィグレーションの追加
コンフィグレーションはSettings.hsとconfig/settings.ymlで行うことになります。
data AppSettings = AppSettings
    { appStaticDir              :: String
      ・
      ・
    -- Mail server configuration values.
    , appMailHost              :: Text
    , appMailPort              :: Int
    , appMailFrom              :: Text
    , appMailTo                :: Text
    }
      ・
      ・
instance FromJSON AppSettings where
    parseJSON = withObject "AppSettings" $ \o -> do
        let defaultDev =
      ・
      ・
        appMailHost              <- o .: "mail-host"
        appMailPort              <- o .: "mail-port"
        appMailFrom              <- o .: "mail-from"
        appMailTo                <- o .: "mail-to"
      ・
      ・
        return AppSettings {..}
      ・
      ・
# Mail configuration
mail-host: "_env:MAIL_HOST:localhost"
mail-port: "_env:MAIL_PORT:25"
mail-from: "_env:MAIL_FROM:from@xxxx.xx"
mail-to: "_env:MAIL_TO:to@xxxx.xx"
今回は、通知時刻にメールにて通知処理を行うので、メールサーバのホスト名、ポート番号、送信元、送信先を環境変数で設定できるようにしました。
タイマーの作成
通知時刻にメール送信を行うため、1分間隔でデータベースを検索し、該当するレコードがある場合に、データベースの更新、メールの送信を行います。
本来は別ディレクトリに作成するのが正解なのでしょうが、小規模開発ということでこちらもHandlerディレクトリ内に作成しています。
module Handler.NotifyChecker
 ( checkNotification
 ) where

import Import

--import Control.Concurrent
import Database.Persist.Sqlite
import Network.Mail.Mime (Mail)
import Network.Mail.SMTP
import Data.Time.Clock
import Data.Time.LocalTime
import Data.Time.Format

mail :: AppSettings -> Notification -> TimeZone -> Mail
mail appSettings notification timeZone = simpleMail from to cc bcc subject [body]
  where
    from = Address (Just "NOTIFY SENDER") (appMailFrom appSettings)
    to = [Address Nothing (appMailTo appSettings)]
    cc = []
    bcc = []
    subject = notificationSubject notification
    summary = case notificationSummary notification of
                Just a -> unTextarea a
                Nothing -> ""
    body = plainTextPart $
              "[件名]" ++
              "\r\n" ++
              fromStrict subject ++
              "\r\n" ++
              "[日付]" ++
              "\r\n" ++
              (pack $ show $ notificationActionDate notification) ++
              "\r\n" ++
              "[時間]" ++
              "\r\n" ++
              (pack $ show $ notificationActionTime notification) ++
              "\r\n" ++
              "[通知]" ++
              "\r\n" ++
              (pack $ show (utcToZonedTime timeZone (notificationNotifyDateTime notification))) ++
              "\r\n" ++
              "[説明]" ++
              "\r\n" ++
              fromStrict summary ++
              "\r\n"

notify :: AppSettings -> IO ()
notify appSettings = do
  now <- getCurrentTime
  notifications <- runSqlite dbName $ selectList [NotificationNotifyDateTime <. now, NotificationSent ==. False] []
  timeZone <- getCurrentTimeZone
  mapM_ (\(Entity notificationId notification) -> do
             runSqlite dbName $ update notificationId [NotificationSent =. True]
             sendMail' mailHost mailPort (mail appSettings notification timeZone)
        ) notifications
  where
    dbName = sqlDatabase $ appDatabaseConf $ appSettings
    mailHost = unpack $ appMailHost appSettings
    mailPort = fromIntegral $ appMailPort appSettings

checkNotification :: AppSettings -> IO ()
checkNotification appSettings = do
  forever $ do
    ct <- getCurrentTime
    let sec = read $ formatTime defaultTimeLocale "%S" ct :: Int
    threadDelay $ (60-sec)*(10^6)
    notify appSettings
checkNotificationで1分毎に0秒のときにチェックを行うよう計算し、計算結果の時間分threadDelayで休止した後にnotifyを呼び出します。
notifyでは通知時刻と通知フラグで検索を行い、該当するレコードに対して、メールの送信および通知フラグの更新処理を行います。
後はcheckNotificationをスレッドとしてフォークする箇所ですが、AppSettingsを引数として渡したいので、正解かどうかわからないのですが、Application.hsのmakeApplication内で呼び出すことにしました。
      ・
      ・
import Control.Concurrent
      ・
      ・
makeApplication :: App -> IO Application
makeApplication foundation = do
      ・
      ・
    -- fork notification checker
    _ <- forkIO $ checkNotification $ appSettings foundation
      ・
      ・
    return $ logWare $ defaultMiddlewaresNoLogging appPlain
ルーティング
ルーティング(URLパターンからハンドラーへの対応付け)を設定します。
      ・
      ・
/notify NotifyR GET POST
/notify/#NotificationId NotificationR GET POST
その他の設定
ビルドの際に必要な設定です。
      ・
      ・
import Handler.Notify
import Handler.Notification
import Handler.NotifyChecker
      ・
      ・
    exposed-modules: Application
      ・
      ・
                     Handler.Notify
                     Handler.Notification
                     Handler.NotifyChecker
                     Handler.Forms
      ・
      ・
    build-depends: base                          >= 4          && < 5
      ・
      ・
                 , mime-mail
                 , smtp-mail
      ・
      ・
ビルド&動作確認
デフォルトではメール用のモジュールが入っていないので、ビルドしてmime-mailとsmtp-mailをとってきてもらいます。
$ stack build
ビルドが成功したらYesodを起動します。
$ stack exec -- yesod devel
http://localhost:3000/notifyにアクセスして動作確認してみてください。
keterによるデプロイ
Kona LinuxやAmazon EC2に下記のディレクトリ構成を作ります。
$ sudo mkdir -p /opt/keter/etc
$ sudo mkdir -p /opt/keter/incoming
$ sudo mkdir -p /opt/keter/db
$ sudo chown $USER.$USER /opt/keter/etc
$ sudo chown $USER.$USER /opt/keter/incoming
$ sudo chown $USER.$USER /opt/keter/db
まずはketer自身の実行ファイルを作成します。
$ stack install keter
作成された実行ファイルketerをKona LinuxやAmazon EC2の/usr/bin/等に放り込みます。
次にプロジェクトのketerファイルを作成するためのコンフィグレーションを設定します。
stanzas:
  - type: webapp
    exec: ../dist/bin/notify
    args: []
    hosts:
      - localhost
      - aws.hostname.xxx
    requires-secure: false
プロジェクトのketerファイルを作成します。
$ stack exec -- yesod keter
作成されたnotify.keterをKona LinuxやAmazon EC2の/opt/keter/incomingにコピーします。
次にketerを実行するためのコンフィグレーションを設定します。
root: /opt/keter

listeners:
  - host: "*4"
    port: 3000

setuid: ubuntu

env:
  SQLITE_DATABASE: /opt/keter/db/notify.sqlite3
  MAIL_HOST: localhost
  MAIL_PORT: "25"
  MAIL_FROM: from@mydomain.xxx
  MAIL_TO: to@mydomain.xxx
Ubuntu 14.04 LTSでは、keterでの実行の場合、環境変数はここで設定する必要があるようです。(他の箇所の設定はことごとく無視されました。)
デーモンとして起動するためのコンフィグレーションを設定します。
description "keter"

start on (net-device-up and local-filesystems and runlevel [2345])
stop on runlevel [016]
respawn

console output

exec keter /opt/keter/etc/keter-config.yaml
起動して確認します。
sudo start keter
http://aws.hostname.xxx:3000/notifyにアクセスして動作確認してみてください。
さいごに
駆け足でstackによる開発環境の構築からketerによるデプロイまで見てきました。
開発環境の構築自体はstackを入れてしまえば、あとはstackのコマンドでGHCのインストールからデプロイファイルの作成まで行うことができるので、以前より格段に開発しやすくなっているようです。
Amazon EC2側にはstackのインストールといった開発環境の構築は必要なく、開発環境側でビルドした実行ファイルketerとプロジェクトのデプロイファイルnotify.keter、設定ファイルketer-config.yamlがあればWebアプリケーションを動作させることができるのも魅力的です。