Appiumの存在を知る
個人開発ではありますが、2025年はモバイル開発(Flutter)を進めてきました。
機能作成(コーディング)を中心に進めていました。機能作成中と並行して実施すると書き直しになってしまうということもあり、テストコードについて、全然進めていませんでした。
2026年は、そのあたりの強化を予定しています。
来年に向けて、テストコード実装の準備をしておこうと思い始めたタイミングでした。
Googleで「Flutter Test」や「Flutter VRT」と検索する中で、以下サイトを通じてAppiumというライブラリの存在を知りました。
実際に簡単なテストを作成してみたところ、私自身が作成しているアプリでもテストコード実装時に役立ちそうと思いました。
今回は上記経緯で触ってみたAppiumについて書きました。
読んでいただく前に
Appiumの内容を中心となりますので、以下内容は特に記載していません。
- Flutterのインストールや基本的な話
- Android Studioのセットアップの話
-
Golden Test(※)やalchemistと利用方法や比較検討
※golden_toolkitはメンテナンス継続されなくなっています。
Appiumのドキュメントを見ていこう
Star数が20.7kでした。相当な支持を受けていると思いました。
何者?
Appium is an open-source automation framework that provides WebDriver-based automation possibilities for a wide range of different mobile, desktop and IoT platforms. Appium is modular and extensible, and supports multiple programming languages, which means there is an entire ecosystem of related software:
README.mdの最初に記載された内容です。エコシステムなどの話はすぐに理解できる話ではないですが、自動化を進めやすくする仕組みが整っていますよ!というのが伝わってきます。
- オープンソースの自動化フレームワーク - モバイル、デスクトップ、IoTプラットフォームなど、幅広いプラットフォームに対応したWebDriverベースの自動化が可能
- モジュール式で拡張可能 - 柔軟な設計により、様々なニーズに合わせてカスタマイズや機能追加ができる
- 複数のプログラミング言語に対応 - 多言語サポートにより、関連ソフトウェアを含む充実したエコシステムが形成されている
なぜAppium?
先ほど記載した内容と重なる部分もありますが、以下の3つが目に留まりました。
You can write tests with your favorite dev tools using any WebDriver-compatible language such as Java, Python, Ruby and C#. There are also third party client implementations for other languages.
Some drivers like xcuitest and uiautomator2 have built-in mobile web and hybrid app support. Within the same script, you can switch seamlessly between native app automation and webview automation, all using the WebDriver model that's already the standard for web automation.
You can run your automated tests locally and in a cloud. There are multiple cloud providers that support various Appium drivers (mostly targeting iOS and Android mobile automation).
- 多言語によるテストコード作成が可能
- ネイティブアプリの中にあるWebビュー部分もテスト可能
- 自動化テストをローカルでもクラウドでも実行可能
開発の背景とドライバー
この話は深堀りすると長いので、冒頭部分だけ記載します。
※基本的に上記の2ページから引用した内容です。
Seleniumが長年Webブラウザの自動化を行ってきています。
その過程で開発されたAPIが「WebDriver」ですが、現は標準化され、ChromeやFirefoxなどの主要ブラウザがこれに対応しています。
Appiumに関して、モバイルアプリ自動化のために「独自の新しい方法」を作ることもできたようですが、既存の標準(WebDriver)を採用することを選んだそうです。
理由は、WebサイトもモバイルアプリもTVアプリも、基本的なUI操作(ボタンを押す、テキストを入力する、画面遷移など)は本質的に同じだから、とのことでした。
「複数の無関係なプラットフォームの自動化をどのようにサポートするか?」この問いに答えるために「ドライバー」というものが必要になります。
ドライバーの動作について理解することの主な利点は、典型的な複雑さや典型的なドライバーアーキテクチャを認識することで、テストで問題に遭遇した際、デバッグプロセスに役立つようです。
「WebDriver」という標準が大きな影響をもたらしており、「ドライバー」について知ることでより理解が深まる、ということだと思いました。
Appiumがどのようにこのプロトコルを幅広いプラットフォーム上の自動化動作にマッピングするのか。
トリックは、厳密に言えば、Appiumはマッピングしない、ということのようです。この責任は、Appiumドライバーと呼ばれる一種のソフトウェアモジュールに委ねられています。
ドライバーはAppiumのプラグイン可能なモジュールのようなもので、Appiumに特定のプラットフォーム(またはドライバーの目的に応じた一連のプラットフォーム)を自動化する力を与えるということです。結局のところ、ドライバーの責任は、WebDriverプロトコルを表すAppium内部のインターフェースを単に実装することです。
・・・・・
話が複雑になってきましたね。ここまでにします。
セットアップ
前置きはこれくらいで、以下のページの内容に沿って早速環境構築を進めます。
Installing Appium
System Requirements
利用条件が記載されています。
Nodejsに関して、私はこの機会にNode.js 24.xにアップグレードしました。
A macOS, Linux, or Windows operating system
Node.js version in the SemVer range ^20.19.0 || ^22.12.0 || >=24.0.0
LTS is recommended
npm version >=10 (npm is usually bundled with Node.js, but can be upgraded independently)
npm install -g appium
appium
エラーなく起動できました。
メッセージにある通り、これからdriversをインストールします。

So what's next? Even though Appium is installed and running, it does not come bundled with any drivers, which means it cannot automate anything yet. We will therefore set up automation for Android - continue to Installing the UiAutomator2 Driver.
Installing the UiAutomator2 Driver
Set up Android automation requirements
大きく3つ記載あります。
- Android SDK:Android Studio Narwhal 4を使ってセットアップ
- Java JDK:Oracleのサイトからインストール
- Prepare the Device:Emulatorまたは実機を用意
Android Studio関係のセットアップ
必要なツール等のインストール完了までの所要時間ですが、1時間とみてください。
Install the driver itself
コマンド経由でインストールを進めました。
appium driver install uiautomator2
インストール処理が完了したようです。

Validating the Install
実際に利用するにあたり、問題なく機能するPCの状態か判定してくれます。
0 required fixes neededを確認しました。
3 optional fixes possibleと表示されていましたが、一旦無視して進めます。
ターミナル出力詳細
Running 7 doctor checks for the "uiautomator2" driver
info Doctor ### Starting doctor diagnostics  ###
info Doctor  ✔ ANDROID_HOME is set to: C:\Users\{user}\AppData\Local\Android\Sdk
info Doctor    Checking adb, emulator
info Doctor      'adb' exists in C:\Users\{user}\AppData\Local\Android\Sdk\platform-tools\adb.exe
info Doctor      'emulator' exists in C:\Users\{user}\AppData\Local\Android\Sdk\emulator\emulator.exe
info Doctor  ✔ adb, emulator exist in 'C:\Users\{user}\AppData\Local\Android\Sdk'
info Doctor  ✔ JAVA_HOME is set to: C:\tools\Oracle_JDK-21
info Doctor  ✔ 'bin\java.exe' exists under 'C:\tools\Oracle_JDK-21'
WARN Doctor  ✖ bundletool.jar cannot be found
WARN Doctor  ✖ ffmpeg.exe cannot be found
WARN Doctor  ✖ gst-launch-1.0.exe and/or gst-inspect-1.0.exe cannot be found
info Doctor ### Diagnostic completed, 0 required fixes needed, 3 optional fixes possible. ###
info Doctor ### Optional Manual Fixes ###
info Doctor To fix these optional issues, please do the following manually:
WARN Doctor  ➜ bundletool.jar is used to handle Android App bundles. Please download the binary from https://github.com/google/bundletool/releases/ and store it to any folder listed in the PATH environment variable. Folders that are currently present in PATH:
(中略)
WARN Doctor  ➜ ffmpeg.exe is used to capture screen recordings from the device under test. Please read https://www.ffmpeg.org/download.html.
WARN Doctor  ➜ gst-launch-1.0.exe and gst-inspect-1.0.exe are used to stream the screen of the device under test. Please read https://gstreamer.freedesktop.org/documentation/installing/index.html?gi-language=c.
info Doctor Bye! All issues have been fixed!
info Doctor
これでセットアップは完了しましたので、実際にコード作成に進みます。
テストコード作成
テスト実行時の作業状況
実際にテストを実行する際、PCでは以下を開いています。
- Visual Studio Code(2ウインドウ)
- Flutterのアプリケーション用
- テストコード実行用
- コマンドプロンプト
- Appium起動用
Write a Test (Python)
サクッと試すにはPythonかjavascriptがよさそうです。
Flutterであれば、javascriptの方が書きやすい方もいるかと思いますが、私はPythonで進めました。
サンプルを元にコード修正します。
以下のコードは、アプリ起動直後の画面からタップを繰り返し、画面B→画面Cと遷移する操作を検証するコードです。
基本的な内容ですが、まずはこれが機能するか確かめます。
変数:capabilitiesのパラメータに関して、基本的にはサンプルコード通りですが、以下の項目は値を以下の通り更新しています。
-
automationName:Installing the UiAutomator2 Driver 部分で共有した画像に記載されたautomationNameの値を設定 -
appPackage:android\app\src\main\kotlin\com\example\poc\MainActivity.ktのpackage名(Flutterのプロジェクトの話) -
appActivity:FlutterでAndroid開発を進めている場合は、.MainActivity
import unittest
from appium import webdriver
from appium.options.android import UiAutomator2Options
from appium.webdriver.common.appiumby import AppiumBy

capabilities = dict(
    platformName='Android',
    automationName='UiAutomator2',
    deviceName='Android',
    appPackage='com.example.poc_250216',
    appActivity='.MainActivity',
    language='ja',
    locale='JP'
)

appium_server_url = 'http://localhost:4723'

class TestAppium(unittest.TestCase):
    def setUp(self) -> None:
        self.driver = webdriver.Remote(appium_server_url, options=UiAutomator2Options().load_capabilities(capabilities))

    def tearDown(self) -> None:
        if self.driver:
            self.driver.quit()
    def test_sample_apps(self) -> None:
        el = self.driver.find_element(by=AppiumBy.XPATH, value='//*[contains(@content-desc, "M4: Input/Output")]')
        el.click()
        el = self.driver.find_element(by=AppiumBy.XPATH, value='//*[contains(@content-desc, "バリデーションなし")]')
        el.click()
        print("成功: 脆弱な例ボタンをクリックしました")
次の操作までに間をあける考慮が必要
共有したコードを実行すると、以下の通り失敗に終わります。
NoSuchElementErrorとどちらにも表示されています。
Appium側のターミナル
[3a539658][W3C] Matched W3C error code 'no such element' to NoSuchElementError
[3a539658][AndroidUiautomator2Driver@a2f5] Encountered internal error running command: NoSuchElementError: An element could not be located on the page using the given search parameters.
at AndroidUiautomator2Driver.findElement (C:\Users\eno49\AppData\Roaming\npm\node_modules\appium\node_modules@appium\base-driver\lib\basedriver\commands\find.ts:75:12)
[3a539658][HTTP] <-- POST /session/3a539658-91bc-444b-9f20-e2a91a69c113/element 404 129 ms - 891
Python側のターミナル
NoSuchElementError: An element could not be located on the page using the given search parameters.
at AndroidUiautomator2Driver.findElOrEls (C:\Users\eno49.appium\node_modules\appium-uiautomator2-driver\node_modules\appium-android-driver\lib\commands\find.ts:86:11)
画面表示まで待つ
人間が操作するときと同じ話ですが、あるボタンをタップして別画面に遷移後、即時で次の操作は行えません。
そこはプログラムも同じになるので、3秒間置いてから次の操作をするなどの配慮が必要です。
もう少し本格的なテストを書こう
上記の画面遷移だけでは実践的な内容にならないので、もうちょっとやってみます。
先ほど記載した「画面表示まで待つ」の話を含めて、フォームに入力をして送信する操作に関するコードを書いてみます。
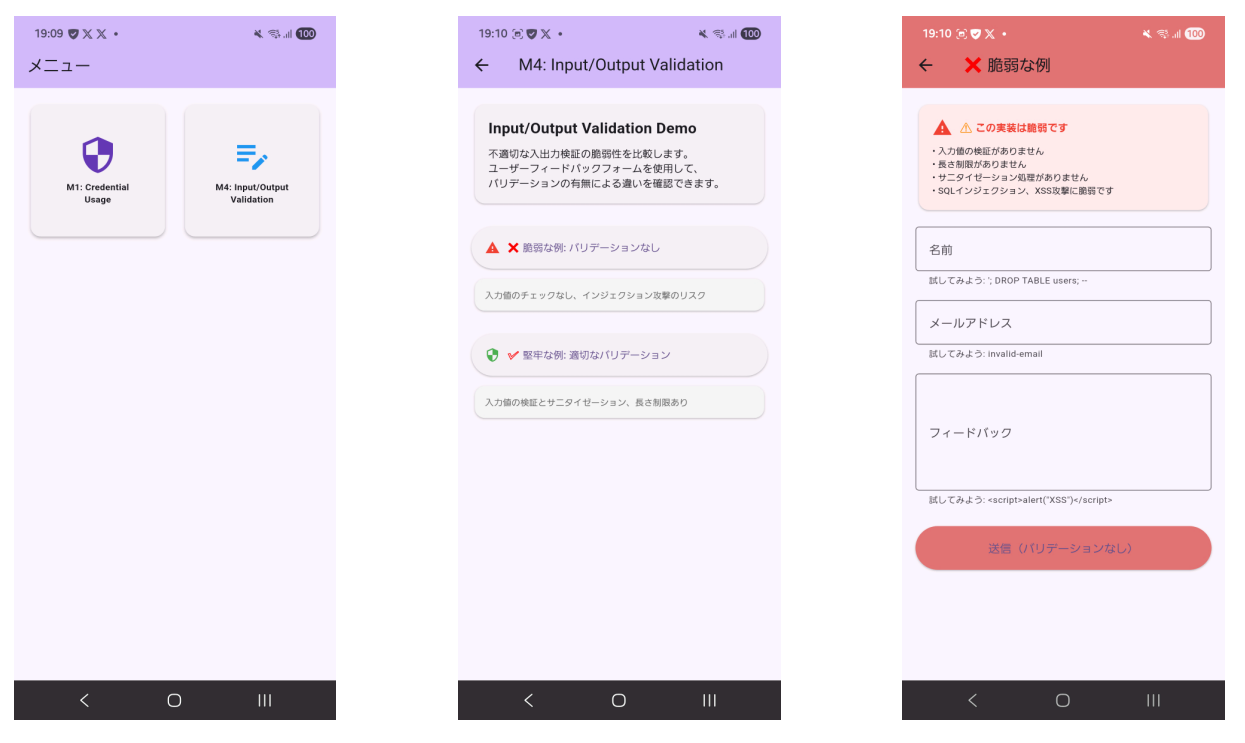
どういったアプリ?
冒頭にアプリ作成を進めている、と記載しましたが、それとは別のアプリです。
OWASP Mobile Top 10を理解するための学習用Flutterアプリです。
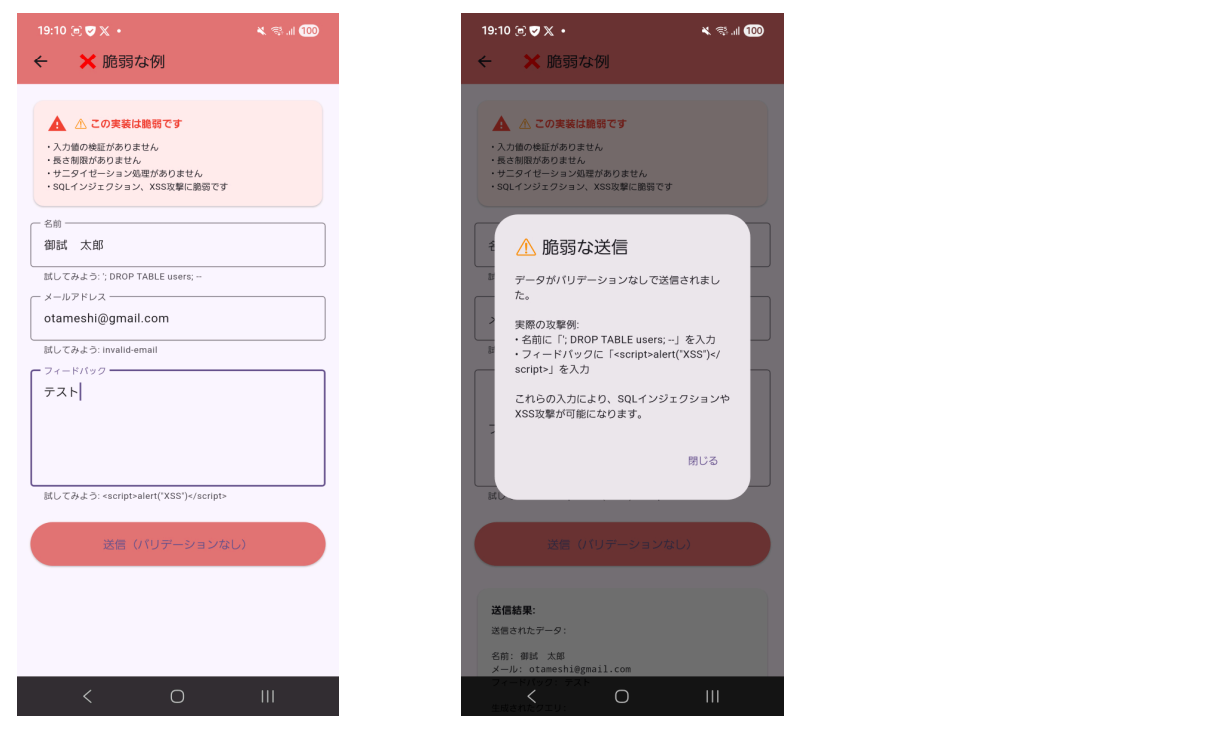
以下で、スクリーンショットを添付していますが、このスクリーンショットの操作について、コードベースで機能するか確認を行います。
アプリのスクリーンショット
ホーム画面表示からフォーム画面表示まで
フォーム入力から送信まで
コード全体
上記の操作を自動化するためのコードを実装しました。
最初に共有したコードと同じ箇所はカットしています。
コード詳細
# 必要なライブラリを追加
from selenium.webdriver.support.ui import WebDriverWait
from selenium.webdriver.support import expected_conditions as EC

# 中略

    def test_sample_apps(self) -> None:
        # 最初の要素をクリック
        el = self.driver.find_element(by=AppiumBy.XPATH, value='//*[contains(@content-desc, "M4: Input/Output")]')
        el.click()

        # 最大5秒間、要素が表示されるまで待つ
        wait = WebDriverWait(self.driver, 5)
        el = wait.until(
            EC.presence_of_element_located((AppiumBy.XPATH, '//*[contains(@content-desc, "バリデーションなし")]'))
        )
        el.click()
        print("成功: 脆弱な例ボタンをクリックしました")

        # 脆弱な例の画面が表示されるまで待つ
        wait.until(
            EC.presence_of_element_located((AppiumBy.XPATH, '//*[contains(@content-desc, "❌ 脆弱な例")]'))
        )
        print("成功: 脆弱な例画面が表示されました")

        # 3つのEditTextフィールドを取得
        text_fields = self.driver.find_elements(by=AppiumBy.CLASS_NAME, value='android.widget.EditText')
        print(f"成功: {len(text_fields)}個のテキストフィールドを検出しました")

        # 名前フィールド(1番目)に入力
        if len(text_fields) > 0:
            text_fields[0].click()
            text_fields[0].send_keys("テスト太郎")
            print("成功: 名前フィールドに入力しました")

        # メールアドレスフィールド(2番目)に入力
        if len(text_fields) > 1:
            text_fields[1].click()
            text_fields[1].send_keys("test@example.com")
            print("成功: メールアドレスフィールドに入力しました")

        # フィードバックフィールド(3番目)に入力
        if len(text_fields) > 2:
            text_fields[2].click()
            text_fields[2].send_keys("これはテストフィードバックです")
            print("成功: フィードバックフィールドに入力しました")

        # キーボードを閉じる
            self.driver.hide_keyboard()
            print("成功: キーボードを閉じました")

            # 送信ボタンが見えるように少し待つ
            import time
            time.sleep(1)

            try:
                # 方法1: content-descで検索
                submit_button = wait.until(
                    EC.presence_of_element_located((AppiumBy.XPATH, '//*[contains(@content-desc, "送信")]'))
                )
                submit_button.click()
                print("成功: 送信ボタンをクリックしました")
            except:
                pass

if __name__ == '__main__':
    unittest.main()
テスト成功
python test.py
いきなり成功したわけではないですが、
成功すると、Python側のターミナルで以下の最後にOKと表示されます。
成功: 脆弱な例ボタンをクリックしました
成功: 脆弱な例画面が表示されました
成功: 3個のテキストフィールドを検出しました
成功: 名前フィールドに入力しました
成功: メールアドレスフィールドに入力しました
成功: フィードバックフィールドに入力しました
成功: キーボードを閉じました
成功: 送信ボタンをクリックしました
.
----------------------------------------------------------------------
Ran 1 test in 29.201s

OK
page_sourceの出力が有効となる場合があるかも
現在どういったページを読み込んでいるのか、その情報があるとコード作成が進めやすいと感じました。以下コード自体は生成AIから得たのですが、こういうトラブルシューティングの際に本当に役立ちます。
以下をtest_sample_appsメソッド内で実装して実行すると、xml形式の情報がターミナルに出力されます。
page_source = self.driver.page_source
print("=== Page Source ===")
print(page_source)
print("===================")
理解を深めていこう
以下あたりのページを見ていると、できることがまだまだたくさんあると分かりました。
まだ手を付けていないので、読み進めていこうと思います。
テストコード作成の横展開
今回、フォーム提出する処理についてテストコードを実装しました。
実際のアプリケーション規模で書き続けるのは大変なケースが多いです。生成AIやMCPを利用して効率化したいです。
簡単な内容で恐縮ですが、以下それぞれを試して効果がありそうなことは確かめられたので、活かしていきたいです。
Android関係のMCP(Model Context Protocol)
Android対応の可能性がありそうなMCPを少し調べてみました。
playwright-mcp
現状Android未対応でしたので、特に記載する内容はありません。
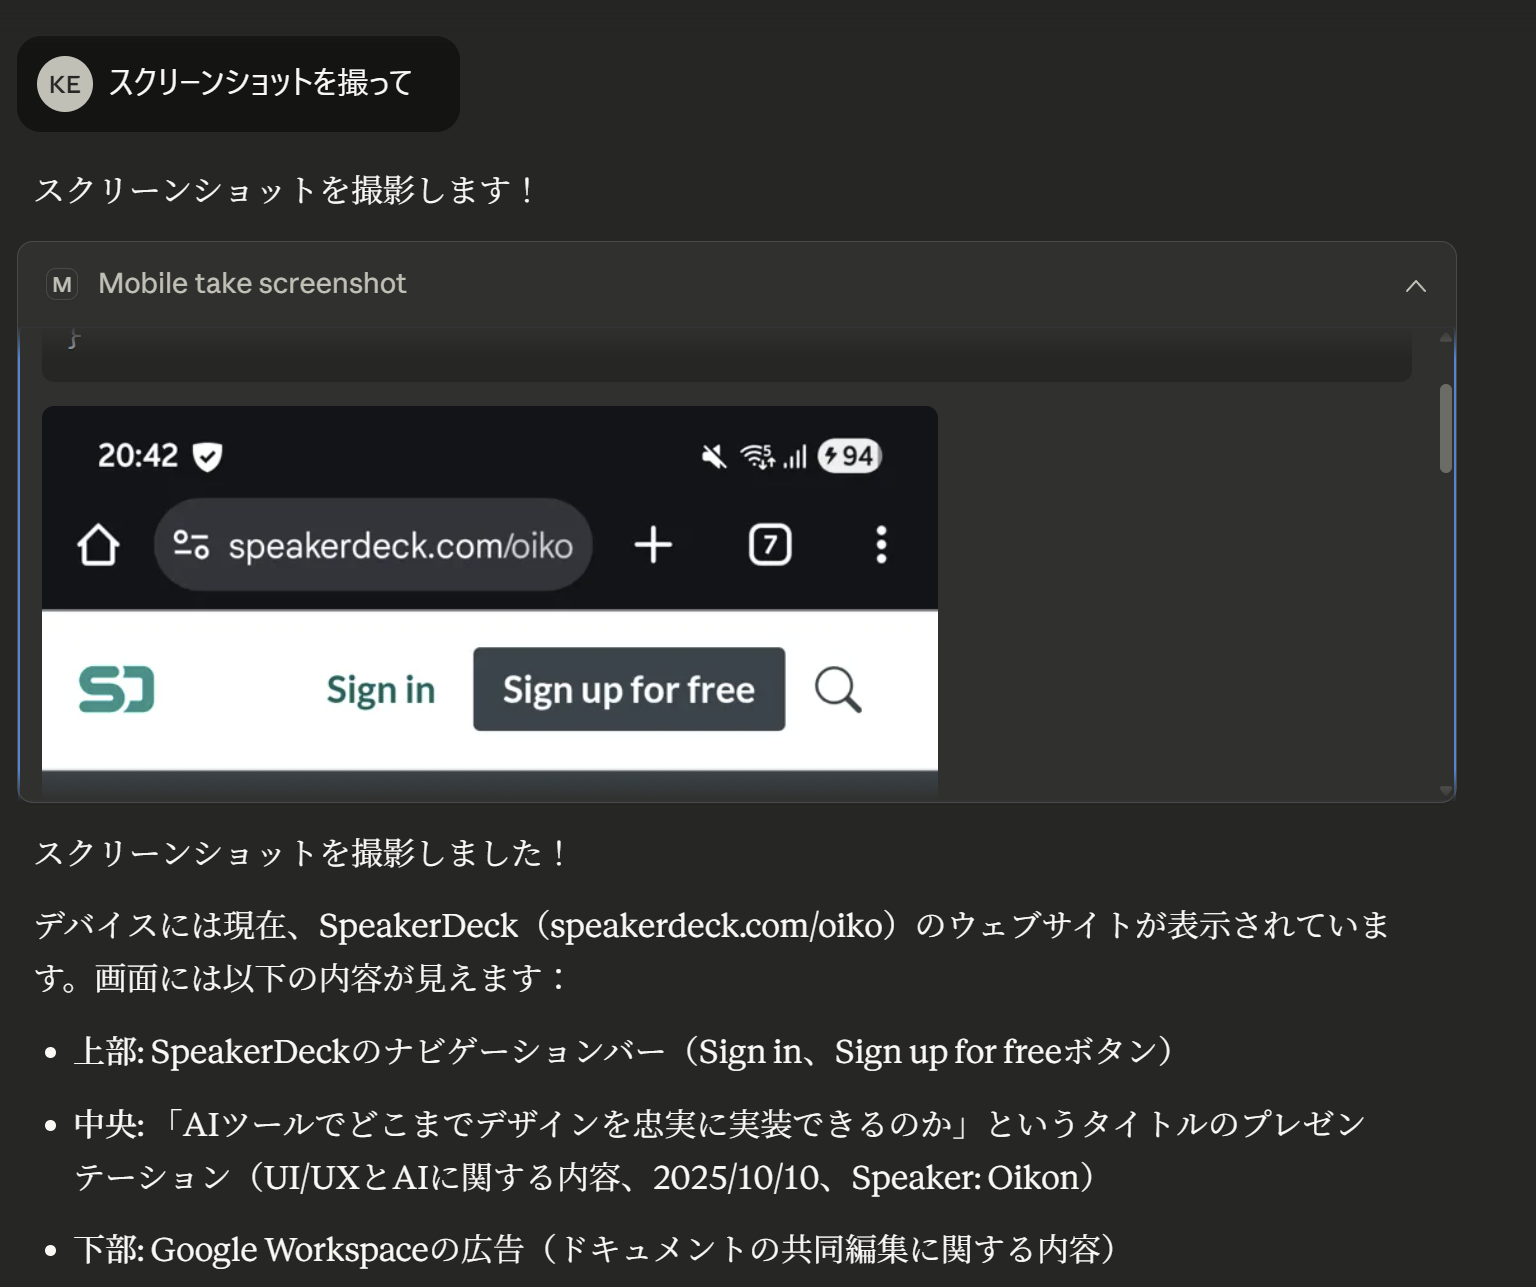
mobile-mcp
以下手順で実際に動かしてみました。
- MCPサーバーの設定を設定
- USBケーブルでPCとスマホを接続
- 以下のようにチャット
mobile-mcpを利用したい。
スクリーンショットを撮って。
Claude Desktopのチャットの一部ですが、speakerdeckのスクリーンショットが撮影できていました。何か役立つ場面があるかもしれません。
まとめ
今回、Appiumを触ってAndroidアプリケーションのテストコード作成方法について学んでみました。
記載した通り、生成AIやMCPも活用すれば、アプリケーション全体のテストコード作成もスムーズに進められそうです。来年に向けた準備が1つできてよかったです。
ありがとうございました。
参考記事