はじめに
Difyでは画像をアップロードしてLLMに問い合わせることはできますが、画像URLを直接入力してVQA(Visual Question Answering)を行いたいというニーズもあります。
今回はその実現方法をご紹介します。
完成イメージ
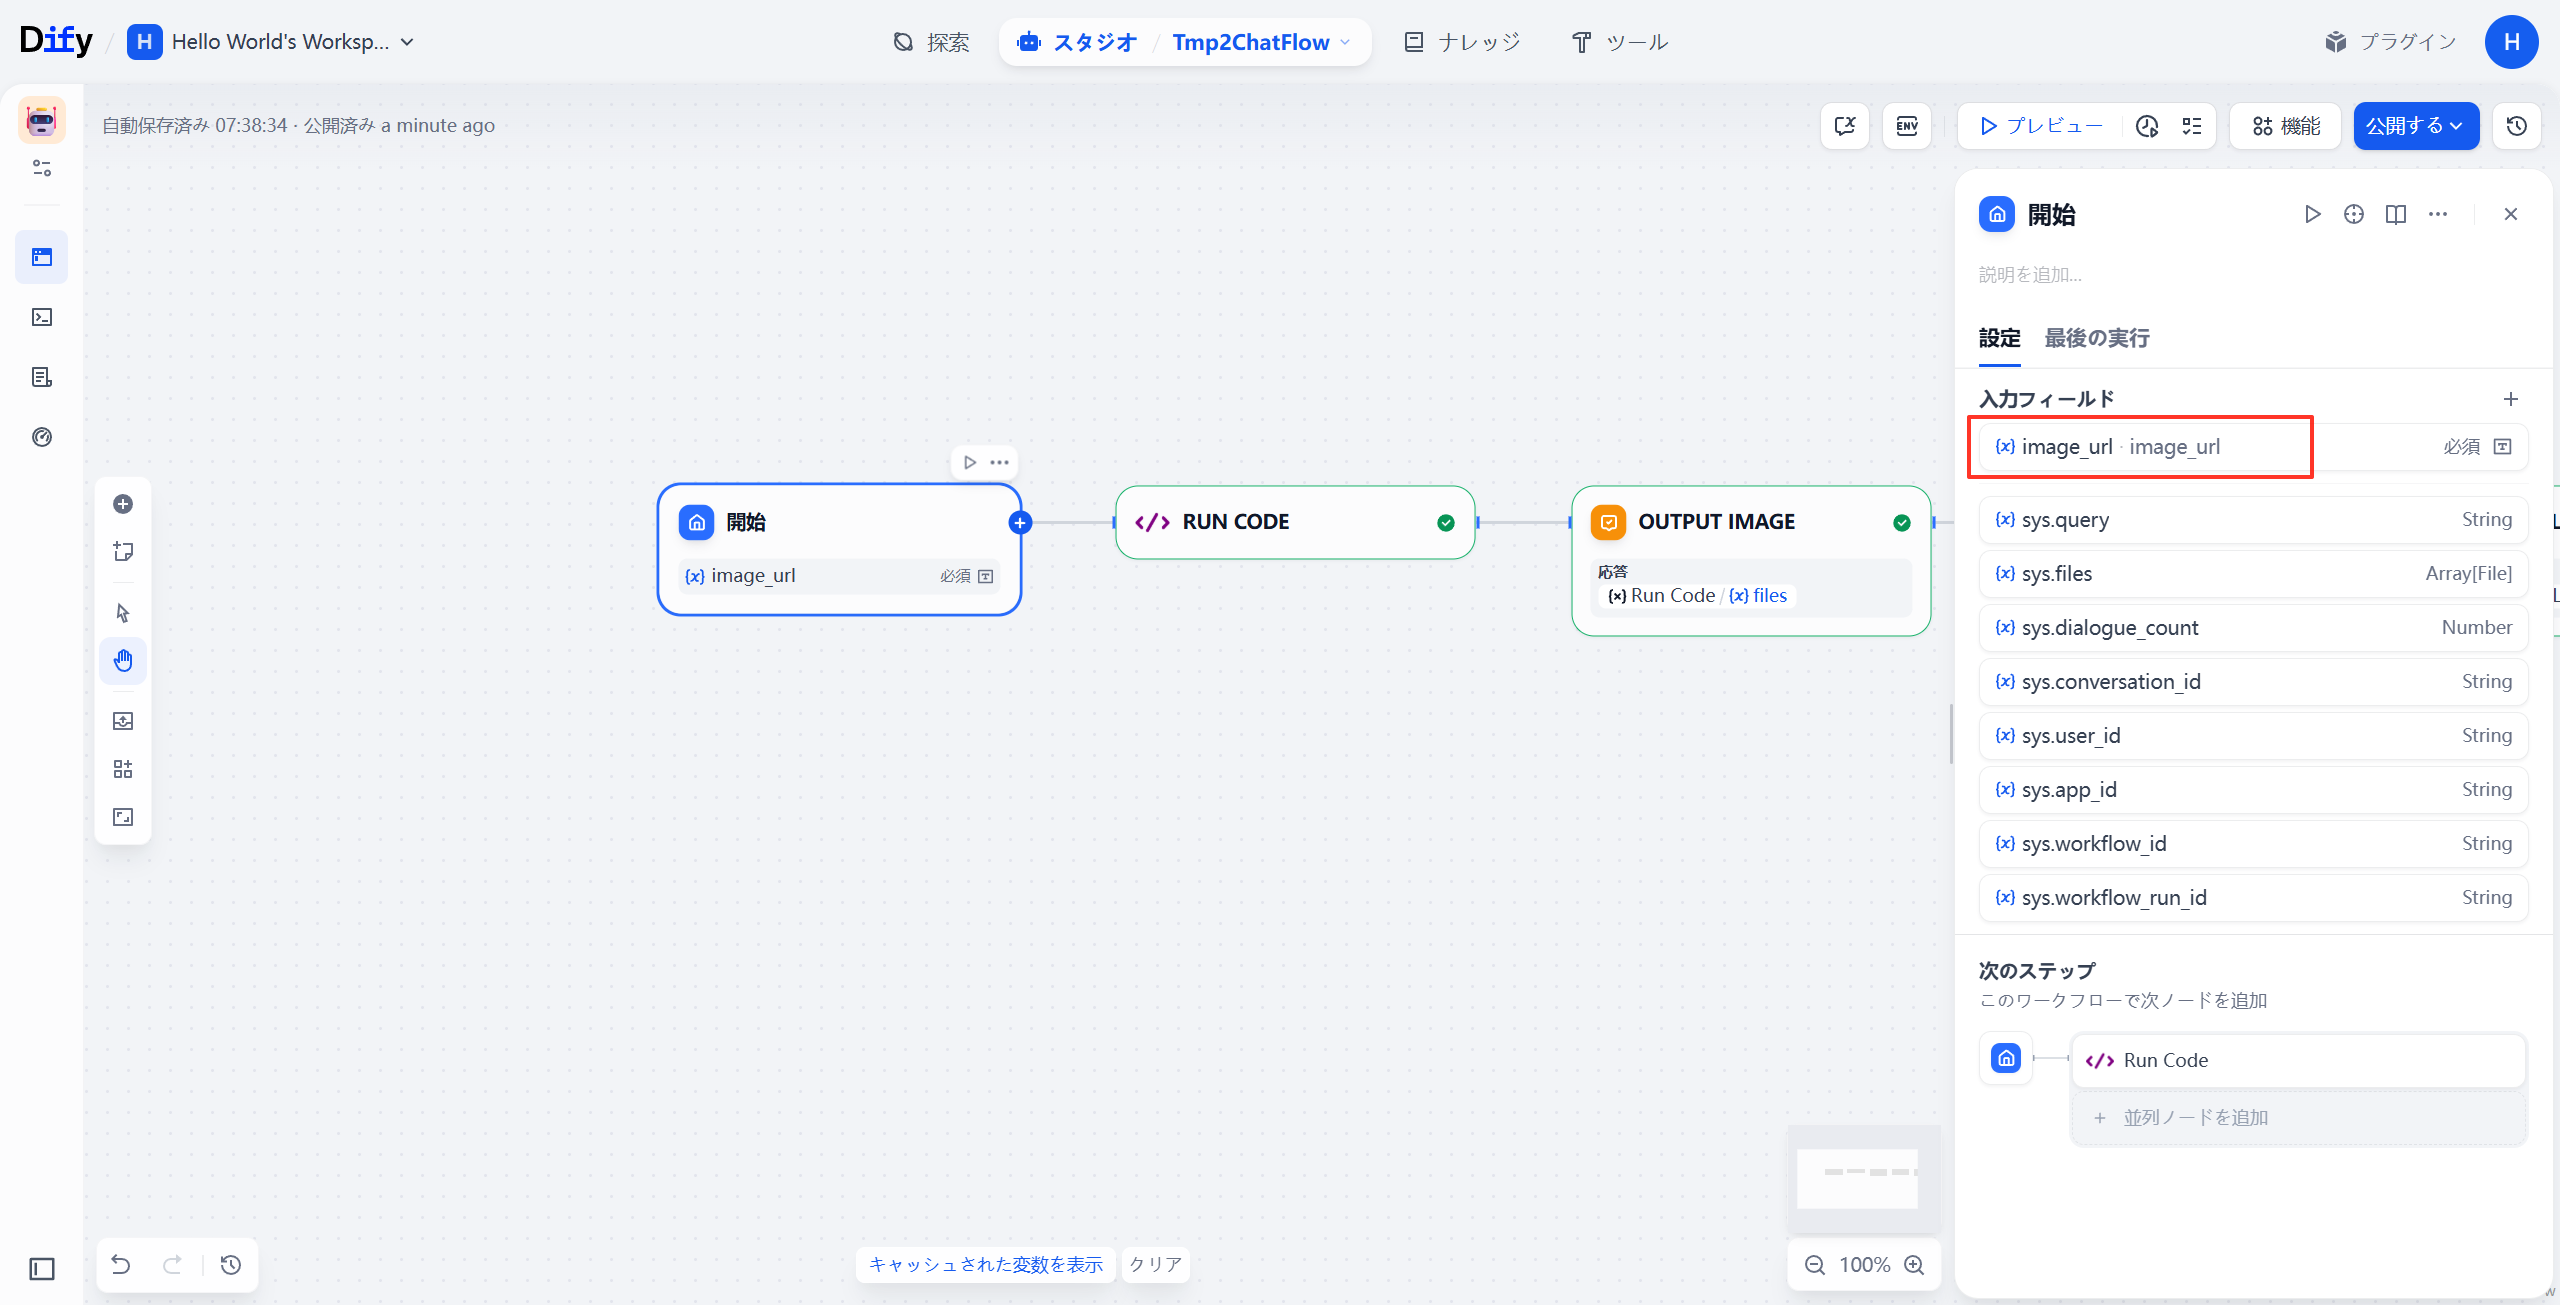
🧩 ステップ1:開始ノードに入力フィールドを追加
- Difyのワークフロー編集画面を開きます。
- 開始ノードを選択し、入力フィールドを1つ追加します。
- 名前を
image_urlに設定します。
🧩 ステップ2:画像ダウンロード&変換用のRun Codeノードを追加
- Sandbox Fusionの Run Code ノードを追加します。
- 以下のように設定します:
| 項目 | 値 |
|---|---|
| Language | python |
| Timeout | 120 |
| Fetch Files | image.jpg |
| Code | 以下のスクリプトを貼付 |
import requests
from PIL import Image
from io import BytesIO
from pathlib import Path
from typing import Optional

def download_and_convert_image(
    url: str,
    output_path: str = "image.jpg",
    quality: int = 95,
    timeout: int = 30,
    max_size_mb: int = 50
) -> Optional[str]:
    """
    URLから画像をダウンロードしてJPEG形式に変換する

    Args:
        url: 画像のURL
        output_path: 出力ファイルパス
        quality: JPEG品質 (1-100)
        timeout: タイムアウト時間(秒)
        max_size_mb: 最大ファイルサイズ(MB)

    Returns:
        成功時は出力ファイルパス、失敗時はNone
    """

    # URLバリデーション
    if not url or not url.startswith(('http://', 'https://')):
        print("❌ 無効なURL")
        return None

    # HTTPヘッダー設定
    headers = {
        "User-Agent": "Mozilla/5.0 (Windows NT 10.0; Win64; x64) AppleWebKit/537.36",
        "Accept": "image/*,*/*;q=0.8",
        "Accept-Encoding": "gzip, deflate, br"
    }

    try:
        print(f"📥 ダウンロード中: {url}")

        # 画像ダウンロード
        response = requests.get(url, headers=headers, timeout=timeout, stream=True)
        response.raise_for_status()

        # ファイルサイズチェック
        content_length = response.headers.get('content-length')
        if content_length and int(content_length) > max_size_mb * 1024 * 1024:
            print(f"❌ ファイルサイズが大きすぎます (>{max_size_mb}MB)")
            return None

        # 画像処理
        with Image.open(BytesIO(response.content)) as img:
            print(f"🖼️ 画像情報: {img.format} {img.size} {img.mode}")

            # カラーモード変換(透明背景を白に変換)
            if img.mode in ('RGBA', 'LA'):
                # アルファチャンネル付きの場合、白背景で合成
                background = Image.new('RGB', img.size, (255, 255, 255))
                background.paste(img, mask=img.split()[-1])
                img = background
            elif img.mode == 'P':
                # パレットモードの場合
                img = img.convert('RGBA')
                background = Image.new('RGB', img.size, (255, 255, 255))
                background.paste(img, mask=img.split()[-1] if len(img.split()) == 4 else None)
                img = background
            elif img.mode != 'RGB':
                # その他のモードをRGBに変換
                img = img.convert('RGB')

            # 出力ディレクトリ作成
            Path(output_path).parent.mkdir(parents=True, exist_ok=True)

            # JPEG保存
            img.save(output_path, 'JPEG', quality=quality, optimize=True)

        # 結果表示
        file_size = Path(output_path).stat().st_size
        print(f"✅ 完了: {output_path} ({file_size:,} bytes)")
        return output_path

    except requests.RequestException as e:
        print(f"❌ ネットワークエラー: {e}")
    except Image.UnidentifiedImageError:
        print("❌ 画像形式エラー")
    except (OSError, PermissionError) as e:
        print(f"❌ ファイルエラー: {e}")
    except Exception as e:
        print(f"❌ エラー: {e}")

    return None


# 使用例
if __name__ == "__main__":
    # 基本的な使用方法
    image_url = "{{#1754152172687.image_url#}}"
    result = download_and_convert_image(image_url)

    if result:
        print(f"🎉 成功: {result}")
    else:
        print("💔 処理が失敗しました")

    # カスタム設定での使用例
    # result = download_and_convert_image(
    #     url=image_url,
    #     output_path="output/converted_image.jpg",
    #     quality=85,
    #     timeout=60,
    #     max_size_mb=100
    # )
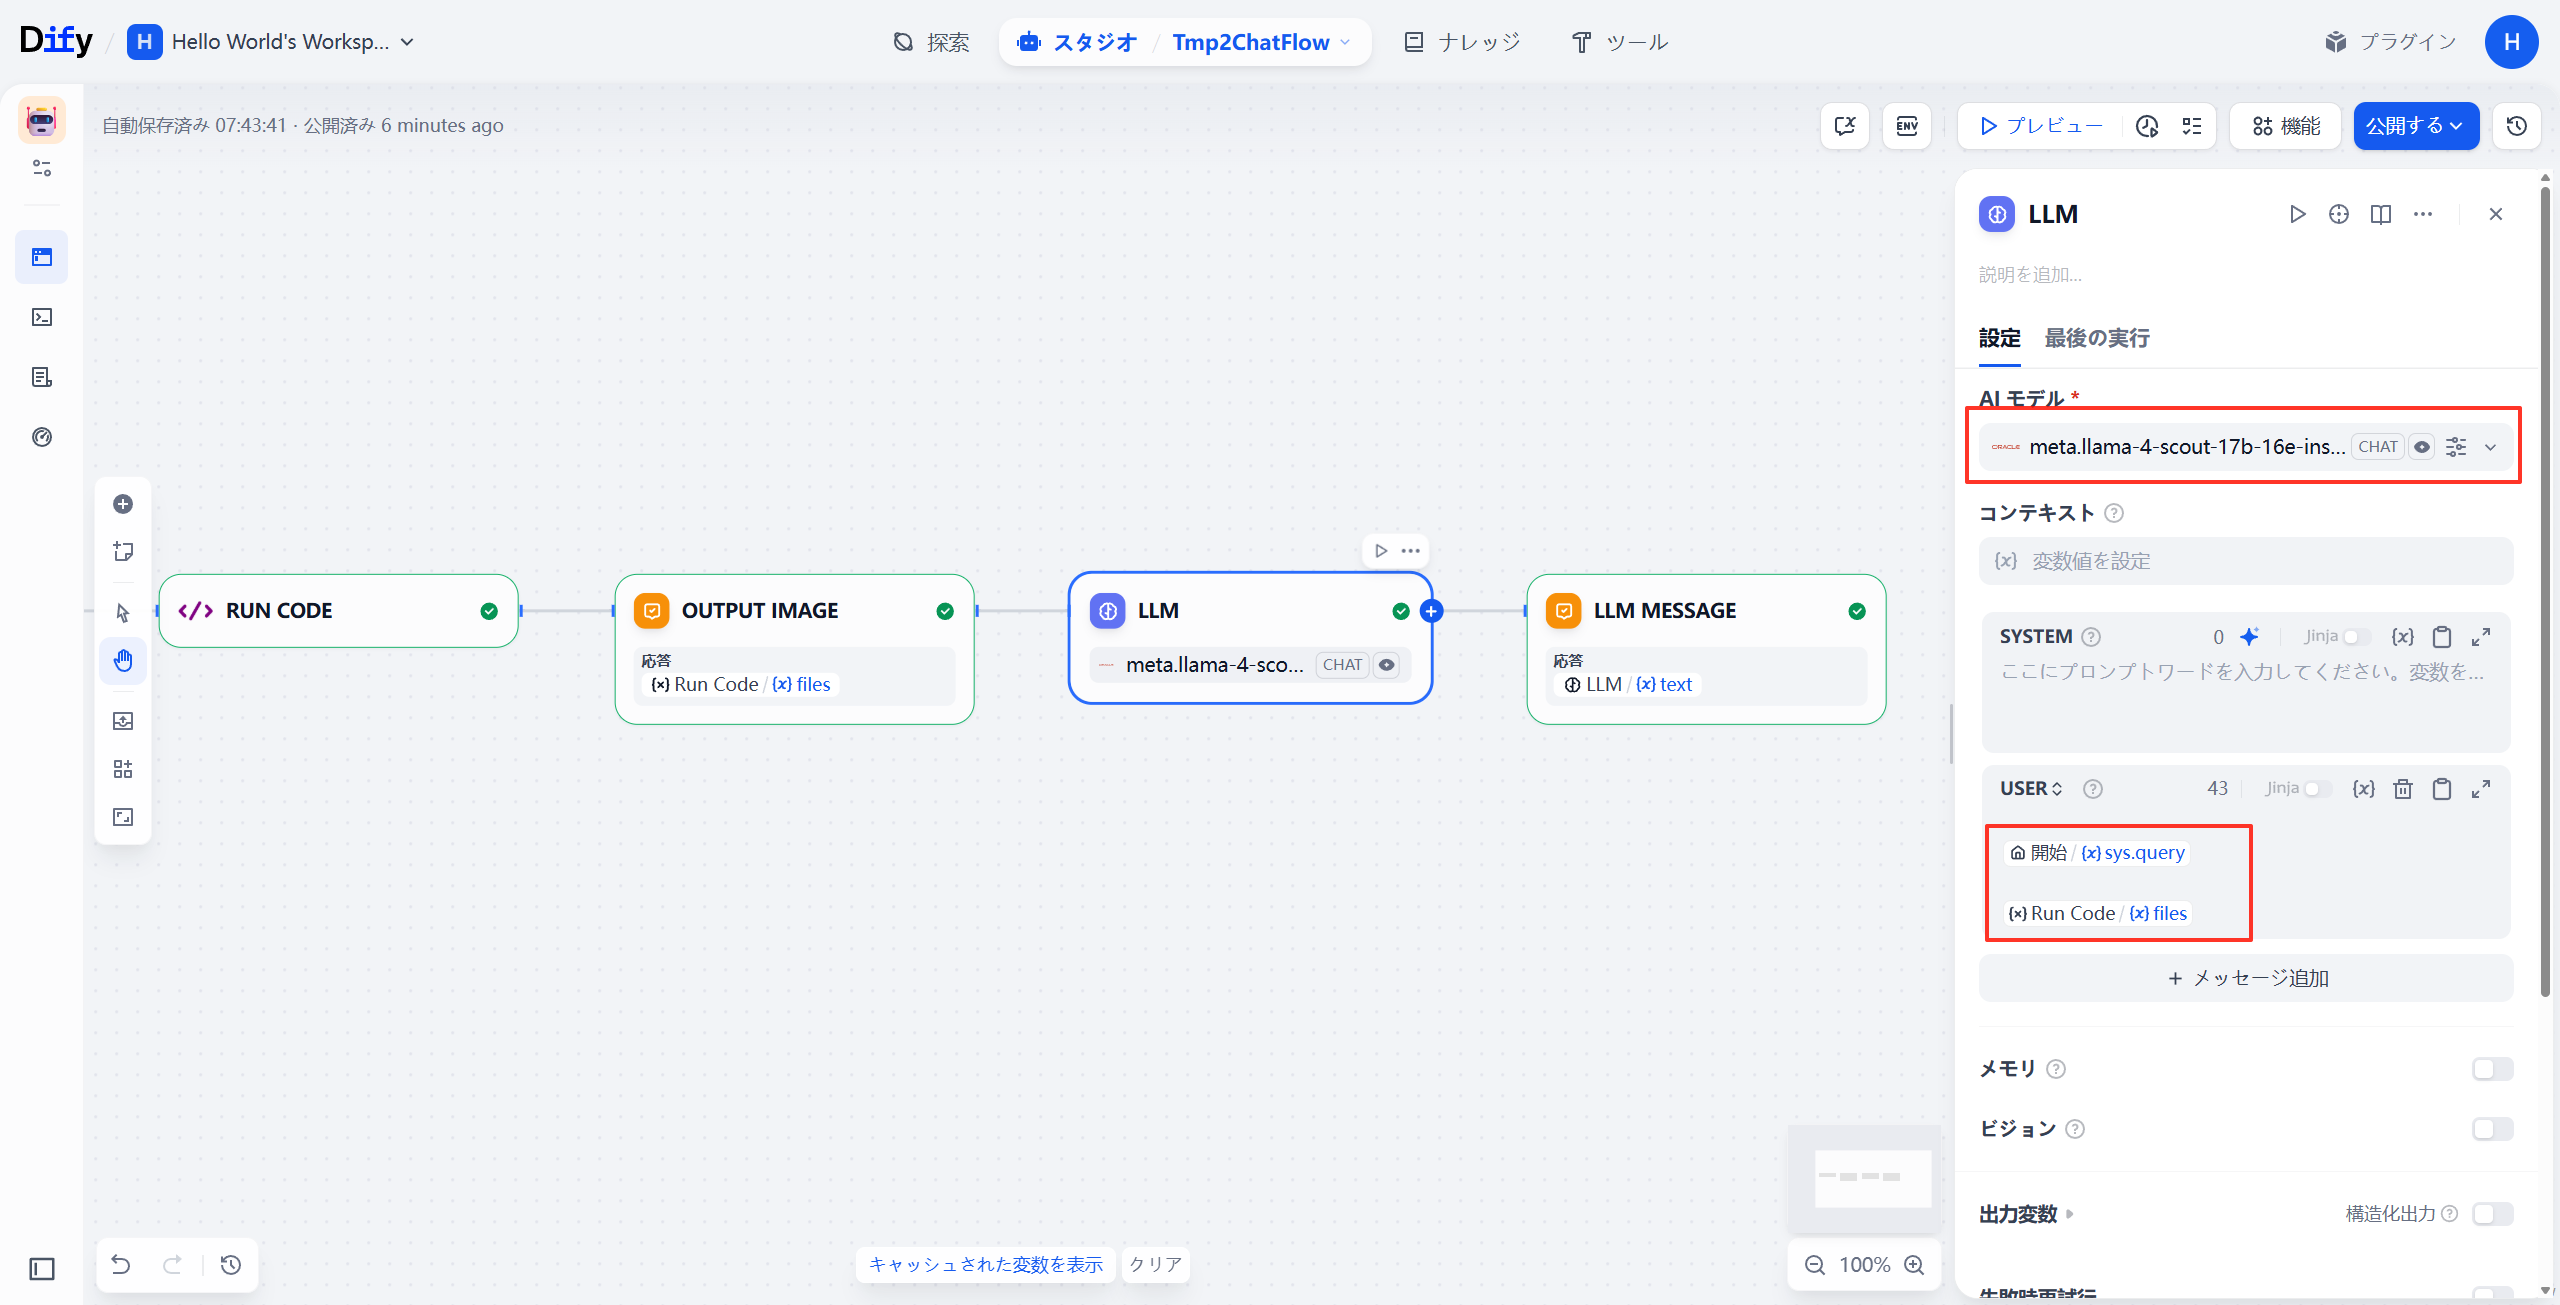
🧩 ステップ3:LLMノードで画像を解析
- LLMノードを追加します。
- 以下のように設定:
| 項目 | 値 |
|---|---|
| AIモデル |
llama-4-scout(例) |
| USERメッセージ | 以下のように記載 |
開始/sys.query
Run Code/files
🧩 ステップ4:回答ノードで結果を出力
-
Run Codeノードの後に、回答ノードを追加し、
filesを出力。 -
LLMノードの後にもう1つ回答ノードを追加し、
textを出力。
✅ テスト実行
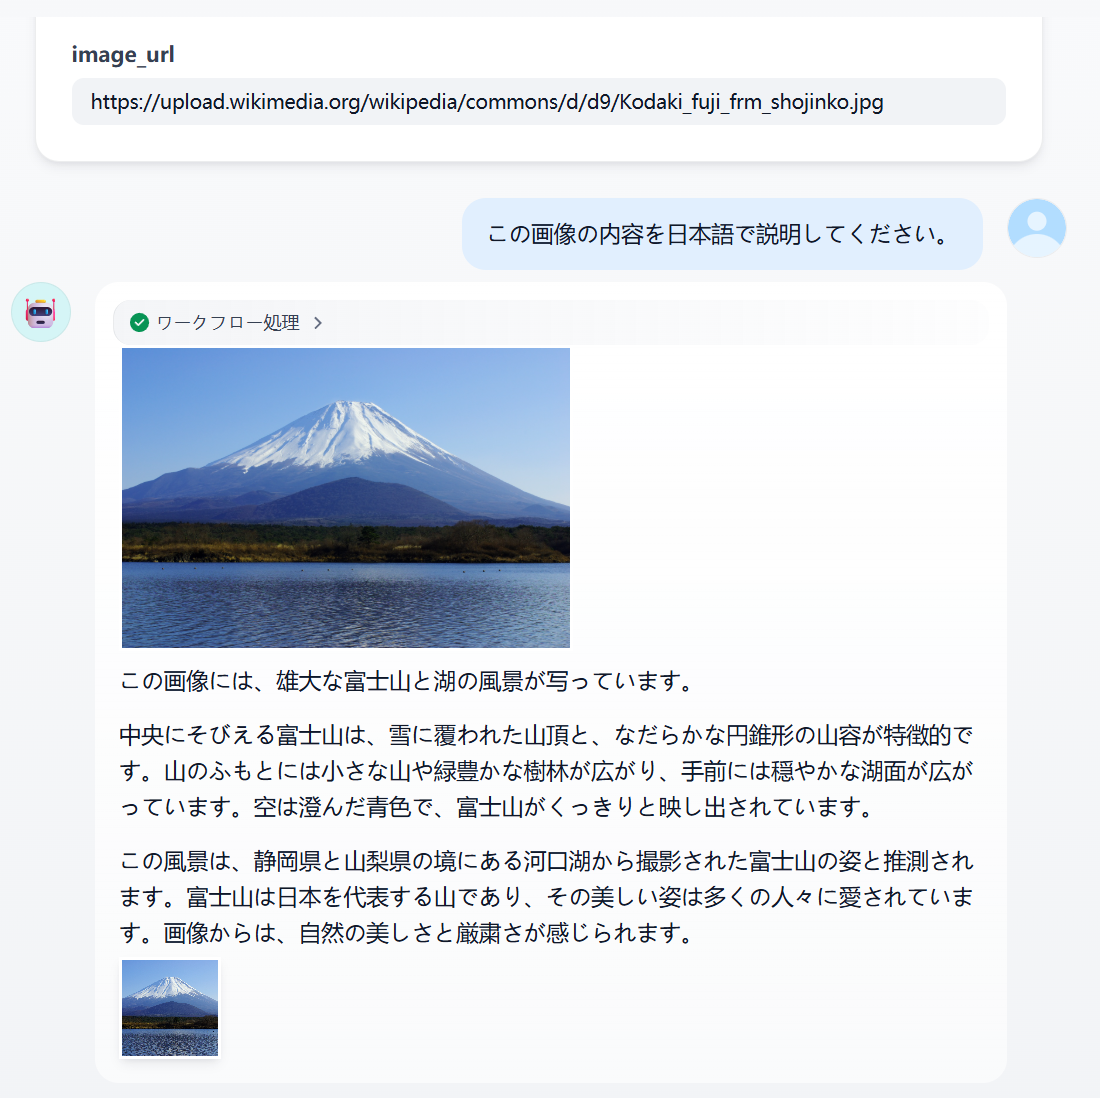
入力例
-
image_url:
https://upload.wikimedia.org/wikipedia/commons/d/d9/Kodaki_fuji_frm_shojinko.jpg -
query:
この画像の内容を日本語で説明してください。
📝 まとめ
Difyのワークフローを使うことで、画像URLを入力するだけでVQAが可能になります。
画像の前処理(形式変換・サイズ調整)も自動で行えるため、使いやすく拡張性も高い構成になっています。