CentOS7.9@wsl2にIntel oneAPI(intel compiler)環境を構築する。
いくつかの紹介されているように、Intelのコンパイラ&ライブラリであるIntel oneAPIがフリーで使えるようなので、CentOS7.9@wsl2にインストールしてみます。
コンパイラ&MPI&MKL(数値計算ライブラリ)を入れたいのでBaseKitとHPCkitをインストールしました。
wsl2だと、gcc系も入っていないようで、ちょっとつまずいたので記録します。
合わせて、確認に使った下記のhelloプログラムも記載しておきます。
- Fortran (with OpenMP, MPI)
- C (with MPI)
- C++ (with MPI)
(お役に立てたら、LGTMお願いします)
インストールした環境
wsl2でCentOS7.9を入れた状態(下記参照)
https://qiita.com/egoo/items/ced8345afb0ec383de9a
GCCの準備
gccをOnlineでインストールする。
参照したURL: https://www.gadgets-today.net/?p=806
下記をrootで実行。
まずは、現状とインストールできるバージョンを確認
$ which gcc
# 結果
/usr/bin/which: no gcc in (:/usr/local/sbin:/usr/local/bin:/usr/sbin:/usr/bin:)

$ yum info gcc
# 結果(一部掲載)
Available Packages
Name        : gcc
Version     : 4.8.5

$ yum info gcc-c++
# 結果
Name        : gcc-c++
Version     : 4.8.5

$ yum info gcc-gfortran
# 結果
Name        : gcc-gfortran
Version     : 4.8.5
続いてインストール
$ yum install gcc
$ yum install gcc-c++
$ yum install gcc-gfortran
# Dependencyも含めてインストール、Updateしてくれる。

# gcc-c++で確認
$ which g++
# 結果
/usr/bin/g++

$ g++ --version
# 結果
g++ (GCC) 4.8.5 20150623 (Red Hat 4.8.5-44)
Copyright (C) 2015 Free Software Foundation, Inc.
intel OneAPIのインストール。
BaseKitとHPCkitをダウンロード。こちらはオフライン版で作業します。
参考サイト:https://qiita.com/implicit_none/items/35bc4be8f2022903747a
をもとに、下記のファイル2つをダウンロード。
下記の2つをダウンロード
l_BaseKit_p_2021.1.0.2659_offline.sh
l_HPCKit_p_2021.1.0.2684_offline.sh
インストール
# まずはBaseKit
sudo bash l_BaseKit_p_2021.1.0.2659_offline.sh
# 次にHPCKit
sudo bash l_HPCKit_p_2021.1.0.2684_offline.sh
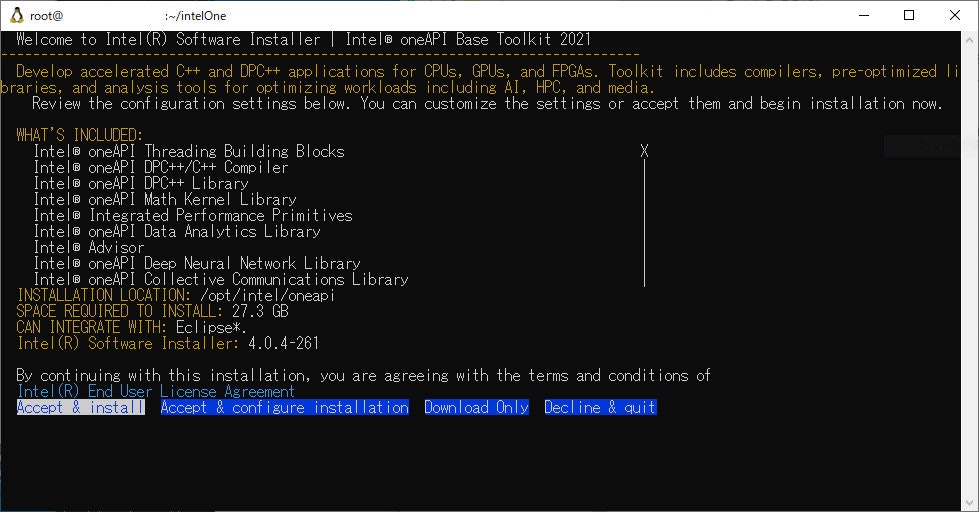
それぞれ実行すると、下記のようなGUI画面が出てきます。
End User License Agreementに同意したら、
Accept & installで進みます。
特定のプログラムのみインストールしたい場合は、Accept & configura installationを適宜チェックを外してください。
設定
インストールフォルダあるsetvars.shを実行すればパスを通してくれます。
$ source /opt/intel/oneapi/setvars.sh
$ which ifort
# 実行結果
/opt/intel/oneapi/compiler/2021.1.1/linux/bin/intel64/ifort
$ ifort --version
# 実行結果
ifort (IFORT) 2021.1 Beta 20201112
Copyright (C) 1985-2020 Intel Corporation.  All rights reserved.
helloプログラムを実行して、確認する。
ここからは、一般ユーザーで実行します。
まずは、ログイン時にパスが通るように設定する。
# ~/.bashrcに下記を加える。
source  /opt/intel/oneapi/setvars.sh

# bashrcの再読み込み
$source ~/.bashrc
# 確認
$ ifort --version
$ which ifort
# 実行結果
/opt/intel/oneapi/compiler/2021.1.1/linux/bin/intel64/ifort
Fortran系
通常Fortran
動かすプログラムは下記
program hello
  write(*,*) 'hello,world!'
end program hello
実行。
$ ifort hello.f90 -o hello.exe
$ ./hello.exe
# 実行結果
 hello, world!
MPI Fortran
参考:https://curc.readthedocs.io/en/latest/programming/MPI-Fortran.html
動かすプログラムは下記
     PROGRAM hello_mpi
     include 'mpif.h'

     integer rank, size, ierror, tag
     character node*20

     call MPI_INIT(ierror)
     call MPI_COMM_SIZE(MPI_COMM_WORLD, size, ierror)
     call MPI_COMM_RANK(MPI_COMM_WORLD, rank, ierror)
     call MPI_Get_processor_name(node, node_len, ierror)
     write(*,*) 'hello, world! @ ',node, rank, 'of ', size

     call MPI_FINALIZE(ierror)
     END PROGRAM
実行。
$ mpiifort hello_mpi.f90 -o hello_mpi.exe
# ↓ 実行するとき"./"を省略しない
$ mpirun -n 3 ./hello_mpi.exe
# 実行結果
 hello, world! @ node1                1 of            3
 hello, world! @ node1                2 of            3
 hello, world! @ node1                0 of            3
openMP fortran
program hello_omp
  !$ use omp_lib
  !$omp parallel
   write(*,*) "hello, world @",omp_get_thread_num(),"of",omp_get_num_threads()
  !$omp end parallel
end program hello_omp
実行してみる。
$ ifort -qopenmp hello_omp.f90 -o hello_omp.exe
# 環境変数OMP_NUM_THREADSに並列化したいthreads数を指定
$ export OMP_NUM_THREADS=4
$ ./hello_omp.exe
# 実行結果
 hello, world @           0 of           4
 hello, world @           2 of           4
 hello, world @           3 of           4
 hello, world @           1 of           4

# ちなみにoptionを"-openmp"にすると下記。wsl2だから?
$ ifort -openmp hello_omp.f90 -o hello_omp.exe
# 実行結果
ifort: command line error: option '-openmp' is not supported. Please use the replacement option '-qopenmp'
C系
通常のC
# include <stdio.h>
main( )
{
  printf("hello, world\n");
}
$ icc hello.c -o hello.exe
$ ./hello.exe
# 実行結果
hello, world
MPI C
参考:https://mpitutorial.com/tutorials/mpi-hello-world/
# include <mpi.h>
# include <stdio.h>

int main(int argc, char** argv) {
    MPI_Init(NULL, NULL);
    int size;
    MPI_Comm_size(MPI_COMM_WORLD, &size);
    int rank;
    MPI_Comm_rank(MPI_COMM_WORLD, &rank);
    char node[MPI_MAX_PROCESSOR_NAME];
    int name_len;
    MPI_Get_processor_name(node, &name_len);
    printf("hello, world @ %s, %d of %d \n",node, rank, size);
    MPI_Finalize();
}
$ mpiicc hello_mpi.c -o hello_mpi.exe
$ mpirun -n 5 ./hello_mpi.exe
# 実行結果
hello, world @ node1, 1 of 5
hello, world @ node1, 3 of 5
hello, world @ node1, 0 of 5
hello, world @ node1, 2 of 5
hello, world @ node1, 4 of 5
C++系
通常
# include <iostream>
using namespace std;
int main(){
  cout << "hello, world" << endl;
  return 0;
}
$ icpc hello.cpp -o hello.exe
$ ./hello.exe
# 実行結果
hello, world
MPI C++
プログラムはhello_mpi.cと同じものをhello_mpi.cppとして実行
$ mpiicpc hello_mpi.cpp -o hello_mpi.exe
$ mpirun -n 2 ./hello_mpi.exe
# 実行結果
hello, world @ node1, 1 of 2
hello, world @ node1, 0 of 2
(補足) GCCで実行する場合
gcc系で実行する場合は、下記の表に従ってコンパイル時のコマンドを読み替えれば実行可能です。
| nomal | MPI | OpenMP | |
|---|---|---|---|
| intel | ifort | mpiifort | ifort -qopenmp |
| gcc | gfortran | mpif90 | gfortran -fopenmp |
| nomal | MPI | |
|---|---|---|
| intel | icc | mpiicc |
| gcc | cc/gcc | mpicc |
| nomal | MPI | |
|---|---|---|
| intel | icpc | mpiicpc |
| gcc | g++/cpp | mpicxx |
(mpif90,mpiccは/opt/intel/oneapi/mpi/2021.1.1/binにリンクされている.
intelOneAPIを入れてないのであればOpenMPIなどが必要)