動画を結合する必要があったので色々調べてみました。
しかし、使うクラスが結構あってしかもそれぞれがどういう役割かをしっかり把握しないとならいないから大変です( ;´Д`)
最低限のコードでふたつの動画を単純に結合するだけのサンプルを作りました。
今回作った動画合成のサンプルをGitHubに上げてあるのでよかったら見てみてください。
使用するクラス郡
- AVURLAsset
- AVAssetTrack
- AVMutableComposition
- AVMutableCompositionTrack
- AVMutableVideoCompositionInstruction
- AVMutableVideoCompositionLayerInstruction
- AVMutableVideoComposition
- AVAssetExportSession
- AVMutableAudioMix
- AVMutableAudioMixInputParameters
各種クラスの相関図
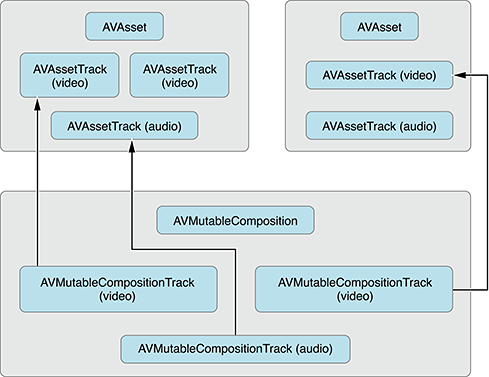
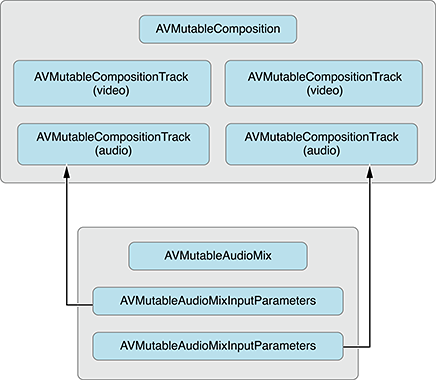
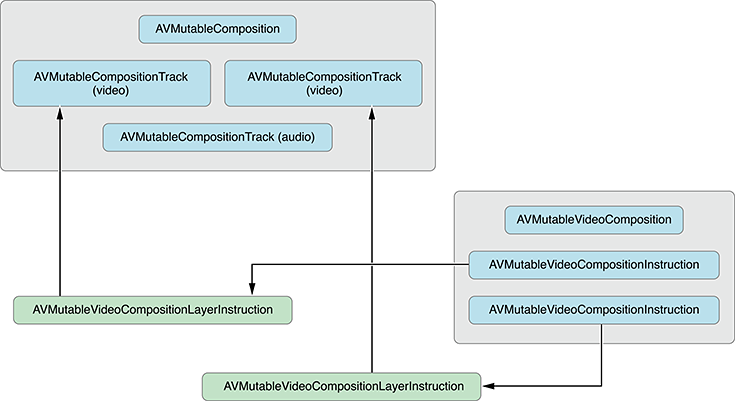
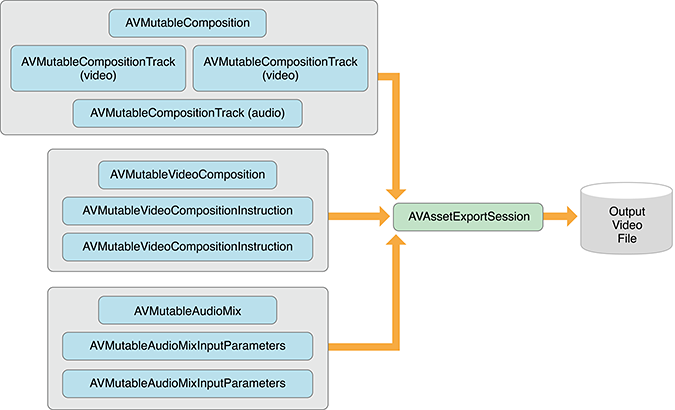
ドキュメントから引用させてもらうと、以下の様な相関関係があります。
大まかなカテゴリ分け
あくまで自分の理解で、という意味ですが以下のように考えると役割が把握しやすいかなと。
合成処理の本体
AVMutableComposition
このクラスが基本的に合成処理を担当します。
トラック情報
AVMutableCompositionTrack
ちなみにトラックの意味を調べたらこんな意味でした↓
トラック 【track】
磁気テープやディスクなどの記録メディアに映像や音声の信号を記録する帯状の領域のこと。実際にはデータが断続しているディジタル信号の記録でも、イメージとしては各信号ごとに帯状の領域となっている。
映像・音声の合成処理
AVMutableVideoComposition
AVMutableAudioMix
情報の設定、表現
動画には映像部分と音声部分があり、さらにそれらには時間や画角、ボリュームなど様々な情報が必要です。
それらを表すのが以下のクラス。
[映像]
映像の合成に使われる設定(命令)です。
※ Instructionは「命令」という意味。
AVMutableVideoCompositionInstruction
AVMutableVideoCompositionLayerInstruction
[音声]
こちらは音声の情報です。ボリュームとかですね。
AVMutableAudioMixInputParameters
動画の出力(Export)
こちらはそのままの意味なので分かりやすいですね。
AVAssetExportSession
2つの動画を合成する大まかな流れ
- 合成を実行する
AVMutableCompositionオブジェクトを作る -
AVAssetオブジェクトの生成と、オブジェクトから動画部分と音声部分のトラック情報をそれぞれ取得する - トラック合成用の
AVMutableCompositionTrackを、AVMutableCompositionから生成する - (3)で生成したトラックに動画・音声を登録する
- 動画の合成命令用オブジェクトを生成(
AVMutableVideoCompositionInstructionとAVMutableVideoCompositionLayerInstruction) - 動画合成オブジェクト(
AVMutableVideoComposition)を生成 - 音声合成用パラメータオブジェクトの生成(
AVMutableAudioMixInputParameters) - 音声合成用オブジェクトを生成(
AVMutableAudioMix) - 動画情報(
AVAssetTrack)から回転状態を判別する - 回転情報を元に、合成、生成する動画のサイズを決定する
- 合成動画の情報を設定する
- 動画出力用オブジェクトを生成する
- 保存設定を行い、Exportを実行
という流れになります。
サンプルコード
ちょっと長いですが、今回書いたコードを載せておきます。
実際に動作するサンプルはGitHubに上がっています。
インスタンスを生成してcreate:メソッドを実行すると、プロジェクト内にある動画ふたつを合成して保存するだけのものです。
それぞれなにをしているかはコード内のコメントに記載しています。
@import UIKit;
@import AVFoundation;
@import MediaPlayer;

# import "Composition.h"

@interface Composition ()
@property (nonatomic, copy) void (^handler)(NSURL *url);
@end


@implementation Composition

- (void)create:(void (^)(NSURL *url))handler
{
    self.handler = handler;

    /////////////////////////////////////////////////////////////////////////////
    // 手順1

    // Compositionを生成
    AVMutableComposition *mutableComposition = [AVMutableComposition composition];

    /////////////////////////////////////////////////////////////////////////////
    // 手順2

    // AVAssetをURLから取得
    AVURLAsset *videoAsset1 = [[AVURLAsset alloc] initWithURL:self.movieFile1 options:nil];
    AVURLAsset *videoAsset2 = [[AVURLAsset alloc] initWithURL:self.movieFile2 options:nil];

    // アセットから動画・音声トラックをそれぞれ取得
    AVAssetTrack *videoAssetTrack1 = [videoAsset1 tracksWithMediaType:AVMediaTypeVideo][0];
    AVAssetTrack *audioAssetTrack1 = [videoAsset1 tracksWithMediaType:AVMediaTypeAudio][0];

    AVAssetTrack *videoAssetTrack2 = [videoAsset2 tracksWithMediaType:AVMediaTypeVideo][0];
    AVAssetTrack *audioAssetTrack2 = [videoAsset2 tracksWithMediaType:AVMediaTypeAudio][0];

    /////////////////////////////////////////////////////////////////////////////
    // 手順3

    // 動画合成用の`AVMutableCompositionTrack`を生成
    AVMutableCompositionTrack *compositionVideoTrack = [mutableComposition addMutableTrackWithMediaType:AVMediaTypeVideo
                                                                                       preferredTrackID:kCMPersistentTrackID_Invalid];
    // 音声合成用の`AVMutableCompositionTrack`を生成
    AVMutableCompositionTrack *compositionAudioTrack = [mutableComposition addMutableTrackWithMediaType:AVMediaTypeAudio
                                                                                       preferredTrackID:kCMPersistentTrackID_Invalid];

    /////////////////////////////////////////////////////////////////////////////
    // 手順4

    // ひとつめの動画をトラックに追加
    // `videoAssetTrack1`の動画の長さ分を`kCMTimeZero`の位置に挿入
    [compositionVideoTrack insertTimeRange:CMTimeRangeMake(kCMTimeZero, videoAssetTrack1.timeRange.duration)
                                   ofTrack:videoAssetTrack1
                                    atTime:kCMTimeZero
                                     error:nil];
    // ひとつめの音声をトラックに追加
    [compositionAudioTrack insertTimeRange:CMTimeRangeMake(kCMTimeZero, audioAssetTrack1.timeRange.duration)
                                   ofTrack:audioAssetTrack1
                                    atTime:kCMTimeZero
                                     error:nil];

    // ふたつめの動画を追加
    // `videoAssetTrack2`の動画の長さ分を`videoAssetTrack1`の終了時間の後ろに挿入
    [compositionVideoTrack insertTimeRange:CMTimeRangeMake(kCMTimeZero, videoAssetTrack2.timeRange.duration)
                                   ofTrack:videoAssetTrack2
                                    atTime:videoAssetTrack1.timeRange.duration
                                     error:nil];
    // ふたつめの音声を追加
    [compositionAudioTrack insertTimeRange:CMTimeRangeMake(kCMTimeZero, audioAssetTrack2.timeRange.duration)
                                   ofTrack:audioAssetTrack2
                                    atTime:audioAssetTrack1.timeRange.duration
                                     error:nil];

    /////////////////////////////////////////////////////////////////////////////
    // 手順5

    // Video1の合成命令用オブジェクトを生成
    AVMutableVideoCompositionInstruction *mutableVideoCompositionInstruction1 = [AVMutableVideoCompositionInstruction videoCompositionInstruction];
    mutableVideoCompositionInstruction1.timeRange = CMTimeRangeMake(kCMTimeZero,
                                                                    videoAssetTrack1.timeRange.duration);
    mutableVideoCompositionInstruction1.backgroundColor = UIColor.redColor.CGColor;

    // Video1のレイヤーの合成命令を生成
    AVMutableVideoCompositionLayerInstruction *videoLayerInstruction1;
    videoLayerInstruction1= [AVMutableVideoCompositionLayerInstruction videoCompositionLayerInstructionWithAssetTrack:compositionVideoTrack];
    mutableVideoCompositionInstruction1.layerInstructions = @[videoLayerInstruction1];

    // Video2の合成命令用オブジェクトを生成
    AVMutableVideoCompositionInstruction *mutableVideoCompositionInstruction2 = [AVMutableVideoCompositionInstruction videoCompositionInstruction];
    mutableVideoCompositionInstruction2.timeRange = CMTimeRangeMake(videoAssetTrack1.timeRange.duration,
                                                                    CMTimeAdd(videoAssetTrack1.timeRange.duration, videoAssetTrack2.timeRange.duration));
    mutableVideoCompositionInstruction2.backgroundColor = UIColor.blueColor.CGColor;

    // Video2のレイヤーの合成命令を生成
    AVMutableVideoCompositionLayerInstruction *videoLayerInstruction2;
    videoLayerInstruction2= [AVMutableVideoCompositionLayerInstruction videoCompositionLayerInstructionWithAssetTrack:compositionVideoTrack];
    mutableVideoCompositionInstruction2.layerInstructions = @[videoLayerInstruction2];

    /////////////////////////////////////////////////////////////////////////////
    // 手順6

    // AVMutableVideoCompositionを生成
    AVMutableVideoComposition *mutableVideoComposition = [AVMutableVideoComposition videoComposition];
    mutableVideoComposition.instructions = @[mutableVideoCompositionInstruction1, mutableVideoCompositionInstruction2];

    /////////////////////////////////////////////////////////////////////////////
    // 手順7

    // Audioの合成パラメータオブジェクトを生成
    AVMutableAudioMixInputParameters *audioMixInputParameters;
    audioMixInputParameters = [AVMutableAudioMixInputParameters audioMixInputParametersWithTrack:compositionAudioTrack];
    [audioMixInputParameters setVolumeRampFromStartVolume:1.0
                                              toEndVolume:1.0
                                                timeRange:CMTimeRangeMake(kCMTimeZero, mutableComposition.duration)];

    /////////////////////////////////////////////////////////////////////////////
    // 手順8

    // AVMutableAudioMixを生成
    AVMutableAudioMix *mutableAudioMix = [AVMutableAudioMix audioMix];
    mutableAudioMix.inputParameters = @[audioMixInputParameters];

    /////////////////////////////////////////////////////////////////////////////
    // 手順9

    // 動画の回転情報を取得する
    CGAffineTransform transform1 = videoAssetTrack1.preferredTransform;
    BOOL isVideoAssetPortrait = ( transform1.a == 0 &&
                                  transform1.d == 0 &&
                                 (transform1.b == 1.0 || transform1.b == -1.0) &&
                                 (transform1.c == 1.0 || transform1.c == -1.0));

    /////////////////////////////////////////////////////////////////////////////
    // 手順10

    CGSize naturalSize1 = CGSizeZero;
    CGSize naturalSize2 = CGSizeZero;
    if (isVideoAssetPortrait) {
        naturalSize1 = CGSizeMake(videoAssetTrack1.naturalSize.height, videoAssetTrack1.naturalSize.width);
        naturalSize2 = CGSizeMake(videoAssetTrack2.naturalSize.height, videoAssetTrack2.naturalSize.width);
    }
    else {
        naturalSize1 = videoAssetTrack1.naturalSize;
        naturalSize2 = videoAssetTrack2.naturalSize;
    }

    CGFloat renderWidth  = MAX(naturalSize1.width, naturalSize2.width);
    CGFloat renderHeight = MAX(naturalSize1.height, naturalSize2.height);

    /////////////////////////////////////////////////////////////////////////////
    // 手順11

    // 書き出す動画のサイズ設定
    mutableVideoComposition.renderSize = CGSizeMake(renderWidth, renderHeight);

    // 書き出す動画のフレームレート(30FPS)
    mutableVideoComposition.frameDuration = CMTimeMake(1, 30);

    /////////////////////////////////////////////////////////////////////////////
    // 手順12

    // AVMutableCompositionを元にExporterの生成
    AVAssetExportSession *assetExportSession = [[AVAssetExportSession alloc] initWithAsset:mutableComposition
                                                                                presetName:AVAssetExportPreset1280x720];
    // 動画合成用のオブジェクトを指定
    assetExportSession.videoComposition = mutableVideoComposition;
    assetExportSession.audioMix         = mutableAudioMix;

    // エクスポートファイルの設定
    NSString *composedMovieDirectory = NSSearchPathForDirectoriesInDomains(NSCachesDirectory, NSUserDomainMask, YES)[0];
    NSString *composedMoviePath      = [NSString stringWithFormat:@"%@/%@", composedMovieDirectory, @"test.mp4"];

    // すでに合成動画が存在していたら消す
    NSFileManager *fileManager = NSFileManager.defaultManager;
    if ([fileManager fileExistsAtPath:composedMoviePath]) {
        [fileManager removeItemAtPath:composedMoviePath error:nil];
    }

    // 保存設定
    NSURL *composedMovieUrl = [NSURL fileURLWithPath:composedMoviePath];
    assetExportSession.outputFileType              = AVFileTypeQuickTimeMovie;
    assetExportSession.outputURL                   = composedMovieUrl;
    assetExportSession.shouldOptimizeForNetworkUse = YES;

    // 動画をExport
    [assetExportSession exportAsynchronouslyWithCompletionHandler:^{
        switch (assetExportSession.status) {
            case AVAssetExportSessionStatusFailed: {
                NSLog(@"生成失敗");
                break;
            }
            case AVAssetExportSessionStatusCancelled: {
                NSLog(@"生成キャンセル");
                break;
            }
            default: {
                NSLog(@"生成完了");
                if (self.handler) {
                    self.handler(composedMovieUrl);
                }
                break;
            }
        }
    }];
}


/**
 *  合成するひとつめの動画ファイル
 */
- (NSURL *)movieFile1
{
    NSBundle *bundle = NSBundle.mainBundle;
    NSString *path   = [bundle pathForResource:@"URLHookmark" ofType:@"mp4"];
    NSURL *url       = [NSURL fileURLWithPath:path];
    return url;
}


/**
 *  合成するふたつめの動画ファイル
 */
- (NSURL *)movieFile2
{
    NSBundle *bundle = NSBundle.mainBundle;
    NSString *path   = [bundle pathForResource:@"FurShader" ofType:@"mp4"];
    NSURL *url       = [NSURL fileURLWithPath:path];
    return url;
}

@end
本来は動画の合成だけじゃなくて、音声を合成してアフレコにしたり、静止画を上に重ねて表示、とかきっとそういうことをやるんだと思います。
が、まずは最低限動作するコードを把握しておかないと色々混乱するのでまとめてみました。


