この記事はZOZO Advent Calendar 2022Vol.1の20日目の記事です。
はじめに
本記事はiOS 16で追加されたライブアクティビティについての概要と実装についてのまとめです。
ライブアクティビティとは?
ライブアクティビティはiOS 16で追加されたアプリの最新データをDynamicIslandとロック画面に表示する機能です。
DynamicIslandはiPhone14 Pro、iPhone14 Pro Maxでのみ使用できます。(2022年12月時点)
| iPhone14 Pro、iPhone14 Pro Max | それ以外 |
|---|---|
| ロック画面、 DynamicIsland |
ロック画面 |

参照https://developer.apple.com/documentation/activitykit
ライブアクティビティを表示するには?
ライブアクティビティはActivityKitとWidgetKit、SwiftUIを使用して表示します。
まずはライブアクティビティの構成について紹介します。
ライブアクティビティの構成
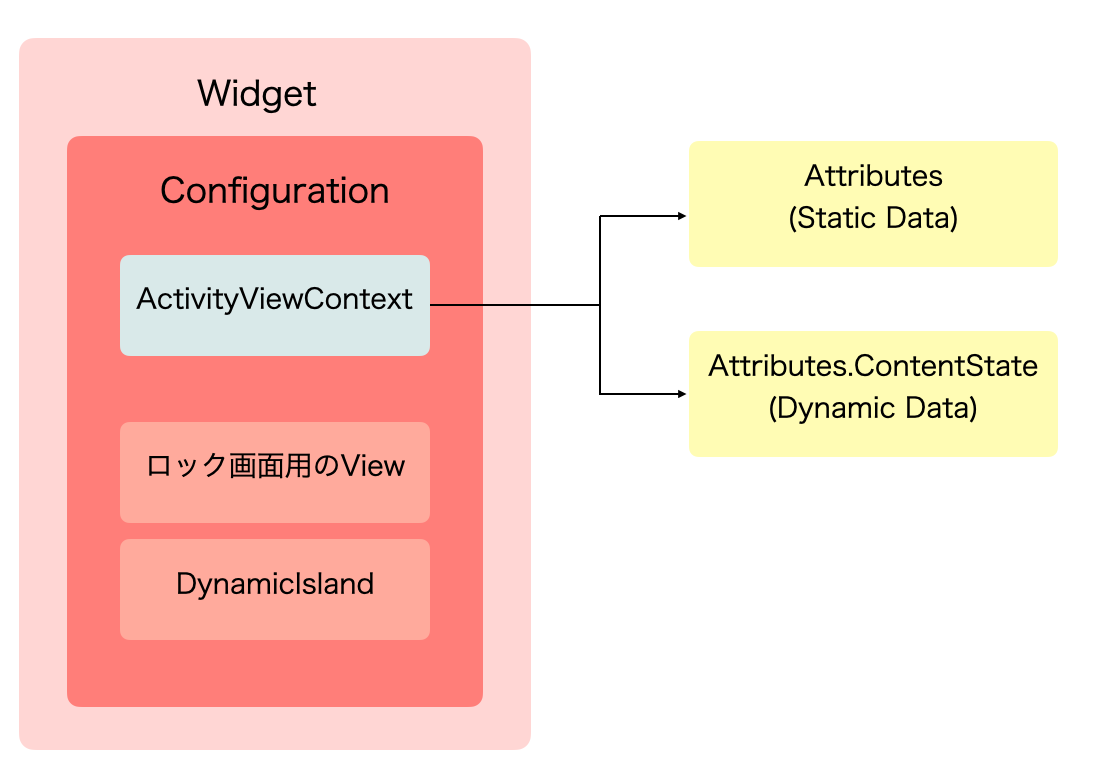
ライブアクティビティを表示するのに必要になるのは3つです。
- ライブアクティビティに表示するデータ
- ロック画面に表示するView
- DynamicIslandの表示要素
ライブアクティビティに表示するためのデータは静的なデータと動的なデータの2種類あります。
動的なデータを更新することで、ライブアクティビティの状態を更新することができます。
ロック画面、DynamicIslandのデータの表示にはActivityViewContextを使用します。
ライブアクティビティとウィジェットの違い
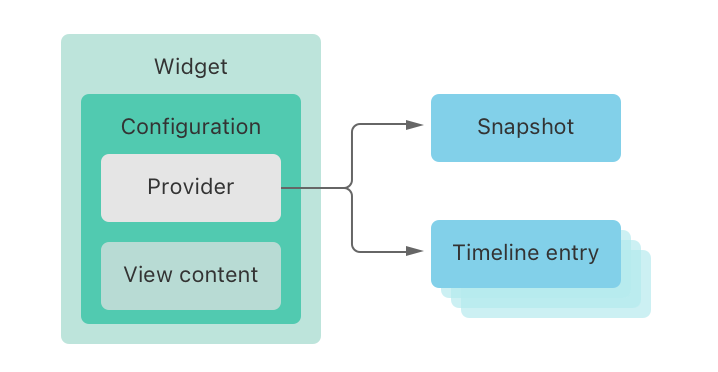
ライブアクティビティはActivityKitだけではなくWidgetKitも使用しているため、構成はウイジェットと似ていますが、データを更新する方法が違います。
以下ウイジェットの構成です。ウイジェットはProviderというのを使用してデータの更新を行います。
参照 https://developer.apple.com/documentation/WidgetKit
ライブアクティビティの実装
本記事では、ライブアクティビティを表示するところをピックアップして書きますので、詳細なライブアクティビティの作り方やライブアクティビティの更新、終了については触れません。
今回は以下のような静的なデータ1つと動的なデータ1つを表示するライブアクティビティを作成します。
実装の流れは次の通りです。
- ライブアクティビティに表示するデータの作成
- ライブアクティビティ用のWidgetを作成
- ロック画面に表示するViewの作成
- DynamicIslandの表示要素の作成
- ライブアクティビティの起動
1. ライブアクティビティに表示するデータの作成
ライブアクティビティに表示するデータはActivityAttributesに準拠します。
struct SampleAttributes: ActivityAttributes {
    // 静的なーデータ
    var name: String

    // 動的なデータ
    public struct ContentState: Codable, Hashable {
        var time: Date
    }
}
2. ライブアクティビティ用のWidgetを作成
ライブアクティビティのウイジェットのConfigurationにはActivityConfigurationを使用します。
@main
struct SampleActivityWidget: Widget {
    var body: some WidgetConfiguration {
        ActivityConfiguration(for: SampleAttributes.self) { context in
            // ロック画面のView
        } dynamicIsland: { context in
            // DynamicIslandの要素
        }
    }
}
3. ロック画面に表示するViewの作成
次にロック画面用のViewを作成し、ライブアクティビティのConfigurationに設定します。
ロック画面に表示するViewは160ptの高さ以内にするのをおすすめします。高さ160ptを超える場合、ロック画面でライブアクティビティが切り詰められることがあるようです。
struct LockScreenLiveActivityView: View {
    let context: ActivityViewContext<SampleAttributes>

    var body: some View {
        VStack {
            Text("Hello \(context.attributes.name)")
            Text(context.state.time, style: .time)
        }
        .activityBackgroundTint(Color.cyan)
        .activitySystemActionForegroundColor(Color.black)
    }
}
@main
struct SampleActivityWidget: Widget {
    var body: some WidgetConfiguration {
        ActivityConfiguration(for: SampleAttributes.self) { context in
            LockScreenLiveActivityView(context: context)
        } dynamicIsland: { context in
            // DynamicIslandの要素
        }
    }
}
4. DynamicIslandの表示要素の作成
DynamicIslandでのライブアクティビティの表示は、ロック画面と異なり複数の表示形式があります。
複数の表示方法がありますが、システムが状況にあった表示を行ってくれるので、DynamicIslandに表示するレイアウトを実装すれば良いです。
以下がDynamicIslandの実装です。
struct SampleLiveActivity: Widget {
    var body: some WidgetConfiguration {
        ActivityConfiguration(for: SampleAttributes.self) { context in
            LockScreenLiveActivityView(context: context)
        } dynamicIsland: { context in
            DynamicIsland {
                DynamicIslandExpandedRegion(.center) {
                    Text("Hello \(context.attributes.name)")
                }
                DynamicIslandExpandedRegion(.bottom) {
                    Text(context.state.time, style: .time)
                }
            } compactLeading: {
                // compactLeadingとcompactTrailingは分けて実装するが、まとまってcomactとしてDynamicIslandに表示される
                Text("Hello \(context.attributes.name)")
            } compactTrailing: {
                Text(context.state.time, style: .time)
            } minimal: {
                 Text("Min")
            }
        }
    }
}
これで、ライブアクティビティを表示する準備が出来ました。あとはライブアクティビティを起動するだけです。
5. ライブアクティビティの起動
ライブアクティビティの起動は request(attributes:content:pushType:)を呼びます。
ライブアクティビティはiPhoneのみでで使用できるかつ、ライブアクティビティを無効に設定することができるため、使用できるかのチェックをareActivitiesEnabledで行います。
また、ライブアクティビティは複数起動できますが、起動できる制限に達成した場合ライブアクティビティの起動に失敗する場合があるのでエラー処理をおこないます。
if ActivityAuthorizationInfo().areActivitiesEnabled {
    do {
        activity = try Activity<SampleAttributes>.request(attributes: .init(name: "edm"), content: .init(state: .init(time: .now), staleDate: Calendar.current.date(byAdding: .minute, value: 30, to: Date())!))
    } catch (let error) {
        // エラー処理
    }
}
以上でライブアクティビティを表示することができます。
おわりに
ライブアクティビティの構成や表示するまでの流れについてでした。
次は今回触れなかったライブアクティビティの更新、終了についてまとめたいと思います。


